
Cat Stevens’ timeless classic, “Wild World,” is a song that resonates with guitar players of all levels. For beginners, it might seem daunting at first glance due to its array of chords. However, beneath the surface lies a fantastic opportunity to master essential guitar skills. This lesson will break down “Wild World Guitar Chords” into manageable steps, focusing on smooth chord transitions and rhythmic strumming patterns that will not only get you playing this iconic song but also significantly improve your overall guitar playing ability. Get ready to explore the beauty of “Wild World” and enhance your guitar journey!
Unveiling the Simplicity Behind “Wild World”
“Wild World,” penned and performed by the legendary Cat Stevens in the early 1970s, is deceptively simple yet rich in musicality. It’s a fantastic choice for beginner guitarists because it introduces a variety of common chords in a context that’s both melodically engaging and rhythmically consistent. While the chord chart might initially appear complex, we’ll demystify it, showing you how to navigate each change with confidence and musicality. The song is primarily in the key of A minor and played at a comfortable tempo of around 100 beats per minute (BPM), making it accessible for learners to grasp the chord progressions and strumming techniques without feeling rushed.
Mastering the Strumming Patterns
The rhythmic foundation of “Wild World” is built upon a strumming style reminiscent of Neil Young and many other folk and rock guitarists of the era. We’ll focus on two primary strumming patterns that you can interchange to add dynamics and feel to your rendition.
Rhythm Pattern #1: The Fuller Strum
This pattern provides a rich, full sound, perfect for emphasizing the emotional depth of the song. It centers around sixteenth notes, but don’t let that intimidate you! At our tempo, it remains quite manageable.
- Beat 1: Two strong downstrokes on the eighth notes. For the first eighth note, you can choose to play just the bass note (the root of the chord), a partial chord (like the A and D strings for Am), or the full chord. Palm muting these downstrokes can add a percussive, rhythmic drive.
- Sixteenth Notes: Following the initial downstrokes, alternate between down and up strums on the sixteenth notes to fill out the rhythm.
Rhythm Pattern #2: The Sparser, Singer-Friendly Strum
This variation is slightly less dense, making it ideal for singing along or when you want a more understated accompaniment.
- Beat 1: Identical to Rhythm Pattern #1, starting with two eighth-note downstrokes.
- Beat 2: Here’s where it differs. Break the second beat into a dotted eighth note (downstroke) followed by a sixteenth note (upstroke). This creates a subtle syncopation and opens up space in the rhythm.
As you become comfortable with both, experiment with switching between these patterns. Many guitarists naturally alternate between them while playing “Wild World,” adding subtle variations and keeping the performance engaging.
Download MP3
Listen to the audio example above to hear these strumming patterns in action. Focus on internalizing the rhythm and feel before moving on to chord changes.
Practice each strumming pattern individually with a simple Am chord. Aim for consistency and a steady tempo. Once you’re comfortable, try transitioning between Rhythm Pattern #1 and Rhythm Pattern #2 within a measure. This rhythmic flexibility will be invaluable as you learn the full song.
Conquering Chord Changes in the Verse
The verse of “Wild World” introduces a series of chord changes that are excellent for developing your dexterity and chord transition skills. The progression might look lengthy, but we’ll break it down into digestible segments, focusing on efficient finger movements.
Here’s the chord progression for the first part of the verse:
Am – D7 – G – Cmaj7 – Fmaj7 – Dm – E
Let’s examine each transition, focusing on smooth and economical finger movements. A key principle to remember is: minimize finger movement. The less your fingers have to travel, the quicker and smoother your chord changes will become.
1. Am to D7:
- Am Chord: Typically played with index finger on the 1st fret of the B string, middle finger on the 2nd fret of the D string, and ring finger on the 2nd fret of the G string.
- D7 Chord: To transition from Am to D7, simply keep your index finger planted on the 1st fret of the B string. Scoot your ring finger down to the 1st fret of the high E string and move your middle finger to the 2nd fret of the G string (where your ring finger was).
Notice how the index finger acts as an anchor, minimizing the overall change. On the beat of the chord change, you can even just strum the open D string as the bass note, giving you extra time to fully form the D7 chord for the subsequent sixteenth notes.
2. D7 to G:
- D7 Chord: (as described above)
- G Chord: For an efficient transition, use your middle finger on the 3rd fret of the low E string and your index finger on the 2nd fret of the A string. Remarkably, these two fingers maintain their relative shape from the D7 chord. You’re essentially moving this “shape” down and across the strings. Then, slide your ring finger up to the 3rd fret of the high E string.
By thinking in terms of shapes and relative finger positions, you can make seemingly complex changes feel more intuitive and fluid.
3. G to Cmaj7:
- G Chord: (as described above)
- Cmaj7 Chord: We’ll use a Cmaj7 instead of a standard C chord here for a richer sound and slightly smoother transition. A common Cmaj7 fingering involves the ring finger on the 3rd fret of the A string, middle finger on the 2nd fret of the D string, and index finger on the 1st fret of the B string, with the high E string open. To move from G to Cmaj7, lift your middle and index fingers from the G chord and reposition them for the Cmaj7 shape.
However, to prepare for the next chord, Fmaj7, we can modify our Cmaj7 fingering slightly. Instead of using the index finger on the 1st fret of the B string, we can use the ring finger on the 2nd fret of the D string and the middle finger on the 2nd fret of the G string, leaving the index finger free. This might seem less conventional for Cmaj7 initially, but it sets us up perfectly for the next transition.
4. Cmaj7 to Fmaj7:
- Cmaj7 Chord: (using the modified fingering – ring finger on 2nd fret D, middle finger on 2nd fret G)
- Fmaj7 Chord: This transition becomes remarkably easy with our modified Cmaj7. Simply shift your ring and middle fingers up one string set. Your ring finger moves to the 3rd fret of the A string, and your middle finger to the 2nd fret of the D string. The index finger can now fret the 1st fret of the B string to complete the Fmaj7.
This “shape shifting” technique is a cornerstone of smooth chord changes.
5. Fmaj7 to Dm:
- Fmaj7 Chord: (as described above)
- Dm Chord: A typical Dm chord is fingered with the index finger on the 1st fret of the high E string, middle finger on the 2nd fret of the G string, and ring finger (or pinky) on the 3rd fret of the B string. If you use your middle finger for the 2nd fret of the G string in Fmaj7, it’s already in the correct position for Dm! Simply remove your ring and index fingers from the Fmaj7 and place your index finger on the 1st fret of the high E string and your pinky (or ring finger) on the 3rd fret of the B string.
6. Dm to E:
- Dm Chord: (as described above)
- E Chord: This change requires more finger movement but can still be approached systematically. Place your middle finger on the 2nd fret of the A string, your ring finger on the 2nd fret of the D string, and your index finger on the 1st fret of the G string. From Dm, your middle finger is already on the 2nd fret. Move it down to the A string. Then, let your ring finger follow to the 2nd fret of the D string, and place your index finger on the 1st fret of the G string.
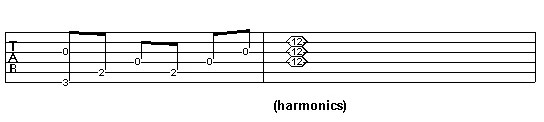
For the final measure of E in this section (often held for four beats), consider adding your pinky to the 3rd fret of the B string to create an E7 chord. This provides a slight variation and sets up a nice pull-off flourish.
Download MP3
Listen to the audio example above to hear these chord changes within the verse progression.
Practice these chord changes slowly and deliberately. Focus on accuracy over speed initially. Isolate the transitions that feel challenging and repeat them until they become smoother. Remember to use the strumming patterns learned earlier while practicing the chord progressions.
Adding Riffs and Runs in the Chorus
The chorus of “Wild World” elevates the song with piano-inspired riffs that translate beautifully to the guitar. These riffs, played in straight sixteenth notes, add a layer of complexity and melodic interest.
Chorus Riff #1: Descending C Major Scale
This riff is a descending C major scale and follows an Fmaj7 chord, making it surprisingly accessible.
 Finger positions for descending C major scale
Start by ensuring you have a solid Fmaj7 chord. Then, using the finger positions shown above, play the descending C major scale. The key is to maintain a consistent rhythm and evenness in your sixteenth notes. Begin slowly, focusing on accuracy. Don’t try to play it fast until you can play it cleanly at a slower tempo. This riff should flow naturally out of the Fmaj7 and back into the subsequent chord.
Chorus Riff #2: Lower String Run
This second riff is a cool-sounding run on the lower strings, maintaining the sixteenth-note rhythm. It occurs after a C major chord and returns to a C major chord, suggesting playing the riff while maintaining the C chord shape as much as possible, using the ring finger to execute the notes on the lower strings.
Practice each riff separately until you can play them smoothly and in time. Then, integrate them into the chorus progression, focusing on seamless transitions between chords and riffs.
Chorus Turnaround
To transition back to the verse, “Wild World” uses a simple turnaround consisting of a quick Dm and E chord. Play each for a beat, using two sixteenth notes followed by an eighth-note rest for a slightly dramatic effect. This Dm-E progression resolves nicely back to the Am that begins the verse.
Download MP3
Listen to the audio example above to hear the chorus riffs and turnaround in context.
Song Structure and Performance Tips
“Wild World” follows a standard song structure, making it easy to learn in sections:
- Intro: First four measures of the verse.
- Verse 1: Full verse chord progression.
- Chorus 1: Chorus with riffs and turnaround.
- Verse 2: Full verse chord progression.
- Chorus 2: Chorus with riffs and turnaround.
- Verse 3 (Instrumental/Vocal): First two lines (four measures) as instrumental (or “la la la” vocal part), last two lines sung as before.
- Chorus 3 & 4 (Outro): Play the chorus twice. Modify the turnaround at the end of the third chorus to two beats of C followed by two beats of G (strummed in sixteenth notes). For the final chorus, end on a single, sustained C chord.
When performing “Wild World,” focus on maintaining a steady tempo and smooth chord changes. Don’t rush the riffs; aim for clarity and evenness. Dynamics are also important – vary your strumming intensity to match the emotional arc of the song. Pay attention to the subtle variations like the E7 at the end of the verse and the final chorus outro to add your personal touch.
Conclusion: Embrace the “Wild World” of Guitar Chords
Learning “Wild World guitar chords” is a rewarding journey for any beginner guitarist. While it presents a variety of chords and techniques, breaking it down into manageable sections, practicing chord transitions methodically, and mastering the strumming patterns will unlock this beautiful song and significantly enhance your guitar skills. Don’t be discouraged by the initial complexity. With patience and practice, you’ll find that songs with many chords are not as intimidating as they first appear. Embrace the challenge, enjoy the process, and soon you’ll be playing “Wild World” with confidence and musicality.
Explore more lessons and songs at guitarplayers.net to continue your guitar playing adventure!