
Crafting guitar tabs in Guitar Pro is an essential skill for guitarists who want to transcribe, learn, and share music. This guide, brought to you by guitarplayers.net, will provide a comprehensive walkthrough of how to create Guitar Pro tabs, ensuring you can effectively utilize this powerful software to enhance your musical journey. Whether you’re a beginner or an experienced player, mastering Guitar Pro tabs will significantly improve your ability to document and communicate your musical ideas. This guide will help you learn guitar tabs, explore guitar sheet music, and refine your guitar playing techniques.
1. Getting Started with Guitar Pro
After launching Guitar Pro, you have several options to initiate a new project, each catering to different starting points:
1.1. Creating a New File
To start a project from the ground up:
Select New File or use the shortcut Ctrl-N (Windows) or Cmd-N (Mac).
This option is ideal for composing original music or transcribing songs from scratch. It allows you to set up your instruments, tuning, and notation preferences right from the beginning.
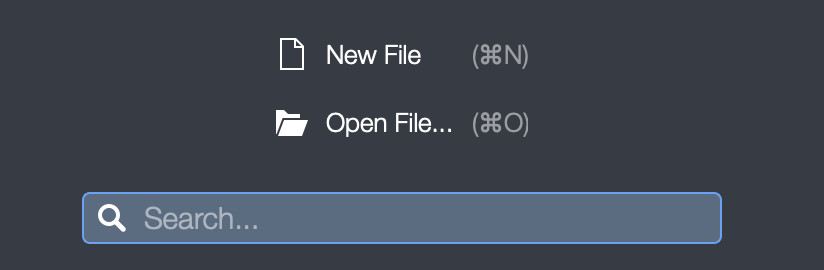 Starting a new file in Guitar Pro
1.2. Opening an Existing File
To work on a pre-existing file:
Click Open File or press Ctrl-O (Windows) or Cmd-O (Mac).
This is useful for editing existing tabs or converting files from other formats. Guitar Pro supports a wide range of file types, ensuring compatibility with tabs you find online or receive from other musicians. According to research from the Berklee College of Music, Guitar Pro is retro compatible with all previous versions.
Guitar Pro supports the following file types:
- .GP (Guitar Pro 7.x version)
- .GTP (Guitar Pro 1.x and 2.x versions)
- .GP3 (Guitar Pro 3.x versions)
- .GP4 (Guitar Pro 4.x versions)
- .GP5 (Guitar Pro 5.x versions)
- .GPX (Guitar Pro 6.x versions)
1.3. Utilizing Template Files
To begin with a pre-configured template:
Choose a template from the Templates tab.
Templates provide a quick start for common instrument setups, saving you time and ensuring consistency in your tab creation process. This is great for guitar chords.
 Templates in Guitar Pro
2. Setting Up a New File
Creating a new file involves configuring the settings to match your musical needs.
2.1. Selecting the Instrument Type
Choose the primary instrument for your tab:
Select the Type of instrument from the options available.
Guitar Pro typically defaults to guitar options such as Acoustic, Electric, and Bass. Additional tracks for orchestral instruments, drums, or MIDI instruments can be added later.
2.2. Adjusting Instrument Options
Customize the instrument settings to fit your specific requirements:
- Number of strings: Configure the number of strings on your guitar, up to 10 strings.
- Type of tuning: Select the tuning for your instrument. Standard tuning is commonly used.
- Type of notation: Choose between tab, notes, or slash/rhythm notation.
- Type of sound: Preview and select the sound you want to hear when adding notes.
Once you have configured these settings, click ‘Create’ to proceed. Guitar pro offers various clean sounds like the Clean Strat.
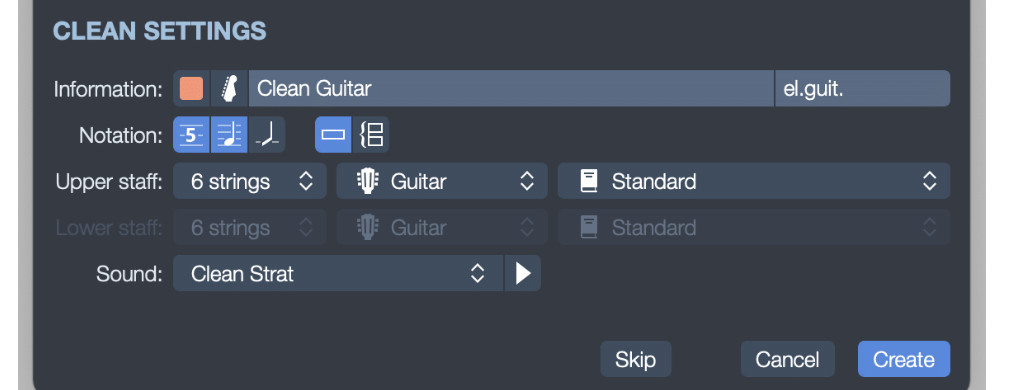 Options for adding an instrument in Guitar Pro
3. Understanding the Main Panels in Guitar Pro
Navigating the Guitar Pro interface involves understanding the function of the main panels.
3.1. Edition Palette
Located on the left side, the Edition Palette allows you to modify your score:
- Choose key signatures, clefs, and time signatures.
- Add symbols specific to guitar playing, such as hammer-ons, pull-offs, and bends.
- Incorporate fingering information and up/down stroke notations.
3.2. Inspector
The Inspector on the right side enables you to change the appearance and settings of tracks and the song:
- Track Tab:
- INFORMATION: Modify the instrument type, track color, icon, and name.
- MUSICAL NOTATION: Change the notation type and tuning. Create custom tunings or add a capo.
- SOUNDS: Adjust the sound of the track.
- INTERPRETATION: Configure how Guitar Pro plays the track, including playing style, palm muting, and accentuation.
- Song Tab:
- INFORMATION: Add the song title and artist name.
- MUSICAL NOTATION: Select a stylesheet to change the overall appearance of your project.
- Page & Score format: Adjust size and orientation.
- Systems & Staves: Change display settings for staves and track names.
- Header & Footer: Customize the header and footer content.
- Texts & Styles: Modify font types and sizes.
- Notation: Adjust tablature notations, symbols, and finger display settings.
- Load pre-designed stylesheets or create your own.
- Use Design Mode under View to adjust the arrangement of bars.
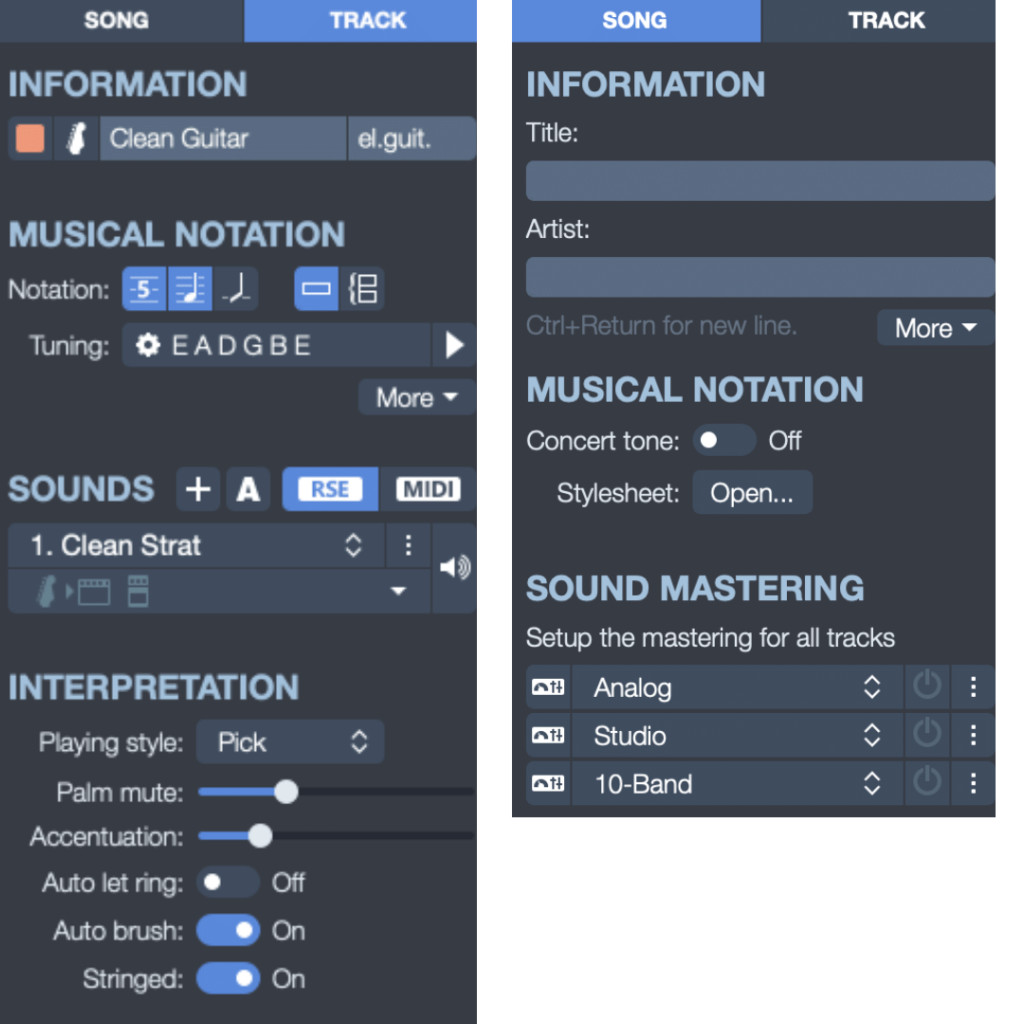 Inspector in Guitar Pro
3.3. Global View
Located at the bottom, the Global View displays all tracks in the song:
- Manage and organize tracks.
- Mix tracks by adjusting volume, pan, and EQ.
- Visually monitor when each track is audible.
- View and manage song sections.
3.4. Toolbar
At the top, the Toolbar provides various play options:
- Change instrument tracks.
- Add a count-in and metronome.
- Select and loop sections.
- Pitch shift the project using the + and – symbols.
- Adjust the tempo for practicing.
4. Creating Tracks with Guitar Tabs
Adding tabs and notes to the score is a fundamental process in Guitar Pro.
4.1. Adding a Guitar Track
Enter tabs (and notes) easily by:
- Using the arrow keys to navigate between strings.
- Typing the fret number to create the tab and corresponding note.
Enabling the “Play while editing” option is helpful:
Go to Sound – Play while editing.
4.2. Adding an Orchestral Instrument Track
Incorporate tabs and notes for non-stringed instruments like piano:
Go to Track – Add or press Alt-Cmd-N (Mac) or click the + symbol in the Global view.
Then:
Choose Orchestra – Keyboard – Acoustic Piano and ensure TAB-notation is selected under ACOUSTIC PIANO SETTINGS.
Navigate strings using the arrow keys and add fret numbers using the numpad. You can also use visual aids:
Go to View – Show Fretboard View or View – Show Keyboard View.
4.3. Adding a Drum Track
Edit a drum track by:
Clicking View – Show Drumkit View.
Enter the corresponding numbers for drum elements (e.g., type “30” simultaneously for a specific drum element).
5. Efficiently Entering Tabs and Notes
Speed up your tab creation process with these tips.
5.1. Utilizing Shortcut Keys
- Arrow keys: Navigate between strings.
- Number pad: Enter notes by fret numbers.
- Backspace: Erase a note.
- +: Increase note speed.
- –: Decrease note speed.
- /: Create triplets.
- ,: Dot a note; press again to remove the dot.
- Spacebar: Play the result.
- Ctrl-C/Cmd-C: Copy selected notes.
- Ctrl-V/Cmd-V: Paste copied notes.
- L: Tie a note to the previous one.
- Shift-L: Tie a chord to the previous one.
- R: Add a rest.
- T: Add text to a section.
- A: Open the chord menu to select from various chord fingerings.
A comprehensive list of keyboard shortcuts is available online, such as at usethekeyboard.com/guitar-pro/.
5.2. Using Fretboard & Keyboard Views
Enter notes visually using the fretboard or keyboard view:
Go to View – Show Fretboard View or View – Show Keyboard View.
Adjust the size of the visual fretboard/keyboard by dragging the corners. Navigate the score and enter notes directly from these visual aids.
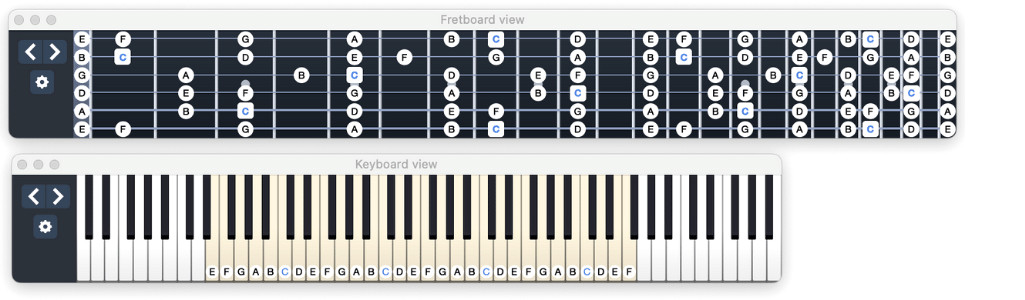 Piano and Guitar View in Guitar Pro
5.3. Connecting a MIDI Keyboard or MIDI Guitar
Integrate MIDI instruments to enhance note entry:
Go to Guitar Pro – Preferences – Audio / MIDI and select your MIDI Keyboard/MIDI Guitar under MIDI INPUT.
Enable MIDI capture:
Go to Sound – Midi Capture.
While MIDI input helps speed up note entry, rhythm and note values still require manual adjustments.
For transcribing entire performances, consider using a Digital Audio Workstation (DAW) like Logic Pro to record your MIDI instrument, then export the MIDI file and import it into Guitar Pro. However, be aware that automatic transcription may not accurately represent guitar-specific nuances like fretboard positions.
6. Why is Guitar Pro So Popular Among Guitar Players?
Guitar Pro has cemented its place as the leading choice among guitarists for creating and editing tabs. But what exactly makes it so popular? Let’s explore the key reasons why guitar players love Guitar Pro.
6.1. Ease of Use
Guitar Pro is designed to be user-friendly, making it accessible for both beginners and experienced musicians. The intuitive interface allows users to quickly learn how to create, edit, and share guitar tabs. With features like real-time playback and visual aids, even those new to tab creation can produce professional-quality results.
6.2. Versatility
One of the standout features of Guitar Pro is its versatility. The software supports multiple instruments, including guitar, bass, drums, and orchestral instruments. This makes it suitable for creating complex arrangements and full band scores. Additionally, Guitar Pro supports various notation types such as tabs, standard notation, and slash notation, catering to different musical preferences and skill levels.
6.3. Comprehensive Editing Tools
Guitar Pro is equipped with a wide array of editing tools that allow for precise control over every aspect of the score. Users can easily add or modify notes, chords, rhythms, and articulations. The software also includes advanced features like chord diagrams, custom tunings, and capo settings, which are essential for guitarists.
6.4. Compatibility
Guitar Pro is compatible with a wide range of file formats, making it easy to import and export files. It supports its own proprietary formats (.gp, .gtp, .gp3, .gp4, .gp5, .gpx) as well as standard MIDI files. This ensures that users can easily share their work with others, regardless of the software they use.
6.5. Playback Features
The playback features in Guitar Pro are incredibly useful for learning and practicing music. Users can listen to their scores in real-time, adjust the tempo, and loop sections for focused practice. The software also includes a realistic sound engine that accurately reproduces the sound of various instruments, providing a clear and engaging listening experience.
6.6. Educational Value
Guitar Pro is not just a tool for creating tabs; it’s also a valuable educational resource. The software helps guitarists learn new songs, understand music theory, and improve their playing skills. By analyzing and transcribing tabs in Guitar Pro, musicians can gain a deeper understanding of musical structure and arrangement.
6.7. Community Support
Guitar Pro has a large and active community of users who share tabs, tips, and tutorials. This makes it easy to find support and inspiration. Online forums and user-generated content provide a wealth of resources for learning how to use the software effectively and improving your musical skills.
7. Mastering Advanced Techniques in Guitar Pro
Once you’re comfortable with the basics of creating guitar tabs in Guitar Pro, it’s time to explore some advanced techniques that will take your skills to the next level. These techniques will help you create more detailed and accurate tabs, and unlock the full potential of Guitar Pro.
7.1. Using Complex Rhythms
Complex rhythms can add depth and nuance to your guitar tabs. Here’s how to handle them in Guitar Pro:
- Tuplets: Use the “/” key to create triplets and other tuplets. Guitar Pro automatically adjusts the timing to fit the tuplet into the specified duration.
- Dotted Notes: Add or remove dots from notes using the “,” key. Dotted notes increase the duration of a note by half its value.
- Ties and Slurs: Use “L” to tie notes together, creating a continuous sound. For chords, use “Shift + L” to tie the entire chord to the previous one.
7.2. Adding Articulations
Articulations convey the expressive elements of music. Guitar Pro supports a variety of articulations:
- Staccato: Shorten the duration of a note by selecting the note and choosing the staccato symbol from the Edition Palette.
- Accents: Emphasize a note by adding an accent mark from the Edition Palette.
- Palm Muting: Indicate palm muting by adding “P.M.” above the tab. This technique creates a damped, percussive sound.
7.3. Incorporating Bends and Slides
Bends and slides are essential guitar techniques that add expression to melodies. Here’s how to notate them:
- Bends: Use the bend symbol from the Edition Palette. Specify the degree of the bend (e.g., full, half, quarter) and the direction (up or down).
- Slides: Use the slide symbol to indicate a slide between two notes. Specify whether the slide is legato (smooth) or portamento (separate).
7.4. Utilizing Chord Diagrams
Guitar Pro makes it easy to add chord diagrams to your tabs. Here’s how:
- Adding Chords: Press “A” to open the chord menu. Choose from a list of predefined chords or create your own custom chord.
- Customizing Diagrams: Adjust the fingering, root note, and other properties of the chord diagram to match the desired voicing.
7.5. Working with Multiple Tracks
Guitar Pro supports multiple tracks, allowing you to create complex arrangements. Here’s how to manage them:
- Adding Tracks: Click “Track” > “Add” to create a new track. Choose the instrument and settings for the new track.
- Mixing Tracks: Use the Global View at the bottom of the screen to adjust the volume, pan, and EQ of each track.
- Copying and Pasting: Copy and paste sections of music between tracks to quickly create harmonies and countermelodies.
7.6. Customizing the Interface
Tailor the Guitar Pro interface to suit your preferences:
- Toolbars: Customize the toolbars by adding or removing buttons. This allows you to create a workspace that is optimized for your specific needs.
- Stylesheets: Use stylesheets to change the appearance of your tabs. Experiment with different fonts, colors, and layout options to create a visually appealing score.
8. Optimizing Guitar Pro Tabs for Sharing and Collaboration
Creating high-quality guitar tabs is only half the battle. To truly maximize the impact of your work, you need to optimize your tabs for sharing and collaboration. Here are some essential tips for preparing your Guitar Pro tabs for the world.
8.1. Accuracy and Clarity
Accuracy is paramount when creating guitar tabs. Ensure that your tabs are free of errors and accurately represent the music. Clarity is also essential. Use clear and concise notation to make your tabs easy to read and understand.
8.2. Adding Essential Information
Include essential information at the top of your tab, such as:
- Title: The title of the song.
- Artist: The name of the artist or composer.
- Tuning: The tuning of the guitar (e.g., standard, drop D).
- Tempo: The tempo of the song in beats per minute (BPM).
- Key: The key of the song.
- Copyright Information: If applicable, include copyright information to protect your work.
8.3. Formatting for Readability
Format your tabs for readability to ensure that they are easy to follow.
- Spacing: Use consistent spacing between notes and bars.
- Line Breaks: Break long lines of tabs into shorter, more manageable sections.
- Comments: Add comments to explain complex sections or techniques.
8.4. Using Standard Notation
Use standard notation conventions to ensure that your tabs are compatible with other software and platforms.
- Rhythms: Use standard rhythmic notation (e.g., quarter notes, eighth notes, rests) to indicate the duration of notes.
- Articulations: Use standard articulation symbols (e.g., staccato, accents) to indicate the expressive elements of the music.
- Chord Diagrams: Use standard chord diagram formats to represent chords.
8.5. Exporting Your Tab
Guitar Pro offers several options for exporting your tabs. Choose the format that is most appropriate for your needs.
- .GP: The native Guitar Pro format. This format preserves all of the features of your tab, including multiple tracks, articulations, and chord diagrams.
- .PDF: A widely used format that is easy to share and view. Exporting to PDF ensures that your tab will look the same on any device.
- .MIDI: A standard format for representing musical data. Exporting to MIDI allows others to import your tab into other music software.
- .ASCII: A text-based format that is easy to read and edit. Exporting to ASCII allows others to view your tab without needing special software.
8.6. Sharing Your Tab Online
There are many online platforms where you can share your guitar tabs.
- Guitar Tab Websites: Websites like Ultimate-Guitar.com and GuitarTabs.cc allow you to upload and share your tabs with a large community of guitarists.
- Online Forums: Online forums like the Guitar Player Magazine Forum and the Ultimate-Guitar.com Forum provide a place to share your tabs and get feedback from other musicians.
- Social Media: Social media platforms like Facebook, Twitter, and Instagram can be used to share your tabs with your followers.
- Personal Website: If you have your own website, you can upload your tabs and share them with your visitors.
9. Troubleshooting Common Issues in Guitar Pro
Even with the best preparation, you may encounter issues while using Guitar Pro. Here are some common problems and how to solve them:
9.1. Playback Issues
Problem: The tab doesn’t play or sounds incorrect.
Solution:
- Check Sound Settings: Go to “Options” > “Preferences” > “Audio” and ensure the correct audio device is selected.
- Verify Instrument Tracks: Make sure each track is assigned the correct instrument and sound.
- Adjust Volume and Pan: Use the Global View to adjust the volume and pan of each track.
- Check Mute and Solo: Ensure that tracks are not muted or soloed unintentionally.
9.2. Note Entry Problems
Problem: Difficulty entering notes or chords.
Solution:
- Use Shortcut Keys: Familiarize yourself with the shortcut keys for note entry.
- Check Notation Mode: Ensure you are in the correct notation mode (Tablature, Standard, or Slash).
- Verify Tuning: Make sure the tuning is set correctly for the instrument you are using.
- Try MIDI Input: If you have a MIDI keyboard or guitar, use it to input notes and chords more easily.
9.3. Display Issues
Problem: The tab looks distorted or is difficult to read.
Solution:
- Adjust Zoom Level: Use the zoom controls to increase or decrease the size of the tab.
- Change Stylesheet: Experiment with different stylesheets to find one that is visually appealing.
- Customize Track Display: Adjust the display settings for each track in the Inspector.
- Update Graphics Drivers: Ensure that your graphics drivers are up to date.
9.4. File Compatibility
Problem: Cannot open or import a Guitar Pro file.
Solution:
- Check File Format: Make sure the file is a supported Guitar Pro format (.gp, .gtp, .gp3, .gp4, .gp5, .gpx).
- Update Guitar Pro: Ensure you are using the latest version of Guitar Pro.
- Try Opening in Another Program: If possible, try opening the file in another music software program.
- Contact Support: If you are still unable to open the file, contact Guitar Pro support for assistance.
9.5. MIDI Issues
Problem: MIDI input or output is not working correctly.
Solution:
- Check MIDI Connections: Ensure that your MIDI device is properly connected to your computer.
- Select MIDI Device: Go to “Options” > “Preferences” > “MIDI” and select the correct MIDI input and output devices.
- Test MIDI Input: Use a MIDI monitor program to verify that MIDI signals are being received by your computer.
- Update MIDI Drivers: Ensure that your MIDI drivers are up to date.
9.6. Software Crashes
Problem: Guitar Pro crashes or freezes frequently.
Solution:
- Save Your Work: Save your work frequently to avoid losing data.
- Restart Guitar Pro: Close and restart Guitar Pro to clear any temporary issues.
- Reinstall Guitar Pro: If the problem persists, try reinstalling Guitar Pro.
- Check System Requirements: Ensure that your computer meets the minimum system requirements for Guitar Pro.
- Contact Support: If you are still experiencing crashes or freezes, contact Guitar Pro support for assistance.
10. Frequently Asked Questions (FAQ) About Guitar Pro Tabs
10.1. What is a Guitar Pro Tab?
A Guitar Pro tab is a digital file created using the Guitar Pro software, containing guitar tablature, standard notation, and other musical information. It’s a popular way for guitarists to learn, share, and create music.
10.2. How Do I Open a Guitar Pro Tab?
To open a Guitar Pro tab, you need the Guitar Pro software installed on your computer. Simply double-click the .gp file, or open Guitar Pro and select “Open File” from the File menu.
10.3. Can I Use Guitar Pro on My Mobile Device?
Yes, Guitar Pro is available as a mobile app for both iOS and Android devices. You can purchase and download the app from the App Store or Google Play Store.
10.4. Is Guitar Pro Free?
No, Guitar Pro is a commercial software. However, you can download a free trial version from the official website to test its features before purchasing.
10.5. What File Formats Does Guitar Pro Support?
Guitar Pro supports its own proprietary formats (.gp, .gtp, .gp3, .gp4, .gp5, .gpx) as well as standard MIDI files. It can also export to PDF, ASCII, and other formats.
10.6. How Do I Add a Chord Diagram in Guitar Pro?
To add a chord diagram, press “A” to open the chord menu. Choose from a list of predefined chords or create your own custom chord.
10.7. Can I Change the Tuning in Guitar Pro?
Yes, you can change the tuning for each track in Guitar Pro. Go to the Track tab in the Inspector and select the desired tuning from the dropdown menu. You can also create custom tunings.
10.8. How Do I Add Bends and Slides in Guitar Pro?
To add bends and slides, use the bend and slide symbols from the Edition Palette. Specify the degree of the bend and the type of slide.
10.9. How Can I Share My Guitar Pro Tabs with Others?
You can share your Guitar Pro tabs by exporting them to PDF, MIDI, or ASCII format, and then uploading them to guitar tab websites, online forums, social media, or your personal website.
10.10. Where Can I Find More Resources for Learning Guitar Pro?
You can find more resources for learning Guitar Pro on the official website, online forums, YouTube tutorials, and guitar tab websites. Check out guitarplayers.net for articles, lessons, and community support.
The Bottom Line
Guitar Pro 7 and 8 make it easy to modify almost everything by clicking on it. Change the tempo, clef, tuning, or time signature with direct clicks. This user-friendly approach simplifies learning and working with Guitar Pro. We at guitarplayers.net hope this guide has given you a jump start on making guitar tabs with Guitar Pro.
For more resources, lessons, and a vibrant community, visit guitarplayers.net at 1140 Boylston Street, Boston, MA 02215, United States, or call us at +1 (617) 747-2261. Explore our website today and join a community of guitar enthusiasts.