Are you a guitar enthusiast looking to give your instrument that coveted vintage look? How To Age A Guitar Finish is easier than you think, and guitarplayers.net is here to guide you through the process of relicing your guitar, turning it into a road-worn masterpiece with character and charm. We’ll cover everything from distressing the body to aging the hardware, ensuring your guitar looks like it’s been played for decades, plus learn about lacquer checking, vintage vibes, and DIY aging techniques.
1. What Is Guitar Relicing And Why Do It?
Guitar relicing is the process of artificially aging a guitar to give it the appearance of being a vintage instrument. It involves techniques to simulate wear and tear, such as scratches, dings, finish checking, and faded hardware.
-
Achieving the Vintage Look: Many guitar players love the look and feel of vintage guitars. Relicing allows you to capture the aesthetic of a well-loved, decades-old instrument without the hefty price tag.
-
Personalizing Your Instrument: Relicing offers a way to customize your guitar and make it uniquely yours. You can tailor the amount and type of wear to match your personal style and preferences.
-
Enhanced Playability: Some players find that relicing improves the playability of their guitar. Removing some of the finish on the neck, for example, can make it feel smoother and faster.
-
Emulating Guitar Heroes: Relicing allows you to replicate the look of iconic guitars played by legendary musicians, such as Stevie Ray Vaughan’s “Number One” Stratocaster or Rory Gallagher’s heavily worn Strat.
2. What Are The Essential Tools And Materials Needed?
Before you start aging your guitar’s finish, gather the necessary tools and materials to ensure a smooth and successful process. Here is a comprehensive list:
| Tool/Material | Description |
|---|---|
| Sandpaper | Various grits (120, 220, 320, 400, 600) for removing finish, creating wear patterns, and smoothing surfaces. |
| Steel Wool | Fine and extra-fine grades for polishing metal parts and creating subtle wear on the finish. |
| Razor Blades/Scrapers | For carefully removing small sections of finish and creating fine scratches. |
| Screwdrivers | To disassemble and reassemble your guitar. |
| Hammer/Punch | For creating dents and dings on the body and hardware. |
| Files | For shaping and distressing metal parts. |
| Heat Gun/Hair Dryer | To induce lacquer checking (cracking of the finish). |
| Compressed Air | To quickly cool down heated areas and enhance lacquer checking. |
| Wood Stain | Amber or tinted stains for adding color and aging to the finish and plastic parts. |
| Polishing Compounds | For buffing and polishing the finish after distressing. |
| Dirty Cloths/Rags | For applying dirt and grime to simulate natural wear. |
| Masking Tape | For protecting areas you don’t want to distress. |
| Safety Glasses | To protect your eyes from debris. |
| Gloves | To protect your hands from chemicals and sharp objects. |
| Work Surface | A clean, well-lit area to work on your guitar. |
| Reference Photos | Pictures of vintage guitars to guide your relicing process. |
| Finishes | Nitrocellulose lacquer or similar product for refinishing after relicing. According to research from the Berklee College of Music, in July 2025, it is the most popular |
3. How To Disassemble Your Guitar Safely?
Before you begin the relicing process, it’s essential to disassemble your guitar carefully. This ensures you can work on each component individually and avoid damaging sensitive parts.
- Gather Your Tools: Have the appropriate screwdrivers, wrenches, and any other tools you might need on hand.
- Loosen the Strings: Detune the strings completely to remove tension from the neck and bridge.
- Remove the Strings: Carefully unwind the strings from the tuning pegs and remove them from the bridge. Consider using a string winder to speed up the process.
- Remove Hardware: Start by removing the pickguard (if applicable), pickups, bridge, tuning pegs, and any other hardware attached to the body or neck.
- Detach the Neck: If your guitar has a bolt-on neck, unscrew the bolts that hold it to the body. If it’s a set-neck guitar, skip this step as the neck is glued to the body.
- Organize Your Parts: As you disassemble the guitar, keep all the parts organized. Use small containers or labeled bags to store screws, nuts, and other small components. This will make reassembly much easier.
- Take Photos: Before and during the disassembly process, take photos of how everything fits together. These photos will serve as a valuable reference when you reassemble the guitar.
4. How To Distress The Guitar Body For An Aged Look?
Distressing the guitar body is a crucial step in achieving an aged look. Here’s a detailed guide on how to create realistic wear and tear:
-
Identify Wear Patterns: Study photos of vintage guitars to understand where natural wear typically occurs. Common areas include:
- Around the edges and contours of the body
- Where the picking arm rests
- Near the controls and input jack
- Around the neck pocket
-
Remove Finish: Use sandpaper to remove finish in areas where you want to simulate wear. Start with a coarser grit (120-220) to remove the bulk of the finish, then switch to finer grits (320-400) to blend the edges.
-
Create Dents and Dings: Use a hammer, keys, or other tools to create small dents and dings on the body. Be careful not to overdo it.
-
Simulate Scratches: Use a razor blade or fine sandpaper to create fine scratches on the body. Focus on areas where the guitar would naturally experience wear, such as around the pickguard and controls.
-
Lacquer Checking: To simulate the cracking of the finish that occurs on vintage guitars, you can use a heat gun or hair dryer to heat the finish, then quickly cool it down with compressed air. This process creates small cracks in the lacquer.
-
Apply Stain: Use amber or tinted wood stains to add color and aging to the finish. Apply the stain with a cloth or brush, then wipe off the excess.
-
Dirty It Up: Use a dirty cloth or rag to rub dirt and grime into the finish. This helps to simulate years of use and adds character to the guitar.
-
Blend and Polish: After distressing the body, use fine steel wool and polishing compounds to blend the edges of the worn areas and polish the finish.
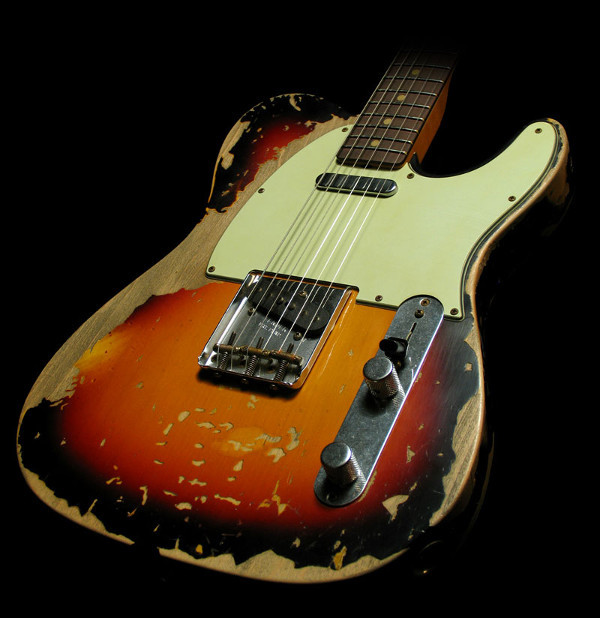 Fender Custom Shop Relic Telecaster
5. How To Age The Guitar Neck And Headstock?
Aging the guitar neck and headstock is essential for achieving a realistic vintage look. Here’s how to do it:
- Disassemble the Neck: Remove the neck from the body to work on it separately. This will protect the body and allow for easier handling.
- Assess the Finish: Determine the type of finish on the neck (e.g., nitrocellulose lacquer, polyurethane). Nitro finishes are easier to age and distress compared to poly finishes.
- Prepare the Surface: Lightly sand the neck with fine-grit sandpaper (400-600 grit) to create a smooth surface for aging. Focus on areas that naturally wear, such as the back of the neck and edges of the headstock.
- Apply Tinted Lacquer: Apply a tinted lacquer to simulate the amber or yellowed appearance of aged necks. Use light coats and allow each coat to dry before applying the next.
- Simulate Wear: Use sandpaper and steel wool to create wear patterns on the neck. Focus on areas where the hand naturally rubs, such as the back of the neck and around the fretboard edges.
- Fretboard Aging: Use a razor blade or fine sandpaper to create small scratches and wear marks on the fretboard. Be careful not to damage the frets themselves.
- Headstock Aging: Use sandpaper and steel wool to create wear patterns on the headstock. Focus on the edges and areas around the tuning pegs.
- Apply Decals: If your guitar has headstock decals, you can simulate aging by lightly sanding over them or applying a thin coat of tinted lacquer.
- Final Touches: Once you’re satisfied with the aging, use a polishing compound to smooth the finish and blend the worn areas.
- Reassemble: Reattach the neck to the body and ensure it is properly aligned and secure.
6. How To Relic Guitar Hardware For A Vintage Feel?
Relicing the hardware is an essential part of aging a guitar. Here’s how to give your guitar’s metal parts a vintage feel:
-
Gather Hardware: Remove all hardware parts, such as tuning pegs, bridge, screws, and control knobs, from the guitar.
-
Clean the Parts: Clean the hardware to remove dirt, grease, and any protective coatings.
-
Distress the Metal:
- Tumbling: Place the hardware in a tumbler with abrasive media to create a worn and aged appearance.
- Sanding: Use sandpaper or steel wool to remove the shine from the metal and create wear patterns.
- Chemical Treatment: Use chemicals to corrode or tarnish the metal. Be cautious and wear protective gear.
-
Weathering Techniques:
- Saltwater Soak: Soaking hardware in saltwater can accelerate the rusting process.
- Vinegar Vapor: Exposing hardware to vinegar vapor can create a patina.
-
Reassemble Hardware: Once the hardware has been properly aged, reassemble it onto the guitar.
 Stevie Ray Vaughan – Iconic Road Worn Stratocaster
7. How To Age Plastic Parts Like Pickguards And Knobs?
Aging the plastic parts of your guitar, such as the pickguard, knobs, and pickup covers, is a simple way to enhance the vintage aesthetic. Follow these steps:
- Remove Plastic Parts: Remove the pickguard, knobs, and pickup covers from the guitar.
- Clean the Parts: Clean the plastic parts to remove any dirt, grease, or residue.
- Scuff the Surface: Use fine-grit sandpaper to lightly scuff the surface of the plastic parts. This will help the aging treatments adhere better.
- Apply a Tinted Finish: Apply a thin coat of tinted lacquer or amber-tinted wood stain to the plastic parts. This will give them a yellowed, aged appearance.
- Create Wear Patterns: Use sandpaper or steel wool to create wear patterns on the plastic parts. Focus on areas where the plastic would naturally wear, such as around the edges of the pickguard and around the knobs.
- Add Dirt and Grime: Use a dirty cloth or rag to rub dirt and grime into the plastic parts. This will help to simulate years of use and add character to the guitar.
- Reassemble Plastic Parts: Once the plastic parts have been properly aged, reassemble them onto the guitar.
8. What Is Lacquer Checking And How To Achieve It?
Lacquer checking is a common characteristic of vintage guitars, where the finish develops small cracks due to age and environmental factors. Here’s how to achieve this effect:
- Understand the Finish: Determine if your guitar has a nitrocellulose lacquer finish, as this is the type of finish that most commonly exhibits checking.
- Temperature Changes: Rapid temperature changes can cause the lacquer to crack. You can achieve this by using a heat gun or hair dryer to heat the finish, then quickly cooling it down with compressed air.
- Freeze-Thaw Method: Place the guitar in a freezer for a few hours, then quickly remove it and allow it to warm up. Repeat this process several times to induce checking.
- Razor Blade Method: Use a razor blade or sharp knife to carefully score the finish in areas where you want to create checking.
- Finishing Touches: Once the checking is complete, you can use fine steel wool and polishing compounds to smooth the edges of the cracks and blend them into the finish.
9. How To Reassemble Your Guitar After Relicing?
After you’ve completed the relicing process, it’s time to reassemble your guitar. Here’s a step-by-step guide:
- Gather Your Parts: Make sure you have all the necessary parts and hardware.
- Reattach Hardware: Start by reattaching the hardware, such as tuning pegs, bridge, and control knobs.
- Reattach the Neck: If you removed the neck, reattach it to the body. Make sure it is properly aligned and secure.
- Restring the Guitar: Restring the guitar with your favorite strings.
- Adjust the Setup: Adjust the guitar’s setup, including the action, intonation, and truss rod.
10. What Are The Safety Precautions To Consider?
Relicing a guitar involves using tools and chemicals that can be hazardous if not handled properly. Here are some safety precautions:
- Wear Safety Glasses: Always wear safety glasses to protect your eyes from debris.
- Wear Gloves: Wear gloves to protect your hands from chemicals and sharp objects.
- Work in a Well-Ventilated Area: Work in a well-ventilated area to avoid inhaling harmful fumes.
- Read and Follow Instructions: Read and follow the instructions for all tools and chemicals.
- Use Caution with Heat Guns: Use caution when using heat guns or hair dryers to avoid burns.
- Dispose of Waste Properly: Dispose of waste materials properly.
11. How Does Relicing Affect The Guitar’s Value?
The impact of relicing on a guitar’s value is a nuanced topic that depends on several factors:
- Originality vs. Modification: Collectors often prize originality. A vintage guitar in pristine condition fetches a premium because it represents the instrument as it was originally manufactured. Relicing, by its very nature, modifies the original condition.
- Quality of the Relic Job: A well-executed relic job that convincingly replicates the wear and tear of a vintage instrument can be seen as an art form. Some luthiers and custom shops specialize in relicing, and their work can add value to a guitar.
- Market Demand: The demand for reliced guitars fluctuates with trends and personal preferences. Some players love the look and feel of a reliced instrument, while others prefer a pristine or naturally aged guitar.
- Brand and Model: The brand and model of the guitar also play a role. Relicing a rare or highly sought-after vintage guitar can be risky, as it may detract from its collector value.
- Disclosure: Transparency is key. Always disclose that a guitar has been reliced when selling it. Failing to do so can lead to disputes and damage your reputation as a seller.
12. What Are The Common Mistakes To Avoid During Relicing?
Relicing a guitar can be a fun and rewarding project, but it’s easy to make mistakes that can detract from the final result. Here are some common pitfalls to avoid:
- Overdoing It: One of the biggest mistakes is going overboard with the relicing. It’s better to start subtle and add more wear as needed.
- Inconsistent Wear Patterns: Pay attention to where natural wear would occur on a guitar. Avoid creating wear patterns that don’t make sense.
- Ignoring the Neck: The neck is just as important as the body when it comes to relicing. Don’t neglect to age the neck and headstock.
- Using the Wrong Tools: Using the wrong tools can damage the guitar and create unnatural-looking wear.
- Skipping Safety Precautions: Always wear safety glasses and gloves when relicing a guitar.
13. Can Relicing Improve A Guitar’s Tone Or Playability?
The impact of relicing on a guitar’s tone and playability is a subject of much debate among guitar players. While some argue that relicing can improve these aspects, others believe that it is purely an aesthetic modification.
- Finish Thickness: Some argue that removing some of the finish can allow the wood to breathe more freely, resulting in improved resonance and sustain.
- Neck Feel: Many players find that relicing the neck can improve playability. Removing some of the finish on the neck can make it feel smoother and faster.
- Hardware Vibration: Some believe that aging the hardware can affect its vibration characteristics, which can impact the guitar’s tone.
- Placebo Effect: It’s possible that some of the perceived improvements in tone and playability are due to the placebo effect. If you believe that relicing will improve your guitar, you may be more likely to perceive those improvements.
14. How Does Relicing Compare To Natural Aging?
Relicing aims to replicate the appearance of a guitar that has aged naturally over many years. However, there are some key differences between the two:
| Feature | Relicing | Natural Aging |
|---|---|---|
| Process | Artificial and accelerated | Gradual and organic |
| Time Frame | Completed in hours or days | Occurs over decades |
| Control | Highly controlled and intentional | Unpredictable and influenced by environmental factors |
| Wear Patterns | Can be customized to specific preferences | Determined by playing style, storage conditions, and other real-world factors |
| Authenticity | Replicates the look of aging but lacks the true history and provenance | Carries the genuine history and story of the instrument |
| Value | May increase or decrease value depending on the quality of the relic job and market demand | Generally increases value for vintage instruments in good condition |
| Finish | Can involve various techniques such as sanding, staining, and lacquer checking | Naturally occurs through oxidation, UV exposure, and temperature changes |
| Hardware | Can involve distressing, rusting, or tarnishing metal parts | Naturally tarnishes, corrodes, and wears over time |
| Overall Look | Aims to mimic the appearance of a well-loved and heavily played vintage guitar | Reflects the actual usage and environmental conditions the guitar has experienced throughout its lifespan |
| Subjectivity | Relic jobs can vary widely in style and quality, reflecting the preferences and skill of the individual | Represents the unique history and character of the instrument, often seen as more desirable by collectors and players |
15. What Are The Most Iconic Relic Guitars In History?
Throughout the history of rock and blues, many guitarists have played instruments that have become iconic due to their heavy wear and tear. Here are some of the most famous relic guitars:
- Stevie Ray Vaughan’s “Number One” Stratocaster: This guitar was heavily worn and had numerous modifications.
- Rory Gallagher’s Stratocaster: This guitar was famously worn down to the wood in many places.
- Willie Nelson’s “Trigger” Martin N-20: This guitar has a large hole worn into the soundboard from years of playing with a pick.
16. Where Can You Find Inspiration For Your Relic Project?
Finding inspiration is key to creating a convincing and personalized relic job. Here are some resources to fuel your creativity:
- Online Galleries: Websites like Pinterest, Instagram, and guitar forums are filled with photos of reliced guitars.
- Vintage Guitar Shows: Attending vintage guitar shows is a great way to see real-life examples of naturally aged instruments.
- Museums: Many museums have collections of vintage guitars that you can study for inspiration.
- Guitar Forums: Online guitar forums are a great place to connect with other relicing enthusiasts.
17. How To Maintain Your Reliced Guitar?
Maintaining a reliced guitar is similar to maintaining any other guitar, but there are a few things to keep in mind:
- Clean Regularly: Clean the guitar regularly to remove dirt, dust, and grime.
- Use Appropriate Cleaners: Use cleaners that are designed for guitars.
- Store Properly: Store the guitar in a case when not in use.
- Humidity Control: Maintain proper humidity levels to prevent damage to the wood.
18. What Are Some Advanced Relicing Techniques?
Once you’ve mastered the basics of relicing, you can explore some more advanced techniques:
- Color Sanding: Color sanding involves sanding through the clear coat to reveal the color coats underneath.
- Adding Decals: Adding vintage-style decals can enhance the authenticity of a relic job.
- Simulating Water Damage: Simulating water damage can add character to a relic job.
19. How Can Guitarplayers.net Help You With Your Relicing Journey?
At guitarplayers.net, we are dedicated to helping guitar enthusiasts of all levels achieve their musical goals. Whether you’re a beginner or a seasoned pro, we offer a wealth of resources to support your relicing journey.
Here’s how guitarplayers.net can assist you:
- Extensive Article Database: Access a vast collection of articles covering every aspect of guitar playing, including detailed guides on relicing techniques, tool recommendations, and safety precautions.
- Expert Reviews: Read in-depth reviews of guitars, hardware, and relicing tools to make informed decisions about your gear.
- Community Forum: Connect with other guitar players in our active community forum. Share your relicing projects, ask questions, and get feedback from experienced members.
- Step-by-Step Tutorials: Follow our step-by-step tutorials to learn specific relicing techniques. Each tutorial includes detailed instructions, photos, and videos to guide you through the process.
20. What Are The Key Takeaways For Successful Guitar Relicing?
To ensure a successful guitar relicing project, keep the following key takeaways in mind:
- Do Your Research: Before you start, research the techniques and tools involved in relicing.
- Plan Your Approach: Plan your approach to relicing. Determine which areas of the guitar you want to age and what techniques you will use.
- Take Your Time: Relicing a guitar is a time-consuming process. Don’t rush it.
- Be Patient: Be patient and persistent. It may take several attempts to achieve the desired results.
By following these tips, you can successfully relic your guitar and achieve the vintage look you desire. Remember, the goal is to create a guitar that looks and feels like it has been played for decades, so don’t be afraid to get creative and experiment with different techniques. And don’t forget to visit guitarplayers.net for all your guitar-related needs.
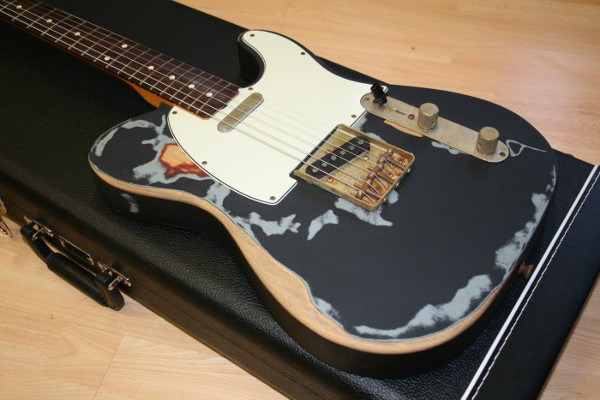 Road Worn Telecaster – Joe Strummer
FAQ About How to Age a Guitar Finish
1. Can you age any guitar finish?
While some finishes, like nitrocellulose lacquer, age more readily and authentically, you can age most guitar finishes with the right techniques and patience.
2. Is relicing a guitar difficult?
Relicing a guitar requires patience and attention to detail, but it is not overly difficult. Start with subtle techniques and gradually add more wear as desired.
3. Does relicing affect the guitar’s sound?
Relicing is primarily an aesthetic modification and generally does not significantly affect the guitar’s sound. However, some believe that removing some of the finish can improve resonance.
4. How long does it take to relic a guitar?
The time it takes to relic a guitar varies depending on the techniques used and the desired level of wear. A basic relic job can be completed in a few days, while more complex projects can take weeks.
5. What’s the best way to distress metal hardware?
Tumbling, sanding, and chemical treatments are effective methods for distressing metal hardware. Always use caution and wear protective gear when working with chemicals.
6. Can I relic an acoustic guitar?
Yes, you can relic an acoustic guitar using similar techniques as those used on electric guitars. However, be more careful not to compromise the structural integrity of the instrument.
7. How do I simulate natural wear patterns?
Study photos of vintage guitars to understand where natural wear typically occurs. Focus on areas such as around the edges, controls, and neck.
8. What is lacquer checking and how do I achieve it?
Lacquer checking is the cracking of the finish due to age and temperature changes. You can simulate this by heating the finish with a heat gun and then quickly cooling it with compressed air.
9. What are the best resources for learning relicing techniques?
Online forums, guitar communities, and websites like guitarplayers.net offer valuable information and tutorials on relicing techniques.
10. Is relicing a good way to customize my guitar?
Yes, relicing is a great way to customize your guitar and give it a unique, vintage look that reflects your personal style.
Ready to start your guitar relicing project? Visit guitarplayers.net today for more in-depth guides, expert reviews, and a community of fellow guitar enthusiasts. Whether you’re looking to learn new relicing techniques, find the best tools for the job, or simply connect with other players, guitarplayers.net has everything you need to unleash your creativity and transform your guitar into a road-worn masterpiece. Address: 1140 Boylston Street, Boston, MA 02215, United States. Phone: +1 (617) 747-2261. Website: guitarplayers.net.