Learning to hold your guitar correctly might seem obvious, but it’s the foundational step every beginner guitarist needs to nail before diving into chords, strumming, or picking. This guide applies to both electric and acoustic guitars, understanding that while acoustic guitars are often bulkier, the core holding principles remain consistent.
If there’s one golden rule to etch into your mind every time you pick up your guitar, it’s this: avoid hunching!
Hunching over your guitar is a common bad habit among guitarists. It’s detrimental to your posture and can lead to long-term back problems. Let’s explore the correct way to hold a guitar while seated, ensuring comfort and proper playing technique right from the start.
The Ideal Sitting Guitar Position
 Man sitting holding an acoustic guitar, legs open, guitar resting on right leg. Man sitting holding an acoustic guitar, legs open, guitar resting on right leg. |
The classic sitting position involves open legs, with the guitar resting comfortably on the right leg for right-handed players (reverse for left-handed). The guitar body sits comfortably just below chest level. Notice the straight back and the right-angle bend in the left arm, minimizing wrist strain for fretting. |
|---|---|
 Woman sitting cross-legged holding a guitar, guitar resting on right leg. Woman sitting cross-legged holding a guitar, guitar resting on right leg. |
Crossing your legs can offer enhanced comfort. If you strum with your right arm, crossing your right leg is often preferred. While her left arm angle is slightly more acute than a right angle, it’s acceptable as she can comfortably reach across the fretboard. The key is ensuring your fret hand arm doesn’t exceed a 90-degree angle to prevent wrist strain. Her strumming arm’s elbow is positioned at the guitar’s top corner, providing an effective pivot point over the soundhole or first pickup. |
 Electric guitar tilted back slightly towards the player for fretboard visibility. Electric guitar tilted back slightly towards the player for fretboard visibility. |
Tilting the guitar slightly towards you, particularly an electric guitar, can improve your view of the fretboard – especially helpful for beginners. As you progress, you’ll rely less on looking at the fretboard, but this slight tilt is perfectly acceptable in the learning phase. |
 Man sitting on the ground, classical guitar position, guitar body at chest height. Man sitting on the ground, classical guitar position, guitar body at chest height. |
Sitting on the ground is another viable option. Again, the leg positioning is adjusted to elevate the guitar body to chest height or just below, minimizing any need to hunch. The strumming or picking arm maintains that crucial top-corner positioning for optimal movement. |
 Man humorously positioned on railway tracks with a guitar, emphasizing straight back posture. Man humorously positioned on railway tracks with a guitar, emphasizing straight back posture. |
Humor aside, this image highlights the importance of a straight back. While we strongly advise against playing guitar on railway tracks, the guitarist’s posture is indeed commendable! |
Key takeaways for sitting guitar posture:
- Whether legs are crossed or uncrossed, ensure your knees are high enough to support the guitar around chest level. This prevents you from having to stoop or hunch over.
- Rest the guitar’s lower curve (the bout) on your thigh of your strumming hand side (right thigh for right-handed players). This provides a stable and balanced base.
- Position the guitar flat against your torso, though a slight tilt towards you for fretboard visibility is acceptable and sometimes preferred.
- Consciously avoid hunching your back. Maintain an upright, comfortable posture.
- Ensure your strumming elbow naturally points towards the top corner of the guitar. This elbow position is crucial as it allows your forearm and wrist to pivot smoothly across the strings while simultaneously supporting the guitar against your body.
- The arm of your fret hand (the hand pressing the strings) should ideally be at a 90-degree angle or less. A more acute angle reduces wrist strain when reaching around the fretboard, promoting comfortable and injury-free playing.
Mastering the Standing Guitar Position
Once you’re comfortable sitting, incorporating a guitar strap and practicing while standing is crucial. Standing guitar playing offers a different dynamic and is essential if you plan to perform or play gigs.
Here’s a look at both correct and incorrect standing guitar postures:
 Man standing holding an electric guitar with neck tilted up, correct posture. Man standing holding an electric guitar with neck tilted up, correct posture. |
This guitarist demonstrates excellent standing posture. Tilting the guitar neck upwards for fretboard access is perfectly fine and doesn’t compromise other aspects of posture. The fret hand elbow maintains an acute angle (less than 90 degrees), and his back is straight. The guitar body rests at a comfortable strumming height. His strumming arm elbow is forward, squared with his body, creating an ideal pivot point. Note the slight bend in his left leg, providing balance and allowing him to lean without hunching. |
|---|---|
 Woman standing holding a guitar with incorrect posture, loose strap, hunching over. Woman standing holding a guitar with incorrect posture, loose strap, hunching over. |
This image illustrates common mistakes in standing guitar posture. The excessively loose strap forces her to hunch over to reach the fretboard. Her fret hand arm angle is obtuse (greater than 90 degrees), likely causing wrist strain. The strumming arm elbow is pushed back, hindering a smooth pivot for strumming and picking. This posture is inefficient and potentially harmful. |
Key considerations for standing guitar posture:
- Strap Height is Key: Avoid setting your strap too low. A guitar hanging down near your knees makes proper fretting technique incredibly difficult as you struggle to wrap your hand and fingers correctly around the neck. Forget about looking “cool” – prioritize playability and comfort.
- Maintain Fret Hand Angle: Aim to position the guitar so your fret-hand arm is at a 90-degree angle or less. This minimizes wrist strain and allows for optimal finger dexterity.
- No Hunching! Just like in the sitting position, hunching while standing is detrimental. Keep your back straight and use your legs and strap adjustments to position the guitar correctly.
- Strumming Arm Positioning: Ensure your forearm is positioned squarely and angled towards the top corner of the guitar, not behind you. This forward elbow position provides the necessary pivot point for fluid strumming and picking motions.
For more in-depth guidance, including video demonstrations, explore resources from professional guitar tutors for both acoustic and electric guitar techniques.
Hand Position on the Guitar Neck: The Fret Hand
Correct hand positioning on the guitar neck is fundamental for efficient chord playing. Incorrect positioning can make learning chords significantly harder.
Let’s examine the ideal fret-hand position from different perspectives:
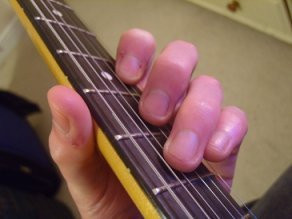 Close up of a thumb wrapping over the top of the guitar neck. Close up of a thumb wrapping over the top of the guitar neck. |
As illustrated, your thumb should rest comfortably on the back of the guitar neck, ideally towards the top edge. Your wrist should be relaxed, neither too tense nor hanging too low. A slight bend in the wrist is natural and correct; excessive bending should be avoided to prevent future issues. Players with smaller hands might find their thumb positioned more centrally on the neck’s back. The initial focus should be on achieving a relaxed and comfortable hand position. As you progress to chords, finger positions will vary, but establishing this relaxed foundational position is key. Note for larger hands: Some guitarists with larger hands find it comfortable to bring their wrist higher and slightly curl their thumb over the top edge of the neck (as shown in the leftmost image). While comfort is paramount, be aware that this thumb-over position may require adjustment for certain chord shapes, requiring more thumb movement in the long run. |
|---|
Mastering the Guitar Pick Hold
The crucial element in holding a guitar pick (plectrum) is avoiding a death grip. The pick needs to be held loosely enough to flex smoothly over the strings.
Holding the pick between the tips of your index finger and thumb provides the optimal balance of control and flexibility.
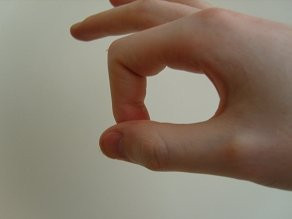 Front view of fingers forming an 'O' shape ready to hold a guitar pick. Front view of fingers forming an 'O' shape ready to hold a guitar pick. |
This is how the “O” shape looks from the front, illustrating the relaxed and curved position of the index finger and thumb. |
|---|---|
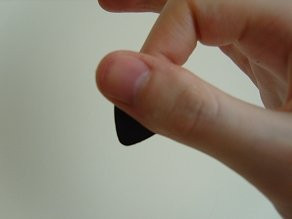 Front view of a hand holding a guitar pick, relaxed grip, pick extending slightly. Front view of a hand holding a guitar pick, relaxed grip, pick extending slightly. |
The thumb remains relatively straight in this view, highlighting the relaxed yet supportive grip. Holding the pick in this manner facilitates a smooth and flexible interaction with the strings, preventing a harsh or “jabbing” playing style when strumming and picking. |
Developing this pick-holding technique from the outset will significantly contribute to smoother, more fluid strumming and picking as you progress. You’ll glide over the strings with ease rather than attacking them rigidly.
Next Steps in Your Guitar Journey
Hopefully, you now have a solid understanding of how to hold a guitar correctly, eliminating basic postural errors that could hinder your progress. With this fundamental knowledge, you’re well-prepared to move on to other essential guitar basics, such as learning to finger chords and mastering basic picking techniques.
Remember to divide your practice time equally between standing and sitting positions, as standing guitar playing can initially feel quite different and potentially more challenging. However, mastering both is crucial, especially if you aspire to perform on stage one day!
| Tweet about this lesson |
|---|
Related Articles:
Best Way to Hold a Guitar Pick