Creating custom songs for Guitar Hero can greatly enhance your gameplay and allow you to experience your favorite music in a whole new way. This guide provides a detailed walkthrough on how to create your own Guitar Hero Songs, offering an alternative approach to methods using Freetar Hero or Anvil Studio. While this method may seem lengthy initially, it becomes efficient with practice and can empower you to build an extensive library of personalized guitar hero songs.
If you have any questions about this tutorial or the software mentioned, please post them in the comments section.
Table of Contents
- Summary of Tools and Templates
- Getting Started: Choosing Your Song
- Finding the Tempo of Your Song
- Charting with TabIt: Step-by-Step
- Charting with Guitar Pro 4.x
- Charting with PowerTab
- Editing Your Chart in Anvil Studio
- Synchronization Check with Guitar Hero Explorer
- Implementing Tempo and Time Signature Changes with MIDI Maestro
- Adding Star Power to Your Guitar Hero Songs
- (Future Update: Inserting Player 1/2 Positions)
- Creating Bass, Rhythm Guitar, and Co-op Tracks
- Incorporating Different Difficulty Levels
- Finalizing Your Custom Guitar Hero Song
- Further Resources for Guitar Hero Song Creation
- Conclusion
1. Summary of Tools and Templates
This tutorial utilizes a combination of software to create your custom guitar hero songs. Here’s a breakdown of the tools you’ll need:
-
Tablature Software (Choose One):
- TabIt: Recommended for its user-friendly interface, ideal for beginners in note charting.
- Guitar Pro: A robust tool preferred by many for its advanced features and precision. Version 4.0.7 or later is recommended.
- PowerTab: A freeware option, suitable for those seeking a cost-effective solution.
-
MIDI Editor:
- Anvil Studio: Essential for finalizing your MIDI files and integrating them with Guitar Hero templates. This freeware is a cornerstone of the process.
-
Tempo and Time Signature Adjustment:
- MIDI Maestro: Necessary for implementing tempo and time signature changes to ensure your song syncs perfectly in Guitar Hero.
-
Guitar Hero Song Preview Tool:
- Guitar Hero Explorer: Crucial for testing and synchronizing your custom songs within the Guitar Hero environment.
-
Essential Templates:
- Guitar Hero Template for TabIt
- Guitar Hero Template for Guitar Pro
- Guitar Hero Template for PowerTab
- Guitar Hero 1 Template for Anvil Studio [Right-click-save] (Optional if not targeting Guitar Hero 1)
- Guitar Hero 2 Template for Anvil Studio [Right-click-save] (Used as the primary example in this guide)
While PowerTab and Anvil Studio are available as freeware, TabIt and Guitar Pro offer trial versions, allowing you to explore their capabilities before considering a purchase. Choosing TabIt for its ease of use is recommended for beginners, and MIDI Maestro is indispensable for tempo adjustments.
Note: Regardless of your chosen tablature program, reviewing the TabIt section is highly recommended as it covers the foundational principles of note charting applicable across all platforms.
2. Getting Started: Choosing Your Song
The first step in creating your own guitar hero songs is selecting the music you want to chart. If you’re new to this process, it’s wise to begin with a song that has a straightforward tempo and rhythm. This will simplify the initial charting process and help you grasp the fundamental techniques more easily.
For this tutorial, we will use a segment from “Only for the Weak” by In Flames as an example. We’ll focus on charting the first four measures of both rhythm and lead guitar parts. You are welcome to follow along with this example to familiarize yourself with the process, but feel free to choose any song that motivates you to create your first custom guitar hero song.
Click here to listen to the song clip we’ll be using.
3. Finding the Tempo of Your Song
Accurately determining the tempo of your chosen song is critical for synchronization in Guitar Hero. Here are several methods to find the BPM (Beats Per Minute):
-
Using a Metronome: Play your song and use a physical or digital metronome to manually match the beat. This method requires a good sense of rhythm but can be effective.
-
Tempo Tapping in TabIt: If you’re using TabIt, press
CTRL+M, then click “TAP.” Play the song and tap any key on your keyboard in time with the beat. TabIt will estimate the tempo. Refine this by observing the tempo reading and adjusting until it aligns well with the song. Then, click the metronome icon and pressF5to play along, further fine-tuning the tempo. -
Referencing Existing Tablatures: If a tablature for your song exists in TabIt, Guitar Pro, or PowerTab, it often includes tempo information. This can serve as a reliable starting point.
While specific tempo detection features in Guitar Pro and Power Tab are not detailed here, these programs often have built-in tools or informational displays that can assist in determining BPM. The tempo for our example song, “Only for the Weak,” is 210 BPM.
4. Charting with TabIt: Step-by-Step
To begin charting your guitar hero song in TabIt, first open the Guitar Hero template you downloaded.
Don’t be concerned if your TabIt interface appears different from screenshots, as TabIt is customizable. The template is pre-configured to map different tracks to Guitar Hero difficulties and functions. For this tutorial, we’ll focus on “Expert” difficulty, which is typically Track 4 in the template.
The Guitar Hero TabIt template, showing tracks designated for different difficulties and functions.
As indicated in the track comments, the first five lines correspond to the Guitar Hero fret buttons (Green to Orange). The sixth line is for Star Power, and the seventh is for Player 1/2 sections in Face-Off mode.
For songs already tabbed on websites like TabIt’s official site, you can copy and paste guitar lines directly into your Guitar Hero template. Locate a tab for your chosen song, copy the guitar part (CTRL+C), and paste it (CTRL+V) into the Expert track of your guitarhero.tbt template. While proper tuning is not necessary for charting, ensure you’re pasting into the correct Expert track.
Demonstrating how to copy guitar tabs and paste them into the Guitar Hero template in TabIt.
Note: Track positions may shift in subsequent images for clarity. Focus on the content of the tracks rather than their vertical order.
Note: If your song is not in 4/4 time signature, you must adjust this in TabIt. Go to “Song” > “Recreate Bar Lines…” and enter the top number of the time signature (e.g., ‘3’ for 3/4 time). This adjustment is crucial within TabIt, but further steps are needed to ensure time signature changes are recognized in Guitar Hero (covered later with MIDI Maestro).
Let’s chart the rhythm guitar part of our example song. Observe the original rhythm guitar tab:
The original tablature for the rhythm guitar part of “Only for the Weak”.
Recreate this in the Expert track of your TabIt template. The vertical lines in TabIt represent note values and serve as a guide for placing notes. Typically, chords align with the four major lines within each measure. Recreating the rhythm part will look similar to this:
The rhythm guitar part recreated within the TabIt Guitar Hero template.
Remember, the top line is the GREEN button, and the fifth line is the ORANGE button. Input notes accordingly. The 6th and 7th strings are reserved for Star Power and Player 1/2 positions, respectively, and are not used for standard notes.
By default, notes in TabIt sustain until the next note. For Guitar Hero, we often need single notes or shorter sustains. To create a staccato effect, insert an asterisk * immediately after the ‘0’ (or fret number). This acts as a “rest,” cutting the note short in Guitar Hero.
Using asterisks to create single, non-sustaining notes in the TabIt chart.
Guitar Hero interprets rests and sustains differently from tablature programs. To achieve accurate sustain lengths in Guitar Hero, you may need to shorten the duration of notes in TabIt by approximately half of the intended sustain time.
Now, for the lead guitar part. Although the Expert track is suitable for lead guitar, for clarity, we’ll focus on the rhythm track for this initial charting example. Here’s how the lead guitar part might be represented:
Example of a lead guitar part charted in TabIt, showing note placement and rests.
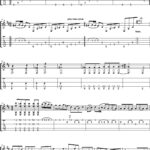
Combined, the rhythm and lead parts charted in TabIt might look like this:
Both rhythm and lead guitar parts charted together in the TabIt template.
With your note chart ready in TabIt, it’s time to export it as a MIDI file. Go to “File” > “Export MIDI”.
Navigating to the MIDI export option within TabIt’s file menu.
In the export dialog, ensure the track containing your note chart is selected. Click “OK” and choose a location to save your MIDI file.
Choosing the relevant track for MIDI export in TabIt.
Remember to save your TabIt file (“File” > “Save As…”) as a backup. This will allow you to easily make adjustments later if needed without overwriting your template.
5. Charting with Guitar Pro 4.x
Charting in Guitar Pro 4.x is conceptually similar to TabIt. Open the Guitar Hero template for Guitar Pro.
The Guitar Hero template loaded in Guitar Pro 4, ready for note charting.
Follow the same principles as described in the TabIt section for note placement, rests, and charting based on tablature. Once your chart is complete in Guitar Pro, export it as a MIDI file, similar to the TabIt export process (“File” > “Export MIDI”).
Exporting the Guitar Hero song chart as a MIDI file from Guitar Pro 4.
Always save your Guitar Pro file (“Save As…”) to preserve your work and avoid overwriting the original template.
6. Charting with PowerTab
PowerTab offers a freeware alternative for charting. While track separation might appear differently, the provided template helps organize difficulty levels. Access the guitar tracks by clicking the guitar icon on the toolbar.
Locating the guitar track view within the PowerTab interface.
The tracks are pre-labeled: 1. Expert, 2. Hard, 3. Medium, 4. Easy. The bass is retuned to match TabIt’s settings, but octave adjustments might be necessary if you encounter pitch issues.
The Guitar Hero template in PowerTab, showing labeled difficulty tracks.
Exporting MIDI from PowerTab follows the same general procedure as TabIt and Guitar Pro: locate the MIDI export option in the “File” menu and export your chart as a MIDI file.
7. Editing Your Chart in Anvil Studio
Anvil Studio is crucial for integrating your MIDI chart with Guitar Hero. Open Anvil Studio and load the MIDI file you exported from TabIt, Guitar Pro, or PowerTab using “File” > “Open Song…”.
Next, open one of the Anvil Studio templates you downloaded (either gh1template.mid or gh2template.mid), depending on whether you are targeting Guitar Hero 1 or 2. For this tutorial, we’re using gh2template.mid. Use “File” > “Merge Song…” and select the gh2template.mid file. Then, switch to the “Compose” view.
Merging the exported MIDI chart with the Guitar Hero 2 template in Anvil Studio.
Select the track labeled “TabIt MIDI – Track” (or similar, depending on your source program), which contains your charted notes. Press CTRL+A to select all notes, then CTRL+C to copy them. Now, select the “PART GUITAR RHYTHM” track and press SHIFT+Insert to paste the notes. Although typically notes go into “PART GUITAR” for single-player mode, we’re using “PART GUITAR RHYTHM” for this rhythm guitar example.
Delete the now redundant “TabIt MIDI – Track.” Press ALT, T, D sequentially, then confirm deletion with “Yes” or SPACEBAR.
Finally, set the tempo you determined earlier (210 BPM for our example) in the top toolbar of Anvil Studio.
Adjusting the tempo in the Anvil Studio toolbar to match the song’s BPM.
Save your modified MIDI file using “File” > “Save Song As…”.
8. Synchronization Check with Guitar Hero Explorer
To test your custom guitar hero song in Guitar Hero, you’ll need to import it using Guitar Hero Explorer (GHEx). Follow steps 6-9 of this tutorial for detailed instructions on importing your MIDI and song files into GHEx.
Importing can take time, especially initially. After the first import and rewrite, subsequent replacements are much faster.
As mentioned in the GHEx tutorial, if the notes are out of sync, adjust the “offset” setting in GHEx. Alternatively, refine the MIDI itself by slightly shifting notes in your tablature program and re-exporting/re-importing until synchronization is perfect.
9. Implementing Tempo and Time Signature Changes with MIDI Maestro
If your song has tempo variations or time signature changes, MIDI Maestro is essential. Open MIDI Maestro and load your finalized MIDI file from Anvil Studio using “File” > “Open…”. Dismiss any prompts about MIDI file defaults.
You’ll see tracks listed, and a yellow bar representing notes. Ignore the second event bar for now.
The MIDI Maestro interface displaying tracks and note data.
Go to “View” > “Staff.” If notes aren’t visible on the staff, click the number ‘7’ in the track list.
Enabling staff view in MIDI Maestro to visualize notes.
To insert a tempo change, use “Insert” > “Tempo.” For example, to speed up the 2nd measure and revert to the original tempo in the 3rd, configure the tempo change as shown:
Setting up a tempo change to affect a specific measure in MIDI Maestro.
To apply a tempo change from a specific measure to the end of the song, set both “Measure” numbers to the same value (e.g., ‘2’ for measure 2 onwards).
For time signature changes, use “Insert” > “Meter.” Similar to tempo changes, you can apply time signature changes to specific measures or from a measure to the end of the song.
Inserting a time signature change for a specific measure in MIDI Maestro.
Note: Guitar Hero primarily supports x/4 time signatures. Other time signatures (e.g., 7/8) may be converted by the game, potentially misaligning notes with measures, though the overall sync should remain unaffected. Time signatures enhance accuracy but are not critical for basic playability.
Note: MIDI Maestro adds unwanted tracks and events to your MIDI. After using MIDI Maestro, re-import the MIDI into Anvil Studio to delete these extra tracks.
Unwanted tracks added by MIDI Maestro, visible in Anvil Studio.
To remove unwanted events, access the “Event List” view in Anvil Studio (see Chapter 14 for instructions). In the Event List, locate and delete any extraneous events added by MIDI Maestro using the “Delete Event” button.
Deleting unwanted events from the Event List in Anvil Studio.
10. Adding Star Power to Your Guitar Hero Songs
Star Power enhances gameplay and scoring. In your tablature program, the 6th string is designated for Star Power. Mark the sections where you want Star Power to activate:
Marking sections for Star Power activation on the 6th string in TabIt.
Export the MIDI and re-import it into Anvil Studio, following the steps from Chapter 7 to merge and transfer your charted notes.
In Anvil Studio, select the “PART GUITAR RHYTHM” track (or “PART GUITAR”). In the “Compose” view, change the track display from “Staff” to “Piano Roll” using the dropdown menu under track names.
If you see only a few piano keys, click “add sounds” below the keys and set “Lowest Note” to C5 and “Number of Notes to Show” to 50.
Star Power is represented by blue bars at the top of the piano roll. They may appear upside down due to tuning.
Star Power notes visualized as blue bars in Anvil Studio’s Piano Roll view.
To create Star Power phrases, drag the right edge of the blue bar to extend it across the desired notes. Slightly extend the bar beyond the last note of the Star Power phrase.
Extending the Star Power bar in the Piano Roll to cover a phrase.
Save your MIDI. Star Power is now integrated into your guitar hero song.
Note: If you add Star Power before incorporating difficulty levels or player positions, and later re-import updated MIDIs into Anvil Studio, Star Power stretches may need to be re-adjusted. Guitar Pro users may avoid this issue as MIDI import in Guitar Pro can preserve event data during edits.
11. (Future Update: Inserting Player 1/2 Positions)
This section regarding Player 1/2 position insertion will be updated in the future.
12. Creating Bass, Rhythm Guitar, and Co-op Tracks
To create charts for Bass, Rhythm Guitar, or Co-op modes, use the provided templates in TabIt, Guitar Pro, or PowerTab and chart these parts as you would the main guitar part.
When importing into Anvil Studio, instead of copying notes to “PART GUITAR” or “PART GUITAR RHYTHM,” copy them to “PART BASS” or “PART RHYTHM” (or other appropriate track names in the template) according to the part you charted. The process is otherwise identical.
13. Incorporating Different Difficulty Levels
Create each difficulty level (Easy, Medium, Hard, Expert) separately within your chosen tablature program using the provided template.
Difficulty levels pre-defined in the TabIt Guitar Hero template.
When importing into Anvil Studio, you’ll have multiple “TabIt tracks” (or similar).
Multiple tracks from TabIt representing different difficulty levels in Anvil Studio.
For each difficulty, highlight one of the “TabIt tracks,” go to “Track” > “Merge…,” and merge it with the other “TabIt tracks.” Then, copy the notes from the merged track to the appropriate “PART” track in the Anvil Studio template (e.g., “PART GUITAR EASY,” “PART GUITAR MEDIUM,” etc.). Delete the “TabIt tracks” after merging and copying. Save your MIDI file. It’s now ready for GHEx import with all difficulty levels included.
14. Finalizing Your Custom Guitar Hero Song
Before finalizing, open your MIDI in Anvil Studio one last time. Go to the “Event List” view and select the “EVENTS” track.
Accessing the Event List view in Anvil Studio to finalize the MIDI.
Note: Ensure your “EVENTS” track structure matches the example. Discrepancies here can cause issues in-game.
Double-click the “Comments: [end]” line (or “Comments: end” in GH1 template). A window will appear.
Editing the “end” comment event in Anvil Studio to adjust song length.
Adjust the number in the second box of this window to extend the timestamp on the left of “Comments” to at least 1 second beyond the song’s actual length. This number will be large. Increment or decrement it while observing the timestamp until it exceeds the song’s duration.
Example of an adjusted timestamp in the “end” comment event, extending beyond song length.
If the timestamp is too short, the song will end prematurely in-game. If it’s excessively long, you’ll experience a delay before the “You Rock!” message. Aim for approximately one second of extra time.
Once finalized, save the MIDI, import into GHEx, build your ISO, burn the game, and enjoy your custom guitar hero song!
15. Further Resources for Guitar Hero Song Creation
Explore these additional resources for deeper insights and troubleshooting:
- Idiot Proof Guide to playing custom made songs in GH2: Instructions for putting custom songs onto a Guitar Hero 1 or 2 DVD.
- Custom Song FAQ: Answers to frequently asked questions about custom songs.
- Guitar Hero MIDI and VGS File Details: Technical details about Guitar Hero MIDI and VGS files.
- Beginner’s Guide to Creating Custom Mids: A guide specifically for using Anvil Studio for custom charts.
- Guitar Pro 5 template – now with Tutorial!: Tutorial for charting with Guitar Pro 5 (also helpful for 4.x).
16. Conclusion
This comprehensive guide equips you with the knowledge to create your own guitar hero songs. Mastering this process takes time and practice, but the ability to play custom tracks significantly enriches your Guitar Hero experience. We encourage you to experiment, share your creations, and contribute to the vibrant community of custom guitar hero song creators.
_________________
whiskeyface’s Custom Songs | Idiot Proof Guide to MAKING Custom Guitar Hero Songs