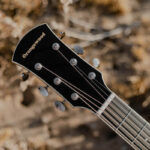
Adding a guitar logo to your headstock can give your instrument a professional and personalized touch. Whether you’re building a guitar from scratch or refinishing an old favorite, applying a waterslide decal for your guitar logo is a straightforward process that can significantly enhance its appearance. This guide will walk you through the steps to seamlessly apply your guitar logo decal, ensuring a clean and lasting finish.
First, prepare your decal by soaking it in water for about 30 to 60 seconds. This will loosen the adhesive backing, making it ready for application. Ensure the water is at room temperature for optimal decal flexibility.
Once soaked, carefully remove the decal and its backing paper from the water using tweezers. Position it on the guitar headstock, close to your desired placement. Avoid separating the film from the backing paper just yet to maintain control.
Gently press the decal film onto the headstock while carefully sliding out the backing paper with your tweezers. The decal should now be sitting directly on the headstock surface.
With a bit of water still present, you can precisely adjust the decal’s position. If it sticks, adding a tiny drop of water will help it float and slide easily into the perfect alignment. Take your time to get the guitar logo exactly where you want it.
Use a soft kitchen towel to carefully absorb most of the water around the decal. Then, with a fresh, dry section of the towel, gently dab the decal to press out any remaining water and ensure it adheres smoothly. Be extremely cautious during this step to avoid accidentally shifting or tearing the delicate decal film of your guitar logo.
After drying the excess water and confirming the decal is flat and wrinkle-free, let it sit overnight. This ensures any residual moisture evaporates completely, allowing the decal to fully bond with the headstock before the next crucial step.
Finally, protect your meticulously applied guitar logo with clear coats of lacquer. The initial coats are critical; they must be very light mists. Applying heavy coats immediately can cause the decal to wrinkle or become damaged. Hold the spray can further away than usual and apply a very thin, misted layer. Wait about 30 minutes between each of the first couple of mist coats. Don’t be concerned if the surface appears slightly textured at first; this will smooth out as you apply subsequent, heavier coats of clear lacquer. This careful layering will embed your guitar logo beautifully and permanently under a glossy finish.

