
Introduction
Pink Floyd’s “Wish You Were Here” is a timeless classic, instantly recognizable by its haunting acoustic guitar intro. For guitar players, mastering this intro solo is a rite of passage. Darrin Goodman, instructor at GuitarControl.com, breaks down this beautiful piece in an easy-to-follow lesson. Whether you’re a beginner looking to expand your repertoire or an experienced player wanting to perfect this iconic solo, this guide, complete with “Wish You Were Here” guitar tab references, will help you learn it tonight. Get ready to delve into the nuances of David Gilmour’s legendary acoustic guitar work.
 Darrin Goodman demonstrating Wish You Were Here intro solo techniques on acoustic guitar
Breaking Down the “Wish You Were Here” Intro Solo
This intro solo, while not overly complex, requires attention to detail in terms of timing, slides, and bends to truly capture the emotive feel of the original. Darrin Goodman expertly guides you through each measure, ensuring you grasp the essential techniques. Let’s explore the solo section by section.
Getting Started: Measures 1 & 2
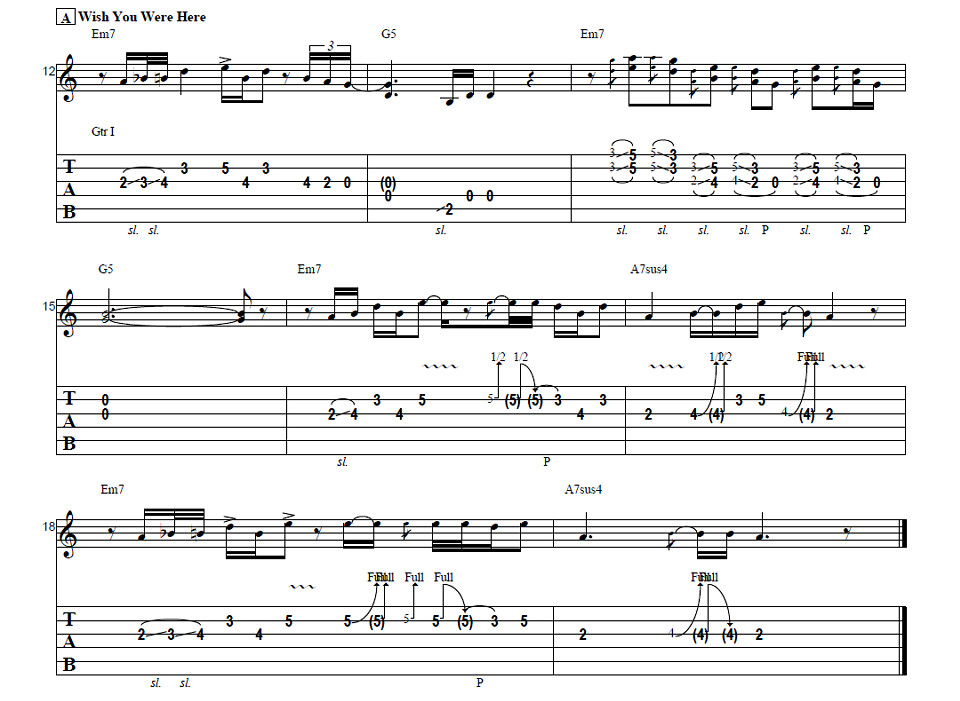
The solo begins on the second fret of the G string. You’ll start with a pick and slide up to the fourth fret. The slide isn’t perfectly smooth; you want to slightly emphasize the sound as you pass over the third fret. Darrin recommends using your middle finger for this initial slide because it positions your index finger perfectly for the next note on the third fret of the B string.
The rhythm in the opening measures is subtle and feel-based rather than strictly counted. Think of it as a slight hesitation before moving to the third fret of the B string. This note on the B string is a quarter note, landing on beat two. Next, move to the fifth fret of the B string, followed by the fourth fret of the G string (using your second finger), and back to the third fret of the B string. Keeping your first finger anchored on the third fret of the B string throughout this sequence makes these transitions smoother and more efficient. Listen carefully to the original recording to internalize the timing and phrasing of these opening notes.
After this sequence, there’s a brief pause, a small rest that allows you to reposition your hand for the next phrase. Shift your hand down so your first finger is now on the second fret of the G string and your third finger is on the fourth fret. You’ll pick the fourth fret of the G string followed by the open D string. This is immediately followed by a slide from nowhere up to the second fret of the A string and then two subsequent open D strings. This completes the first two measures of the intro solo, establishing the melodic and rhythmic foundation of the piece.
Navigating the Double Stops: Measures 3 & 4
Measure three is often cited as the trickiest part for many learners, focusing on a series of double stops. Darrin suggests using your third finger to barre across the third fret of the B and high E strings. Pick these double strings and slide up to the fifth fret. The slide should again have that “from nowhere” feel, even though you’re starting on the third fret. Immediately slide back down to the first fret and repeat the slide up to the third fret.
The next part of this measure involves similar double stop slides, but now on the G and B strings, and staggered by a half step. Darrin finds using the second and third fingers easiest here, positioning them on the third fret of the G string and the fourth fret of the B string respectively. Execute the same slide technique, moving up a half step to the fourth fret of the G string and the fifth fret of the B string. The rationale behind using these fingers is that the middle finger’s natural length makes this hand position more comfortable and fluid. Slide from the 3rd and 4th frets to the 4th and 5th frets, and then descend to the second fret of the G string and the third fret of the B string. This is followed by an open G string, then the double stop sequence again, another open G string, and finally an open B string, which rings out for the entirety of the fourth measure. This section is crucial for developing dexterity and precise sliding technique.
Building to a Bend: Measures 5 & 6
Measure five marks a return to a feel similar to the beginning. Starting again on the second fret of the G string with your middle finger, slide to the fourth fret, followed by the third fret of the B string, back to the fourth fret of the G string, and then up to the fifth fret of the B string. Remember to use your middle finger to facilitate these smooth transitions.
As you reach the fifth fret of the B string, let it ring and add vibrato. Then, execute a bend on this note, releasing it and performing a pull-off back to the third fret. Immediately descend to the fourth fret of the G string and then back to the third fret of the B string. This combination of bending and pull-off adds expressive depth to the solo.
Moving into measure six, start on the second fret of the G string. Transition to the fourth fret of the G string. Darrin recommends using your first finger on the second fret, second finger on the third, and third finger on the fourth fret, preparing for a bend. Shift up to the third and fifth frets on the B string, then descend back to the second through fourth frets on the G string. Perform a bend and conclude on the second fret. This measure showcases a dynamic use of bends and finger positioning for expressive playing.
The Final Touches: Measures 7 & 8
Measure seven echoes the opening measures once again. Slide from the second fret through the third and fourth frets on the G string, followed by the third fret of the B string, back to the fourth fret of the G string, and finally to the fifth fret of the B string.
For the concluding measure, bend the fifth fret of the B string and release it, performing a pull-off back to the fifth fret, then to the second fret of the G string, and finally to the fourth fret of the G string. End with a bend and release on the fourth fret of the G string, resolving on the second fret of the G string. This final sequence brings the intro solo to a graceful and recognizable close.
Timing and Practice Tips
To nail the timing and feel of the “Wish You Were Here” intro solo, practice along with the original Pink Floyd track. The intro solo enters the second time the chord progression is played. Practicing in unison with the lead guitar track initially can help you internalize the timing. Once comfortable, practice playing along with the song from the beginning, where only the rhythm guitar part is present, to get a feel for entering the solo at the right moment. Listen for the rhythmic cues in the song that signal the start of the solo – these act as your pickup notes.
Conclusion
Congratulations! You’ve just navigated the intro solo to “Wish You Were Here.” As Darrin Goodman demonstrates, while not excessively difficult, mastering this solo involves several key techniques that are valuable for any guitarist. While it’s traditionally played on acoustic guitar, learning it on electric guitar is perfectly acceptable, especially for beginners or those with less playable acoustic guitars. The key is to practice slowly, focusing on accuracy and feel. Don’t forget to grab the free “Wish U Were Here Guitar Tab” to aid your learning process.
If you found this lesson helpful, give it a thumbs up and leave a comment below with any questions or other guitar topics you’d like to explore. For more comprehensive guitar lessons and tutorials, be sure to subscribe to GuitarControl.com and hit the notification bell to stay updated on new content. Keep practicing, and enjoy playing this iconic intro!