Ensuring your guitar plays at its best often comes down to the condition of its frets. Many guitarists, from beginners to seasoned players, understand that fretwork can significantly impact playability. A crucial aspect of optimal guitar performance is fret leveling, a process that directly influences what level strings should look like on your guitar. This guide provides a straightforward method to level, crown, and polish your frets, even without a workshop full of expensive tools.
You might be surprised how much even budget-friendly guitars can benefit from proper fretwork. Level frets are the foundation for achieving low, buzz-free action and comfortable playability, directly answering the question of What Should Level Strings Look Like Guitar – they should be consistently low and even across the fretboard, without unnecessary buzzing or high spots.
To embark on this fret leveling journey, you will need a few essential tools. Fortunately, you don’t need to break the bank to acquire them. Here’s a list of minimum required tools:
1. Notched Straight Edge
A notched straight edge is indispensable for assessing the straightness of your guitar neck, bypassing the frets themselves. While high-end options exist, a budget-friendly straight edge will suffice for this task.
2. Level Sanding Beam
A level sanding beam is another must-have tool for fret leveling. Again, you don’t need to opt for the most expensive model. Consider a beam that allows for “under the strings” leveling, although this tutorial focuses on fret leveling without strings. For most jobs, a 9-inch beam offers a good balance of stability for the entire fretboard and maneuverability for spot leveling.
3. Fret Crowning File or 3-Corner File
Crowning files can range in price, but a cost-effective alternative is a 3-corner file. With a bit of modification (grinding down the edges), a 3-corner file can effectively crown frets. Specialized 3-corner files designed for fret crowning are also available. Investing in a decent crowning file is worthwhile for achieving that crucial rounded fret shape.
4. Fret Rocker
A fret rocker is used to identify uneven frets. Again, inexpensive options are perfectly adequate as long as they are straight. Kits combining a notched straight edge and fret rocker offer good value.
5. Sandpaper (Various Grits)
You’ll need an assortment of sandpaper grits, typically including 400, 600, 800, 1000, and 1500. These grits are essential for progressively polishing the frets after leveling and crowning, leading to a smooth, playable surface that contributes to what level strings should look like – clean and unobstructed.
With these tools, an investment of around $80 can set you up for a lifetime of fret maintenance. The improvement in your guitar’s playability after leveling the frets is often transformative. Guitars that once felt cumbersome can become a joy to play, and you might find yourself wanting to apply this fret leveling process to all your instruments.
For this tutorial, we’ll be working on a roasted maple neck from an online marketplace. While necks from such sources can be hit-or-miss, this particular neck appears to be well-constructed with properly seated frets. The roasted maple is aesthetically pleasing, and the neck represents a good example for demonstrating the fret leveling process.
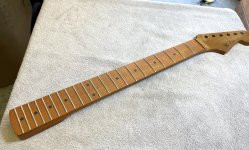 Guitar Neck
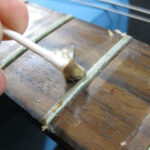
A close inspection of the fret ends reveals they are not dressed – a common characteristic of necks in this price range. However, the primary focus at this stage is to check for any loose or improperly seated frets. Address any such issues before proceeding. Loose frets can be carefully tapped into place with a soft-faced hammer or glued and clamped. For gluing, thin superglue can be wicked along the fret edges and clamped using paint stir sticks to ensure secure adhesion. In this case, the frets are well-seated, so we can move forward.
Given that this is a finished maple neck, masking the fretboard is advisable to protect the finish during the leveling process. Masking is often unnecessary for rosewood fretboards as they can be cleaned up with a razor blade scrape after fretwork. However, maple fretboards, especially finished ones, are more susceptible to scratching and are best protected. Painter’s tape is ideal for this purpose.
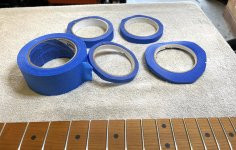 Masking the Fretboard
Prior to masking, it’s crucial to ensure the guitar neck is as straight as possible. This step is often overlooked but is essential for accurate fret leveling.
Begin by assessing the truss rod’s functionality. Loosen the truss rod completely and, if it’s a double-action rod, confirm it engages in both directions. Using your notched straight edge, check for gaps around the 5th to 7th frets while the truss rod is loose. Gradually tighten the truss rod until the gap diminishes. Test for rocking of the straight edge; rocking indicates over-tightening. The goal is to achieve minimal gap and minimal rocking. Remember that wood necks are not perfectly uniform, so aim for the closest possible straightness.
With the neck straightened and the fretboard masked, you are ready to commence leveling. The first step is to mark the top of each fret with a marker. A wide marker works well for even coverage.
With all frets marked, prepare your leveling beam. While specialized sanding rolls are available, you can use adhesive-backed sandpaper or secure regular sandpaper with double-sided tape. 320 grit sandpaper is a good starting point for leveling.
During the initial passes with the leveling beam, work along the entire length of the fretboard, moving slowly from side to side and following the fretboard radius. Apply minimal pressure; the beam’s weight is usually sufficient. The objective is to lightly sand every fret and remove the marker from the tops. It’s normal to observe more material being removed from certain areas than others during this process.
The image below illustrates this point: notice how some frets show significant flattening (arrow) while others still have marker remaining (circle). This variation is precisely why fret leveling is necessary – to bring all frets to a consistent height, ensuring what level strings should look like on your guitar is achieved – even and low.
After several passes, pause to assess your progress. It’s crucial to work gradually, as material removal is irreversible. Identify “low spots” – areas where the marker hasn’t been completely sanded off. Avoid spot leveling these areas, as it can create dips in the fret line. Instead, continue sanding the entire fretboard until all frets have been uniformly touched. The amount of material removed from each fret will vary, indicating the initial unevenness of the frets. This is expected and signifies that the leveling process is working to create a consistent fret height, which is fundamental to achieving what level strings should look like on a guitar.
(Continued in the next section covering crowning and polishing)