Learning guitar is an exciting journey, and one of the very first steps is understanding how to get your instrument in tune. Nothing can be more frustrating than trying to learn songs on a guitar that sounds off-key. Knowing what are the notes of guitar strings is fundamental to tuning, playing chords, and ultimately enjoying your guitar playing experience. This guide will walk you through the standard guitar string notes, explain why they are important, and provide you with the knowledge to confidently tune your guitar every time you pick it up.
Understanding Standard Guitar Tuning: EADgbe
The standard tuning for a 6-string guitar is EADgbe. This sequence represents the notes of the open strings, from the thickest string (lowest pitch) to the thinnest string (highest pitch). Let’s break down each string and its corresponding note:
- 6th String (Thickest): E – This is the lowest E note on the guitar. Often referred to as the Low E string.
- 5th String: A – Tuned to the note A.
- 4th String: D – Tuned to the note D.
- 3rd String: G – Tuned to the note G.
- 2nd String: B – Tuned to the note B.
- 1st String (Thinnest): e – This is the highest E note on the guitar, one octave higher than the 6th string. Often referred to as the High e string.
To help you remember these guitar string names, many beginners use mnemonics. Some popular phrases include:
- Eddie Ate Dynamite, Good Bye Eddie
- Eat Apples Daily Grow Big Ears
- Every Average Dude Gets Better Eventually
Choose the saying that resonates most with you to help solidify the guitar string notes in your memory.
 Guitar string notes visualized on the fretboard to help beginners learn EADgbe tuning.
Why Knowing Guitar String Notes Matters for Tuning
Understanding what are the notes of guitar strings is crucial for several reasons when it comes to tuning and playing:
-
Using Electronic Tuners Effectively: While electronic tuners are incredibly helpful, they work by detecting the pitch of the string you are playing and telling you whether it’s sharp (too high) or flat (too low). Knowing the target note for each string (E, A, D, G, B, e) allows you to confidently tune each string to the correct pitch as indicated by the tuner.
-
Tuning by Ear and Using Reference Pitches: If you find yourself without an electronic tuner, knowing the string notes enables you to tune your guitar by ear. You can use a reference pitch from another instrument, a tuning fork, or even a pitch pipe. By understanding the guitar string notes, you can match each string to its correct pitch relative to the reference.
-
Understanding Chord Shapes and Scales: As you progress in your guitar journey, knowing the notes on your fretboard, starting with the open string notes, is fundamental to understanding chord construction, scales, and music theory. It all begins with knowing what are the notes of guitar strings in standard tuning.
-
Communicating with Other Musicians: When playing with other musicians, being able to refer to guitar strings by their note names is essential for clear communication, especially when discussing tuning issues or song arrangements.
Tuning Your Guitar: A Step-by-Step Guide Focusing on String Notes
Now that you understand the importance of knowing what are the notes of guitar strings, let’s explore how to tune your guitar, keeping these notes in mind.
Tuning with an Electronic Tuner
Electronic tuners, whether clip-on, pedal tuners, or tuner apps, make the tuning process straightforward. Here’s how to tune your guitar using a tuner, focusing on the target notes:
- Clip-on Tuner: Attach the clip-on tuner to your guitar’s headstock.
- Tuner App/Pedal Tuner: Open your tuner app or engage your pedal tuner and ensure it’s ready to detect notes.
- Tune the 6th String (Low E): Pluck the thickest string (6th string). The tuner will display the note it detects. Adjust the tuning peg for the 6th string until the tuner indicates you are at ‘E’ and in tune (often shown with a green light or needle in the center). Tightening the peg raises the pitch, and loosening it lowers the pitch.
- Tune the 5th String (A): Move to the next string (5th string). Pluck it and tune it until the tuner reads ‘A’ and indicates it’s in tune.
- Tune the 4th String (D): Repeat the process for the 4th string, tuning it to ‘D’.
- Tune the 3rd String (G): Tune the 3rd string to ‘G’.
- Tune the 2nd String (B): Tune the 2nd string to ‘B’.
- Tune the 1st String (High e): Finally, tune the thinnest string (1st string) to ‘e’.
Repeat this process, going through each string again, as tuning one string can sometimes slightly affect the others. Your guitar should now be in standard EADgbe tuning.
Tuning Without a Tuner (Using Reference Pitches and By Ear)
Tuning without a tuner relies on relative tuning, where you tune each string in relation to a previously tuned string. Here’s how to do it, using the knowledge of guitar string notes:
-
Reference Pitch (Optional but helpful): Ideally, start with a reference pitch for the Low E string. You can use a piano, a tuning fork (A440, then fret and tune E string to match), or another instrument known to be in tune. If you don’t have a reference pitch, you can start by estimating the Low E and then adjust the whole guitar later if needed.
-
Tune the 6th String (Low E): Tune the 6th string to your reference E pitch, or estimate it if you don’t have one.
-
Tune the 5th String (A): Fret the 6th string at the 5th fret. This fret produces an A note. Play this fretted note and then play the open 5th string. Adjust the tuning peg of the 5th string until the open 5th string sounds the same pitch as the 5th fret of the 6th string (which is A).
-
Tune the 4th String (D): Fret the 5th string at the 5th fret. This fret produces a D note. Tune the open 4th string to match this pitch.
-
Tune the 3rd String (G): Fret the 4th string at the 5th fret. This fret produces a G note. Tune the open 3rd string to match this pitch.
-
Tune the 2nd String (B): Important Exception: For the 2nd string, you fret the 3rd string at the 4th fret (not the 5th). The 4th fret of the G string produces a B note. Tune the open 2nd string to match this pitch.
-
Tune the 1st String (High e): Fret the 2nd string at the 5th fret. This fret produces a high e note. Tune the open 1st string to match this pitch.
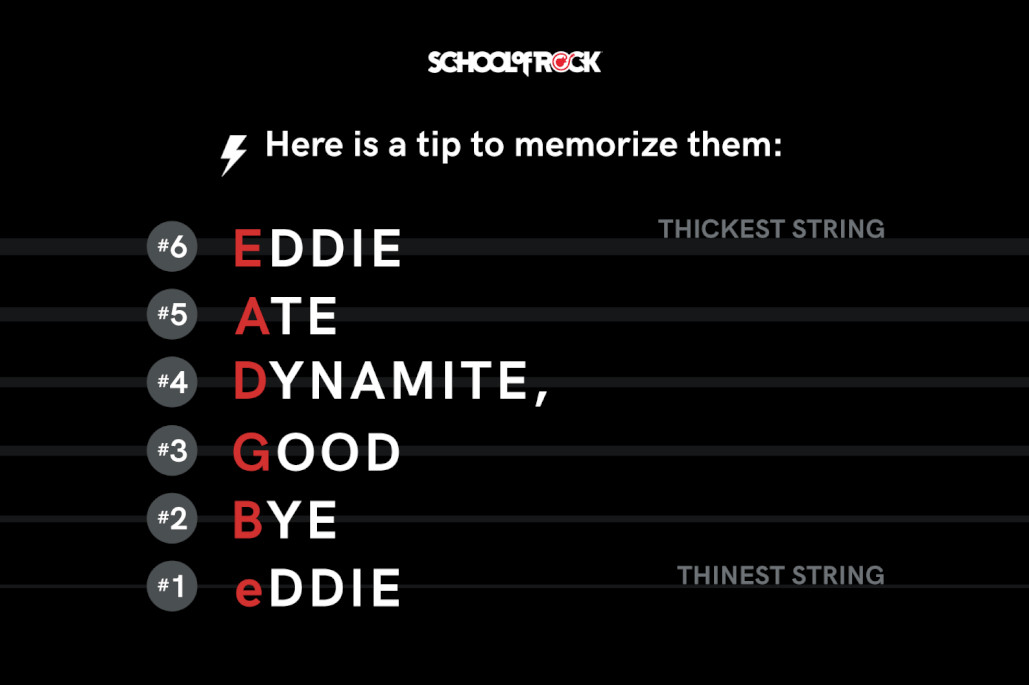 Diagram showing fret positions for tuning guitar strings to each other without a tuner.
Just like with electronic tuning, go through each string again to fine-tune, as adjustments can affect other strings. Tuning by ear takes practice, but understanding what are the notes of guitar strings and how they relate to each other on the fretboard is key to developing this skill.
Tips for Keeping Your Guitar in Tune Longer
Once you have successfully tuned your guitar, here are some tips to help it stay in tune for longer:
- Regular String Changes: Old strings lose their elasticity and ability to hold tune. Change your strings regularly, especially when they start sounding dull or constantly go out of tune.
- Stretch New Strings: New strings need to be stretched. After installing new strings, gently stretch them by pulling them away from the fretboard and retuning. Repeat this process a few times until the strings settle and hold their tune better.
- Maintain Proper Humidity and Temperature: Extreme changes in temperature and humidity can cause the wood of your guitar to expand or contract, affecting tuning stability. Store your guitar in a stable environment, ideally around room temperature and moderate humidity.
- Proper Storage: When not playing, store your guitar in its case or gig bag. This protects it from environmental changes and accidental bumps that can knock it out of tune.
- Gentle Playing: Aggressive playing, especially heavy bending, can pull your guitar out of tune more quickly. While expressive playing is great, be mindful of your technique and check your tuning frequently, especially during and after intense playing sessions.
Conclusion
Understanding what are the notes of guitar strings is a foundational element of learning guitar. It’s not just about tuning; it’s about building a deeper understanding of your instrument and music itself. By mastering the EADgbe tuning and practicing these tuning methods, you’ll ensure your guitar always sounds its best, making your practice sessions more enjoyable and productive. Keep practicing, keep tuning, and enjoy the rewarding journey of learning to play the guitar!