
Today, we’re diving into the captivating world of fingerstyle guitar, focusing on a technique that adds a unique rhythmic and melodic dimension to your playing: thumb picking guitar. This approach, beloved by guitarists across genres, allows you to create rich, textured sounds from your acoustic guitar.
Thumb picking essentially divides the guitar’s sonic landscape between your thumb and fingers. Imagine your thumb taking on the role of a bass player, laying down a consistent and rhythmic foundation on the lower strings. Simultaneously, your index, middle, and ring fingers become melody and rhythm weavers, dancing across the higher strings with syncopated patterns and captivating melodies.
Think of it like this: your thumb acts as the steady left hand of a pianist, providing the rhythmic pulse, while your fingers are the expressive right hand, adding melodic and harmonic interest. If this analogy isn’t immediately clear, don’t worry – by the end of this guide, you’ll grasp the concept and be well on your way to mastering thumb picking.
The Importance of the Thumb Pick
The thumb pick is arguably the most defining element of this guitar style. While you can technically play thumb picking without one, using a thumb pick is highly recommended to achieve the authentic sound and feel.
A thumb pick is essentially a plectrum designed to be worn on your thumb. It extends the thumb’s reach and provides a harder, more defined attack on the bass strings. This is crucial for creating that strong, clear bass line that underpins the thumb picking style.
Think of the sound difference between striking a bass drum with a soft mallet versus a hard beater – the thumb pick provides that desired sharpness and projection for your bass notes. While fingerstyle purists may sometimes play without a pick, for learning and achieving the classic thumb picking tone, a thumb pick is your best friend.
Let’s start building our thumb picking foundation using an E major open chord.
Establishing the Alternating Bass
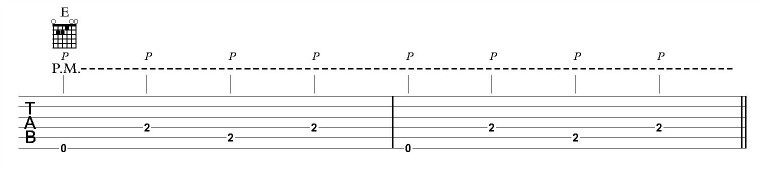 Thumb picking bass part notation with E chord diagram
The alternating bass is the rhythmic heartbeat of thumb picking guitar. Your thumb becomes the metronome, keeping steady time on the lower strings. In the example above in E major, you’ll alternate between the 6th string (E) and the 5th string (A).
Here’s how to practice the bass component:
- Form an E major open chord. Ensure all fingers are fretting the chord cleanly, even though we’re only focusing on the bass notes initially. This is important for maintaining proper hand position and preparing for adding melody notes later.
- Focus on your thumb. Using your thumb pick, strike the 6th string (E) and then the 5th string (A) in an alternating pattern.
- Count a steady 1, 2, 3, 4. Each bass note should fall directly on the beat. This develops your internal rhythm and timing, essential for thumb picking.
- Palm Muting is Key. Notice in the audio example (and try to emulate it yourself) the “bom, chick, bom, chick” sound. This distinctive percussive quality comes from palm muting. Rest the edge of your picking hand’s palm lightly on the bridge or just behind it. This dampens the bass strings, creating a shorter, punchier, and more defined bass tone that is characteristic of thumb picking. Experiment with the amount of pressure to find the right level of muting.
Don’t underestimate the simplicity of this exercise! Mastering a consistent and rhythmically solid alternating bass is the bedrock upon which all thumb picking techniques are built. Practice this slowly and deliberately until it becomes automatic and your thumb feels like a reliable timekeeper.
The “Pinch” Technique
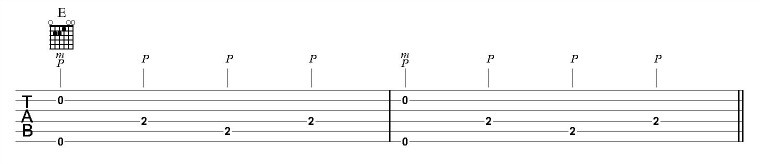 Thumb picking pinch notation and chord diagram
Now that you have the alternating bass groove established, let’s introduce a new element called the “pinch.” This technique adds a bright, contrasting note that sits above the bass line, creating a more textured and interesting sound.
The “pinch” involves plucking an open string with one of your fingers simultaneously as your thumb plays a bass note. In our example, we’ll use the open B string and your middle finger (m).
Here’s how to incorporate the pinch:
- Maintain your alternating bass pattern on the 6th and 5th strings with your thumb.
- Focus on beat 1 of each measure. As your thumb strikes the 6th string on beat 1, use your middle finger (m) to pluck the open B string at precisely the same moment. This simultaneous action is the “pinch.”
- Listen to the contrast. Pay attention to how the bright, ringing open B string note cuts through the muted bass notes. This contrast is a hallmark of thumb picking and is greatly enhanced by the palm muting we discussed earlier. The muting provides definition and prevents the bass from overpowering the higher strings.
Practicing the pinch refines your coordination between your thumb and fingers and introduces the concept of layering different rhythmic and melodic elements in thumb picking.
Syncopation: Adding Rhythmic Interest
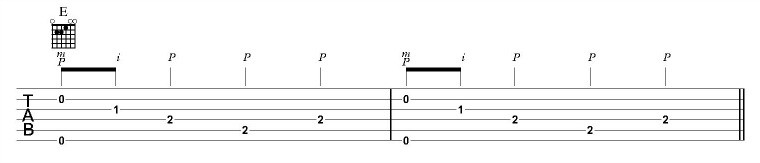 Thumb picking syncopation 1 notation and chord diagram
To truly unlock the magic of thumb picking guitar, we need to introduce syncopation. Syncopation is simply emphasizing the “off-beats” or the spaces between the main beats. This creates a rhythmic push and pull that makes the music groove and feel more dynamic.
In this step, we’ll add a syncopated note using your index finger (i).
Here’s how to add the first syncopated note:
- Keep your alternating bass and pinch pattern going. Your thumb is still maintaining the 6th and 5th string rhythm, and your middle finger is still pinching the open B string on beat 1.
- Focus on the space between beat 1 and beat 2. In this space, use your index finger (i) to pluck the 3rd string (G string). This note falls “in between” the bass notes, creating syncopation.
- Count: “1 and 2 3 4.” The index finger note falls on the “and” between 1 and 2. This “and” is the off-beat.
 Thumb picking syncopation 2 notation and chord diagram
Let’s take syncopation a step further by adding another note between the bass notes.
Here’s how to add the second syncopated note:
- Maintain the pattern from the previous step. Thumb alternating bass, middle finger pinch on beat 1, and index finger syncopation between beat 1 and 2.
- Focus on the space between beat 2 and beat 3. In this space, use your middle finger (m) to pluck the 2nd string (B string). This is another syncopated note, falling between the bass notes.
- Count: “1 and 2 and 3 4.” Now you have syncopated notes on both “ands” within the measure, creating a more complex and rhythmically engaging pattern.
These syncopated notes, played by your fingers while your thumb provides the steady bass, are what give thumb picking its distinctive and appealing rhythmic complexity. Practice these examples slowly at first, gradually increasing speed as your coordination improves.
Thumb Picking Across Different Chords
Once you’re comfortable with the thumb picking pattern on the E chord, it’s time to expand your horizons and apply it to other chord shapes. Remember, the core principle remains the same: your thumb provides the alternating bass foundation, and your fingers add melodic and rhythmic interest on the higher strings.
Here’s the thumb picking pattern applied to an A chord:
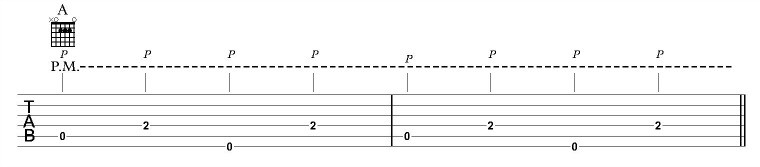 Thumb picking on A chord bass part notation and chord diagram
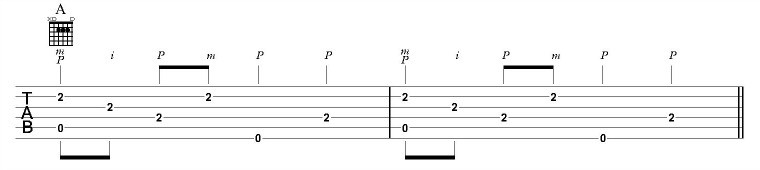 Thumb picking on A chord full pattern notation and chord diagram
Notice that the bass notes change to fit the A chord. You’re now alternating between the 5th string (A) and the 4th string (D). The finger patterns remain similar, but you’ll need to adjust slightly to accommodate the different chord voicing.
And here it is on a B7 chord:
 Thumb picking on B7 chord bass part notation and chord diagram
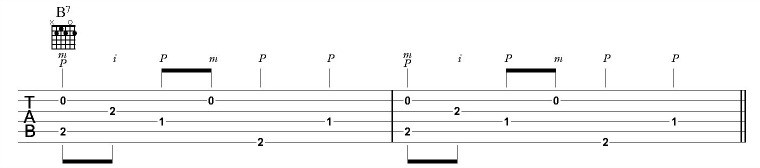 Thumb picking on B7 chord full pattern notation and chord diagram
For the B7 chord, the bass alternates between the 6th string (E) and the 5th string (A). A slight adjustment here: you may need to lift your 2nd finger from the 5th string momentarily to allow the thumb pick to cleanly strike the 6th string bass note. This is a common adaptation in thumb picking – feel free to slightly adjust your fretting hand as needed to facilitate the thumb’s bass notes.
The key takeaway here is to isolate the bass part for each new chord first. Get the alternating bass pattern solid for the new chord, then gradually add in the pinch and syncopated finger notes. Practice transitioning between these chords while maintaining the thumb picking pattern to develop fluidity.
Explore the Masters of Thumb Pick Guitar
To truly appreciate and advance in thumb picking guitar, listen to the masters! These legendary guitarists have defined and popularized the style:
- Merle Travis: A pioneer of thumb picking, his style is characterized by intricate melodies and driving rhythms.
- Chet Atkins: Known as “Mr. Guitar,” Chet Atkins elevated thumb picking to an art form, blending country, jazz, and pop influences with incredible finesse.
- Tommy Emmanuel: A modern virtuoso, Tommy Emmanuel takes thumb picking to breathtaking levels of complexity and showmanship, incorporating percussive techniques and dynamic arrangements.
- Marcel Dadi: A European master who beautifully interpreted and popularized American fingerstyle guitar, including thumb picking, bringing it to a wider audience.
Listening to these guitarists is not just enjoyable; it’s educational. Pay attention to their bass lines, their melodic phrasing, their rhythmic feel, and how they use dynamics. Try to learn some of their songs – it’s the best way to immerse yourself in the thumb picking style.
To take your fingerstyle journey further, consider exploring best online fingerstyle guitar lessons for structured learning and deeper techniques.
Thumb picking guitar opens up a world of musical possibilities on the acoustic guitar. With dedication and consistent practice, you’ll be laying down your own captivating bass lines and weaving melodies with your fingers in no time. Happy picking!
