
Switches are fundamental components in guitar pedals, acting as the gatekeepers of your signal path and effect engagement. Whether you’re a DIY pedal builder or simply curious about what makes your stompboxes tick, understanding the different types of switches is essential. This guide will delve into the world of guitar pedal switches, covering everything from the basic mechanics to the various types you’ll encounter, and how they’re used in your favorite effects.
Understanding Switch Basics: Poles and Throws
At its core, a switch is an electromechanical device designed to control the flow of electricity within a circuit. It does this by either completing or breaking a circuit, or by redirecting current between different paths. To understand switch specifications, we need to grasp two key terms: poles and throws.
- Poles: A pole refers to the number of separate circuits a switch can control simultaneously. Think of it as the number of independent inputs to the switch.
- Throws: A throw indicates the number of distinct output contact points that each pole can connect to. It essentially tells you how many different positions or paths the switch can direct the current to.
Single Pole, Single Throw (SPST) Switches
The simplest type of switch is the Single Pole, Single Throw (SPST) switch. Imagine a basic on/off light switch – that’s an SPST switch in action.
In schematic diagrams, an SPST switch is represented as a single line that can be either open (circuit broken, no current flow) or closed (circuit completed, current flow). It controls a single circuit and has only one output connection.
A schematic diagram illustrating a single pole, single throw (SPST) switch, the most basic type of electrical switch.
You can easily visualize an SPST switch with a simple toggle switch. It has two positions: on and off. In pedal building, while less common for primary effect engagement, SPST switches can be used for simple on/off functions like power switches for specific circuit sections or selecting between two distinct modes where only one can be active at a time.
Single Pole, Double Throw (SPDT) Switches
Moving a step up in complexity, we encounter the Single Pole, Double Throw (SPDT) switch. This type of switch still controls only one circuit (single pole), but it can direct the current to one of two different output paths (double throw).
Schematically, an SPDT switch has one input and two output connections. It can connect the input to either one output or the other, but not both simultaneously.
 Schematic diagram of a single pole, double throw switch
A schematic diagram showing a single pole, double throw (SPDT) switch, capable of directing current to two different paths.
In guitar pedals, SPDT switches are incredibly versatile. They are often used for:
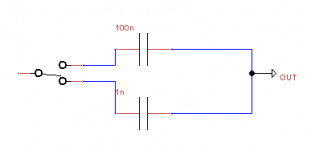
- Mode Switching: Selecting between different clipping diodes for overdrive pedals, or choosing between different tone capacitor values for a brighter or darker sound.
- Mid-Scoop Switches: Engaging or disengaging a mid-cut circuit in EQ or distortion pedals.
- Voltage Selection: In some vintage-style circuits, SPDT switches might be used to switch between different voltage settings for unique tonal characteristics.
Double Pole, Double Throw (DPDT) and Beyond
As we move towards more complex switches, we encounter Double Pole switches. A Double Pole switch essentially combines two independent switches into a single unit, both activated simultaneously. A Double Pole, Double Throw (DPDT) switch, therefore, controls two separate circuits, and each circuit can be directed to one of two different paths.
While visualizing DPDT and even larger switches (like 3PDT) might seem complicated, the principle remains the same: each pole controls a separate circuit, and the throws determine the output paths for each circuit.
Triple Pole, Double Throw (3PDT) Stomp Switches
For guitar pedal enthusiasts and builders, the Triple Pole, Double Throw (3PDT) stomp switch is arguably the most important. This is the workhorse switch commonly used for true bypass switching in effects pedals.
A typical 3PDT stomp switch used in guitar effects pedals for true bypass and LED indication.
A 3PDT switch has three poles, meaning it can control three separate circuits at once, and each pole has two throws. In the context of true bypass, these three poles are cleverly utilized to:
- Signal Bypass: Completely remove the pedal’s circuit from the signal path when bypassed, ensuring no signal degradation.
- Effect Engagement: Connect the pedal’s circuit into the signal path when engaged.
- LED Indication: Control the LED indicator to show whether the effect is on or off.
True Bypass Wiring with a 3PDT Switch
Let’s break down how a 3PDT switch achieves true bypass in a typical guitar pedal setup.
A wiring diagram illustrating how a 3PDT switch is used to achieve true bypass in a guitar pedal circuit.
When the 3PDT switch is in position 1 (Bypass):
- The input signal from your guitar is directly routed to the output jack, completely bypassing the pedal’s circuit. This is achieved through connections within the switch that directly link the input and output jacks.
- Simultaneously, the input to the pedal’s circuit is grounded. This prevents any potential noise or signal bleed from the inactive circuit affecting the bypassed signal.
- The LED indicator circuit is disconnected, turning the LED off.
When the 3PDT switch is in position 2 (Effect Engaged):
- The input signal from your guitar is now routed into the input of the pedal’s circuit.
- The output of the pedal’s circuit is connected to the output jack, sending the processed signal to your amplifier.
- The ground connection to the pedal’s input is disconnected, allowing the signal to flow through the circuit.
- The LED indicator circuit is completed, turning the LED on to indicate the effect is active.
This clever arrangement ensures that when bypassed, your guitar signal takes the most direct path possible, preserving your tone and dynamics.
Types of Guitar Pedal Switches: Beyond Poles and Throws
While understanding poles and throws is crucial, switches are also categorized by their activation mechanism and functionality. Let’s explore the common types you’ll find in guitar pedals.
Toggle Switches
Toggle switches are activated by moving a lever or “toggle” back and forth. They are mechanically simple and provide a tactile way to switch between settings.
ON/ON Toggle Switches
An ON/ON toggle switch is typically an SPDT configuration. It has two positions, each establishing a connection between the common pole and one of the throws. There is always a connection in either position.
For example, in an SPDT ON/ON switch:
- Position 1: Connects pin 1 to pin 2 (and pin 4 to pin 5 in a DPDT version).
- Position 2: Connects pin 2 to pin 3 (and pin 5 to pin 6 in a DPDT version).
These are used for simple two-state switching like selecting different components in a circuit. It’s important to note that you can use a Double Throw switch (like SPDT or DPDT) as a Single Throw switch (like SPST) by simply ignoring one of the output connections.
ON/OFF/ON Toggle Switches
ON/OFF/ON toggle switches are SPDT or DPDT switches with three positions. The key feature is the center “OFF” position, where no connection is made between the pole and either throw.
- Position 1: Connects pin 1 to pin 2.
- Center Position: No connection between pin 2 and either pin 1 or pin 3.
- Position 3: Connects pin 2 to pin 3.
This type is useful for:
- Diode Selection: As mentioned earlier, switching between different sets of clipping diodes in overdrive circuits, with the center position bypassing the diodes entirely for a cleaner sound.
- Tone Stack Variations: Selecting different capacitor or resistor values in a tone stack, with the center position potentially offering a neutral or bypassed tone stack configuration.
ON/ON/ON Toggle Switches
ON/ON/ON toggle switches, often DPDT, provide three distinct connection configurations. These are further categorized into Type 1 and Type 2, which differ in their internal wiring and connection patterns in the center position.
- Type 1: In the center position, both poles are connected to their respective “middle” throws.
- Type 2: In the center position, the poles are connected to different throws compared to the outer positions, creating a unique combination.
[ (Link to a detailed explanation of Type 1 vs Type 2 DPDT ON/ON/ON switches could be added here if available) ]
It’s crucial to identify the type of ON/ON/ON switch you need for your project, as Type 1 and Type 2 are not interchangeable without circuit modifications. Datasheets or continuity testing with a multimeter are essential for determining the switch type.
Rotary Switches
Rotary switches are activated by turning a knob, offering multiple positions selectable in a circular fashion. They are ideal for selecting from a range of options.
[ (Link to a Rotary Switch product page on a parts website like Tayda Electronics could be added here) ]
Internally, a rotary switch has a central pole and multiple throws arranged in a circle. As you rotate the knob, the pole makes contact with each throw sequentially, often with a “click” at each position. Rotary switches can have multiple poles as well, allowing for complex multi-circuit switching.
They are commonly used for:
- Mode Selection: Choosing between multiple modes in versatile pedals like multi-effects or complex overdrives.
- EQ Contour Selection: Stepping through different EQ presets or frequency bands.
- Waveform Selection: In modulation pedals, selecting different waveforms for LFOs (Low-Frequency Oscillators).
Determining the specific connections for each position of a rotary switch usually requires using a multimeter in continuity mode to trace the connections as you rotate the knob.
Push Button (Stomp) Switches
Push button switches, especially the robust “stomp” type, are designed for foot activation in guitar pedals. We’ve already discussed the 3PDT stomp switch extensively for true bypass. However, smaller push button switches also exist for finger-operated controls.
These switches are momentary or latching (explained below), and their primary function in pedals is typically effect on/off switching or engaging momentary functions.
DIP Switches
DIP (Dual In-line Package) switches are small switch arrays designed for mounting directly on PCBs. They are intended for “set-and-forget” configurations, as they are not easily accessible once the pedal is assembled in an enclosure.
[ (Link to a DIP Switch product page on a parts website like Tayda Electronics could be added here) ]
DIP switches are useful for:
- Internal Configuration: Setting internal parameters of a pedal, like gain ranges, bass response, or input impedance, that the user might adjust infrequently.
- Calibration or Fine-Tuning: Adjusting internal trimmers or settings during pedal setup or troubleshooting.
Think of DIP switches as mini toggle switches grouped together in a compact package for PCB mounting, ideal for less frequently changed settings.
Momentary vs. Latching Switches
Finally, switches can be categorized as either momentary or latching, based on their behavior when activated.
-
Latching Switches: These are the most common type in guitar pedals. A latching switch maintains its state (on or off) after you activate it, until you activate it again. The 3PDT stomp switch is a latching switch – you stomp it once to turn the effect on, and stomp again to turn it off. Toggle switches are also typically latching.
-
Momentary Switches: A momentary switch only makes or breaks a connection while you are actively pressing or toggling it. When you release the switch, it springs back to its original position. A common example is a kill switch on a guitar.
In pedal building, momentary switches are often used for:
- Relay Bypass Systems: In more advanced bypass implementations, momentary switches control relays, which in turn switch the signal path. Relay bypass systems are known for their durability and “click-less” switching. [ (Link to an article explaining relay bypass, like the Coda Effects article mentioned in the original text, could be added here) ]
- Tap Tempo: In delay or tremolo pedals, a momentary switch can be used for tap tempo, allowing you to set the effect’s rate by tapping the switch in time with the desired tempo.
- Momentary Effect Engagement: Some pedals use momentary switches to engage an effect only while the switch is pressed, creating stuttering or glitching effects.
While latching switches are the standard for on/off pedal switching, momentary switches offer unique possibilities for creative pedal designs and advanced bypass methods.
Conclusion
Understanding guitar pedal switches is crucial for anyone involved in pedal building, modification, or even just for appreciating the inner workings of your gear. From the basic concepts of poles and throws to the different types of switches available, this guide has provided a comprehensive overview. Whether you’re selecting a 3PDT stomp switch for true bypass, a toggle switch for mode selection, or exploring the possibilities of momentary switching, a solid grasp of switch types will empower your pedal journey.