
Changing your acoustic guitar strings is a fundamental skill for any guitar player. Fresh strings can dramatically improve your guitar’s tone, making it sound brighter, clearer, and more resonant. Not only does it enhance your playing experience, but regular string changes are also essential for maintaining your instrument’s health and ensuring tuning stability. Whether you’re a beginner or a seasoned player, knowing how to properly restring your acoustic guitar is a must.
This comprehensive guide will walk you through each step of the process, ensuring you can confidently replace your acoustic guitar strings and get back to playing your favorite tunes with a revitalized sound.
Step 1: Gather Your Tools and Prepare Your Workspace
Before you start, make sure you have everything you need. This includes:
- New acoustic guitar strings: Choose the gauge and type that suit your playing style and guitar.
- String winder (optional but highly recommended): This tool will significantly speed up the winding process.
- Wire cutters: To trim excess string length.
- Guitar tuner: To tune your guitar after restringing.
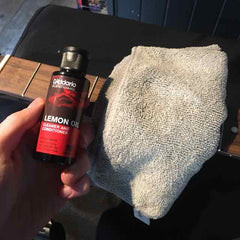
- Lemon oil (for dark wood fretboards like rosewood or ebony): To condition the fretboard.
- Soft cloth: For cleaning and applying lemon oil.
Find a clean, well-lit workspace where you can comfortably work on your guitar. A table or desk covered with a soft cloth or guitar mat is ideal to protect your instrument’s finish.
Step 2: Remove the Old Strings
Start by detuning your strings until they are slack. This reduces tension on the neck and bridge, making them easier and safer to remove. You can use a string winder to quickly unwind the strings from the tuning pegs.
Once the strings are loose, you can remove them from the bridge. For acoustic guitars with bridge pins, gently pull out each pin using a string winder with a built-in pin puller or needle-nose pliers if needed. Keep the bridge pins organized, as they need to be reinserted in the same holes. After removing the pins, you can pull the old strings out through the bridge. At the headstock, simply unwind the strings completely and remove them from the tuning pegs.
Step 3: Clean Your Guitar
With the strings off, this is the perfect opportunity to clean your acoustic guitar. Dust and grime can accumulate in areas that are usually hard to reach, such as under the strings and around the bridge.
Use a soft, dry cloth to wipe down the entire guitar body, neck, and headstock. Pay special attention to the fretboard, bridge, and soundhole area. For tougher grime, you can use a guitar polish or cleaner specifically designed for your guitar’s finish.
Step 4: Condition the Fretboard (If Necessary)
If your acoustic guitar has a dark wood fretboard like rosewood or ebony, now is a good time to hydrate the wood with lemon oil. These woods can dry out over time, especially in dry climates, which can lead to cracks and fret sprout.
Apply a few drops of lemon oil to a clean, soft cloth. Wipe the cloth up and down the fretboard, applying a thin, even coat of oil to the wood. Don’t over-saturate the fretboard; a little lemon oil goes a long way. Let the oil soak into the wood for a few minutes, then wipe off any excess with a clean part of the cloth. Avoid getting lemon oil on the guitar’s finish, as it can damage certain types of finishes.
 Applying lemon oil to the fretboard to hydrate the wood
Step 5: Hydrate the Bridge (Optional)
Similar to the fretboard, the bridge of your acoustic guitar can also benefit from occasional hydration, especially if it appears dry. If your bridge is made of rosewood or ebony and looks dry, you can carefully apply a very small amount of lemon oil to it using a cloth.
Important: If you choose to hydrate the bridge, make sure to remove the saddle first. Lemon oil can make the saddle slippery, which can cause tuning instability and string slippage. If you don’t remove the saddle, be very careful to avoid getting lemon oil on it.
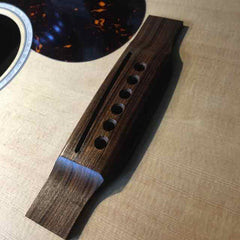 Hydrating the bridge of the acoustic guitar with lemon oil
Step 6: Prepare Your New Strings
Open your new set of acoustic guitar strings. It’s helpful to lay them out in order from thickest to thinnest to easily identify each string. The thickest string (usually the 6th string, low E) goes closest to your head when you play, and the thinnest string (1st string, high E) is furthest away.
Before inserting the strings, it’s a good practice to create a slight bend at the ball end of each string. A 45-degree bend about an inch from the ball end will help secure the string against the bridge plate inside the guitar, improving tuning stability and preventing string slippage.
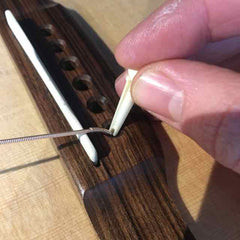 Bending the end of a new acoustic guitar string
Step 7: Install the Strings at the Bridge
Insert the ball end of the thickest string (usually the low E string) into the corresponding bridge hole. Make sure the ball end sits snugly against the bridge plate inside the guitar body.
Place a bridge pin into the hole, ensuring the grooved side of the pin is facing towards the headstock (down the neck). Push the pin in firmly until it is securely seated and the string is held in place. You should feel the pin “lock” into position.
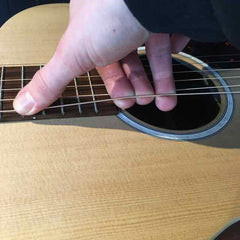
Repeat this process for all six strings, working from the thickest to the thinnest. After inserting each string and pin, gently tug on the string near the soundhole to ensure the ball end is properly seated against the bridge plate.
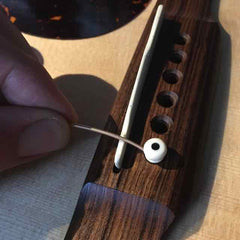 Inserting the string and bridge pin into the acoustic guitar bridge
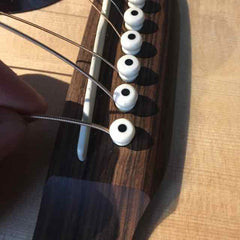 All strings installed at the bridge with bridge pins
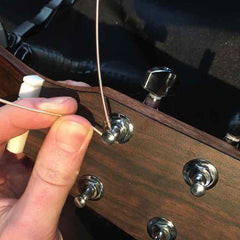
Step 8: Thread the Strings Through the Tuning Pegs
Now, bring the strings up to the headstock. Ensure that the holes in the tuning pegs are aligned straight down the neck. This starting position will help ensure proper string winding later.
For each string, guide it over the saddle, through the nut slot corresponding to that string, and then insert the end of the string into the hole of the correct tuning peg. Pull the string through the tuning peg hole, leaving some slack for winding.
 Threading the acoustic guitar string through the tuning peg
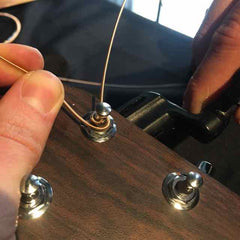
Step 9: Measure and Cut Excess String
To ensure you have enough string to wind around the tuning peg for good tuning stability, but not so much that it becomes messy, measure the string against the headstock. Pull the string taut and measure about two to three tuning pegs past the tuning peg it’s inserted into. This is roughly the amount of string you’ll need to wind around the post.
Cut off the excess string length beyond your measured point using wire cutters. Cutting the excess string now makes winding easier and prevents a tangled mess of extra string.
 Measuring the excess string length before cutting
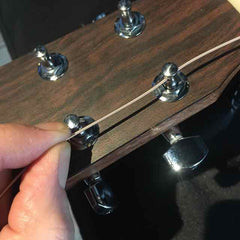
Step 10: Wind the Strings onto the Tuning Pegs
Begin winding the string around the tuning peg. For most tuning pegs, you’ll wind counter-clockwise for the lower strings (E, A, D) and clockwise for the higher strings (G, B, e) when looking at the headstock from the front. However, always double-check the direction of winding based on your specific tuning pegs to ensure you’re tightening and not loosening the string.
Keep tension on the string as you wind, guiding the string downwards on the tuning post. The goal is to have the string wraps neatly stacked downwards, starting from the top of the tuning post. This helps to increase the break angle of the string over the nut, improving tuning stability and tone.
 Winding the acoustic guitar string onto the tuning peg
 Proper string winding technique on the tuning peg
Step 11: Initial Tuning and Stretching
After winding each string, bring them up to pitch gradually. It’s best to tune in stages, moving back and forth between strings rather than tuning one string fully to pitch and then moving to the next. This helps distribute the tension evenly across the neck and prevents overstressing any single point.
Use a guitar tuner to tune each string to its correct pitch (E, A, D, G, B, e from thickest to thinnest). You can use a clip-on tuner, a pedal tuner, or a tuning app.
Once the strings are roughly in tune, it’s crucial to stretch them. New strings will stretch out as you play, which can cause them to go out of tune quickly. To pre-stretch your strings, gently pull each string away from the fretboard in the middle of the neck. Don’t pull too hard, just enough to stretch the string slightly. You’ll likely hear the pitch drop as the string stretches.
Retune the strings to pitch after stretching. Repeat the stretching and retuning process several times until the strings hold their tuning relatively well after stretching. This step is vital for minimizing tuning issues and ensuring your guitar stays in tune longer.
 Stretching the new acoustic guitar strings
Step 12: Final Tuning and Enjoy Your Playing
After stretching the strings and retuning, your acoustic guitar should be ready to play! Do a final tuning check to ensure all strings are at the correct pitch.
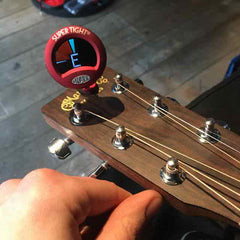 Using a clip-on tuner to tune the acoustic guitar
Play your guitar and enjoy the bright, clear sound of your new strings. You may need to fine-tune your guitar a few more times as the new strings settle in completely, especially during the first few playing sessions. Regular restringing, typically every 1-3 months depending on how often you play, will keep your acoustic guitar sounding its best and ensure a pleasurable playing experience.