Want to learn How To Record Guitar With Garageband? At guitarplayers.net, we’ll guide you through the process, whether you’re a beginner or a seasoned player, and get the best sound out of your guitar using GarageBand’s intuitive tools for acoustic guitar, electric guitar, and even bass guitar. Discover how to use microphones or direct input, explore virtual amps and presets, and customize your sound with Amp Designer and Pedalboard plugins with step-by-step instructions to get the most out of your music production. Let’s dive in and unleash your musical potential with high-quality audio, mastering techniques, and digital audio workstations!
1. Understanding Your Recording Options
When exploring how to record guitar with GarageBand, you have two primary methods, each offering distinct advantages based on your guitar type and desired sound. Knowing these differences is critical for getting the best recording possible for rock, country, blues or pop music.
- Microphone Recording: Ideal for capturing the natural sound of acoustic guitars, electro-acoustic guitars (both unplugged and amplified), and electric guitars via an amplifier.
- Direct Input (DI) Recording: Best for utilizing GarageBand’s built-in presets, Amp Designer, and Pedalboard plugins, offering convenience and extensive customization options, especially if you are using an electric guitar or a guitar with built-in pickups.
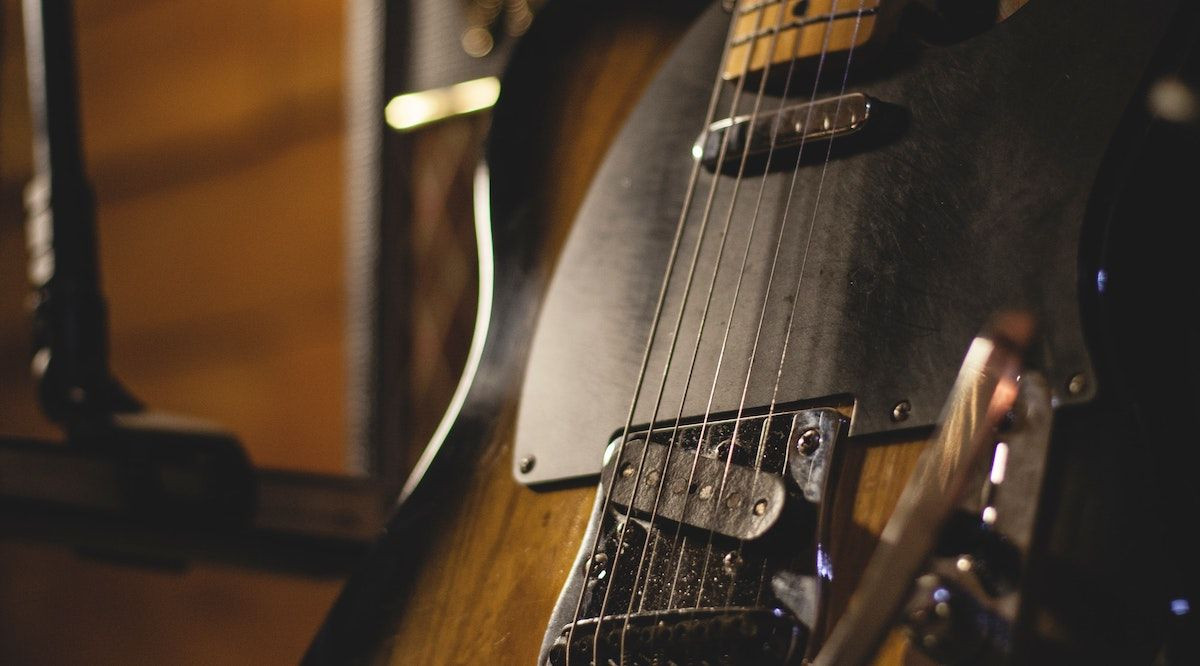 Electric guitar with amp and microphone for recording setup
1.1. What are the benefits of Recording with Microphones?
Microphone recording is the best way to get a true and natural sound from your guitar.
- Authentic Sound: Captures the genuine acoustic nuances of your guitar and amplifier.
- Professional Quality: Mimics professional recording setups, providing a rich, detailed sound.
- Versatility: Suitable for various guitar types and amplifier setups, enhancing the overall sonic texture.
1.2. What are the benefits of Recording with Direct Input?
Direct Input recording offers a practical and versatile approach, especially when paired with GarageBand’s extensive digital tools, such as virtual amplifiers and effects, which is a great way to experiment with different sounds.
- Convenience: Requires minimal setup, perfect for quick recording sessions and reduces the need for external hardware.
- Customization: Offers a vast array of virtual amps and effects within GarageBand, allowing for precise sound shaping, which is especially useful if you’re looking to create rock, country, or blues music.
- Quiet Recording: Ideal for noise-sensitive environments, eliminating the need for a physical amplifier.
2. Setting Up for Recording
Once you’ve chosen your preferred recording method, properly setting up your equipment is essential to achieve the best results in GarageBand. Here’s a comprehensive guide to ensure your setup is optimized for high-quality guitar recordings, regardless of whether you are using direct input or microphones.
2.1. How do I prepare my equipment for microphone recording?
Proper mic placement and connectivity are crucial for capturing the best sound.
- Positioning: Place your microphone(s) strategically in front of your guitar or amplifier to capture the desired sound nuances.
- Connectivity: Ensure your microphones are correctly connected to your audio interface via XLR cables or directly to your computer via USB.
- Audio Interface: Use an audio interface to convert the analog signal from your microphone to a digital signal that your computer can understand.
2.2. How do I prepare my equipment for direct input recording?
Connecting your guitar directly to your recording device simplifies the process.
- Connectivity: Connect your guitar to your computer via an audio interface.
- Audio Interface: Use an audio interface to convert the analog signal from your guitar to a digital signal that your computer can understand.
- DI Box (Optional): Use a DI (Direct Input) box to balance the signal and reduce noise, especially over long cable runs, for a cleaner signal.
2.3. Why are Headphones important for recording?
Headphones are indispensable for monitoring your recording in real-time and ensuring a clean, feedback-free session.
- Real-time Monitoring: Listen to your guitar as you play to make immediate adjustments.
- Feedback Prevention: Avoid unwanted feedback by isolating the sound.
- Connectivity: Connect your headphones to your audio interface, USB mic, or directly to your Mac.
3. Launching Your GarageBand Project
Starting a new project in GarageBand is straightforward and sets the stage for your recording session.
3.1. How do I start a new project in GarageBand?
Initiating a new project ensures a clean slate for your guitar recording:
- Open GarageBand: Launch the GarageBand application on your macOS device.
- Select Empty Project: Choose the “Empty Project” option from the initial screen.
- Navigate to New Project (If Needed): If GarageBand opens with a previous project, go to File > New to create a new project.
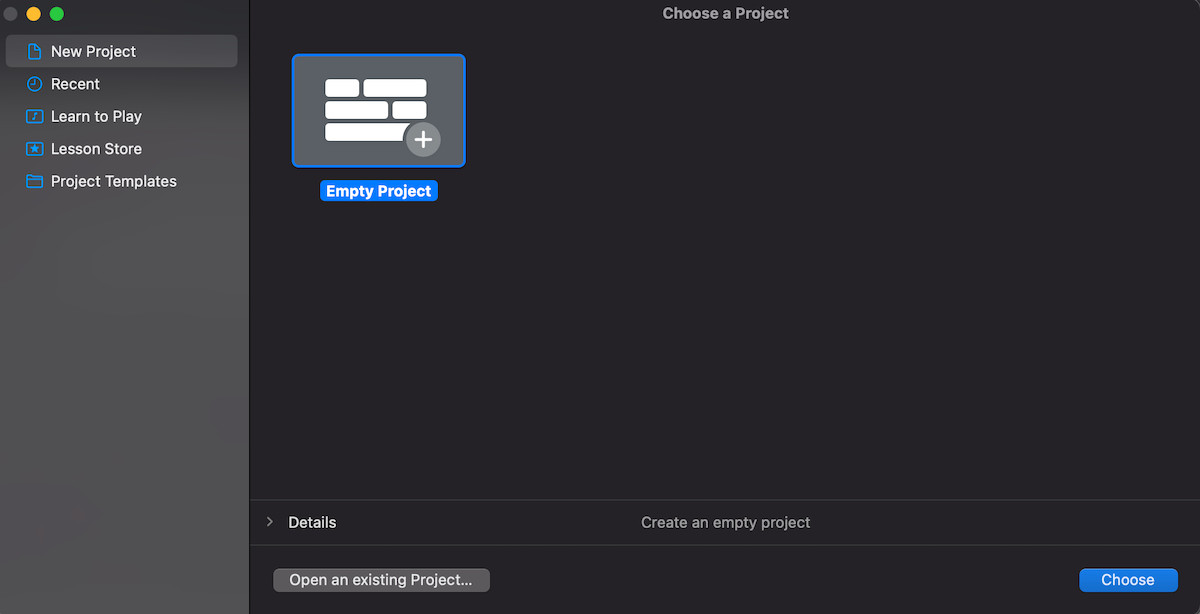 GarageBand opening screen with option to select empty project
4. Configuring Audio Preferences
Setting up your audio preferences in GarageBand ensures the software recognizes your input and output devices, allowing for seamless recording and playback.
4.1. How do I select my audio interface or USB mic?
Selecting the correct audio input device is vital for recording:
- Open Preferences: Navigate to GarageBand > Preferences in the top-left corner of your screen.
- Go to Audio Settings: Select Audio or Audio/MIDI to access audio settings.
- Choose Input Device: Under the Input Device drop-down menu, select your audio interface or USB microphone.
- Choose Output Device: If your headphones are connected to your audio interface or USB mic, select it from the Output Device menu. Otherwise, choose External Headphones or Built-in Output if connected to your Mac.
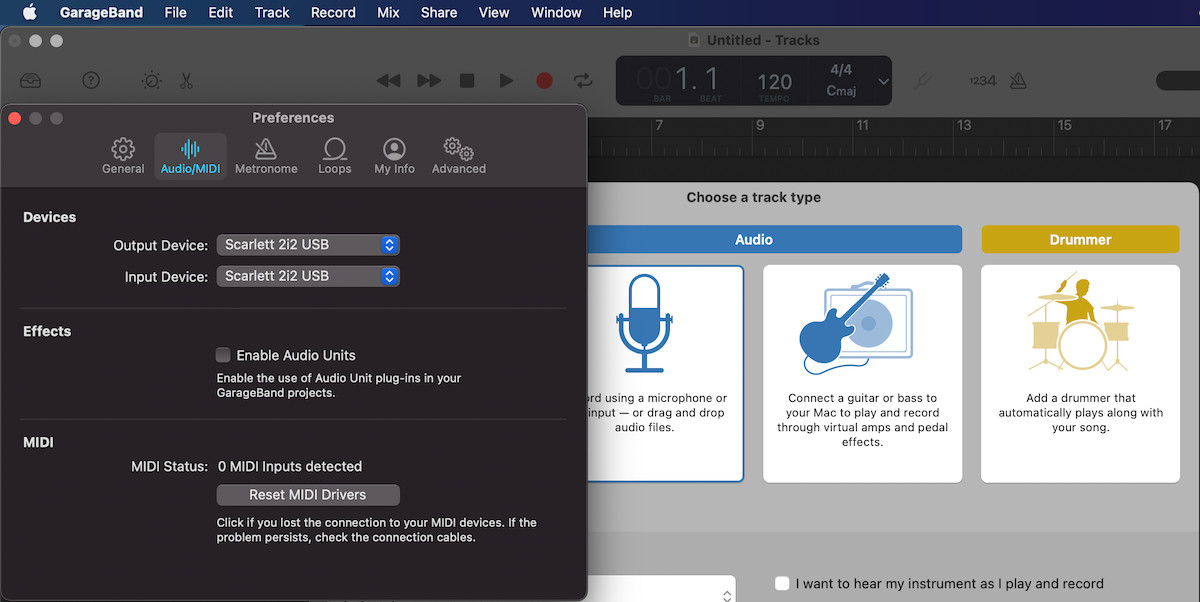 Selecting an audio interface (Scarlett 2i2) in GarageBand preferences
4.2. Can I use multiple USB mics?
While GarageBand may not immediately recognize multiple USB mics, there are workarounds to achieve this setup:
- Aggregate Device: Create an aggregate device in your Mac’s Audio MIDI Setup to combine multiple USB mics into one input.
- Third-Party Software: Use third-party software that supports multiple USB inputs and routes them into GarageBand.
5. Selecting Your Track Type
Choosing the right track type in GarageBand is essential for optimizing your recording based on whether you’re using a microphone or a direct input. Understanding the differences between audio tracks and software instrument tracks can significantly enhance your recording quality and workflow.
5.1. How do I choose an audio track?
An audio track is the standard choice for recording external audio sources like microphones or direct inputs.
- Select Audio Track: In the “Choose a track type” menu, select the audio track option. This is suitable for both microphone and direct input recordings.
- Flexibility: You can switch between track types later by adjusting presets in the sound library, allowing experimentation without starting over.
5.2. How do I create multiple tracks?
Creating multiple tracks allows you to record different parts or use multiple microphones simultaneously.
- Add New Track: Press Cmd + Option + N to add additional tracks.
- Multiple Microphones: Use multiple tracks for recording with two or more microphones or combining a microphone with a direct input.
5.3. Why should I save my project regularly?
Saving your project frequently prevents data loss and ensures your progress is always secured.
- Save Command: Press Cmd + S to save your project.
- Regular Intervals: Save your work at regular intervals to avoid losing progress due to unexpected issues.
6. Enabling Input Monitoring and Record Enable
Enabling input monitoring and record enable options in GarageBand is crucial for real-time feedback and controlled recording. These features allow you to hear your guitar as you play and select which tracks are actively recording.
6.1. What is input monitoring and how do I enable it?
Input monitoring allows you to hear your guitar signal through your headphones in real time.
- Control-Click Track: Control-click on your selected track.
- Configure Track Header: Select Configure Track Header from the options.
- Check Input Monitoring: Ensure Input Monitoring is checked in the popup menu.
- Toggle Icon: An icon will appear on your track, which you can toggle on or off to control monitoring.
6.2. What is record enable and how do I use it?
Record enable allows you to designate which track(s) will record when you hit the record button.
- Configure Track Header: Follow the same steps as above to access the Configure Track Header menu.
- Check Record Enable: Ensure Record Enable is checked.
- Select Tracks: Click the record enable icon on the track(s) you want to record.
 Configuring track headers on a single guitar track on GarageBand for Mac
7. Exploring GarageBand’s Presets
GarageBand’s Sound Library offers a wide array of presets that can significantly enhance your guitar recordings. These presets provide different EQ settings, virtual amps, and effects tailored to various guitar types and playing styles.
7.1. How do I access the Sound Library?
The Sound Library is your gateway to a vast collection of presets and sound options.
- Locate Sound Library: The Sound Library is usually located on the left-hand side of the GarageBand interface.
- Show/Hide: Press Y to show or hide the Sound Library.
- Explore Tabs: Click through the tabs to find presets suited for acoustic or electric guitar.
7.2. How do I choose and customize presets?
Selecting and customizing presets is key to achieving your desired guitar sound.
- Select a Preset: Click on a preset in the Sound Library to apply it to your track.
- Adjust Smart Controls: Use the Smart Controls area below your track to tweak the EQ and other settings. Press B to show or hide the Smart Controls.
- Experiment: Try different presets and adjustments to find the sound that best fits your recording.
7.3. What presets should I use for microphone recordings?
For microphone recordings, focus on presets designed for acoustic guitars to capture the natural sound.
- Acoustic Guitar Presets: These presets enhance the natural tone captured by your microphones, providing clarity and warmth.
- EQ Adjustments: Fine-tune the EQ settings in the Smart Controls to optimize the microphone’s input.
7.4. What presets should I use for direct input recordings?
Direct input recordings benefit from presets that offer virtual amps and effects.
- Electric Guitar and Bass Presets: These presets provide a range of virtual amps and pedals for sound customization.
- Amp Designer and Pedalboard Plugins: Use GarageBand’s Amp Designer and Pedalboard plugins to further customize your sound.
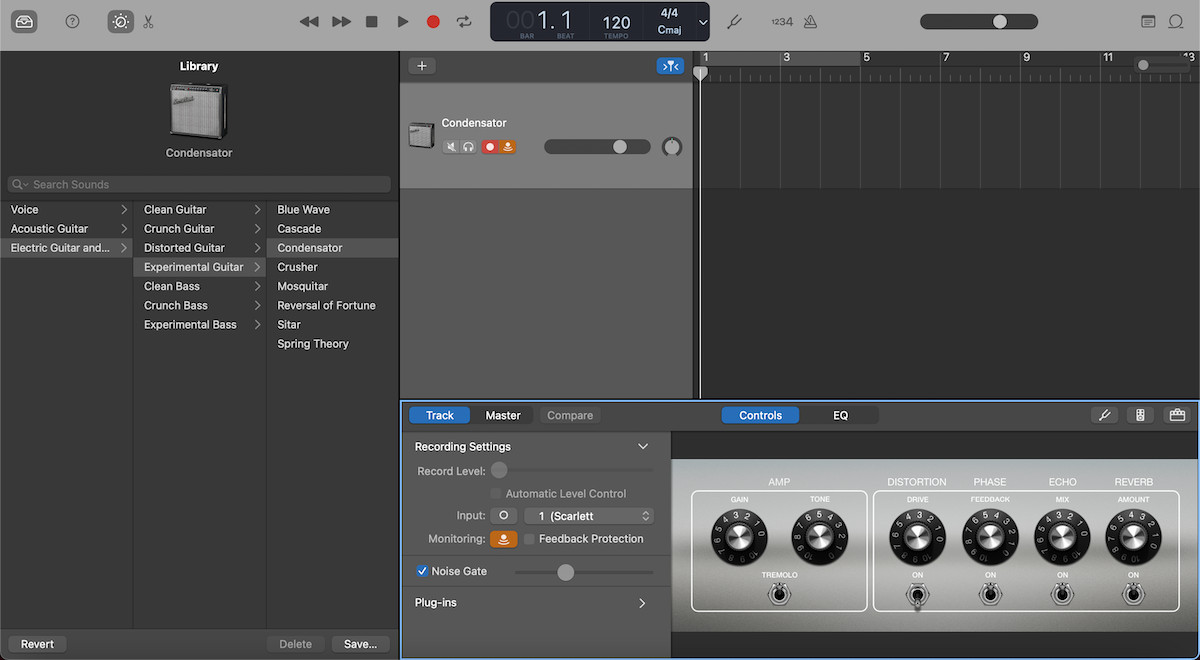 Electric guitar and bass preset in GarageBand
8. Utilizing GarageBand’s Amp Designer Plugin
GarageBand’s Amp Designer plugin is a powerful tool that allows you to emulate a wide range of guitar amplifiers, cabinets, and microphones. This plugin is particularly useful for direct input recordings, offering extensive customization options to shape your guitar tone.
8.1. How do I access Amp Designer?
Accessing Amp Designer is straightforward and opens up a world of amp customization.
- Locate Amp Designer: Find the Amp Designer button on the right-hand side of your Smart Controls area.
- Open Plugin: Click the button to open the Amp Designer plugin.
8.2. How do I customize my amp?
Customizing your amp involves selecting different amp models, cabinets, and microphones.
- Choose Amp Model: Select from a variety of amp models using the drop-down menu.
- Select Cabinet: Pick a cabinet that complements your chosen amp model.
- Choose Microphone: Choose a microphone type to simulate different recording conditions.
- Tweak Knobs: Use the integrated knobs on each amp model to adjust gain, EQ, and other parameters.
- Save Custom Amps: Save your custom amp configurations from the drop-down menu at the top of Amp Designer for future use.
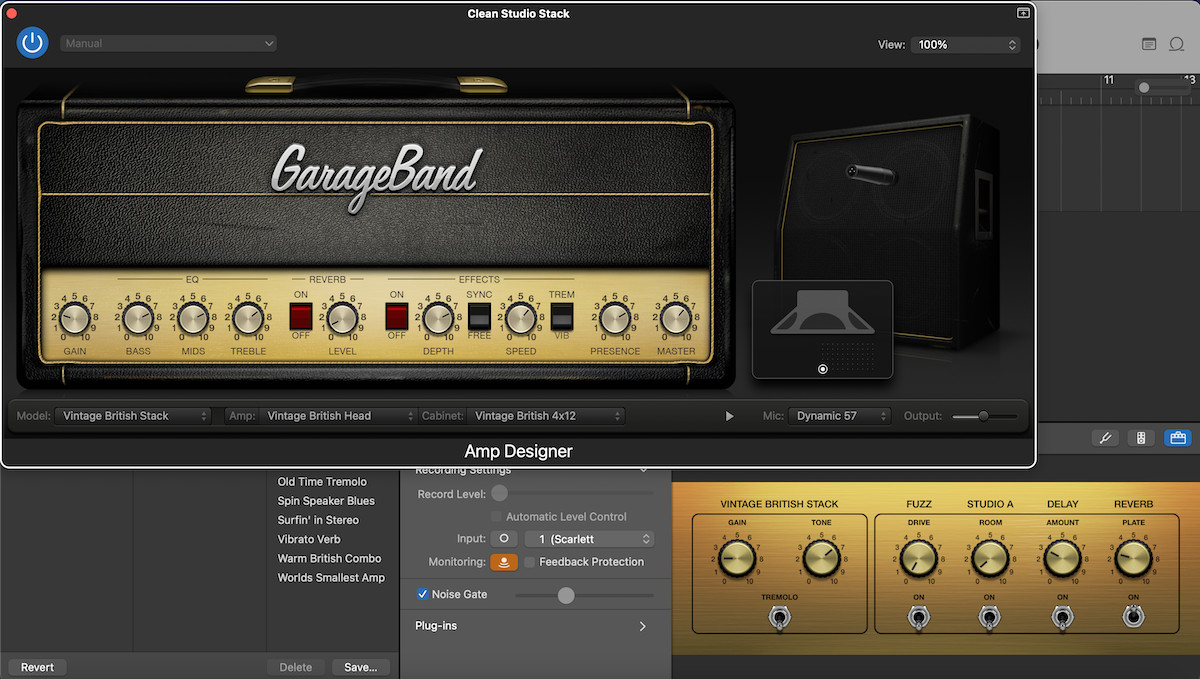 Amp Designer plug-in in GarageBand
9. Leveraging GarageBand’s Pedalboard Plugin
GarageBand’s Pedalboard plugin allows you to add and customize virtual guitar effects pedals, giving you precise control over your guitar’s tone. This plugin is perfect for direct input recordings, providing a wide range of effects from distortion to modulation.
9.1. How do I access Pedalboard?
Accessing the Pedalboard plugin is simple and provides immediate access to a variety of effects.
- Locate Pedalboard: Find the Pedalboard button next to the Amp Designer button in the Smart Controls area.
- Open Plugin: Click the button to open the Pedalboard plugin.
9.2. How do I add and customize pedals?
Adding and customizing pedals involves dragging them from the Pedal Browser and adjusting their settings.
- Open Pedal Browser: The Pedal Browser is located on the right-hand side of the Pedalboard plugin.
- Drag Pedals: Click and drag pedals from the Pedal Browser to the Pedal area in the center of the plugin.
- Reorder Pedals: Drag pedals within the Pedal area to change the order of effects.
- Tweak Settings: Adjust the knobs and switches on each pedal to customize its effect.
- Use Preconfigured Options: Choose from preconfigured pedal combinations in the drop-down menu at the top.
- Open Router: Open the router above your pedals to control the signal flow for different pedal combinations.
 Pedalboard plug-in in GarageBand
10. Elevate Your Guitar Recording Skills
Now that you understand the fundamentals of recording guitar with GarageBand, it’s time to elevate your skills and explore advanced techniques. Here are key areas to focus on, ensuring you get the best possible sound and make the most of GarageBand’s capabilities.
10.1. What are some tips for optimizing your guitar recordings?
Optimizing your guitar recordings involves fine-tuning various aspects of your setup and technique.
- Experiment with Mic Positions: Small adjustments to microphone placement can significantly alter the recorded sound.
- Use High-Quality Cables: Ensure you are using high-quality instrument cables to minimize signal loss and noise.
- Control Room Acoustics: Minimize unwanted reflections by using acoustic treatment in your recording space.
- Monitor Gain Levels: Keep an eye on your input levels to avoid clipping or distortion, ensuring a clean signal.
10.2. What are some post-recording techniques?
Post-recording techniques are essential for refining your raw recordings into polished tracks.
- EQ Adjustments: Use EQ to shape the frequency response of your guitar, enhancing clarity and presence.
- Compression: Apply compression to even out the dynamics, making your guitar sound more consistent and powerful.
- Reverb and Delay: Add reverb and delay to create depth and space, enhancing the overall sonic texture.
- Noise Reduction: Use noise reduction plugins to eliminate unwanted hum or hiss, ensuring a clean recording.
10.3. What are some common mistakes to avoid when recording guitar?
Avoiding common mistakes can save you time and frustration, resulting in better recordings.
- Poor Gain Staging: Setting gain levels too low or too high can result in a noisy or distorted signal.
- Ignoring Room Acoustics: Overlooking the impact of your recording environment can lead to unwanted reflections and resonances.
- Over-Processing: Applying too many effects can muddy your sound, diminishing clarity and detail.
- Neglecting Maintenance: Failing to maintain your guitar and equipment can lead to poor sound quality.
FAQ Section
1. Can I record both acoustic and electric guitars using GarageBand?
Yes, GarageBand supports recording both acoustic and electric guitars. For acoustic guitars, use a microphone to capture the natural sound. For electric guitars, you can use a direct input or record through an amplifier with a microphone.
2. Do I need an audio interface to record guitar with GarageBand?
While you can technically record directly into your computer’s built-in input, an audio interface is highly recommended. It provides better sound quality, lower latency, and additional input options.
3. How do I reduce latency when recording guitar in GarageBand?
To reduce latency, adjust the buffer size in GarageBand’s audio preferences. Lower buffer sizes reduce latency but may increase CPU load. Experiment to find a balance that works for your system.
4. What are the best microphone types for recording acoustic guitar?
Small-diaphragm condenser microphones are generally preferred for recording acoustic guitar. They capture detail and provide a balanced sound.
5. Can I use GarageBand to create professional-quality guitar recordings?
Yes, with the right techniques and equipment, you can achieve professional-quality guitar recordings in GarageBand. Understanding microphone placement, gain staging, and post-processing are crucial.
6. How do I record multiple guitar tracks in GarageBand?
Create multiple audio tracks in GarageBand and arm each track for recording. You can then record each guitar part separately and layer them to create a full arrangement.
7. What are some essential plugins for guitar recording in GarageBand?
Essential plugins include EQ, compression, reverb, and delay. GarageBand comes with a variety of built-in plugins that can be used to shape your guitar tone.
8. How do I properly set the input gain for recording guitar?
Adjust the input gain so that the signal is strong but not clipping. Aim for a peak level around -12dBFS to -6dBFS.
9. Can I use virtual amps and effects with a real guitar amp in GarageBand?
Yes, you can record your guitar amp with a microphone and then use virtual amps and effects in GarageBand to further shape the sound.
10. Where can I find additional resources for learning how to record guitar with GarageBand?
Explore online tutorials, forums, and websites like guitarplayers.net for tips, techniques, and resources on recording guitar with GarageBand.
Conclusion
Recording guitar with GarageBand is an accessible and rewarding endeavor. By understanding the fundamentals of setup, configuration, and sound customization, you can achieve professional-quality recordings in the comfort of your own home. As highlighted by research from the Berklee College of Music, mastering digital audio workstations like GarageBand significantly enhances a musician’s ability to produce high-quality music independently. Take advantage of the resources available at guitarplayers.net, where you can explore lessons, reviews, sheet music, and connect with a vibrant community of guitar enthusiasts.
Ready to take your guitar recording skills to the next level? Visit guitarplayers.net today to discover a wealth of lessons, reviews, sheet music, and a thriving community of guitar enthusiasts! Don’t miss out—start your journey to exceptional guitar recordings now!