
Are you a guitar player eager to record guitar in FL Studio and elevate your music production? At guitarplayers.net, we provide a streamlined guide to help you capture high-quality guitar tracks directly into FL Studio. Learn how to set up your equipment, dial in the perfect tones, and record like a pro, enhancing your overall music production. This tutorial will cover recording electric guitar, acoustic guitar, and even using amp simulation plugins.
1. What Equipment Do I Need to Record Guitar in FL Studio?
To record guitar in FL Studio effectively, you’ll need a few essential pieces of equipment. Investing in quality gear ensures a smooth recording process and professional-sounding results.
Here’s a breakdown of what you’ll need:
| Item | Description |
|---|---|
| Electric Guitar | Your primary instrument. A well-maintained guitar with quality pickups will produce a better sound. |
| Acoustic Guitar | For acoustic recordings, consider a guitar with a built-in pickup or use an external microphone. |
| Instrument Cable | A high-quality cable to connect your guitar to your audio interface. Fender cables are a reliable choice. |
| Audio Interface | This device converts the analog signal from your guitar into a digital signal that your computer can understand. The Presonus AudioBox iTwo is a popular option. |
| DAW (FL Studio) | Digital Audio Workstation software where you’ll record, edit, and mix your guitar tracks. |
| Guitar Amp Plugin | Software that simulates the sound of various guitar amplifiers and effects pedals. Native Instruments Guitar Rig 5 is a widely used plugin. |
| Headphones | Essential for monitoring your recording without causing feedback. Closed-back headphones are ideal for recording. |
| Microphone (Optional) | If you plan to record an acoustic guitar without a pickup or an electric guitar amp, you’ll need a microphone. |
| Microphone Stand (Optional) | To hold the mic in place |
| Pop Filter (Optional) | If you plan to record vocals. |
| Studio Monitors (Optional) | To listen to the recorded sound. |
2. How Do I Set Up My Guitar and Audio Interface with FL Studio?
Setting up your guitar and audio interface correctly is crucial for capturing a clean and clear signal in FL Studio. A proper setup ensures that you avoid noise and latency issues, allowing you to focus on your performance.
Here’s a step-by-step guide:
- Connect Your Guitar: Plug one end of your instrument cable into your guitar and the other end into the input of your audio interface.
- Connect Audio Interface to Computer: Use a USB cable to connect your audio interface to your computer.
- Open FL Studio: Launch FL Studio on your computer.
- Configure Audio Settings:
- Go to “Options” in the top menu.
- Select “Audio settings”.
- In the “Input/Output” section, choose your audio interface from the “Device” dropdown menu.
- Adjust the buffer length. A lower buffer length reduces latency but may increase CPU usage. Start with 128 or 256 samples and adjust as needed.
- Select Input Channel:
- Open the Mixer window (F9).
- Select an empty mixer track.
- In the Input section (usually at the top of the mixer track), choose the input channel on your audio interface where your guitar is connected.
- Monitor Input Level: Play your guitar and watch the level meter on the mixer track. Adjust the input gain knob on your audio interface until the signal is strong but not clipping (reaching the maximum level).
- Enable Direct Monitoring: Many audio interfaces have a direct monitoring feature that allows you to hear your guitar signal in real-time without latency. Check your audio interface’s manual for instructions on how to enable direct monitoring.
- Test the Setup: Put on your headphones and play your guitar. You should hear the guitar signal clearly through your headphones.
 audio interface instrument gain
Instrument gain button on audio interface
3. How to Get Extra Gain for Guitar Recording in FL Studio?
Achieving the right gain level is essential for a good recording. Insufficient gain results in a weak signal, while too much gain leads to clipping and distortion. Here’s how to optimize your gain settings:
- Use the Instrument Input: Most audio interfaces have a dedicated instrument input (Hi-Z input) designed for guitars. This input has a higher impedance, which is better suited for the signal from a guitar pickup.
- Engage the Pad Switch: Some guitars, especially those with active pickups, may output a very hot signal. If your signal is clipping even with the input gain turned down, engage the pad switch (usually labeled “-20dB”) on your audio interface to reduce the input level.
- Adjust Input Gain: Slowly increase the input gain knob on your audio interface while playing your guitar. Aim for a signal level that peaks around -12dB to -6dB on the mixer track in FL Studio. This provides enough headroom to avoid clipping while ensuring a strong signal.
- Use a Clean Gain Plugin: If you still need more gain after maximizing the input gain on your audio interface, you can use a clean gain plugin in FL Studio. Insert the plugin before your amp simulator and use it to boost the signal without adding distortion.
- Check Your Guitar’s Volume Knob: Make sure the volume knob on your guitar is turned up all the way. A lower volume setting on your guitar will result in a weaker signal.
- Use a Preamp Pedal: If you consistently struggle with low gain levels, consider using a preamp pedal between your guitar and audio interface. A preamp pedal boosts the signal before it reaches the interface, providing a stronger input level.
4. What Are the Best Guitar Amp and Effects Plugins for FL Studio?
Choosing the right guitar amp and effects plugins can dramatically impact your recorded sound. These plugins emulate the tones of classic amplifiers and effects pedals, giving you a wide range of sonic options.
Here are some of the best options:
| Plugin | Description | Price |
|---|---|---|
| Native Instruments Guitar Rig 6 Pro | A comprehensive suite with a wide variety of amps, cabinets, and effects. | $199 |
| Positive Grid BIAS Amp 2 | Known for its amp matching technology, allowing you to recreate the sound of real amps. | $99 – $299 |
| IK Multimedia AmpliTube 5 | Offers a vast collection of officially licensed amp and effect models. | $149 – $599 |
| Waves GTR3 | A user-friendly plugin with a selection of classic amps and effects. | $29.99 – $99 |
| Line 6 Helix Native | Emulates the sounds of Line 6’s popular Helix hardware processor. | $399 |
5. How Do I Load a Guitar Amp Plugin in FL Studio?
Loading a guitar amp plugin in FL Studio is straightforward. Once loaded, you can start experimenting with different amp models and effects to craft your desired tone.
Follow these steps:
- Open the Mixer Window: Press F9 to open the Mixer window in FL Studio.
- Select a Mixer Track: Choose an empty mixer track where you want to insert the plugin.
- Open Plugin Selector: Click on one of the empty “Slot” boxes in the Effects section of the mixer track.
- Select Plugin: A plugin selection window will appear. If you’ve already installed the plugin, it should be listed under the “Installed” section. If not, you may need to rescan your plugins (see below).
- Load the Plugin: Click on the plugin name to load it into the selected slot.
- Adjust Settings: The plugin’s interface will open, allowing you to adjust settings such as amp model, gain, EQ, and effects.
- Play Your Guitar: Play your guitar and listen to the output through your headphones or speakers. Adjust the plugin settings until you achieve your desired tone.
If your plugin doesn’t appear in the plugin selection window, you may need to rescan your plugins:
- Go to “Options” in the top menu.
- Select “Manage plugins”.
- Click the “Find plugins” button.
- Make sure the plugin search paths are correctly set to the folders where your plugins are installed.
- Click the “Start scan” button.
- FL Studio will scan your plugin folders and add any new plugins to the plugin database.
6. Why Should I Load Edison Before My Guitar Amp Plugin in FL Studio?
Loading Edison before your guitar amp plugin in FL Studio offers several advantages, particularly when it comes to flexibility and post-processing options. Edison is an audio editing and recording tool within FL Studio.
Here’s why it’s a good practice:
- Capture a Clean Signal: By placing Edison before your amp plugin, you can record a clean, unprocessed version of your guitar signal. This gives you the option to re-amp the signal later using different amp plugins or hardware.
- Non-Destructive Editing: Edison allows you to edit the recorded guitar signal without permanently altering the original file. You can experiment with different edits and effects without fear of ruining the original recording.
- Looping and Time Stretching: Edison offers advanced looping and time stretching capabilities, which can be useful for creating rhythmic guitar parts or fixing timing issues.
- Precise Editing: Edison provides a detailed waveform display and a variety of editing tools, allowing you to make precise adjustments to your guitar recordings.
- Experimentation: Having a clean recording allows you to experiment with different amp simulations and effects chains without being limited to your initial choices.
- Flexibility in Mixing: During the mixing stage, you can choose whether to use the processed signal from your amp plugin or the clean signal from Edison, giving you more control over the final sound.
7. How Do I Find Guitar Amp Plugin Presets in FL Studio?
Presets can be a great starting point for finding your ideal guitar tone. Most amp plugins come with a variety of presets that emulate different amp models and effects chains.
Here’s how to access and use presets:
- Open the Plugin Interface: Load your guitar amp plugin in FL Studio as described earlier.
- Locate the Preset Browser: Most amp plugins have a built-in preset browser or menu. Look for a button or menu labeled “Presets,” “Browser,” or something similar.
- Browse Presets: The preset browser will display a list of available presets. You can usually filter presets by amp model, genre, or artist.
- Load a Preset: Click on a preset name to load it. The plugin’s settings will automatically change to match the selected preset.
- Adjust Settings: Once you’ve loaded a preset, you can tweak the settings to further customize the sound to your liking.
 native instruments guitar rig presets
Native Instruments Guitar Rig presets
8. How to Tweak Guitar Sounds in FL Studio?
Tweaking your guitar sound is where you can truly personalize your tone. Experiment with different settings and effects to create a sound that’s uniquely yours.
Here are some tips for tweaking your guitar sound:
- Start with a Preset: Load a preset that’s close to your desired sound. This gives you a good starting point for further adjustments.
- Adjust Gain: The gain setting controls the amount of overdrive or distortion. Increase the gain for a more aggressive sound, or decrease it for a cleaner tone.
- EQ Settings: Use the EQ controls to shape the frequency response of your guitar sound. Boost the high frequencies for more clarity, or cut the low frequencies to reduce muddiness.
- Experiment with Effects: Add effects such as delay, reverb, chorus, or flanger to add depth and character to your guitar sound.
- Try Different Amp Models: Most amp plugins offer a variety of amp models. Experiment with different models to find the one that best suits your playing style and musical genre.
- Use Multiple Effects: Combine multiple effects to create complex and unique sounds.
- Listen in Context: Always listen to your guitar sound in the context of the entire mix. This will help you make more informed decisions about EQ and effects settings.
9. How to Add Guitar Components in FL Studio?
Adding your own components allows you to build your guitar tone from the ground up. This gives you complete control over every aspect of your sound.
Here’s how to add components:
- Open the Plugin Interface: Load your guitar amp plugin in FL Studio.
- Access the Components Section: Look for a section labeled “Components,” “Modules,” or something similar.
- Browse Components: The components section will display a list of available components, such as amps, cabinets, effects pedals, and rack effects.
- Add a Component: Drag and drop a component from the list onto the plugin’s signal chain.
- Connect Components: Connect the components in the desired order. Most amp plugins have a visual signal chain that allows you to easily connect components.
- Adjust Settings: Adjust the settings of each component to fine-tune your sound.
10. How Can I Save My Custom Guitar Tones in FL Studio?
Saving your custom tones is essential for recalling them in future projects. Most amp plugins allow you to save your custom settings as presets.
Here’s how to save your custom tones:
- Adjust Settings: Fine-tune your amp and effects settings until you achieve your desired tone.
- Save Preset: Look for a “Save,” “Save As,” or “Export” button in the plugin interface.
- Name Preset: Give your preset a descriptive name that will help you remember the type of sound it produces.
- Save Location: Choose a location to save your preset. Some plugins have a default preset folder, while others allow you to create your own folders.
- Recall Preset: To recall your saved preset, simply load it from the preset browser or menu.
11. What Are the Steps to Recording Guitar in FL Studio?
Recording guitar in FL Studio involves several steps to ensure a smooth and efficient process. Proper preparation and setup are key to capturing high-quality recordings.
Here’s a detailed guide:
- Set Up Your Equipment: Connect your guitar to your audio interface and configure your audio settings in FL Studio.
- Load Amp Plugin: Load your preferred guitar amp plugin on a mixer track.
- Dial In Your Tone: Adjust the amp and effects settings to achieve your desired tone.
- Create a New Project: Open a new project in FL Studio or load an existing one.
- Create a New Pattern: Create a new pattern in the Pattern window.
- Arm the Mixer Track: Right-click on the record button on the mixer track where your amp plugin is loaded. Select an input to record from. This “arms” the track for recording.
- Set Recording Options: Click the record button at the top of FL Studio. In the dropdown menu, make sure “Audio” is selected.
- Enable Metronome: If you want to record with a metronome, click the metronome icon in the transport panel.
- Start Recording: Press the spacebar or click the play button to start recording.
- Play Your Part: Play your guitar part along with the metronome or backing track.
- Stop Recording: Press the spacebar or click the stop button to stop recording.
- Review Your Recording: Listen back to your recording to check for any mistakes or issues.
- Edit Your Recording: Use FL Studio’s editing tools to trim, quantize, or otherwise modify your recording as needed.
- Repeat as Necessary: Repeat the recording process until you’re satisfied with your performance.
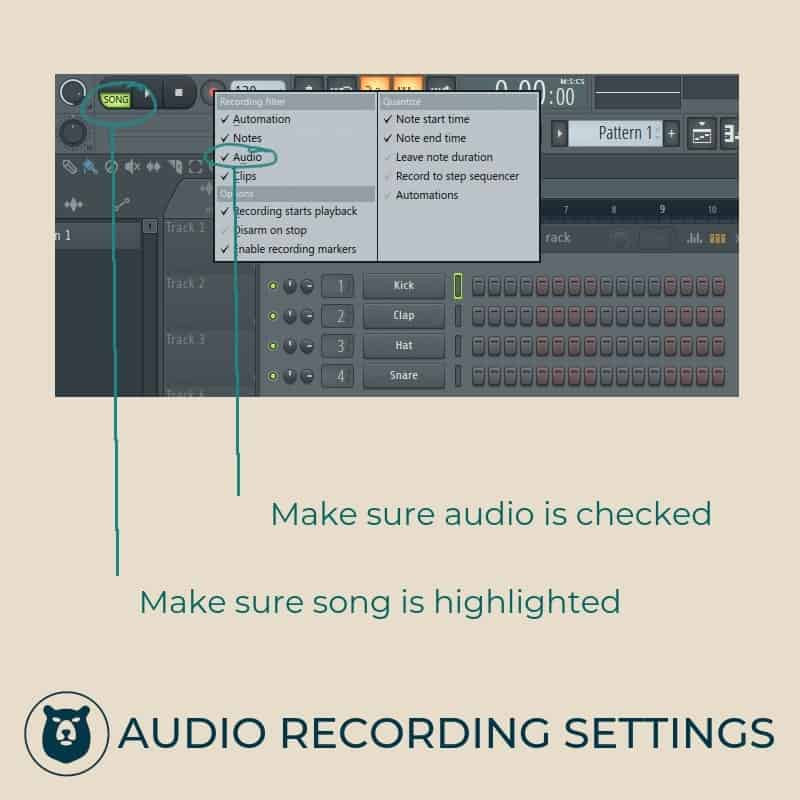 audio recording settings fl studio
Audio recording settings in FL Studio
12. How to Record Electric Guitar in FL Studio?
Recording electric guitar in FL Studio is a common task for many musicians and producers. The process involves setting up your equipment, configuring FL Studio, and capturing your guitar performance.
Here’s a step-by-step guide to recording electric guitar:
- Connect Your Equipment:
- Plug your electric guitar into your audio interface using an instrument cable.
- Connect your audio interface to your computer via USB.
- Plug in your headphones or studio monitors to your audio interface.
- Configure FL Studio:
- Open FL Studio and go to “Options” > “Audio settings”.
- Select your audio interface as the “Device”.
- Adjust the buffer length to minimize latency (start with 128 or 256 samples).
- Set Up a Mixer Track:
- Open the Mixer window (F9).
- Select an empty mixer track.
- Choose the input on your audio interface where your guitar is connected as the input for the mixer track.
- Load a Guitar Amp Plugin:
- Click on an empty “Slot” in the Effects section of the mixer track.
- Select your preferred guitar amp plugin (e.g., Native Instruments Guitar Rig, Positive Grid BIAS Amp).
- Dial In Your Tone:
- Open the guitar amp plugin and browse through presets or create your own custom tone.
- Adjust the amp model, gain, EQ, and effects to achieve your desired sound.
- Arm the Mixer Track for Recording:
- Right-click on the record button on the mixer track.
- Select “Audio input” and choose the input on your audio interface where your guitar is connected.
- Configure Recording Settings:
- Click the record button at the top of FL Studio.
- Make sure “Audio” is selected in the dropdown menu.
- Enable the metronome if desired.
- Start Recording:
- Press the spacebar or click the play button to start recording.
- Play your guitar part along with the metronome or backing track.
- Stop Recording:
- Press the spacebar or click the stop button to stop recording.
- Review and Edit:
- Listen back to your recording to check for any mistakes or issues.
- Use FL Studio’s editing tools to trim, quantize, or otherwise modify your recording as needed.
- Save Your Project:
- Go to “File” > “Save” to save your FL Studio project.
13. How to Record Acoustic Guitar in FL Studio?
Recording acoustic guitar in FL Studio requires a slightly different approach compared to electric guitar. The key is to capture the natural sound of the instrument while minimizing noise and unwanted reflections.
Here’s a guide to recording acoustic guitar:
- Choose Your Recording Method:
- Microphone: The most common method is to use a microphone placed in front of the guitar. A condenser microphone is generally preferred for its sensitivity and ability to capture subtle nuances.
- Direct Input (DI): If your acoustic guitar has a built-in pickup, you can plug it directly into your audio interface. This method is less prone to noise and feedback but may not capture the full richness of the guitar’s sound.
- Set Up Your Microphone (if applicable):
- Position the microphone 6-12 inches away from the guitar, pointing towards the soundhole or the point where the neck joins the body.
- Experiment with different microphone placements to find the sweet spot that captures the best sound.
- Use a pop filter to reduce plosives (bursts of air from your mouth) if you’re singing while playing.
- Connect Your Equipment:
- If using a microphone, connect it to your audio interface via an XLR cable.
- If using DI, plug your guitar directly into your audio interface using an instrument cable.
- Connect your audio interface to your computer via USB.
- Plug in your headphones or studio monitors to your audio interface.
- Configure FL Studio:
- Open FL Studio and go to “Options” > “Audio settings”.
- Select your audio interface as the “Device”.
- Adjust the buffer length to minimize latency (start with 128 or 256 samples).
- Set Up a Mixer Track:
- Open the Mixer window (F9).
- Select an empty mixer track.
- Choose the input on your audio interface where your microphone or guitar is connected as the input for the mixer track.
- Adjust Input Gain:
- Play your guitar and watch the level meter on the mixer track.
- Adjust the input gain on your audio interface until the signal is strong but not clipping.
- Add EQ and Compression (Optional):
- Load an EQ plugin and a compression plugin on the mixer track.
- Use the EQ to shape the frequency response of your guitar sound.
- Use the compressor to smooth out the dynamics and add sustain.
- Arm the Mixer Track for Recording:
- Right-click on the record button on the mixer track.
- Select “Audio input” and choose the input on your audio interface where your microphone or guitar is connected.
- Configure Recording Settings:
- Click the record button at the top of FL Studio.
- Make sure “Audio” is selected in the dropdown menu.
- Enable the metronome if desired.
- Start Recording:
- Press the spacebar or click the play button to start recording.
- Play your guitar part along with the metronome or backing track.
- Stop Recording:
- Press the spacebar or click the stop button to stop recording.
- Review and Edit:
- Listen back to your recording to check for any mistakes or issues.
- Use FL Studio’s editing tools to trim, quantize, or otherwise modify your recording as needed.
- Save Your Project:
- Go to “File” > “Save” to save your FL Studio project.
14. Can I Record Guitar Without an Audio Interface in FL Studio?
While it’s highly recommended to use an audio interface for recording guitar in FL Studio, it is possible to record without one. However, the sound quality may not be as good, and you may experience latency issues.
Here’s how you can record guitar without an audio interface:
- Use Your Computer’s Built-In Sound Card:
- Plug your guitar directly into the microphone input on your computer.
- Alternatively, you can use a USB microphone designed for guitar recording.
- Configure FL Studio:
- Open FL Studio and go to “Options” > “Audio settings”.
- Select your computer’s sound card as the “Device”.
- Adjust the buffer length to minimize latency (start with the lowest possible setting).
- Set Up a Mixer Track:
- Open the Mixer window (F9).
- Select an empty mixer track.
- Choose the input on your computer’s sound card where your guitar is connected as the input for the mixer track.
- Adjust Input Gain:
- Play your guitar and watch the level meter on the mixer track.
- Adjust the input gain in Windows or macOS settings until the signal is strong but not clipping.
- Load a Guitar Amp Plugin:
- Click on an empty “Slot” in the Effects section of the mixer track.
- Select your preferred guitar amp plugin.
- Dial In Your Tone:
- Open the guitar amp plugin and browse through presets or create your own custom tone.
- Adjust the amp model, gain, EQ, and effects to achieve your desired sound.
- Arm the Mixer Track for Recording:
- Right-click on the record button on the mixer track.
- Select “Audio input” and choose the input on your computer’s sound card where your guitar is connected.
- Configure Recording Settings:
- Click the record button at the top of FL Studio.
- Make sure “Audio” is selected in the dropdown menu.
- Enable the metronome if desired.
- Start Recording:
- Press the spacebar or click the play button to start recording.
- Play your guitar part along with the metronome or backing track.
- Stop Recording:
- Press the spacebar or click the stop button to stop recording.
- Review and Edit:
- Listen back to your recording to check for any mistakes or issues.
- Use FL Studio’s editing tools to trim, quantize, or otherwise modify your recording as needed.
- Save Your Project:
- Go to “File” > “Save” to save your FL Studio project.
Keep in mind that recording without an audio interface may result in a noisier signal and higher latency. An audio interface provides better sound quality and lower latency, making it a worthwhile investment for serious guitar recording.
15. What Are Common Problems and Solutions When Recording Guitar in FL Studio?
Recording guitar in FL Studio can sometimes present challenges. Knowing how to troubleshoot common issues can save you time and frustration.
Here are some common problems and their solutions:
| Problem | Solution |
|---|---|
| Latency | Reduce the buffer length in FL Studio’s audio settings. Close unnecessary programs to free up CPU resources. Use an audio interface with low-latency drivers. |
| Noise | Use high-quality cables. Ensure your guitar and audio interface are properly grounded. Reduce gain levels and use noise reduction plugins if necessary. |
| Clipping | Reduce the input gain on your audio interface. Use a pad switch if available. Lower the output volume on your guitar or amp plugin. |
| Weak Signal | Increase the input gain on your audio interface. Use a preamp pedal between your guitar and audio interface. Make sure your guitar’s volume knob is turned up all the way. |
| Plugin Not Loading | Rescan your plugins in FL Studio’s plugin manager. Ensure the plugin is compatible with your version of FL Studio. Check that the plugin is installed correctly. |
| Poor Sound Quality | Use a high-quality audio interface and microphone (if applicable). Experiment with different microphone placements. Adjust EQ and compression settings to shape the sound. |
| Feedback | Use headphones instead of studio monitors while recording. Reduce the output volume of your amp plugin. Position your microphone away from your speakers. |
| Out of Tune Guitar | Tune your guitar before recording. |
| Wrong Tempo | Set the correct tempo for recording, using the tap function to find the tempo by tapping to the beat in the song, then adjusting. |
FAQ: Recording Guitar in FL Studio
| Question | Answer |
|---|---|
| What is the best audio interface for recording guitar? | The Presonus AudioBox iTwo and Focusrite Scarlett series are popular choices due to their sound quality and ease of use. |
| How do I reduce latency when recording guitar? | Lower the buffer length in FL Studio’s audio settings and use an audio interface with low-latency drivers. |
| What are the best guitar amp plugins for FL Studio? | Native Instruments Guitar Rig 6 Pro, Positive Grid BIAS Amp 2, and IK Multimedia AmpliTube 5 are highly recommended. |
| How do I record a clean guitar signal in FL Studio? | Use Edison before your amp plugin to capture an unprocessed version of your guitar signal. |
| How do I create a custom guitar tone in FL Studio? | Experiment with different amp models, effects, and EQ settings to shape your sound. |
| How do I save my custom guitar tones in FL Studio? | Save your settings as a preset within the amp plugin for later use. |
| Can I record guitar without an audio interface? | Yes, but it’s not recommended. The sound quality and latency will be significantly better with an audio interface. |
| How do I fix a noisy guitar recording? | Use high-quality cables, ensure proper grounding, and reduce gain levels. Noise reduction plugins can also help. |
| How do I prevent clipping when recording guitar? | Reduce the input gain on your audio interface and use a pad switch if available. |
| How do I improve the sound quality of my guitar recordings? | Use a high-quality audio interface and microphone (if applicable), experiment with microphone placements, and adjust EQ and compression settings to shape the sound. |
Conclusion
Recording guitar in FL Studio can be a rewarding experience, allowing you to capture your musical ideas and create professional-sounding tracks. By following the steps and tips outlined in this comprehensive guide, you’ll be well-equipped to overcome common challenges and achieve excellent results. Remember to experiment with different settings and techniques to find what works best for you.
Ready to take your guitar recording skills to the next level? Visit guitarplayers.net today for more in-depth tutorials, gear reviews, and a vibrant community of fellow guitar enthusiasts. Whether you’re a beginner or a seasoned pro, guitarplayers.net has everything you need to elevate your playing and recording abilities.
Address: 1140 Boylston Street, Boston, MA 02215, United States
Phone: +1 (617) 747-2261
Website: guitarplayers.net