
A guitar strap is more than just an accessory; it’s a crucial component that unlocks your freedom of movement while playing. Whether you’re performing on stage, jamming with friends, or simply practicing standing up, a guitar strap allows you to comfortably and securely hold your electric, acoustic, or bass guitar.
Think of your guitar strap as a vital link between you and your instrument. It becomes an extension of your playing experience, impacting your posture, comfort, and even your performance. Installing it correctly is paramount, not just for security, but also for ensuring an ergonomic and enjoyable playing experience. This guide will walk you through the essential steps to properly attach your guitar strap, so you can focus on what truly matters: making music.
Understanding Guitar Strap Types and Hardware
Before diving into the attachment process, it’s helpful to understand the basics of guitar straps and the hardware involved. Guitar straps come in a wide variety of materials, widths, and styles, but their fundamental purpose remains the same: to securely hold your guitar. The way a strap attaches to your guitar depends primarily on the type of hardware your guitar has.
Most guitars utilize strap pins, also known as strap buttons. These are small, rounded metal knobs that protrude from the guitar’s body. Electric guitars and basses almost universally come equipped with two strap pins. Many acoustic guitars also feature two pins, although some, particularly older or more traditional models, might only have one.
The placement of these pins is also important. On a two-pin guitar, one pin is almost always located at the bottom of the guitar body, often called the “endpin”. The second pin’s location can vary. It’s commonly found on the upper shoulder of the guitar body, near the neck joint, or sometimes on the heel of the neck itself, where the neck meets the body.
For acoustic guitars with only one strap pin, typically located at the endpin, the attachment method differs slightly. In these cases, the strap’s other end is usually secured to the guitar’s headstock. This method requires either a specialized strap adapter or a simple lace or cord.
Understanding these basic configurations will make attaching your strap straightforward and ensure a secure and comfortable playing experience. Now, let’s look at how to attach your strap to guitars with different pin setups.
Step-by-Step Guide: Attaching a Strap to a Guitar with Two Pins
Guitars with two strap pins are the most common and arguably the easiest to equip with a strap. This method provides a balanced and secure hold, distributing the guitar’s weight effectively. Here’s how to do it:
-
Identify the Strap Ends and Orientation: Most guitar straps are designed to be attached in a specific direction. Look closely at your strap. Some straps are symmetrical and can be attached either way, but many have a designated top and bottom.
- Buckle Orientation: If your strap has an adjustable plastic buckle, the end with two layers of material, where the buckle is typically located, is usually intended for the bottom strap pin (near the endpin of the guitar). This orientation often makes on-the-fly adjustments easier while playing.
- Thickness and Design: Often, one end of the strap will be thinner than the other. The thinner end is generally designed for the bottom pin. Additionally, if your strap features a logo or design, this end usually attaches to the pin closer to the guitar’s neck.
-
Attach the Strap to the Bottom Pin: Take one end of your guitar strap and locate the leather or reinforced end piece with a keyhole-shaped opening or a slit. Carefully slide this opening over the bottom strap pin of your guitar. You may need to apply a bit of pressure to push the leather or fabric over the pin. Ensure the strap is securely seated around the pin and that the pin is fully inside the strap opening.
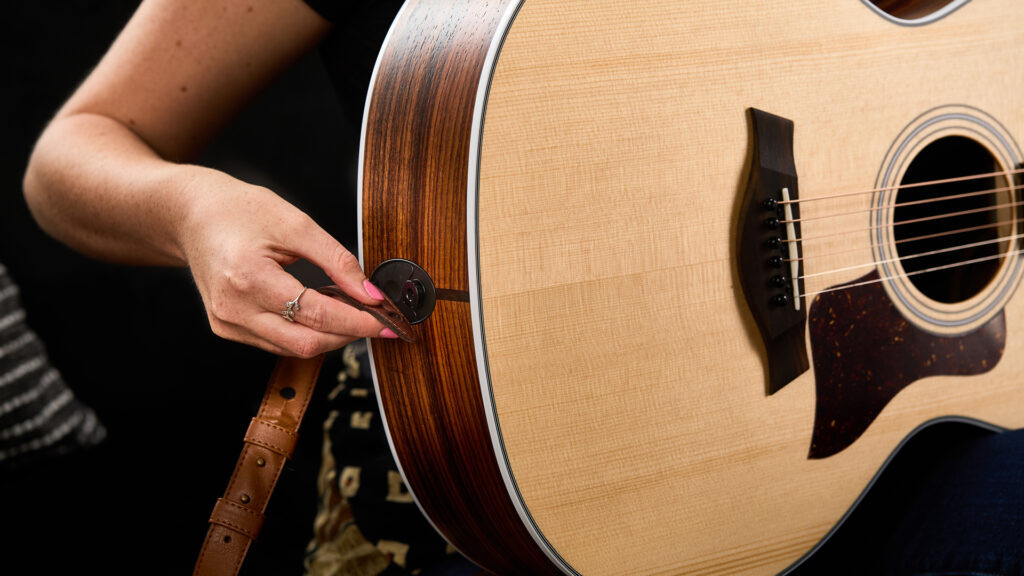 Attaching guitar strap to bottom pin
 -
Attach the Strap to the Top Pin: Take the remaining end of your strap and repeat the process. Locate the strap pin on the upper shoulder or neck heel of your guitar. Slide the opening on the strap end over this pin, ensuring it is securely attached, just like you did with the bottom pin.
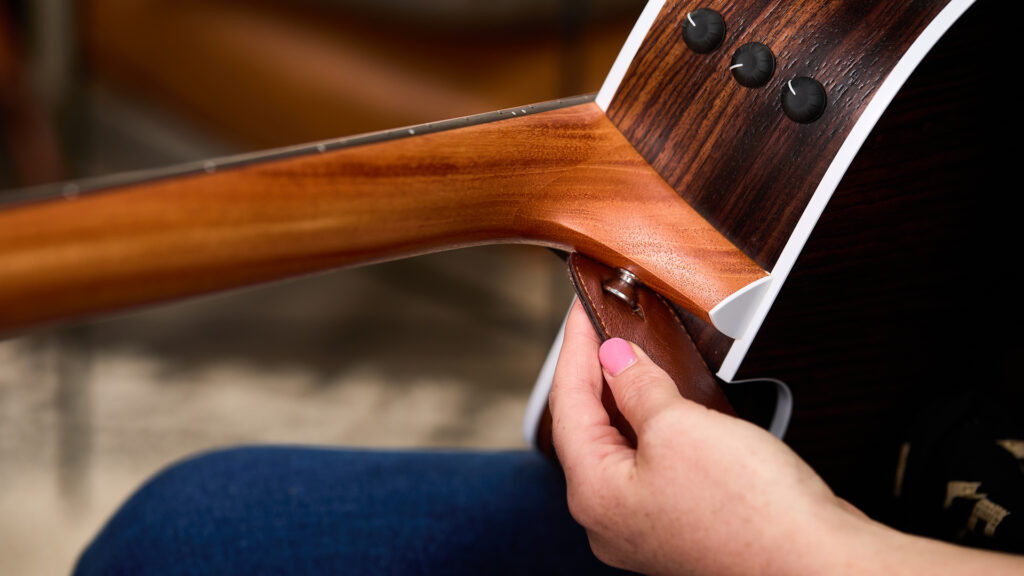 Attaching guitar strap to top pin
 -
Perform a Security Check: Before trusting your guitar to the strap, it’s crucial to test the connection. Gently but firmly tug on each end of the strap where it connects to the pins. You should feel a secure connection with no slippage. If anything feels loose, re-examine your attachment and ensure the strap is fully seated around both pins.
Even with two strap pins, some players might prefer the weight distribution and feel of attaching the strap to the headstock, which we’ll cover next. However, for most guitars with two pins, this method is the standard and most reliable approach.
Step-by-Step Guide: Attaching a Strap to a Guitar with One Pin
Many acoustic guitars, especially classical or folk-style guitars, come with only a single strap pin at the bottom end of the instrument. While you can install a second pin, the traditional method for attaching a strap to a one-pin guitar involves using the headstock. This method is simple, requires no modifications to your guitar, and has been used for generations of guitar players.
-
Attach the Strap to the Bottom Pin: Begin by attaching one end of your guitar strap to the bottom strap pin, exactly as described in step 2 of the two-pin method. Make sure it’s securely fastened.
-
Prepare the Headstock Attachment: The other end of your strap will need to be attached to the headstock. For this, you’ll need a way to tie the strap to the headstock, usually using a strap lace (often included with new straps) or a strap adapter. A strap adapter is a small piece of material, often leather or nylon, with a loop on one end to attach to the strap and a hole or button on the other to secure around the headstock.
-
Thread the Lace or Adapter: If using a lace, thread it through the keyhole opening on the free end of your guitar strap. If using a strap adapter, attach it to the strap end according to the adapter’s instructions.
-
Secure to the Headstock: Now, carefully thread the lace or strap adapter underneath the strings, just above the nut (the white or black piece at the top of the fretboard where the strings pass through). Bring the ends of the lace around the headstock.
-
Tie the Lace or Secure the Adapter: If using a lace, tie a secure knot. A double knot or even a bowline knot is recommended for extra security. Ensure the knot is tight and will not easily come undone. If using a strap adapter, fasten it according to its design, often involving buttoning it closed or using a small fastener.
After attaching to the headstock, the guitar’s weight distribution will feel different compared to a two-pin setup. With headstock attachment, the guitar tends to balance more centrally. Experiment with both methods if your guitar allows, to find your preferred balance.
Adjusting Your Guitar Strap for Perfect Comfort and Playability
Once your strap is securely attached, the next crucial step is adjusting it to the correct length. Strap length is highly personal and depends on your height, playing style, and preferred guitar position. The goal is to find a length that allows you to play comfortably without straining your wrist or shoulder.
General Ergonomic Guidelines: A good starting point is to adjust the strap so that when you’re standing, your guitar sits in roughly the same position it would when you’re sitting down. This helps maintain consistent hand positioning and muscle memory between sitting and standing playing. Ideally, your strap length should allow your fret hand and wrist to remain relaxed, avoiding excessive bending to reach notes or chords. Strain in your fretting hand can lead to discomfort and even injuries over time.
Adjusting Straps with a Sliding Buckle: Many modern guitar straps, especially those made of nylon or similar materials, feature a sliding plastic buckle for easy adjustments.
- To lengthen the strap: Slide the buckle away from the guitar’s neck and towards the lower bout (body) of the guitar.
- To shorten the strap: Slide the buckle towards the guitar’s neck.
You can usually make these adjustments while wearing the guitar, allowing you to fine-tune the length quickly and easily until it feels just right.
Adjusting Leather or Suede Straps: Traditional leather or suede straps often use a two-piece design for adjustment. These straps typically have a wider main strap piece and a narrower adjustment piece that weaves through slits in the wider piece.
-
Detach the Adjustment Piece: To adjust these straps, you’ll need to detach the thinner adjustment piece from the main strap. This usually involves unthreading it from the slits.
-
Re-thread for Desired Length: The slits in the wider strap piece correspond to different strap lengths. Thread the thinner piece through a different set of slits to change the overall length. Experiment with different slit combinations to find your ideal strap height.
-
Secure the Adjustment Piece: Once you’ve found a comfortable length, re-thread the thinner piece securely through the slits, ensuring it’s tightly fastened to prevent slippage.
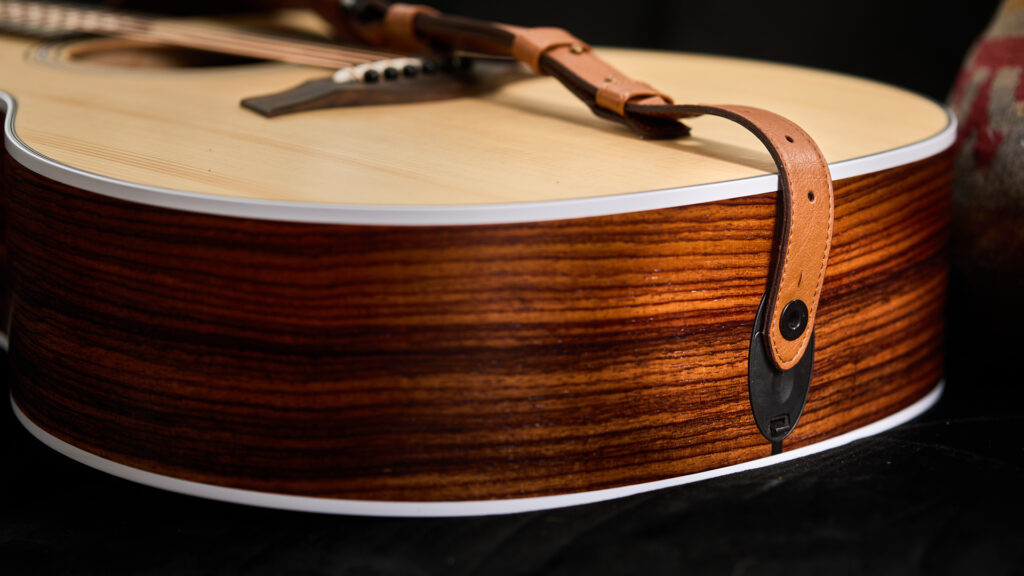 Adjusting leather guitar strap
It’s a good idea to experiment with strap length over several playing sessions to find what truly feels most comfortable and ergonomic for you. What feels right initially might need slight adjustments as you play more and refine your standing posture.
Enhancing Security: The Role of Strap Locks
Once you have your strap adjusted to the perfect length, consider adding an extra layer of security with strap locks. Strap locks are aftermarket hardware replacements for your guitar’s strap pins. They are designed to create a much more secure connection between your strap and your guitar, significantly reducing the risk of your strap accidentally detaching and your guitar falling.
Strap locks consist of two main parts:
- Strap Lock Buttons: These replace your guitar’s existing strap pins. They usually have a locking mechanism built into them.
- Strap Lock Connectors: These attach to your guitar strap ends. They are designed to securely clip or lock onto the strap lock buttons on your guitar.
Using strap locks is a simple but highly effective way to protect your instrument, especially during energetic performances or rehearsals. They provide peace of mind and are a worthwhile investment for any guitarist who values their instrument’s safety. Various types and styles of strap locks are available, from basic and affordable to more elaborate and feature-rich designs.
Choosing the Best Guitar Strap for Your Needs
Knowing how to put on a guitar strap is essential, but choosing the right strap is just as important for comfort, style, and performance. Guitar straps come in a vast array of materials, widths, padding options, and aesthetics. Here are some key factors to consider when selecting a guitar strap:
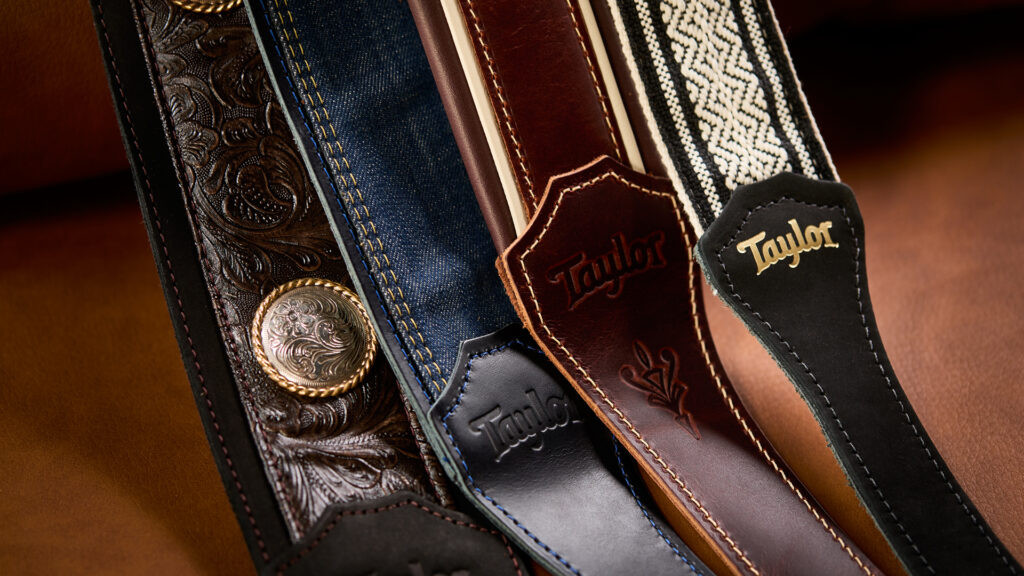
Material: The material of your guitar strap greatly affects its durability, comfort, and even its look. Popular strap materials include:
- Leather: Durable, classic look, often gets more comfortable with age, can be pricier.
- Vegan Leather: Offers a leather-like look and feel without using animal products, often more affordable than genuine leather.
- Suede: Soft and comfortable, good grip, can be less durable than leather in some cases.
- Cotton/Nylon: Affordable, lightweight, breathable, good for electric guitars, can wear out faster than leather.
- Denim: Stylish, casual look, can be durable depending on weave, comfortable for many players.
The ends of most straps, regardless of the main material, are typically made of leather or suede for a secure grip on the strap pins. Material choice often comes down to personal preference, budget, and the style you’re aiming for.
Padding: For longer playing sessions or heavier guitars, consider a strap with padding. Padded straps, often made with foam or similar materials, distribute the guitar’s weight more evenly across your shoulder, reducing pressure and increasing comfort. Padded leather and suede straps are popular choices for acoustic guitarists and players who experience shoulder strain.
Width: Strap width also affects weight distribution. Wider straps (2.5” to 3” or more) spread the guitar’s weight over a larger area, which can be more comfortable, especially for heavier guitars. Narrower straps (around 2”) are more streamlined and lightweight but concentrate the weight on a smaller shoulder area. Standard cotton straps are often around 2” wide, while leather and suede straps can be wider.
Aesthetic: Your guitar strap is also an opportunity to express your personal style! Straps come in every color, pattern, and design imaginable.
{width=1024 height=576}Consider these aesthetic factors:
-
Color and Pattern: Choose a color and pattern that complements your guitar and your personal style. A contrasting color can make your strap stand out, while a complementary color creates a more subtle, unified look.
-
Design Details: Some straps feature embroidery, conchos, or other decorative elements. Consider these if you want a strap with extra visual flair.
-
Material Texture: The texture of the strap material (smooth leather, rough suede, woven cotton) also contributes to the overall look and feel.
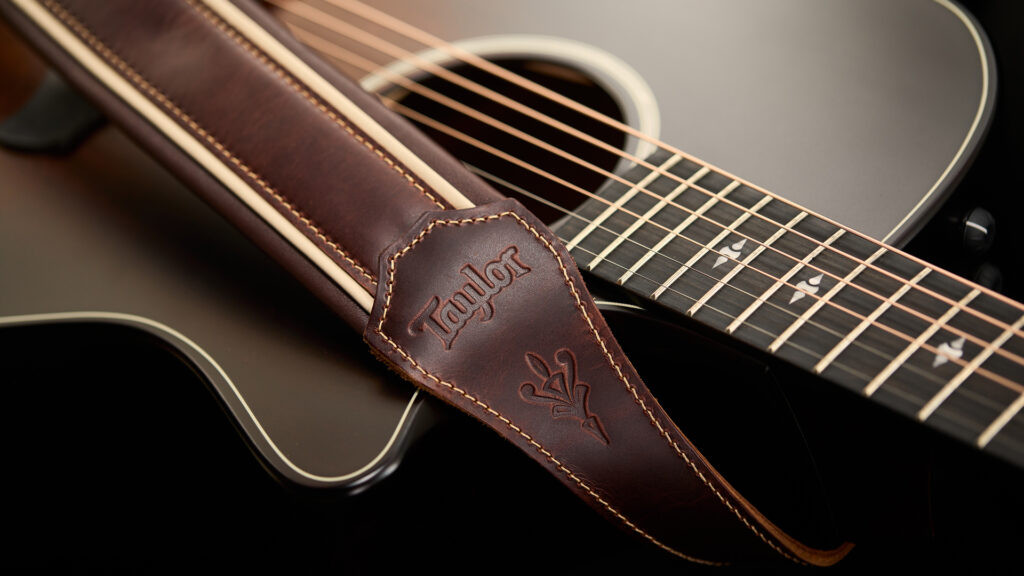 Brown leather guitar strap
Ultimately, the best guitar strap is one that is comfortable, secure, and reflects your personal style. Don’t be afraid to experiment with different materials, widths, and styles to find what works best for you.
Time to Play
A properly attached and adjusted guitar strap is your gateway to playing with freedom and expression. It’s a simple piece of gear that makes a huge difference in your playing experience, allowing you to move, perform, and connect with your music in new ways. A great strap is both functional and stylish, reflecting your personality as a player.
Now that you’ve mastered the art of attaching a guitar strap, you’re ready to take your playing to the next level, standing up and moving with your music. Explore other essential guitar skills, like holding a pick correctly and tuning your guitar, to continue your musical journey. So, strap on your guitar, find your comfortable playing position, and let the music flow!