
Blues guitar is a fantastic genre for beginners. It’s not only accessible but also deeply rewarding, offering a soulful sound that has influenced countless musicians. If you’re just starting your guitar journey and want to dive into the blues, you’ve come to the right place. This guide will equip you with the essential knowledge and techniques to start playing blues guitar today.
What is Blues Music?
Blues music is a cornerstone of modern music, tracing its roots back to the 1930s. Known for its expressive and soulful character, the blues is instantly recognizable and incredibly fun to play on guitar. Whether it’s the emotional cry of a guitar solo or the rhythmic drive of a band, blues music has an undeniable groove that captivates listeners and players alike. There’s a unique feeling that comes from playing the blues, a raw emotion that sets it apart from other genres.
When you embark on your blues guitar journey, there are two key areas to focus on:
- Rhythm Guitar: This forms the backbone of blues music, providing the harmonic foundation.
- Lead Guitar: This allows you to express yourself melodically, playing solos, riffs, and licks.
Let’s explore each of these in detail.
Understanding Blues Rhythm Guitar
Rhythm guitar in blues is all about playing chords, not single notes. While it might not always steal the spotlight like lead guitar, rhythm guitar is absolutely crucial. Its primary role is to establish and maintain a solid groove. Think of it as the heartbeat of the blues – without strong rhythm guitar, lead guitar wouldn’t have a foundation to shine upon.
Blues rhythm guitar often utilizes specific chords that lend themselves to the genre’s distinctive sound. These are commonly known as ‘7th chords’. Let’s learn a few essential ones to get you started.
Essential Blues Guitar Chords for Beginners: 7th Chords
For anyone learning How To Play Blues Guitar, mastering 7th chords is a must. These chords add a characteristic bluesy flavor to your playing. We’ll focus on three of the most popular and fundamental 7th chords:
- E7
- A7
- B7
Let’s break down how to play each of these chords.
The E7 Chord
To play the E7 chord:
- Place your 2nd finger on the 2nd fret of the A string (5th string).
- Place your 1st finger on the 1st fret of the G string (3rd string).
- Strum all six strings.
When you play this chord, ensure that each string rings out clearly. You want to hear the full, rich sound of this essential blues chord.
The A7 Chord
Next, let’s learn the A7 chord:
- Place your 1st finger on the 2nd fret of the D string (4th string).
- Place your 2nd finger on the 2nd fret of the B string (2nd string).
- Strum starting from the A string (5th string) downwards.
If you find this chord challenging at first, remember to take your time and ensure your fingers are pressing down firmly just behind the frets.
The B7 Chord
Finally, let’s tackle the B7 chord:
- Place your 2nd finger on the 2nd fret of the A string (5th string).
- Place your 1st finger on the 1st fret of the D string (4th string).
- Place your 3rd finger on the 2nd fret of the G string (3rd string).
- Strum starting from the A string (5th string) downwards.
The B7 can be a bit trickier for beginners, so practice transitioning to and from this chord slowly until it becomes more comfortable.
Why These Chords? The 12 Bar Blues Progression
These three chords – E7, A7, and B7 – are fundamental because they form the basis of the most common chord progression in blues music: the 12 bar blues. This progression is the backbone of countless blues songs and is essential knowledge for any aspiring blues guitarist.
While you can play a 12 bar blues in various keys, we’ll focus on the key of E for this lesson.
Essential Blues Guitar Chord Progressions: The 12 Bar Blues
The 12 bar blues progression is the absolute cornerstone of blues music. If you want to truly learn how to play blues guitar, understanding and mastering this progression is non-negotiable. It’s been used by blues legends and contemporary artists alike, including icons like B.B. King, John Lee Hooker, and Eric Clapton.
Understanding the 12 Bar Structure
The progression is called “12 bar blues” because it consists of – you guessed it – 12 bars. In musical terms, a bar is a unit of time. So, a 12 bar blues progression unfolds over 12 musical bars.
Here’s the standard 12 bar blues progression in the key of E using the 7th chords we just learned:
E7  | E7  | E7  | E7
A7  | A7  | E7  | E7
B7  | A7  | E7  | B7
Notice the vertical lines (|) which represent bar lines, visually separating each bar of music. If you count the spaces between these lines, you’ll see there are indeed 12 sections, or bars.
Listen to a 12 bar blues progression to internalize its sound and rhythm. Once you’re familiar with its feel, try playing the chord progression yourself. You’ll quickly notice that this progression is inherently cyclical and can be repeated endlessly without losing its groove. This is one of the magical aspects of the 12 bar blues – its simplicity and endless jam potential.
Blues Rhythm Guitar Strumming
While the 12 bar blues chord progression provides the harmonic structure, rhythm guitar strumming patterns bring it to life, adding character and groove. Rhythm is absolutely vital when learning how to play blues guitar. It’s the glue that holds the music together, providing the rhythmic pulse for the entire song.
There are many blues strumming patterns, but let’s focus on a couple of essential ones to get you started. Try applying these strumming patterns over the 12 bar blues progression we just learned. Experiment and find what feels and sounds best to you.
Stepping into Blues Lead Guitar
Beyond rhythm guitar, lead guitar is where you can truly express yourself in the blues. Lead guitar playing typically involves single-note lines that complement the rhythm section. This could be anything from a soaring guitar solo to a catchy guitar riff or a soulful blues lick. Learning lead guitar is arguably one of the most exciting parts of learning how to play blues guitar.
The Role of a Blues Lead Guitarist
In blues music, the lead guitarist often takes center stage with improvisational solos. However, the role extends beyond just solos. Blues lead guitarists frequently add fills, riffs, and licks to enrich the texture and feel of a blues song. These elements add color and personality to the music.
Solos vs. Riffs: Understanding the Difference
It’s helpful to understand the difference between a solo and a riff:
- Solo: A solo is a featured section in a song where the lead guitarist improvises and showcases their skills. It’s a moment for musical storytelling and personal expression, often building in intensity and emotion.
- Riff: A riff is a short, repeated musical phrase or idea. Riffs are often used as recurring motifs throughout a song, adding hooks and rhythmic drive. They generally play a supporting role, adding character and embellishment to the song’s structure.
To start playing blues lead guitar, you need to familiarize yourself with essential scales.
Essential Blues Guitar Scales for Beginners
Scales are the building blocks of melodies and solos. In blues guitar, two scales are particularly crucial:
- The Blues Scale
- The Minor Pentatonic Scale
We’ll learn both of these scales in the key of E to keep things straightforward for now.
The Blues Scale
Let’s start with the Blues Scale in E. To play this scale, begin on the 12th fret of the low E string (6th string). Here’s the scale pattern:
[Insert Blues Scale Shape Diagram Here – Diagram Description: E Blues Scale starting at 12th fret, showing finger positions on the fretboard]
Practice playing this scale pattern ascending and descending until it becomes familiar to your fingers and ears.
Moveable Scale Shapes
A key concept to understand about scale shapes is that they are moveable. This means you can play the same scale pattern in different keys by simply shifting the starting position (root note) on the fretboard.
All root notes on the low E string are shown below:
 Root notes on the E string for blues guitar scales
To play the blues scale in a different key, like A, you just need to find the root note of A on the low E string (which is the 5th fret) and start the same scale pattern from there.
The Minor Pentatonic Scale
The Minor Pentatonic Scale is another essential scale for blues guitar. It’s widely used not just in blues but also in rock, metal, and even jazz. Here’s the Minor Pentatonic Scale shape in the key of E, starting again at the 12th fret:
[Insert Minor Pentatonic Scale Shape Diagram Here – Diagram Description: E Minor Pentatonic Scale starting at 12th fret, showing finger positions on the fretboard]
Like the blues scale, practice this pattern in both directions and try moving it to different root notes on the low E string to play in different keys.
Why Scales are Important
When learning how to play blues guitar, understanding scales is crucial. Scales essentially tell you which notes will sound good when playing in a particular key or over a specific chord progression.
For example, if you are playing a blues progression in the key of E, both the E Blues Scale and the E Minor Pentatonic Scale will work beautifully for improvising solos and creating melodies. All the notes within these scales are harmonically compatible with the E blues progression.
Don’t get too bogged down in music theory at this stage. The most important thing is to start playing and experimenting with these scales over blues backing tracks to develop your ear and intuition.
Essential Blues Guitar Licks for Beginners
Now that you have some scales under your fingers, let’s explore some classic blues guitar licks. Licks are short, melodic phrases that are characteristic of a genre. Learning licks is a fantastic way to build your blues vocabulary and start improvising.
Blues Lick #1
This first lick is based on the blues scale and is excellent for developing your picking technique.
[Insert Tab for Blues Lick #1 Here – Tab description: Blues lick in E using the blues scale]
[Link to Audio Example of Blues Lick #1]
Practice this lick slowly at first, focusing on clean and precise picking. Once you’re comfortable, gradually increase your speed. Try playing it over a blues backing track to hear how it sounds in a musical context.
Blues Lick #2
This is a classic 12 bar blues riff that works equally well on guitar or bass. In musical terms, it’s often referred to as a “walking bass line” when played on bass.
[Link to Audio Example of Blues Lick #2]
This riff is more rhythmically focused and emphasizes the groove of the blues.
Blues Lick #3
This final lick is incredibly versatile and can be used in solos or as a standalone riff over a blues chord progression.
[Insert Tab for Blues Lick #3 Here – Tab description: Blues lick in E minor pentatonic scale]
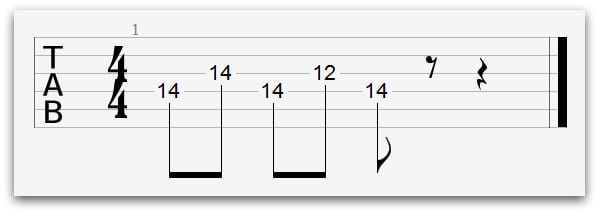 Blues Lick #3 Tab Image
Remember that this lick is moveable. To play it in the key of E, start on the 14th fret. When the chord changes to A7 in a 12 bar blues, you can shift the lick down to start on the 7th fret. For a B7 chord, shift it again to start on the 9th fret. This allows you to adapt the lick to the changing chords within a 12 bar blues progression.
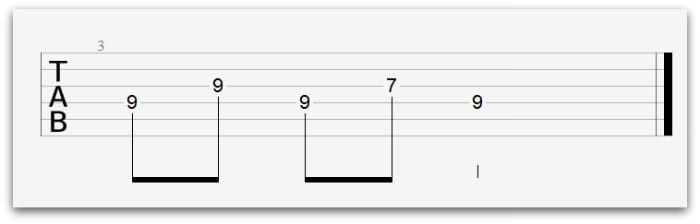 Moveable Blues Lick Example Image
[Link to Audio Example of Moveable Blues Lick over 12 Bar Blues]
Experiment with these licks, practice them in different keys, and try incorporating them into your own blues playing.
Start Your Blues Guitar Journey Today
Learning how to play blues guitar is an incredibly rewarding experience. It’s a genre rich in history, emotion, and musical expression. By mastering the essential chords, progressions, scales, and licks outlined in this guide, you’ll be well on your way to playing authentic blues guitar. Remember to listen to lots of blues music, practice regularly, and most importantly, have fun as you explore this amazing genre. The journey of learning blues guitar is a lifelong adventure, and every step you take will bring you closer to expressing your own blues voice.