Embarking on your guitar-playing journey is an exciting endeavor! Whether you aspire to strum your favorite tunes by the campfire, perform on stage, or simply enjoy the personal satisfaction of making music, learning guitar is a rewarding skill that’s accessible to anyone at any age. You’ve taken the first step just by being here, and that’s a reason to celebrate!
Consider this your starting point. At guitarplayers.net, we are dedicated to providing aspiring musicians with the resources and guidance they need. This guide will walk you through the essential steps to begin playing the guitar, incorporating insights and expanding on key concepts to give you a robust foundation. Throughout this article, you’ll find links to delve deeper into specific areas and further enhance your guitar skills. Let’s begin this musical adventure together!
1. Acoustic vs. Electric Guitar: Choosing Your First Instrument
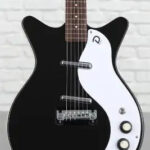
The first major decision for any aspiring guitarist is choosing between an acoustic and an electric guitar. Both types offer unique sounds and playing experiences, and understanding their differences is crucial for beginners. We have detailed guides on our site for both acoustic guitars and electric guitars, but let’s cover the basics here.
 A person holding an acoustic guitar and another person holding an electric guitar, illustrating the choice between acoustic and electric guitars for beginners.
Acoustic Guitars: Simplicity and Portability
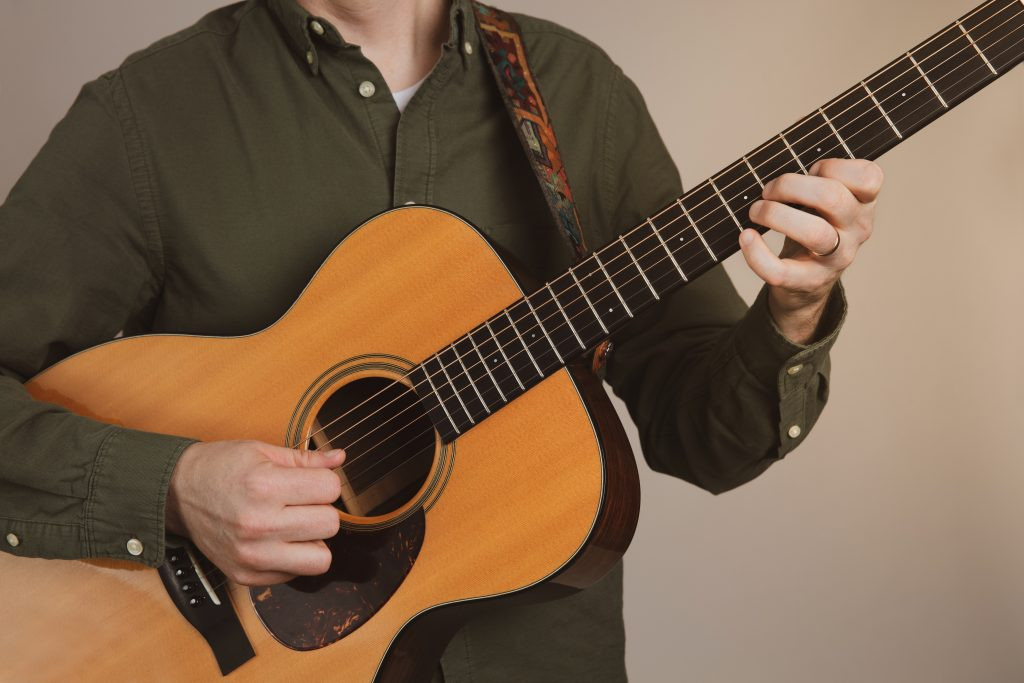
Acoustic guitars are often recommended for beginners due to their simplicity and affordability. They produce sound naturally, without needing amplification, making them highly portable and convenient for practice anywhere.
- Nylon-String Acoustics (Classical Guitars): These are particularly gentle on beginner fingers due to the softer nylon strings, which are wider apart than steel strings. This can make initial chord learning a bit easier on the fingertips. Classical guitars are typically associated with classical, flamenco, and folk music.
- Steel-String Acoustics: These are more versatile and commonly used in popular genres like folk, country, rock, and pop. Steel strings produce a brighter and louder sound than nylon strings. While they might require slightly more finger strength initially, many beginners find them comfortable to learn on and appreciate their broader musical application.
Investing in a decent quality acoustic guitar is advisable. While budget-friendly options are available, a better-quality instrument will not only sound better but also be easier to play and maintain in tune, making your learning experience more enjoyable and less frustrating.
 A close-up of a person playing an acoustic guitar, highlighting the warm tones and accessibility of acoustic guitars for beginners.
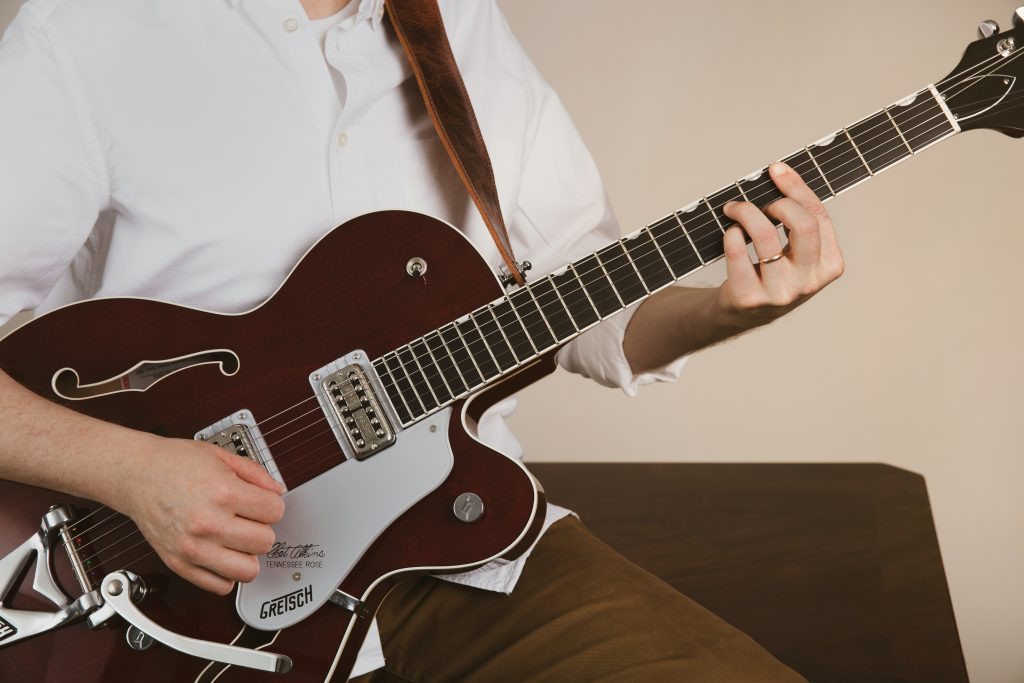
Electric Guitars: Versatility and Effects
Electric guitars offer immense versatility, especially for those interested in genres like rock, blues, metal, and pop. While often more expensive initially due to the need for additional equipment, they provide a different and equally exciting path into guitar playing.
- Lower Action and String Gauge: Electric guitars often have a lower “action” (string height from the fretboard) and use lighter gauge strings than acoustics. This generally makes them easier to press down and fret notes and chords, which can be advantageous for beginners’ finger comfort.
- Amplification and Effects: Electric guitars require an amplifier to be heard properly. This also opens up a world of sonic possibilities through effects pedals and amp settings, allowing you to explore various tones and genres. While the initial setup might be slightly more involved, the tonal flexibility is a significant draw for many.
Choosing between acoustic and electric depends largely on your musical preferences and goals. If you are drawn to genres where the electric guitar is prominent, starting with an electric guitar is perfectly acceptable and can be highly motivating.
2. Understanding the Anatomy of a Guitar
Before you start playing, familiarizing yourself with the parts of the guitar is essential. Knowing the correct terminology will help you understand instructions and communicate effectively with other musicians. For a more detailed breakdown, refer to our guide on the anatomy of a guitar.
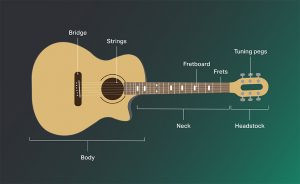 Diagram highlighting key guitar parts such as the headstock, neck, fretboard, body, and strings, essential for beginner guitarists to learn.
Here are the fundamental parts you should know:
- Headstock: Located at the top of the guitar neck, it holds the tuning pegs.
- Tuning Pegs (Tuners): Used to adjust the tension of the strings, thereby tuning the guitar.
- Neck: The long piece of wood extending from the headstock to the body. The fretboard is located on the neck.
- Fretboard: The surface on the neck where you press down the strings to change the pitch. It’s inlaid with metal frets.
- Frets: Metal strips that divide the fretboard into semitone intervals. Pressing a string behind a fret shortens the vibrating length of the string, raising the pitch.
- Body: The main resonant part of the guitar. Acoustic guitars have a hollow body to amplify sound, while electric guitar bodies can be solid, semi-hollow, or hollow, influencing their tone and sustain.
- Soundhole (Acoustic Guitars): The opening in the body of an acoustic guitar that projects the sound.
- Pickups (Electric Guitars): Magnetic devices on the body of an electric guitar that convert string vibrations into electrical signals, which are then amplified.
- Bridge: Located on the body, it holds the strings in place and transfers their vibrations to the body.
- Strings: Typically six strings on a standard guitar, numbered from 1st (thinnest, highest pitch) to 6th (thickest, lowest pitch).
- Knobs and Switches (Electric Guitars): Used to control volume, tone, and pickup selection, shaping the electric guitar’s sound.
Understanding these parts will not only enhance your learning process but also help you in guitar maintenance and communication about your instrument.
3. Mastering the Correct Way to Hold Your Guitar
Proper posture and guitar holding technique are crucial for comfort, preventing injury, and developing good playing habits. Whether you choose acoustic or electric, the principles of holding the guitar remain similar but can be adjusted based on personal preference and playing style. Our blog has a detailed guide on how to hold a guitar.
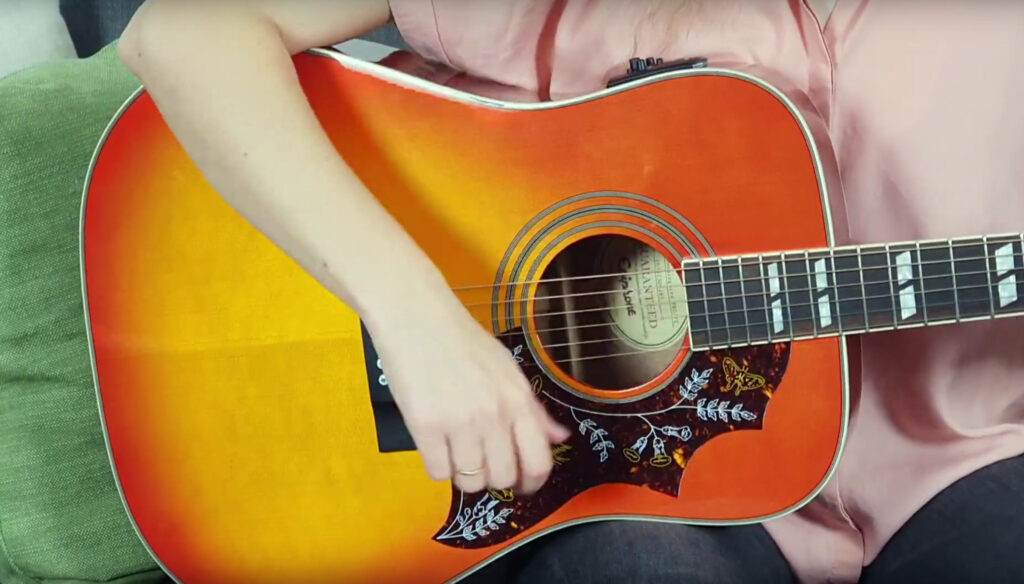 Illustration showing correct guitar posture while sitting, emphasizing a straight back and comfortable arm placement.
Sitting Position:
- Acoustic Guitar: Sit upright in a chair without armrests. Place the guitar body on your lap. You can rest the curve of the guitar body on either your left or right leg, whichever feels more comfortable and provides better access to the fretboard. Using a footstool under your left foot (for right-handed players) can raise your leg and angle the guitar for improved playing posture.
- Electric Guitar: Similar to acoustic, you can play seated with an electric guitar. The lighter body of many electric guitars can make seated playing quite comfortable.
Standing Position (Primarily Electric Guitar):
- Guitar Strap: You’ll need a guitar strap to play standing up. Adjust the strap so the guitar sits at a comfortable height, not too high or too low. Ideally, the guitar should be at roughly the same height as when you are sitting, to maintain consistent hand positioning.
- Balance: Ensure the guitar is balanced and doesn’t pull too heavily to one side. A good strap and proper adjustment are key.
Hand Positions:
- Fretting Hand (Usually Left Hand for Right-Handed Players): This hand is responsible for pressing down the strings on the fretboard to create different notes and chords. Keep your wrist relatively straight and your fingers curved to fret the strings just behind the frets.
- Picking/Strumming Hand (Usually Right Hand for Right-Handed Players): This hand is used to pluck individual strings or strum chords. Keep your wrist relaxed and use your forearm and wrist for strumming motion, not just your fingers.
Left-Handed Players:
- Right-Handed Guitar: Some left-handed players learn on a standard right-handed guitar, adapting their hand positions.
- Flipping the Guitar: Another approach is to restring a right-handed guitar to play left-handed, though this can affect the guitar’s intonation.
- Left-Handed Guitars: The most common and recommended option for left-handed players is to use a guitar specifically designed for left-handed playing. These guitars are built in reverse, offering optimal comfort and playability for left-handed individuals. You can explore left-handed guitars to find the right fit.
Experiment to find the most comfortable and sustainable way to hold your guitar. Good posture and hand positioning are vital for long practice sessions and preventing strain.
4. Learning Guitar Strings and the Fretboard Layout
Understanding the guitar strings and fretboard is fundamental to playing. The fretboard can seem daunting at first, but with a systematic approach, it becomes navigable. You can find a more in-depth guide to learning the guitar fretboard on our site.
Guitar String Names and Order:
Standard guitar tuning (from thickest to thinnest string) is:
- 6th String: E (lowest E – thickest string)
- 5th String: A
- 4th String: D
- 3rd String: G
- 2nd String: B
- 1st String: E (highest E – thinnest string)
A helpful mnemonic to remember this is: Eddie Ate Dynamite, Good Bye Eddie.
Fretting and Finger Strength:
Pressing the strings down onto the fretboard (fretting) is how you change the pitch of the strings. Initially, your fingertips might feel tender, and pressing down firmly enough to get a clear sound might be challenging. This is perfectly normal!
- Calluses: As you continue to play, calluses will develop on your fingertips, making fretting less painful and more comfortable.
- Nylon vs. Steel Strings: Nylon strings are softer and easier to press down than steel strings, which is one reason classical guitars are often recommended for absolute beginners, especially young learners. However, persistence with steel strings will also lead to finger strength and comfort.
- Proper Fretting Technique: Press the string down just behind the fret (closer to the headstock side of the fret). Avoid pressing directly on top of the fret, as this won’t produce a clear sound. You need to press firmly enough to prevent buzzing but not so hard that you strain your hand.
Learning the string names and understanding how fretting changes the pitch are crucial first steps in navigating the guitar fretboard.
5. Tuning Your Guitar to Standard Pitch
Playing a guitar that’s out of tune is not only unpleasant but can also hinder your learning process. Accurate tuning is essential for developing your ear and ensuring that chords and melodies sound correct. While there are alternate guitar tunings used for specific styles, beginners should focus on mastering standard EADGBE tuning first.
 Illustration showing a guitar being tuned with a digital tuner, emphasizing the importance of accurate tuning for beginners.
Methods for Tuning:
- Electronic Tuner: Digital tuners are highly accurate and easy to use, especially for beginners. They come in various forms: clip-on tuners that attach to the guitar headstock, pedal tuners for electric guitars, and handheld devices. Electronic tuners detect the pitch of the string and indicate whether it’s sharp (too high) or flat (too low), guiding you to tune it correctly.
- Tuning Apps: Smartphone apps like GuitarTuna are incredibly convenient and often free. They use your phone’s microphone to detect the pitch of the strings and provide visual feedback, similar to a digital tuner. Tuning apps are readily accessible and a great option for beginners.
- Tuning by Ear (Using Reference Pitches): As your ear training develops, you can learn to tune your guitar by ear, often using a reference pitch like a tuning fork or a piano. This method takes practice but is a valuable skill for any musician. You can also use online tuning references that play the correct pitch for each string.
Tuning Process:
- Start with the 6th String (Low E): Use your chosen tuning method to tune the thickest string to E.
- Tune the 5th String (A): Play the 5th fret of the 6th string (this should be an A note) and compare it to the open 5th string. Adjust the 5th string’s tuning peg until it matches the pitch of the 6th string’s 5th fret.
- Tune the 4th String (D): Play the 5th fret of the 5th string (this should be a D note) and tune the open 4th string to match.
- Tune the 3rd String (G): Play the 5th fret of the 4th string (this should be a G note) and tune the open 3rd string to match.
- Tune the 2nd String (B): Play the 4th fret of the 3rd string (this should be a B note) and tune the open 2nd string to match. Note: This is the exception – it’s the 4th fret, not the 5th.
- Tune the 1st String (High E): Play the 5th fret of the 2nd string (this should be a high E note) and tune the open 1st string to match.
Regularly tuning your guitar before each practice session will become a habit and ensure you are always playing in tune.
6. Learning Basic Guitar Chords: Your Gateway to Songs
Chords are the building blocks of most guitar music. Starting with basic chords is essential for playing songs and developing your musicality on the guitar. Understanding guitar chord charts is a key skill. Chord charts are visual diagrams that show you where to place your fingers to play a specific chord.
We recommend starting with “open chords” or “cowboy chords,” which are played in the first few frets and utilize open strings (strings that are not fretted).
Major and Minor Chords:
Chords can be broadly categorized as major or minor. Major chords generally sound bright and happy, while minor chords tend to sound darker and sadder.
Essential Beginner Major Chords:
- C Major (C): Often one of the first chords learned.
- D Major (D): Another fundamental open chord.
- G Major (G): A very common and versatile chord.
- E Major (E): Bright and powerful sounding.
- A Major (A): Another essential major chord.
Essential Beginner Minor Chords:
- A Minor (Am): A foundational minor chord.
- E Minor (Em): A commonly used and relatively easy minor chord.
- D Minor (Dm): Slightly more challenging than Am and Em but still important for beginners.
Reading Chord Charts:
Chord charts typically represent the guitar neck as if you are looking at it upright.
- Horizontal Lines: Represent the strings (top line is the 6th string, bottom line is the 1st string).
- Vertical Lines: Represent the frets.
- Numbers or Dots: Indicate where to place your fingers. Numbers often correspond to finger numbers (1=index, 2=middle, 3=ring, 4=pinky). Dots simply show finger placement.
- “X” above a string: Means that string should not be played in the chord.
- “O” above a string: Means that string should be played “open” (not fretted).
Example: E Minor Chord (Em)
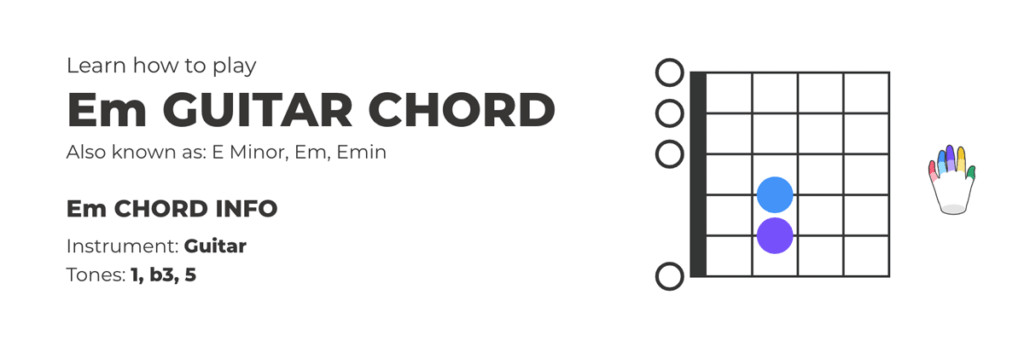 E Minor Chord Guitar Diagram showing finger placement on the fretboard.
Practice transitioning smoothly between these basic chords. Start with two chords and practice switching back and forth until you can do so cleanly and rhythmically. Our guitar chord chart library is a valuable resource for exploring more chords as you progress.
7. Mastering Strumming Techniques for Guitar Chords
Once you can form basic chords, the next step is to learn how to strum them. Strumming is the act of brushing across multiple strings to create a rhythmic accompaniment.
Downstrokes and Upstrokes:
- Downstroke: Strumming downwards, from the lower strings (6th) towards the higher strings (1st).
- Upstroke: Strumming upwards, from the higher strings (1st) towards the lower strings (6th).
Combining downstrokes and upstrokes creates basic strumming patterns.
Basic Strumming Patterns:
Start with simple patterns like all downstrokes, then alternate down-up, down-down-up-up, etc. Experiment with rhythm and timing.
Strumming Hand Techniques:
- Using a Pick: Hold the pick firmly but not too tightly between your thumb and index finger, with a small portion of the pick extending out. Use a relaxed wrist motion for strumming.
- Finger Strumming: You can also strum with your fingers, using your thumb or fingernails to brush across the strings. This can produce a softer, warmer tone compared to using a pick.
Chord Progressions and Strumming Practice:
Practice strumming basic chord progressions (sequences of chords played one after another). For example, C-G-Am-F is a very common progression. Focus on:
- Smooth Chord Changes: Transitioning between chords without pauses or abrupt stops.
- Rhythmic Accuracy: Maintaining a consistent rhythm and tempo while strumming.
- Clean Strumming: Avoiding unwanted string noise and ensuring each strum sounds clear.
As you become comfortable with basic strumming, you can explore more complex chord progressions and strumming patterns. You can also start experimenting with different barre chords, which allow you to play chords up and down the neck.
8. Reading Guitar Tablature (Tabs) for Melodies and Riffs
While chord charts are great for accompaniment, guitar tablature, or “tabs,” is essential for learning melodies, riffs, and solos. Tabs are a simplified form of musical notation that is guitar-specific and easy to learn, even without prior music reading experience.
Understanding Guitar Tabs:
Tabs visually represent the guitar fretboard.
- Horizontal Lines: Represent the six guitar strings (top line is the 1st string, bottom line is the 6th string – opposite of chord charts).
- Numbers on the Lines: Indicate which fret to play on that string. “0” means play the open string.
- Reading Direction: Tabs are read from left to right, just like standard text.
Example Tab Snippet:
e|-----------------|
B|-----------------|
G|-----------------|
D|-----0-2-4-------|
A|-0-2-------------|
E|-----------------|
This tab shows:
- Play the open 5th string (A string – indicated by “0” on the 5th line from the top).
- Then play the 2nd fret on the 5th string.
- Then play the 4th fret on the 4th string (D string).
Tab Symbols and Techniques:
Tabs can also represent various guitar techniques:
- h (Hammer-on): Strike a note, then quickly hammer-on with another finger to a higher fret on the same string.
- p (Pull-off): Pluck a fretted note, then pull-off your finger to sound a lower note on the same string.
- / (Slide Up): Slide from one fret to a higher fret.
- (Slide Down): Slide from one fret to a lower fret.
- b (Bend): Bend the string upwards to raise the pitch.
- r (Release Bend): Release a bent string back to its original pitch.
- v or ~ (Vibrato): Slightly and rapidly vary the pitch of a note.
Tabs are a versatile tool for learning everything from simple melodies to complex guitar solos. Practice reading tabs regularly to expand your repertoire and learn new songs and techniques.
9. Developing Picking Technique and Using a Guitar Pick
While fingerpicking (playing with your fingers) is a valid and beautiful guitar style, using a guitar pick (plectrum) is essential for many genres, particularly rock, blues, and metal, and also for strumming acoustic guitar effectively.
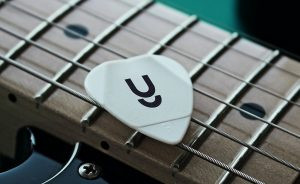 Close-up of a hand holding a guitar pick, showcasing the grip and angle for effective picking technique.
Holding the Pick:
- Grip: Hold the pick between your thumb and index finger. The most common grip is to curve your index finger slightly and place the pick against the side of your index finger’s first knuckle, then secure it with your thumb.
- Relaxation: Don’t grip the pick too tightly. A relaxed grip allows for more fluid and controlled picking.
- Pick Exposure: Only a small portion of the pick (the tip) should protrude from your fingers. Experiment to find the amount that feels most comfortable and gives you control.
Picking Techniques:
- Alternate Picking (Down-Up Picking): The most fundamental picking technique. Alternate between downstrokes and upstrokes for every note. This is crucial for playing faster passages and riffs.
- Downpicking: Playing every note with a downstroke. Often used for heavier, more aggressive rhythms.
- **Up