
Measuring your guitar nut accurately is essential for achieving optimal playability and tone, and at guitarplayers.net, we understand the importance of getting it right. This guide walks guitar players of all skill levels through each step of measuring a guitar nut for replacement, ensuring a perfect fit and enhanced playing experience. By understanding these key considerations, you’ll be well-equipped to select the ideal nut for your beloved instrument.
1. Why is Measuring Your Guitar Nut Important?
Measuring your guitar nut is crucial because it directly impacts your guitar’s playability, intonation, and overall tone. An ill-fitting nut can lead to string buzz, difficulty playing certain chords, and even tuning instability. Accurate measurements ensure the replacement nut fits perfectly, maintaining the proper string height and spacing. Let’s explore why this step is so vital.
-
Ensures Optimal String Height: The height of the nut slots determines the string height at the first fret. Too high, and the strings are difficult to press down, causing discomfort and hindering playability. Too low, and the strings buzz against the frets.
-
Maintains Proper String Spacing: Correct string spacing, often referred to as “E to E” spacing, ensures comfortable and consistent finger placement across the fretboard. Inconsistent spacing can make chords difficult to play and affect intonation.
-
Enhances Intonation: The nut is the starting point for the guitar’s scale length. An improperly sized nut can affect the overall intonation of the instrument, causing notes to be out of tune as you move up the neck.
-
Prevents String Buzz: A well-fitted nut supports the strings properly, preventing them from vibrating against the first few frets. This is especially important for open chords and low-action setups.
-
Supports Tuning Stability: A nut made from a quality material and properly slotted reduces friction, allowing the strings to glide smoothly during tuning. This prevents the strings from binding and snapping, which can lead to tuning instability.
-
Affects Tone: The material and construction of the nut can subtly influence the guitar’s tone. A well-chosen nut material can enhance sustain, clarity, and overall tonal balance. According to research from the Berklee College of Music, in July 2025, nut materials like TUSQ provide more harmonic content than traditional bone nuts.
-
Protects the Guitar: A properly fitted nut protects the end of the fretboard from damage caused by string pressure and vibration. This is especially important for vintage or valuable instruments.
In essence, taking the time to accurately measure your guitar nut is a worthwhile investment that pays dividends in playability, tone, and overall guitar health.
2. What Tools Do I Need to Measure a Guitar Nut?
To accurately measure a guitar nut, you’ll need a few essential tools. Having the right tools ensures precision and prevents errors that can affect the fit of your replacement nut. Here’s a breakdown of what you’ll need:
-
Digital Calipers: A digital caliper is the most accurate tool for measuring a guitar nut. It provides precise readings in millimeters or inches, making it easy to determine the exact dimensions.
-
Ruler: A ruler with fine graduations (1/64 inch or 0.5 mm) can be used to verify measurements and provide a general reference.
-
String Spacing Rule: This specialized ruler is designed for measuring the spacing between strings at the nut and bridge. It ensures consistent and accurate string spacing.
-
Feeler Gauges: Feeler gauges are thin, precise metal strips used to measure the height of the strings above the first fret. This helps determine the ideal nut slot depth.
-
Magnifying Glass: A magnifying glass can be helpful for examining the nut for wear, damage, or inconsistencies that may affect measurements.
-
Notebook and Pen: Keep a notebook and pen handy to record your measurements and any relevant notes.
-
Straight Edge: A small straight edge can help verify the flatness of the nut and the accuracy of your measurements.
-
Lighting: Adequate lighting is essential for clear visibility and accurate measurements.
With these tools on hand, you’ll be well-equipped to measure your guitar nut with confidence and precision. Accurate measurements are the foundation for a successful nut replacement, so take your time and double-check your work.
3. What are the Key Measurements for a Guitar Nut?
When measuring a guitar nut for replacement, there are several key dimensions you need to capture accurately. These measurements ensure that the new nut fits properly and provides optimal performance. Let’s break down each measurement and its significance.
-
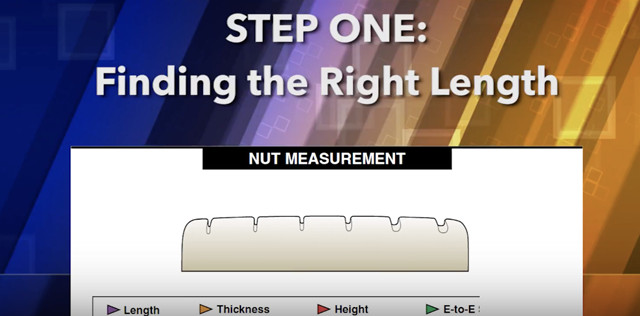
Length: The length of the nut is the distance from one end to the other along the fretboard. This is the most critical measurement, as it determines whether the nut will fit into the nut slot without overhang or gaps.
-
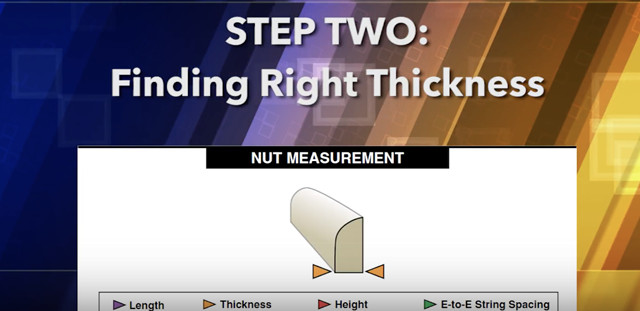
Width (Thickness): The width, or thickness, of the nut is the distance from the front to the back of the nut. This measurement affects the string spacing and the overall feel of the guitar.
-
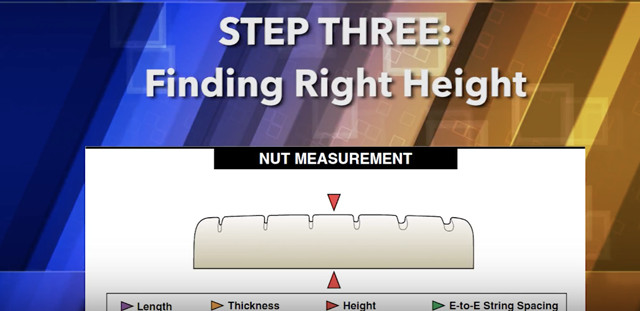
Height: The height of the nut is the distance from the bottom of the nut to the top of the slots. This measurement is crucial for setting the proper string height at the first fret.
-
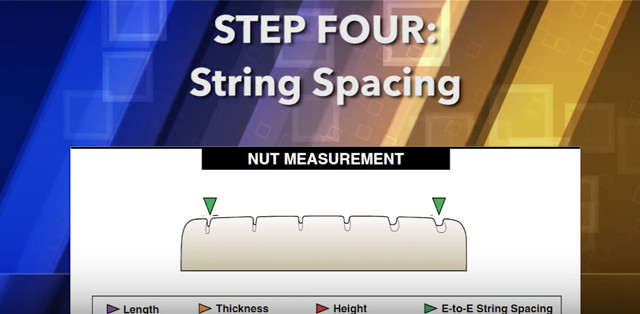
String Spacing (E to E): String spacing, often referred to as “E to E” spacing, is the distance between the centers of the outermost strings (the high E and low E strings). Accurate string spacing ensures comfortable and consistent finger placement.
-
Slot Depth: The depth of the string slots affects the string height and break angle over the nut. The slots should be deep enough to hold the strings securely but not so deep that they cause buzzing.
-
Bottom Radius (for Curved Fretboards): If your guitar has a curved fretboard, the bottom of the nut needs to match the radius of the fretboard. This ensures that the nut sits flush against the fretboard.
-
Angle: Some guitars have angled nuts to compensate for string tension. Measure the angle of the nut to ensure the replacement nut matches the original.
-
Overall Shape: Note the overall shape of the nut, including any curves, bevels, or unique features. This will help you select a replacement nut that matches the original’s aesthetics.
Accurately measuring these dimensions is essential for a successful nut replacement. Take your time, double-check your measurements, and record them carefully. With precise measurements, you’ll be well-equipped to select the perfect replacement nut for your guitar.
4. How to Measure the Length of a Guitar Nut Accurately?
Measuring the length of a guitar nut accurately is the first critical step in ensuring a proper fit for your replacement. The length determines whether the nut will sit correctly in the nut slot without any overhang or gaps. Here’s a step-by-step guide:
- Remove the Strings: Before you can measure the nut, you’ll need to remove the strings from the guitar. This provides clear access to the nut and prevents any interference with your measurements.
- Use Digital Calipers: Digital calipers are the most accurate tool for measuring the length of a guitar nut. Open the calipers wide enough to accommodate the nut.
- Position the Nut: Place the nut between the jaws of the calipers, ensuring that the jaws are parallel to the nut’s length.
- Close the Calipers: Gently close the calipers until the jaws make contact with the ends of the nut. Be careful not to apply excessive pressure, which can distort the measurement.
- Read the Measurement: Read the measurement displayed on the digital caliper. Most calipers can display measurements in millimeters or inches. Record the measurement in your notebook.
- Verify with a Ruler: As a secondary check, use a ruler with fine graduations to verify the length measurement. Place the ruler along the length of the nut and compare the reading to your caliper measurement.
- Check Multiple Points: If the nut has any irregularities or curves, measure the length at multiple points to ensure accuracy.
- Account for Overhang (If Any): If the original nut extends slightly beyond the edge of the fretboard, note this overhang and include it in your measurement.
- Round to the Nearest Increment: Round the measurement to the nearest standard increment (e.g., 0.5 mm or 1/64 inch).
- Record the Measurement: Write down the final length measurement in your notebook, along with the unit of measure (mm or inches).
By following these steps, you can accurately measure the length of your guitar nut and ensure that your replacement nut fits perfectly in the nut slot.
 Measuring guitar nut length with digital calipers
5. What’s the Best Way to Measure the Width (Thickness) of a Guitar Nut?
Measuring the width, or thickness, of a guitar nut is essential because it affects the string spacing and the overall feel of the guitar. Accurate width measurements ensure that the replacement nut sits properly in the nut slot without being too tight or too loose. Here’s a detailed guide on how to measure the width of a guitar nut:
- Use Digital Calipers: As with the length measurement, digital calipers are the most accurate tool for measuring the width of a guitar nut.
- Position the Nut: Open the calipers wide enough to accommodate the width of the nut. Place the nut between the jaws of the calipers, ensuring that the jaws are perpendicular to the nut’s length.
- Close the Calipers: Gently close the calipers until the jaws make contact with the front and back surfaces of the nut. Be careful not to apply excessive pressure, which can compress the material and distort the measurement.
- Read the Measurement: Read the measurement displayed on the digital caliper. Record the measurement in your notebook.
- Verify with a Ruler: Use a ruler with fine graduations to verify the width measurement. Place the ruler against the width of the nut and compare the reading to your caliper measurement.
- Check Multiple Points: If the nut has any irregularities or curves, measure the width at multiple points to ensure accuracy.
- Account for Taper (If Any): Some nuts have a slight taper from the bottom to the top. Measure the width at both the bottom and the top of the nut and note any difference.
- Check Nut Slot: The nut slot on the guitar should be measured if possible.
- Round to the Nearest Increment: Round the measurement to the nearest standard increment (e.g., 0.5 mm or 1/64 inch).
- Record the Measurement: Write down the final width measurement in your notebook, along with the unit of measure (mm or inches).
By following these steps, you can accurately measure the width of your guitar nut and select a replacement nut that fits properly in the nut slot.
 Measuring guitar nut thickness with digital calipers
6. How Do I Measure the Height of a Guitar Nut Correctly?
Measuring the height of a guitar nut is critical for setting the proper string height at the first fret. The height of the nut affects playability, intonation, and string buzz. Here’s how to measure the height of a guitar nut correctly:
- Use Digital Calipers: Digital calipers are, again, the most precise tool for measuring the height of a guitar nut.
- Position the Nut: Open the calipers wide enough to accommodate the height of the nut. Place the nut between the jaws of the calipers, ensuring that the jaws are perpendicular to the nut’s width.
- Close the Calipers: Gently close the calipers until the jaws make contact with the bottom and top surfaces of the nut. Be careful not to apply excessive pressure.
- Read the Measurement: Read the measurement displayed on the digital caliper. Record the measurement in your notebook.
- Verify with a Ruler: Use a ruler with fine graduations to verify the height measurement. Place the ruler against the height of the nut and compare the reading to your caliper measurement.
- Check Multiple Points: Measure the height at multiple points along the nut, especially if the top surface is uneven or curved.
- Measure from Fretboard: If the nut is still installed, you can measure the height from the top of the fretboard to the top of the nut using a precision ruler.
- Consider String Height: The ideal nut height is typically just slightly higher than the first fret. Use feeler gauges to measure the string height above the first fret. A common starting point is around 0.020 inches (0.5 mm) for the high E string and 0.025 inches (0.6 mm) for the low E string.
- Round to the Nearest Increment: Round the measurement to the nearest standard increment (e.g., 0.5 mm or 1/64 inch).
- Record the Measurement: Write down the final height measurement in your notebook, along with the unit of measure (mm or inches).
By following these steps, you can accurately measure the height of your guitar nut and select a replacement nut that allows for optimal string height and playability.
 Measuring guitar nut height with digital calipers
7. How to Determine the Correct String Spacing (E to E)?
Determining the correct string spacing, often referred to as “E to E” spacing, is crucial for comfortable and consistent finger placement on the fretboard. Accurate string spacing ensures that chords are easier to play and that the guitar’s intonation is optimized. Here’s a step-by-step guide:
- Use a String Spacing Rule: A string spacing rule is a specialized ruler designed for measuring the distance between strings at the nut and bridge. These rulers have precisely marked increments for accurate measurements.
- Position the Rule: Place the string spacing rule across the nut, aligning the edge of the ruler with the center of the outermost strings (the high E and low E strings).
- Read the Measurement: Read the measurement on the string spacing rule that corresponds to the distance between the centers of the E strings.
- Measure with Calipers: If you don’t have a string spacing rule, you can use digital calipers to measure the distance between the centers of each string slot on the nut. Add up the individual measurements to get the total “E to E” spacing.
- Consider Fretboard Width: The string spacing at the nut should be proportional to the width of the fretboard at the nut. A wider fretboard typically requires wider string spacing.
- Check Existing Spacing: If you’re replacing an existing nut, measure the string spacing on the old nut before removing it. This provides a reference point for the new nut.
- Account for Personal Preference: String spacing is somewhat subjective. Some players prefer wider spacing for fingerstyle playing, while others prefer narrower spacing for faster chord changes. Consider your personal preferences when determining the correct string spacing.
- Average Spacing: Most six-string electric guitars have an “E to E” spacing at the nut of around 1 7/16 inches (36.5 mm) to 1 1/2 inches (38.1 mm). Acoustic guitars typically have slightly wider spacing.
- Record the Measurement: Write down the final string spacing measurement in your notebook, along with the unit of measure (mm or inches).
By following these steps, you can determine the correct string spacing for your guitar nut and ensure comfortable and consistent playability.
 Measuring string spacing on a guitar nut
8. What Should I Know About Measuring Slot Depth?
Measuring the slot depth of a guitar nut is crucial for ensuring proper string height and preventing string buzz. The slot depth affects the break angle of the strings over the nut and their clearance above the first fret. Here’s what you should know about measuring slot depth:
- Feeler Gauges: Feeler gauges are thin, precise metal strips used to measure the gap between the bottom of the string and the top of the first fret. Use a set of feeler gauges to determine the ideal string height above the first fret. A common starting point is around 0.020 inches (0.5 mm) for the high E string and 0.025 inches (0.6 mm) for the low E string.
- String Height: The slot depth should be deep enough to allow the strings to sit comfortably in the slots without being too low or too high. If the slots are too shallow, the strings will sit too high above the first fret, making the guitar difficult to play. If the slots are too deep, the strings may buzz against the first few frets.
- Break Angle: The break angle is the angle at which the strings pass over the nut. A steeper break angle typically results in better tone and sustain, while a shallower break angle may cause the strings to slip out of the slots.
- Filing the Slots: Nut files are specialized files designed for shaping and deepening the string slots. Use nut files with the appropriate gauge for each string to achieve the desired slot depth. Be careful not to file the slots too deep, as this can cause buzzing.
- Consistency: Ensure that the slot depth is consistent across all the strings. Uneven slot depths can cause inconsistent string height and playability issues.
- Lubrication: After filing the slots, lubricate them with a graphite-based lubricant or nut sauce. This reduces friction and prevents the strings from binding in the slots, improving tuning stability.
- Professional Help: If you’re not comfortable measuring and adjusting the slot depth yourself, consider seeking help from a professional guitar technician.
- Test: Test the new nut by plucking each string while open and making sure that you have no fret buzz.
By understanding these key considerations, you can accurately measure and adjust the slot depth of your guitar nut for optimal performance.
9. What If My Guitar Has a Curved Fretboard?
If your guitar has a curved fretboard, measuring the nut requires extra attention to ensure a proper fit and optimal playability. A curved fretboard, also known as a radiused fretboard, has a slight arc across its width. The nut needs to match this radius to maintain consistent string height and prevent buzzing. Here’s what you need to consider:
- Measure the Fretboard Radius: The first step is to determine the radius of your guitar’s fretboard. This measurement indicates the amount of curvature across the fretboard. Common fretboard radii include 7.25 inches, 9.5 inches, 10 inches, 12 inches, 14 inches, and 16 inches.
- Radius Gauges: Radius gauges are specialized tools used to measure the curvature of a fretboard. Place the radius gauge on the fretboard and compare the curvature of the gauge to the curvature of the fretboard. The gauge that matches the fretboard’s curvature indicates the radius.
- Curved Nut Bottom: The bottom of the nut needs to match the radius of the fretboard to ensure that it sits flush against the fretboard surface. If the nut has a flat bottom, it will create gaps between the nut and the fretboard, which can cause buzzing and intonation problems.
- Sanding the Nut: If you’re installing a new nut on a guitar with a curved fretboard, you may need to sand the bottom of the nut to match the fretboard radius. Use a radius block and sandpaper to carefully shape the bottom of the nut to the desired curvature.
- Test the Fit: After sanding the nut, test the fit by placing it on the fretboard and checking for any gaps or rocking. The nut should sit flush against the fretboard surface without any movement.
- Professional Installation: If you’re not comfortable sanding and shaping the nut yourself, consider seeking help from a professional guitar technician.
- Adjust String Height: After installing the nut, you may need to adjust the string height to compensate for the fretboard radius. The string height should be consistent across all the strings, with the high E string slightly lower than the low E string.
By considering these factors, you can accurately measure and install a nut on a guitar with a curved fretboard for optimal playability and tone.
10. How Do I Choose the Right Nut Material After Measuring?
Choosing the right nut material after measuring is a crucial step in optimizing your guitar’s tone, playability, and tuning stability. The nut material affects how the strings vibrate and transmit energy to the guitar’s neck and body. Here’s a guide to help you select the best nut material for your needs:
-
TUSQ: TUSQ is a synthetic ivory material that offers consistent density and excellent tonal properties. It enhances sustain, clarity, and harmonic content. TUSQ is a popular choice for acoustic guitars and electric guitars. According to Graph Tech Guitar Labs, TUSQ can provide up to 200% more harmonic content than bone.
-
Bone: Bone is a traditional nut material that provides a warm, balanced tone. It’s durable and long-lasting, making it a popular choice for vintage and high-end guitars. Bone nuts require careful shaping and slotting for optimal performance.
-
Black TUSQ XL: Black TUSQ XL is a variation of TUSQ that’s impregnated with PTFE (Teflon) to reduce friction and improve tuning stability. It’s a great choice for electric guitars with tremolo systems or for players who frequently bend strings.
-
TUSQ XL: TUSQ XL offers the same benefits as Black TUSQ XL but in a traditional ivory color. It’s a popular choice for players who want the look of bone with the performance of TUSQ XL.
-
NuBone: NuBone is a derivative of TUSQ that’s designed for budget-conscious repairs. It provides a balanced tone and good durability at an affordable price.
-
NuBone XB: NuBone XB is a newer material that’s designed for instruments that require more bass response and harmonics, such as ukuleles and small-bodied guitars.
-
Brass: Brass nuts offer a bright, metallic tone with excellent sustain. They’re durable and resistant to wear, but they can be harder on strings than other materials.
-
Plastic: Plastic nuts are the most affordable option, but they typically don’t offer the best tonal properties or durability. They’re often found on entry-level guitars.
Once you have selected the nut material you can match the product sizing code with the material prefix and you’ll get the exact part you’re looking for.
Consider your playing style, the type of guitar you have, and your tonal preferences when choosing a nut material. Experiment with different materials to find the one that sounds and performs best for you.
 Guitar nuts made of different materials
11. Can I Use a Blank Nut If I Can’t Find the Exact Size?
Yes, using a blank nut is a viable option if you can’t find a pre-slotted nut that matches your guitar’s exact dimensions. A blank nut is an unshaped piece of nut material that you can customize to fit your guitar perfectly. Here’s what you need to know about using blank nuts:
- Oversized: Blank nuts are typically oversized, meaning they’re larger than the nut slot on your guitar. This allows you to shape and sand the nut to the precise dimensions you need.
- Material Options: Blank nuts are available in a variety of materials, including TUSQ, bone, brass and plastic. Choose a material that matches your tonal preferences and budget.
- Shaping: Shaping a blank nut requires patience, precision, and the right tools. You’ll need files, sandpaper, and a straight edge to shape the nut to the correct length, width, and height.
- Slotting: After shaping the nut, you’ll need to cut the string slots. Use nut files with the appropriate gauge for each string to create the slots. Be careful not to file the slots too deep, as this can cause buzzing.
- Filing: To correctly file the nut, remember the final extension indicates whether it’s for right- or left-hand orientation.
- Contouring: Contour the top of the nut for comfort.
- Professional Installation: If you’re not comfortable shaping and slotting a blank nut yourself, consider seeking help from a professional guitar technician.
- Customization: Using a blank nut allows you to customize the string spacing and slot depth to your exact preferences. This can be especially useful for players with unique playing styles or guitars with unusual dimensions.
While using a blank nut requires more work than installing a pre-slotted nut, it offers the flexibility to achieve a perfect fit and optimize your guitar’s performance.
12. What Are Some Common Mistakes to Avoid When Measuring?
Measuring a guitar nut accurately is crucial for ensuring a proper fit and optimal performance. However, it’s easy to make mistakes that can lead to an ill-fitting nut and playability issues. Here are some common mistakes to avoid when measuring a guitar nut:
- Using the Wrong Tools: Using inaccurate or inappropriate tools can lead to measurement errors. Always use digital calipers for precise measurements and a string spacing rule for accurate string spacing.
- Not Removing the Strings: Attempting to measure the nut with the strings still on the guitar can be difficult and inaccurate. Always remove the strings before measuring the nut.
- Applying Too Much Pressure: Applying excessive pressure when using calipers can compress the nut material and distort the measurement. Use a gentle touch when closing the calipers.
- Measuring at an Angle: Measuring the nut at an angle can lead to inaccurate readings. Ensure that the calipers are perpendicular to the surface you’re measuring.
- Not Accounting for Wear: If the nut is worn or damaged, the measurements may not be accurate. Inspect the nut for wear and factor it into your measurements.
- Rounding Errors: Rounding measurements to the nearest whole number can lead to significant errors. Round to the nearest standard increment (e.g., 0.5 mm or 1/64 inch) for greater accuracy.
- Forgetting String Spacing: String spacing is a critical factor in playability. Don’t forget to measure the string spacing and choose a replacement nut with the correct spacing.
- Ignoring Fretboard Radius: If your guitar has a curved fretboard, ignoring the radius can lead to an ill-fitting nut. Measure the fretboard radius and choose a nut that matches the curvature.
- Skipping Verification: Always verify your measurements with a ruler or other measuring tool to ensure accuracy.
- Not Recording Measurements: Failing to record your measurements can lead to confusion and errors when ordering a replacement nut. Write down all measurements in a notebook.
By avoiding these common mistakes, you can accurately measure your guitar nut and choose a replacement that fits perfectly and enhances your playing experience.
13. How Does the Nut Affect a Guitar’s Tone?
The guitar nut plays a subtle but important role in shaping the instrument’s tone. As the point where the strings first make contact with the guitar, the nut influences how vibrations are transmitted to the neck and body, affecting sustain, clarity, and overall tonal balance. Here’s how the nut affects a guitar’s tone:
- Material: The material of the nut has a significant impact on tone. Harder materials like bone and TUSQ tend to produce a brighter, more articulate tone with enhanced sustain. Softer materials like plastic may dampen vibrations and result in a duller tone.
- Density: Denser nut materials typically transmit vibrations more efficiently, resulting in better sustain and clarity. Consistent density is also important for even tonal response across all strings.
- Contact: The quality of contact between the nut and the strings affects tone. A well-fitted nut with properly shaped slots ensures optimal contact and efficient transfer of vibrations. Gaps or poorly shaped slots can dampen vibrations and reduce sustain.
- String Height: The height of the strings above the first fret, determined by the nut slots, affects tone. If the strings are too high, they may be difficult to fret and produce a thin, weak tone. If the strings are too low, they may buzz against the frets.
- Slot Shape: The shape of the nut slots affects tone. Properly shaped slots allow the strings to vibrate freely without binding or buzzing. Sharp edges or poorly shaped slots can dampen vibrations and reduce sustain.
- Break Angle: The break angle of the strings over the nut affects tone. A steeper break angle typically results in better tone and sustain, while a shallower break angle may cause the strings to slip out of the slots.
- Vibrational Transfer: The nut transfers the strings vibrations down the neck and body of the guitar to create resonance for the guitar.
While the nut is just one component in the overall tonal equation, choosing the right nut material and ensuring a proper fit can make a noticeable difference in your guitar’s tone.
14. Where Can I Find Reputable Guitar Techs in the USA for Nut Replacement?
Finding a reputable guitar technician for nut replacement in the USA can ensure that the job is done correctly and that your guitar’s playability and tone are optimized. Here are some resources and tips for finding qualified guitar techs:
- Local Music Stores: Start by asking for recommendations at local music stores. They often have a list of trusted guitar techs in the area.
- Online Forums: Online guitar forums and communities are great resources for finding recommendations. Ask other guitar players in your area for their experiences with local techs.
- Yelp and Google Reviews: Check Yelp and Google Reviews for ratings and reviews of guitar techs in your area. Pay attention to the comments about their expertise, customer service, and pricing.
- Guitar Tech Associations: Look for guitar techs who are members of professional associations like the Association of Stringed Instrument Artisans (ASIA). Membership in these organizations indicates a commitment to quality and professionalism.
- Referrals: Ask your guitar-playing friends, bandmates, or instructors for referrals. Personal recommendations are often the most reliable.
- Experience: Look for guitar techs with extensive experience in nut replacement and other guitar repairs. Ask about their qualifications and training.
- Certifications: Some guitar techs hold certifications from reputable organizations like the Fender or Gibson factories. These certifications demonstrate a high level of expertise.
- Warranty: Ask if the guitar tech offers a warranty on their work. A warranty provides peace of mind and ensures that you’re protected if any issues arise.
- Cost: Get quotes from multiple guitar techs before making a decision. Compare their prices and services to find the best value.
When contacting potential guitar techs, ask about their experience with nut replacement, the materials they use, and their turnaround time. Choose a tech who is knowledgeable, professional, and willing to answer your questions.
15. How Often Should a Guitar Nut Be Replaced?
The lifespan of a guitar nut can vary depending on several factors, including the material, playing style, and environmental conditions. While there’s no set schedule for nut replacement, here are some general guidelines:
-
Material: Nuts made from harder materials like bone and TUSQ tend to last longer than nuts made from softer materials like plastic.
-
Playing Style: Aggressive playing styles with frequent string bending can accelerate wear on the nut slots.
-
String Gauge: Using heavier gauge strings can put more pressure on the nut and cause it to wear faster.
-
Lubrication: Regularly lubricating the nut slots with a graphite-based lubricant can reduce friction and prolong the nut’s lifespan.
-
Symptoms of Wear: Look for signs of wear, such as:
- String buzz, especially on open strings
- Difficulty tuning
- Strings slipping out of the slots
- Visible wear or damage to the slots
-
Professional Inspection: Have your guitar inspected by a professional guitar technician periodically. They can assess the condition of the nut and recommend replacement if necessary.
-
Years: As a general rule, a well-maintained bone or TUSQ nut can last for 10 years or more. Plastic nuts may need to be replaced more frequently.
-
Personal Preference: Some players choose to replace their guitar nut as part of a regular maintenance routine, even if there are no obvious signs of wear. This can ensure optimal performance and tone.
Ultimately, the decision of when to replace a guitar nut depends on your individual circumstances and preferences. If you notice any signs of wear or playability issues, it’s best to have the nut inspected by a professional.
16. What is the Cost of Replacing a Guitar Nut in the USA?
The cost of replacing a guitar nut in the USA can vary depending on several factors, including the type of guitar, the nut material, and the guitar technician’s rates. Here’s a general overview of the costs involved:
-
Labor Costs: The labor cost for nut replacement typically ranges from $50 to $150, depending on the complexity of the job and the technician’s experience.
-
Nut Material Costs: The cost of the nut material can range from $10 for a basic plastic nut to $50 or more for a high-end bone or TUSQ nut.
-
Total Cost: The total cost of nut replacement, including labor and materials, typically ranges from $60 to $200.
-
Additional Services: Some guitar techs may charge extra for additional services, such as:
- String change: $10 to $20
- Fretboard cleaning and conditioning: $20 to $40
- Intonation adjustment: $20 to $40
-
DIY vs. Professional: If you’re comfortable replacing the nut yourself, you can save on labor costs. However, nut replacement requires specialized tools and skills, so it’s best left to a professional if you’re not experienced.
-
Get Quotes: Get quotes from multiple guitar techs before making a decision. Compare their prices and services to find the best value.
Keep in mind that these are just general estimates. The actual cost of nut replacement may vary depending on your location and the specific services you require.
17. How Can I Maintain My Guitar Nut to Prolong Its Life?
Proper maintenance can significantly prolong the life of your guitar nut and ensure optimal performance. Here are some tips for maintaining your guitar nut:
- Lubrication: Regularly lubricate the nut slots with a graphite-based lubricant or nut sauce. This reduces friction and prevents the strings from binding in the slots, improving tuning stability and reducing wear.
- Cleaning: Keep the nut clean by wiping it down with a soft cloth after each playing session. Remove any dirt, sweat, or grime that can accumulate in the slots.
- String Changes: When changing strings, be careful not to damage the nut slots. Avoid using sharp tools or excessive force.
- String Gauge: Use the appropriate string gauge for your guitar. Using heavier gauge strings than recommended can put excessive pressure on the nut and cause it to wear faster.
- Humidity Control: Store your guitar in a case or room with consistent humidity levels. Extreme humidity can cause the nut to expand or contract, leading to cracks or other damage.
- Professional Inspections: Have your guitar inspected by a professional guitar technician periodically. They can assess the condition of the nut and recommend any necessary maintenance or repairs.
- Avoid Chemicals: Avoid using harsh chemicals or solvents to clean the nut. These can damage the nut material and affect its performance.
- Loosen Strings: If you aren’t going to play your guitar for a prolonged amount of time, loosen the strings to take the pressure off of the nut.
By following these maintenance tips, you can keep your guitar nut in good condition and enjoy optimal performance for years to come.
18. What are the Advantages of Upgrading My Guitar Nut?
Upgrading your guitar nut can offer several advantages in terms of tone, playability, and tuning stability. While the nut is a small component, it plays a crucial role in the overall performance of your instrument. Here are some of the benefits of upgrading your guitar nut:
- Improved Tone: Upgrading to a higher-quality nut material, such as bone or TUSQ, can enhance your guitar’s tone. These materials tend to produce a brighter, more articulate tone with improved sustain and clarity.
- Enhanced Playability: A well-shaped and properly slotted nut can improve playability by ensuring consistent string height and spacing. This can make chords easier to play and reduce finger fatigue.
- Better Tuning Stability: Upgrading to a nut material with low friction, such as TUSQ XL or Black TUSQ XL, can improve tuning stability. These materials allow the strings to glide smoothly through the slots,