
Making an acoustic guitar strap involves more than just aesthetics; it’s about ensuring comfort, security, and personalization for your playing experience. At guitarplayers.net, we guide guitar enthusiasts on customizing their straps, enhancing playability, and reflecting their unique style. This comprehensive guide explores the essentials of acoustic guitar straps, from material selection to secure attachment methods, ensuring your guitar stays safe and your performance shines. Dive in to discover how to create a strap that perfectly complements your instrument and playing style, improving your guitar playing!
Table of Contents
- Understanding the Essentials of Acoustic Guitar Straps
- Selecting the Right Materials for Your Acoustic Guitar Strap
- Tools and Equipment Needed to Craft Your Own Strap
- Step-by-Step Guide: Creating Your Acoustic Guitar Strap
- Mastering the Art of Attaching Your Strap: Secure and Stylish Methods
- Customization Techniques: Personalizing Your Acoustic Guitar Strap
- Ensuring Durability: Maintenance and Care Tips for Your Strap
- Exploring Alternatives: Creative Solutions for Guitar Strap Attachment
- DIY vs. Buying: Weighing the Options for Acoustic Guitar Straps
- Troubleshooting Common Issues with Homemade Guitar Straps
- Elevating Your Guitar Playing Experience with the Perfect Strap
- Frequently Asked Questions (FAQ)
1. Understanding the Essentials of Acoustic Guitar Straps
What is the primary function of an acoustic guitar strap?
An acoustic guitar strap’s main job is to securely hold your guitar, letting you play comfortably whether you’re standing or sitting. It helps distribute the guitar’s weight evenly, which can reduce strain and make playing more enjoyable. The right strap can also improve your posture and technique by keeping the guitar in the correct position.
Besides comfort, a guitar strap also adds a personal touch to your instrument. You can choose straps with unique designs, materials, and colors to match your style. Many guitarists see their strap as an extension of their personality, making it an important part of their overall performance look. At guitarplayers.net, we value how a well-chosen strap combines functionality with personal expression, enhancing every aspect of your musical journey.
How does the design of an acoustic guitar influence strap selection?
The design of an acoustic guitar significantly influences strap selection because guitars vary in size, shape, and the location of strap buttons. Dreadnought guitars, known for their larger bodies, may require longer straps to ensure the guitar sits comfortably. Parlor guitars, being smaller, might need shorter, lighter straps. The placement of strap buttons also affects how the guitar hangs, influencing the choice of strap material and attachment method.
Furthermore, the guitar’s finish and value play a role. For high-end or vintage guitars, players often prefer straps that offer extra protection, such as those with soft padding or secure locking mechanisms, to prevent scratches or accidental drops. The aesthetic of the guitar also matters; a visually striking guitar might pair well with a simple, elegant strap, while a more understated instrument could be complemented by a bolder, more decorative strap. Considering these factors ensures the strap is both functional and visually harmonious with the guitar. For more tips and resources on selecting the perfect strap, visit guitarplayers.net.
Why is choosing the right acoustic guitar strap important for players?
Choosing the right acoustic guitar strap is vital for guitar players because it affects comfort, playing posture, and instrument safety. A well-chosen strap distributes the guitar’s weight evenly, preventing neck or shoulder strain, especially during long performances or practice sessions. Proper support ensures that the guitar remains in the correct position, allowing for better access to the fretboard and improved playing technique.
Additionally, the right strap enhances instrument safety. High-quality straps and secure attachment methods reduce the risk of the guitar slipping or falling, protecting it from potential damage. The strap also reflects a player’s personal style, adding a visual element to their performance. Guitarplayers.net offers resources and guides to help players find straps that meet their specific needs, balancing comfort, security, and personal expression.
 Acoustic guitar with strap button on the heel of the neck
2. Selecting the Right Materials for Your Acoustic Guitar Strap
What materials are commonly used for acoustic guitar straps, and what are their pros and cons?
Acoustic guitar straps are commonly made from leather, nylon, cotton, and sometimes even repurposed materials like seatbelts or hemp. Each material offers unique benefits and drawbacks:
-
Leather: Known for its durability and classic look, leather straps can last for years and often become more comfortable with age. However, they can be more expensive and may require a break-in period.
-
Nylon: Nylon straps are affordable, strong, and come in various colors and designs. They are also easy to clean and maintain. The downside is that they may not be as comfortable as other materials, especially with heavier guitars, and can sometimes feel slippery.
-
Cotton: Cotton straps are soft, comfortable, and eco-friendly. They are a good option for players with sensitive skin. However, they may not be as durable as leather or nylon and can wear out more quickly.
-
Repurposed Materials: Straps made from seatbelts or hemp offer a unique and sustainable option. Seatbelts are incredibly durable and smooth, while hemp is strong and environmentally friendly. The aesthetics can vary widely depending on the source material, and comfort depends on the specific weave and width.
The choice of material depends on your priorities, such as comfort, durability, budget, and style. Guitarplayers.net provides a range of articles and reviews to help you make an informed decision based on your specific needs and preferences.
How does the choice of material affect the comfort and durability of a guitar strap?
The material of a guitar strap significantly affects its comfort and durability. Softer materials like cotton and padded neoprene provide greater comfort, reducing pressure on your shoulder and neck, which is crucial for long playing sessions. However, these may not be as durable as tougher materials.
Durable materials such as leather and nylon can withstand years of use, resisting wear and tear from regular performances. Leather, in particular, molds to your body over time, offering personalized comfort, but it requires proper maintenance to prevent cracking or drying out. Nylon is highly resistant to stretching and tearing, making it a reliable choice for heavier guitars.
Ultimately, the best material balances comfort with durability, depending on your playing style, the weight of your guitar, and how often you use it. Guitarplayers.net offers insights and comparisons to help you find the perfect balance.
Are there eco-friendly or sustainable materials for guitar straps?
Yes, there are several eco-friendly and sustainable materials available for guitar straps. These options appeal to environmentally conscious musicians looking to minimize their impact:
-
Hemp: Hemp is a highly sustainable material known for its strength and durability. It requires minimal pesticides and water to grow, making it an excellent choice for eco-friendly straps.
-
Organic Cotton: Straps made from organic cotton are grown without synthetic pesticides or fertilizers, reducing environmental harm. They are soft, comfortable, and biodegradable.
-
Recycled Materials: Straps made from recycled materials, such as plastic bottles (PET) or reclaimed fabrics, help reduce waste and conserve resources.
-
Vegan Leather: Made from plant-based materials like pineapple leaves (Piñatex) or apple peels, vegan leather offers a cruelty-free alternative to traditional leather while maintaining a similar look and feel.
Choosing sustainable materials supports environmentally responsible practices and helps promote a greener music industry. Guitarplayers.net highlights brands and products that prioritize sustainability, making it easier for musicians to make eco-conscious choices.
3. Tools and Equipment Needed to Craft Your Own Strap
What are the essential tools for making a guitar strap?
Crafting your own guitar strap requires a few essential tools to ensure precision, durability, and a professional finish. Here’s a list of what you’ll need:
- Cutting Tools:
- Rotary Cutter or Heavy-Duty Scissors: For cutting fabric or leather accurately.
- Leather Knife/Utility Knife: For precise cuts on thicker materials like leather.
- Measuring and Marking Tools:
- Ruler or Measuring Tape: To measure the length and width of the strap.
- Fabric Marker or Pencil: To mark cutting lines and design elements.
- Sewing Tools:
- Sewing Machine: A heavy-duty sewing machine is ideal for stitching leather or thick fabrics.
- Needles and Thread: Choose strong needles and thread appropriate for the material (e.g., leather needles for leather).
- Sewing Awl: For punching holes in leather to assist with hand stitching.
- Fastening Tools:
- Hole Punch: To create holes for buckles, snaps, or strap button attachments.
- Riveter Kit: To secure rivets for added strength.
- Hammer: For setting rivets and hardware.
- Finishing Tools:
- Edge Beveler: For smoothing the edges of leather straps.
- Sandpaper: For smoothing rough edges on fabric or leather.
- Leather Conditioner or Sealant: To protect and finish leather straps.
Having these tools on hand will make your guitar strap project smoother and more enjoyable, resulting in a high-quality, personalized accessory. Guitarplayers.net offers tutorials and tips on using these tools effectively.
How do you select the right sewing machine for working with different strap materials?
Selecting the right sewing machine for different guitar strap materials depends on the thickness and type of material you plan to use. Here’s a guide to help you choose:
-
Lightweight Fabrics (Cotton, Nylon): A standard home sewing machine with adjustable settings should suffice. Ensure it has a durable needle that can handle multiple layers of fabric.
-
Medium-Weight Materials (Thick Cotton, Hemp): Look for a sewing machine labeled as “heavy-duty” or one that specifies it can handle denim or canvas. These machines typically have stronger motors and can manage thicker materials without straining.
-
Heavyweight Materials (Leather, Thick Vinyl): For leather or very thick materials, you’ll need an industrial sewing machine or a specialized leather sewing machine. These machines have powerful motors, specialized feet, and the ability to use thicker threads and needles designed for leatherwork.
Key features to consider include:
- Motor Power: A stronger motor ensures the machine can penetrate thick materials consistently.
- Needle Type: Use the correct needle type for your material (e.g., leather needles have a chisel point).
- Adjustable Presser Foot Pressure: This allows you to adjust the pressure on the fabric, preventing slippage or damage.
- Stitch Length and Width Control: Essential for creating consistent and durable stitches.
Check sewing machine reviews and consult with sewing experts to find a machine that fits your specific needs. Guitarplayers.net also offers advice and recommendations on sewing machines suitable for guitar strap making.
Where can you source high-quality materials and hardware for guitar straps?
Sourcing high-quality materials and hardware is crucial for creating durable and professional-looking guitar straps. Here are some reliable sources:
-
Local Fabric Stores: Local fabric stores often carry a variety of materials like cotton, nylon, and webbing suitable for guitar straps. They also offer hardware such as buckles, sliders, and D-rings.
-
Leather Supply Stores: For leather straps, leather supply stores are your best bet. They offer a wide selection of leather hides, leatherworking tools, and hardware specifically designed for leather projects.
-
Online Retailers:
- Amazon: A vast marketplace with numerous sellers offering guitar strap materials and hardware. Check reviews carefully to ensure quality.
- Etsy: Ideal for finding unique, handmade, or vintage materials and hardware. Many sellers specialize in guitar strap components.
- Specialty Craft Websites: Websites like Leather Honey, Tandy Leather, and Buckle Guy specialize in leather and hardware supplies, offering high-quality products and expert advice.
-
Repurposed Materials: Consider using recycled materials like seatbelts from junkyards or thrift stores for a unique and sustainable option.
When sourcing materials, prioritize quality and durability. Read reviews, check material specifications, and consider purchasing samples before committing to larger quantities. Guitarplayers.net provides curated lists and recommendations for trusted suppliers to help you find the best materials for your project.
4. Step-by-Step Guide: Creating Your Acoustic Guitar Strap
How do you measure and cut the material for your acoustic guitar strap?
Measuring and cutting the material for your acoustic guitar strap accurately is essential for a comfortable and well-fitting accessory. Follow these steps:
- Determine the Length:
- Use a measuring tape to determine the desired length of your guitar strap. Standard acoustic guitar straps range from 40 to 60 inches, but personal preference varies. Consider whether you prefer the guitar to sit high or low.
- Determine the Width:
- Decide on the width of your strap. Common widths are 2 to 3 inches. Wider straps distribute weight better but may feel bulkier.
- Prepare the Material:
- Lay your chosen material (leather, fabric, nylon webbing) flat on a clean, stable surface. Smooth out any wrinkles or folds.
- Mark the Measurements:
- Use a fabric marker or pencil to mark the length and width on the material. Use a ruler or measuring tape to ensure straight, accurate lines.
- Cut the Material:
- For Fabric: Use sharp fabric scissors or a rotary cutter and a cutting mat. Follow the marked lines carefully to cut out the strap.
- For Leather: Use a leather knife or utility knife and a metal ruler. Make smooth, controlled cuts, taking care to avoid jagged edges.
- For Nylon Webbing: Use a hot knife or a sharp pair of scissors. Sealing the edges with heat prevents fraying.
- Check for Accuracy:
- Double-check the measurements and ensure the strap is the correct length and width. Trim any uneven edges for a clean, professional look.
Following these steps ensures your guitar strap is the perfect size and shape for comfortable playing. Guitarplayers.net offers detailed tutorials and video guides to assist you through each step.
What are the best sewing techniques for assembling a durable guitar strap?
Assembling a durable guitar strap requires specific sewing techniques to ensure it can withstand the rigors of regular use. Here are some of the best practices:
- Choose the Right Thread:
- Use heavy-duty thread made from nylon or polyester. These threads are stronger and more resistant to wear than standard cotton threads.
- Select the Correct Needle:
- Use a needle appropriate for the material you are sewing. Leather needles have a chisel point to penetrate the hide, while universal needles work well for fabrics and nylon.
- Use a Strong Stitch:
- Straight Stitch: Use a short stitch length (2.5-3mm) for added strength.
- Backstitch: Reinforce the beginning and end of each seam with a backstitch to prevent unraveling.
- Zigzag Stitch: Use a zigzag stitch for added elasticity, especially on areas that will experience stress or movement.
- Reinforce Stress Points:
- Box Stitch: Sew a box stitch around areas where hardware (like buckles or strap button attachments) is attached. This distributes stress and prevents tearing.
- Multiple Rows of Stitching: Sew multiple rows of stitching along the length of the strap and around hardware attachments for extra durability.
- Edge Finishing:
- Fold and Sew Edges: Fold the edges of the fabric over and sew them down to prevent fraying and create a clean finish.
- Edge Binding: Use bias tape or edge binding to encase the edges of the strap for a polished look and added durability.
- Leather Specific Techniques:
- Hand Stitching: For leather, hand stitching with a saddle stitch is incredibly strong and durable. Use an awl to create the holes and stitch with two needles for a secure seam.
- Rivets: Use rivets to reinforce areas where hardware is attached. Rivets provide a mechanical bond that complements stitching.
By using these sewing techniques, you can create a guitar strap that is not only stylish but also strong and reliable. Guitarplayers.net provides step-by-step tutorials and visual aids to help you master these techniques.
How do you attach strap ends and hardware securely?
Attaching strap ends and hardware securely is crucial for the safety and functionality of your guitar strap. Here’s a detailed guide on how to do it properly:
- Prepare the Strap Ends:
- Fold the ends of the strap over to create a loop for attaching hardware. The size of the loop depends on the size of the buckle or strap button attachment you are using.
- For fabric straps, fold the edges over twice to prevent fraying and create a clean, finished edge.
- Sew the Loops:
- Use a heavy-duty sewing machine with a strong needle and thread. Sew the loops securely with multiple rows of stitching.
- Reinforce the stitching with a box stitch or zigzag stitch for added strength.
- Use Rivets for Extra Security:
- For leather straps or areas that require additional reinforcement, use rivets. Punch holes through the layers of material and insert the rivet.
- Use a rivet setter and hammer to secure the rivet in place. Make sure the rivet is set tightly to prevent it from coming loose.
- Attach Buckles and Sliders:
- Thread the strap end through the buckle or slider. Fold the end over and sew it securely, ensuring the hardware is firmly attached.
- Use multiple rows of stitching and a box stitch to reinforce the attachment.
- Attach Strap Button Attachments:
- If your guitar has strap buttons, attach the strap ends directly to the buttons. Ensure the strap ends fit snugly and securely over the buttons.
- For acoustic guitars without a second strap button, you may need to use a leather or nylon cord to tie the strap to the headstock (see Section 5 for more details).
- Check for Stability:
- Once the hardware is attached, test the strap by pulling and tugging on the ends. Make sure everything is secure and there are no loose threads or weak points.
- Inspect the stitching and rivets to ensure they are holding firmly.
By following these steps, you can confidently attach strap ends and hardware, ensuring your guitar strap is safe and reliable. Guitarplayers.net offers visual guides and expert tips to help you with each step.
5. Mastering the Art of Attaching Your Strap: Secure and Stylish Methods
What are the standard methods for attaching a guitar strap to an acoustic guitar?
Attaching a guitar strap to an acoustic guitar typically involves using the existing strap buttons or installing one if necessary. Here are the standard methods:
- Using Two Strap Buttons:
- If your acoustic guitar has two strap buttons (one at the base of the body and one on the heel of the neck), simply attach the strap ends to the buttons. Ensure the strap ends fit snugly and securely over the buttons. Consider using strap locks for added security.
- Using One Strap Button and a Headstock Tie:
- If your guitar only has one strap button at the base, you’ll need to tie the other end of the strap to the headstock. Use a leather or nylon cord, or a specialized headstock strap attachment.
- Thread the cord under the strings, just above the nut. Tie the strap to the cord, ensuring it is securely fastened. This method is common for acoustic guitars without a neck strap button.
- Installing a Second Strap Button:
- If you prefer using two strap buttons, you can install one on the heel of the neck. This requires drilling a small hole and screwing in a strap button. If you’re not comfortable doing this yourself, it’s best to have a professional install it to avoid damaging the guitar.
- Using a Soundhole Hook:
- Some straps come with a hook that attaches to the soundhole. While convenient, this method can potentially scratch the finish around the soundhole, so use it with caution.
- Using a Strap Button Adapter:
- These adapters attach to the existing strap button and provide a secure loop for the strap, allowing you to use straps designed for electric guitars.
Choosing the right method depends on your guitar’s configuration and your personal preference. Guitarplayers.net offers detailed guides and product recommendations to help you select the best attachment method for your needs.
How can you attach a strap to an acoustic guitar without a second strap button?
Attaching a strap to an acoustic guitar without a second strap button requires a bit of creativity. Here are a few reliable methods:
- Using a Headstock Tie:
- Materials: Use a piece of leather or nylon cord, about 12-18 inches long. You can also purchase a specialized headstock strap attachment.
- Method:
- Thread one end of the cord under the strings, just above the nut. Make sure the cord is positioned so it doesn’t interfere with the strings’ vibration.
- Bring the ends of the cord together and tie them securely to the strap end. Use a sturdy knot like a square knot or a figure-eight knot.
- Ensure the knot is tight and the strap is securely attached.
- Using a Soundhole Hook Strap:
- Materials: Purchase a guitar strap with a built-in soundhole hook.
- Method:
- Attach one end of the strap to the strap button at the base of the guitar.
- Carefully insert the hook into the soundhole, ensuring it grips the edge securely. Be cautious not to scratch the finish around the soundhole.
- Using a Cradle Strap:
- Materials: A cradle strap wraps around the body of the guitar, supporting it from underneath.
- Method:
- Position the cradle under the guitar body, adjusting the straps to fit snugly but not too tightly.
- Attach the strap ends to the cradle, ensuring they are securely fastened.
- Installing a Strap Button (Professional Installation Recommended):
- Materials: A strap button and a drill.
- Method:
- If you’re comfortable with basic guitar maintenance, you can install a strap button on the heel of the neck.
- Mark the spot where you want to install the button. Drill a pilot hole, being careful not to drill too deep.
- Screw the strap button into the pilot hole.
- Note: If you’re not confident in your ability to do this without damaging the guitar, take it to a professional luthier.
When using any of these methods, always test the strap thoroughly before playing to ensure it is secure and won’t slip. Guitarplayers.net offers advice and product recommendations to help you find the best solution for your needs.
What are strap locks, and how do they enhance guitar security?
Strap locks are devices designed to replace the standard strap buttons on your guitar, providing a more secure connection between the strap and the instrument. They significantly reduce the risk of the strap slipping off the buttons, which can cause the guitar to fall and potentially be damaged.
How Strap Locks Work:
- Replacement Buttons: The original strap buttons on your guitar are replaced with specialized buttons that have a locking mechanism.
- Locking Mechanism: The guitar strap is fitted with corresponding connectors that attach to the new buttons. These connectors have a mechanism that securely locks onto the button.
- Secure Connection: Once locked, the strap is firmly attached to the guitar, preventing accidental slippage.
Benefits of Using Strap Locks:
- Enhanced Security: The primary benefit is the increased security. Strap locks ensure that the strap stays firmly attached, even during energetic performances.
- Peace of Mind: Knowing your guitar is secure allows you to focus on your playing without worrying about accidental drops.
- Easy to Install: Most strap locks are easy to install with basic tools, making them a simple upgrade for any guitarist.
- Versatility: Strap locks are available in various styles and materials to match your guitar and personal preferences.
Popular Strap Lock Brands:
- Schaller: Known for their robust and reliable designs.
- Dunlop: Offers a variety of strap locks, including traditional and quick-release models.
- Ernie Ball: Provides simple and effective strap lock solutions.
By investing in a set of strap locks, you can protect your guitar and enjoy greater confidence during your performances. Guitarplayers.net offers reviews and comparisons of different strap locks to help you choose the best option for your guitar.
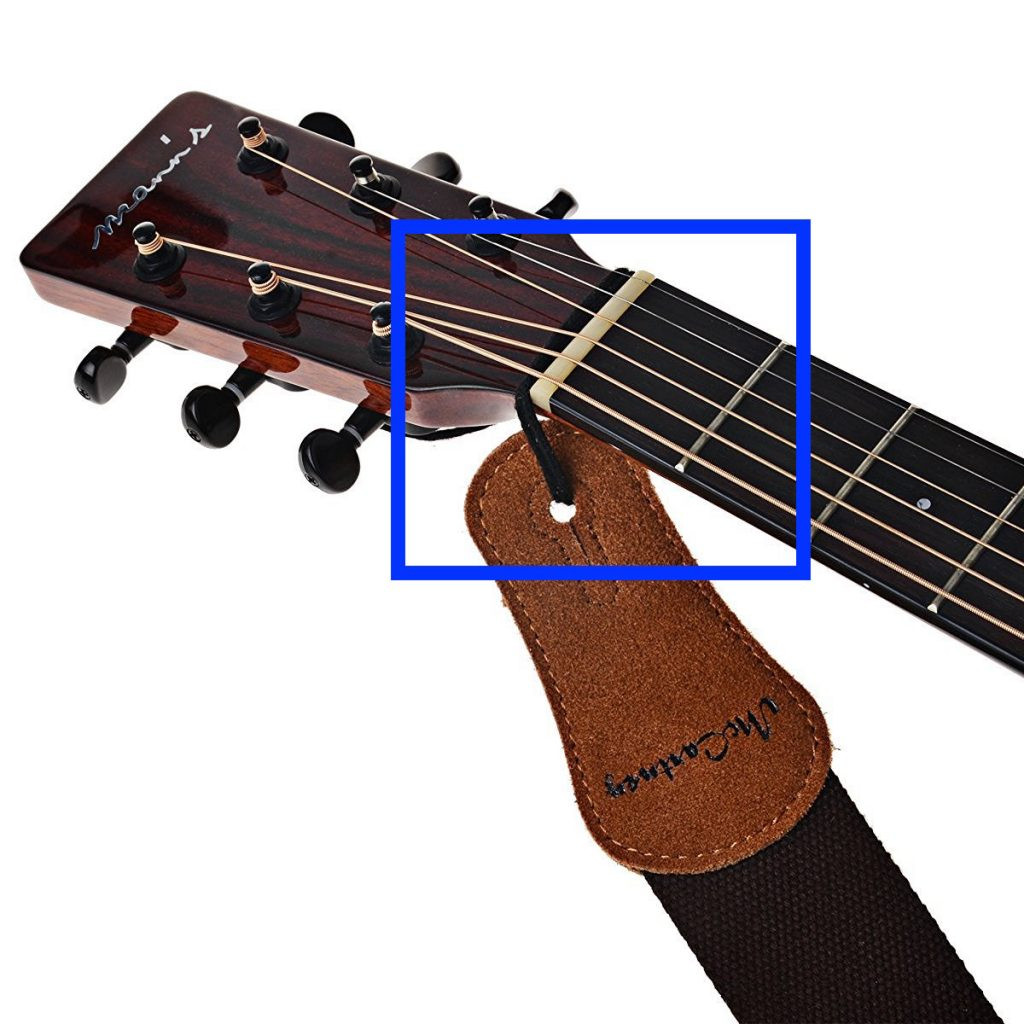 Guitar strap attached with a string above the nut
6. Customization Techniques: Personalizing Your Acoustic Guitar Strap
What are some creative ways to customize your acoustic guitar strap?
Customizing your acoustic guitar strap is a great way to express your personality and add a unique touch to your instrument. Here are some creative ideas:
- Embroidery:
- Add intricate designs, patterns, or your name using embroidery. You can do this by hand or with an embroidery machine.
- Painting:
- Use fabric paints to create colorful designs, artwork, or personalized messages on your strap.
- Adding Patches:
- Sew on patches representing your favorite bands, symbols, or personal interests. This is a simple way to add character to your strap.
- Studs and Spikes:
- Attach studs or spikes for a rock-and-roll look. Ensure they are securely fastened to prevent them from falling off.
- Beading:
- Incorporate beads into your strap design for a bohemian or decorative touch.
- Leather Tooling:
- If you’re working with a leather strap, use leather tooling techniques to create intricate patterns and designs.
- Fabric Appliqués:
- Cut out fabric shapes and sew them onto your strap for a layered, textured look.
- Tie-Dye:
- Tie-dye your strap for a vibrant, psychedelic effect. This works best with cotton or other natural fabrics.
- Weaving:
- Weave colorful threads or ribbons into your strap for a unique, textured design.
- Burning/Engraving:
- Use wood-burning tool to create patterns or text on leather
When customizing your strap, consider the material you’re working with and choose appropriate customization techniques. Guitarplayers.net offers tutorials and inspiration to help you bring your creative ideas to life.
How can you add personalized designs or artwork to a guitar strap?
Adding personalized designs or artwork to a guitar strap allows you to showcase your unique style and creativity. Here are several methods to achieve this:
- Painting:
- Materials: Fabric paints, acrylic paints (for leather), paintbrushes, stencils (optional), and a sealant.
- Process:
- Sketch your design on the strap with a pencil.
- Apply fabric or acrylic paints using brushes or stencils.
- Allow the paint to dry completely.
- Apply a sealant to protect the artwork from wear and tear.
- Embroidery:
- Materials: Embroidery floss, needles, embroidery hoop (optional), and a transfer pen.
- Process:
- Transfer your design onto the strap using a transfer pen.
- Secure the strap in an embroidery hoop (if using).
- Embroider the design using various stitches (e.g., satin stitch, backstitch).
- Knot the ends of the floss securely.
- Fabric Markers:
- Materials: Fabric markers (permanent), stencils (optional).
- Process:
- Draw your design directly onto the strap using fabric markers.
- Use stencils for precise shapes and patterns.
- Allow the ink to dry completely.
- Printing (for Fabric Straps):
- Materials: Iron-on transfers, inkjet printer, iron.
- Process:
- Create your design digitally and print it onto iron-on transfer paper.
- Place the transfer paper on the strap and iron it according to the manufacturer’s instructions.
- Peel off the backing paper to reveal the transferred design.
- Leather Tooling (for Leather Straps):
- Materials: Leather tooling tools (swivel knife, bevelers, stamps), mallet, and a design template.
- Process:
- Transfer your design onto the leather strap.
- Use a swivel knife to cut along the design lines.
- Use bevelers and stamps to add texture and depth to the design.
- Apply a leather finish to protect the tooled design.
- Decoupage:
- Materials: Printed images, decoupage glue, scissors, and a sealant.
- Process:
- Cut out your desired images.
- Apply decoupage glue to the back of the images and place them on the strap.
- Smooth out any wrinkles and allow the glue to dry.
- Apply a sealant to protect the decoupaged images.
Before starting, practice your design on a scrap piece of material to ensure you are happy with the result. Guitarplayers.net offers tutorials and inspiration for various customization techniques.
Can you incorporate your favorite band logos or musical symbols onto a strap?
Yes, incorporating your favorite band logos or musical symbols onto a guitar strap is a fantastic way to personalize it and show your musical taste. Here are several methods to achieve this:
- Patches:
- Materials: Band logo patches or musical symbol patches, needle, and thread.
- Process:
- Purchase patches of your favorite band logos or musical symbols.
- Position the patches on the strap where you want them.
- Sew the patches onto the strap using a needle and thread, ensuring they are securely attached.
- Fabric Painting:
- Materials: Fabric paints, paintbrushes, stencils (optional), and a sealant.
- Process:
- Create or find stencils of your favorite band logos or musical symbols.
- Position the stencils on the strap and apply fabric paint using brushes.
- Allow the paint to dry completely.
- Apply a sealant to protect the painted logos.
- Printing (Iron-On Transfers):
- Materials: Iron-on transfer paper, inkjet printer, iron.
- Process:
- Find or create digital images of your favorite band logos or musical symbols.
- Print the images onto iron-on transfer paper.
- Place the transfer paper on the strap and iron it according to the manufacturer’s instructions.
- Peel off the backing paper to reveal the transferred logos.
- Embroidery:
- Materials: Embroidery floss, needles, embroidery hoop (optional), and a transfer pen.
- Process:
- Transfer the band logos or musical symbols onto the strap using a transfer pen.
- Secure the strap in an embroidery hoop (if using).
- Embroider the designs using various stitches (e.g., satin stitch, backstitch).
- Knot the ends of the floss securely.
- Leather Tooling (for Leather Straps):
- Materials: Leather tooling tools (swivel knife, bevelers, stamps), mallet, and a design template.
- Process:
- Transfer the band logos or musical symbols onto the leather strap.
- Use a swivel knife to cut along the design lines.
- Use bevelers and stamps to add texture and depth to the design.
- Apply a leather finish to protect the tooled designs.
When adding logos or symbols, ensure you have the right to use the images, especially if you plan to sell the straps. guitarplayers.net offers resources and tips for customizing your guitar strap with your favorite musical elements.
7. Ensuring Durability: Maintenance and Care Tips for Your Strap
How should you clean and maintain different types of guitar straps?
Proper cleaning and maintenance are essential for prolonging the life of your guitar strap. Here’s how to care for different types of straps:
- Leather Straps:
- Cleaning:
- Wipe down the strap regularly with a soft, dry cloth to remove dust and dirt.
- For tougher stains, use a damp cloth with a mild leather cleaner. Avoid harsh chemicals or abrasive cleaners.
- Test any cleaner on a small, inconspicuous area first to ensure it doesn’t damage the leather.
- Conditioning:
- Apply a leather conditioner every few months to keep the leather supple and prevent it from drying out and cracking.
- Apply a small amount of conditioner to a clean cloth and rub it into the leather. Allow it to soak in for a few hours, then wipe off any excess.
- Storage:
- Store the strap in a cool, dry place away from direct sunlight and heat.
- Avoid storing the strap in a plastic bag, as this can trap moisture and lead to mold or mildew.
- Cleaning:
- Fabric Straps (Cotton, Nylon, Hemp):
- Cleaning:
- For minor stains, spot clean with a damp cloth and mild detergent.
- For more thorough cleaning, hand wash the strap in a basin with warm water and mild detergent.
- Rinse thoroughly to remove all soap residue.
- For machine washable straps, place the strap in a mesh laundry bag and wash on a gentle cycle with cold water.
- Drying:
- Hang the strap to air dry. Avoid using a dryer, as high heat can damage the fabric.
- Storage:
- Store the strap in a clean, dry place.
- Cleaning:
- Synthetic Straps (Nylon Webbing, Vinyl):
- Cleaning:
- Wipe down the strap with a damp cloth and mild detergent.
- For tougher stains, use a soft brush to scrub the area gently.
- Rinse thoroughly to remove all soap residue.
- Drying:
- Wipe the strap dry with a clean cloth or allow it to air dry.
- Storage:
- Store the strap in a clean, dry place.
- Cleaning:
- General Tips:
- Hardware:
- Periodically check the hardware (buckles, rivets, strap locks) for any signs of wear or damage.
- Tighten any loose screws or replace damaged hardware as needed.
- Avoid Overloading:
- Avoid overloading the strap with excessive weight, as this can cause it to stretch or break.
- Regular Inspection:
- Inspect your strap regularly for any signs of wear, such as fraying, tearing, or loose stitching.
- Repair or replace the strap as needed to ensure it remains safe and reliable.
- Hardware:
By following these maintenance and care tips, you can keep your guitar strap in top condition and enjoy it for years to come. Guitarplayers