Making a guitar with paper is a fun and creative project, perfect for unleashing your inner musician and crafting skills, and guitarplayers.net is here to guide you. This guide will show you how to build a paper guitar, explore various paper guitar designs, and even delve into advanced techniques for crafting intricate musical instruments from paper. You’ll discover valuable paper crafting tips and the joy of creating your own musical instrument.
1. What Materials Do I Need To Make A Paper Guitar?
To create your own paper guitar, you’ll need basic craft supplies and a few household items. These include cardboard, paper towel tubes, rubber bands, scissors, craft knife, craft paint, paint brushes, popsicle sticks, and glue. Decorations can include pom poms, decorative tape, and stickers.
- Cardboard: Provides the main structure for the guitar body.
- Paper Towel Tubes: Used for the guitar’s neck.
- Rubber Bands: Act as the strings, creating different sounds based on size and thickness.
- Scissors: For cutting various components.
- Craft Knife: To make precise cuts for fitting the neck into the body.
- Craft Paint: To customize the appearance of your guitar.
- Paint Brushes: For applying paint evenly.
- Popsicle Sticks: To elevate the strings, improving sound quality.
- Glue Stick: To assemble the different parts of the guitar.
- Pom Poms: Add decorative elements like tuning pegs.
- Decorative Tape: Mark the frets on the guitar neck.
- Stickers: Further customize the body of the guitar.
2. How Do I Construct The Body Of A Paper Guitar?
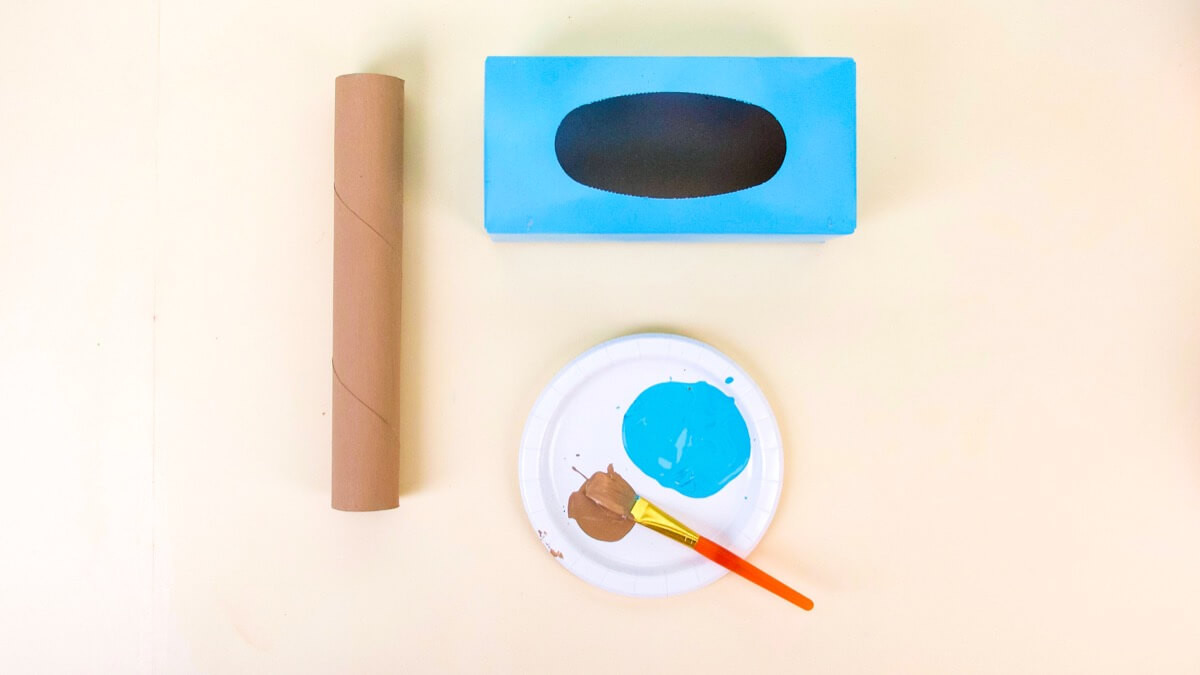
The body of a paper guitar can be made using a tissue box. First, remove the plastic parts from the opening of the box. Paint the outside of the box with your preferred color; you may need multiple coats to cover the original pattern. Allow the paint to dry completely before proceeding.
- Prepare the Tissue Box: Ensure the box is clean and free of any obstructions.
- Apply the Base Coat: Use a broad brush for even coverage.
- Add Additional Coats: Let each layer dry to prevent smudging and ensure a vibrant finish.
- Drying Time: The drying time depends on the type of paint used; acrylics typically dry faster.
 Tissue Box Paper Guitar Body
3. How To Make The Neck Of A Paper Guitar Using A Paper Towel Tube?
Use a cardboard paper towel tube for the neck of the guitar. Paint the tube in a color that resembles a traditional guitar neck, such as brown. Allow the tube to dry thoroughly.
- Select the Right Tube: Ensure the tube is sturdy and not crushed.
- Apply Paint Evenly: Use smooth strokes to avoid streaks.
- Consider Wood Grain Effect: Add texture with a dry brush technique for a realistic look.
- Drying Completely: Ensure the paint is completely dry to avoid sticking when handling.
4. How Do I Assemble The Paper Guitar’s Neck And Body?
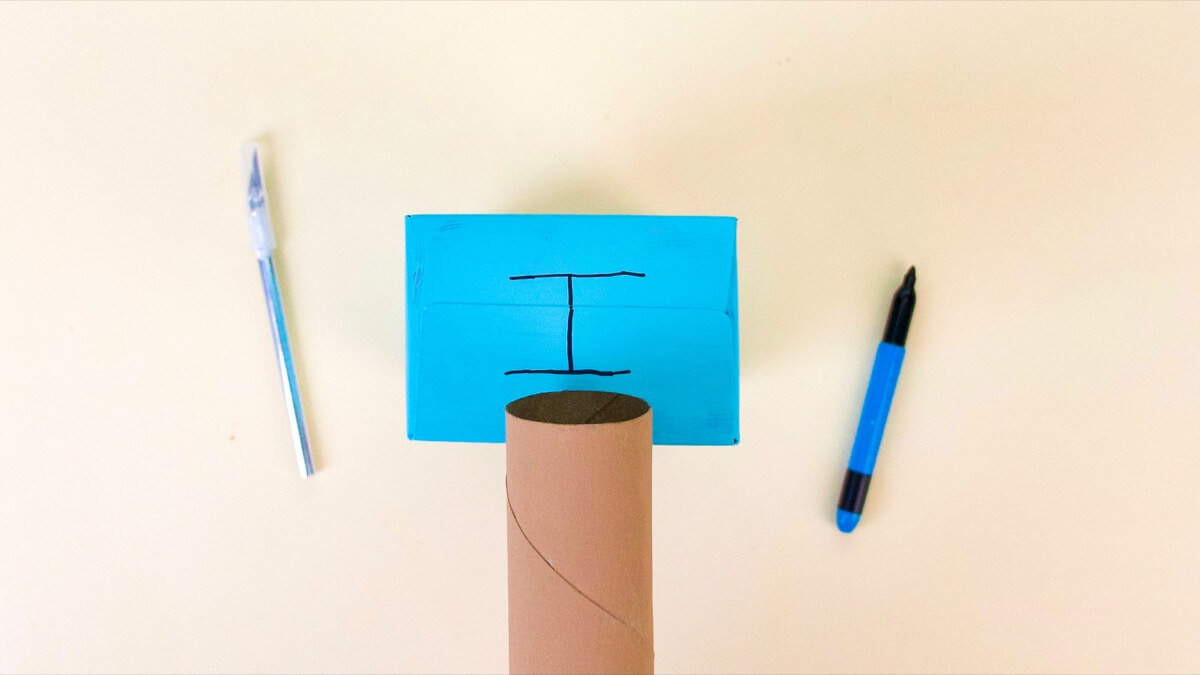
To assemble the paper guitar, determine the side from which the neck will extend based on whether you are right-handed or left-handed. Hold the end of the cardboard tube against the side of the guitar body and draw two parallel lines that match the tube’s width, slightly closer together than the tube itself. Connect these lines with another line to form an H shape.
- Determine Orientation: Right-handed players have the neck extending from the right side when looking down.
- Mark Cutting Lines: Accurate measurements ensure a snug fit.
- Use a Craft Knife: Carefully cut along the marked lines to create an opening.
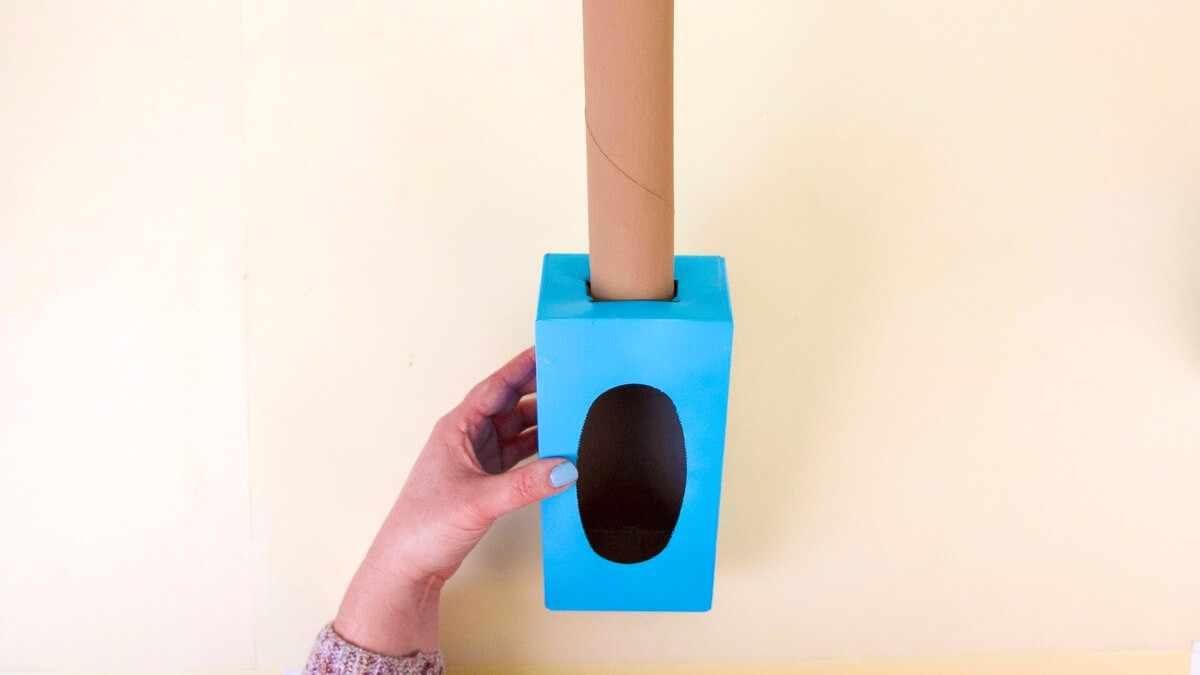
- Insert The Neck: Secure the tube into the hole, ensuring it fits tightly.
 Paper Guitar Neck Assembly
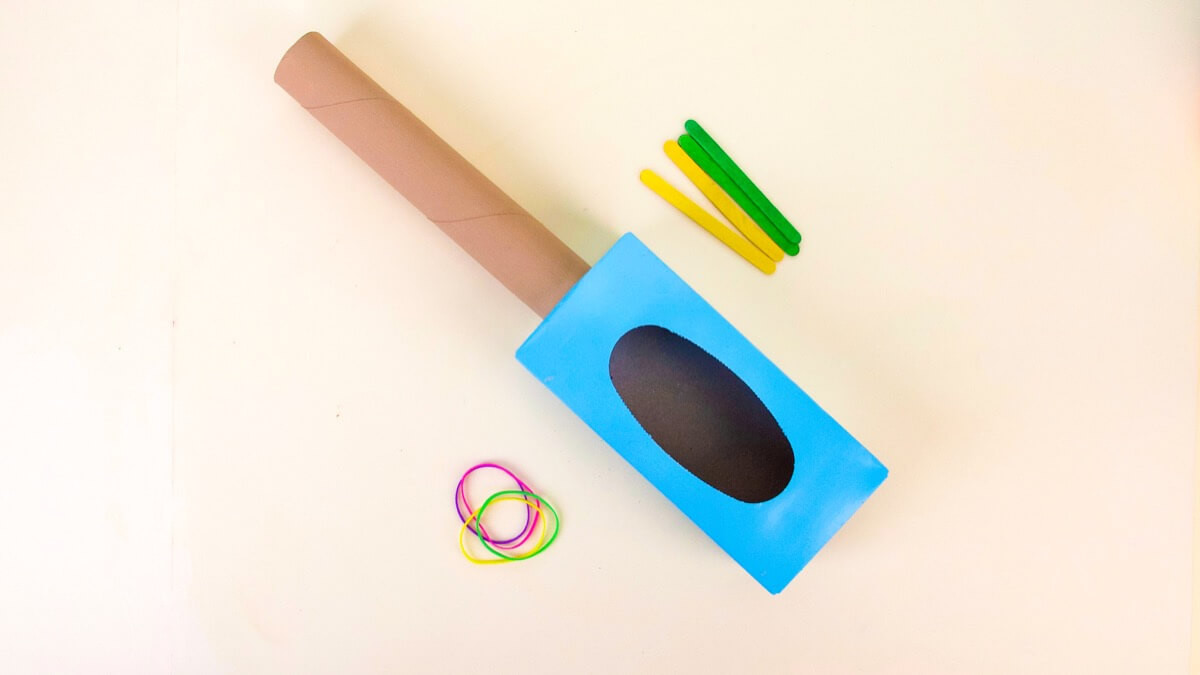
5. How To Attach Strings To A Paper Guitar With Rubber Bands?
For the guitar strings, use rubber bands, ideally four to mimic a ukulele. Stretch the rubber bands around the box, positioning them over the opening in the guitar body. Experiment with different sizes and thicknesses of rubber bands to achieve varying sounds.
- Selecting Rubber Bands: Different sizes and thicknesses produce varied tones.
- Positioning the Strings: Evenly space the rubber bands for balanced sound.
- Securing the Strings: Ensure they are taut but not overly stretched.
- Experimenting with Sound: Test different placements and tensions for unique effects.
 Paper Guitar Rubber Band Strings
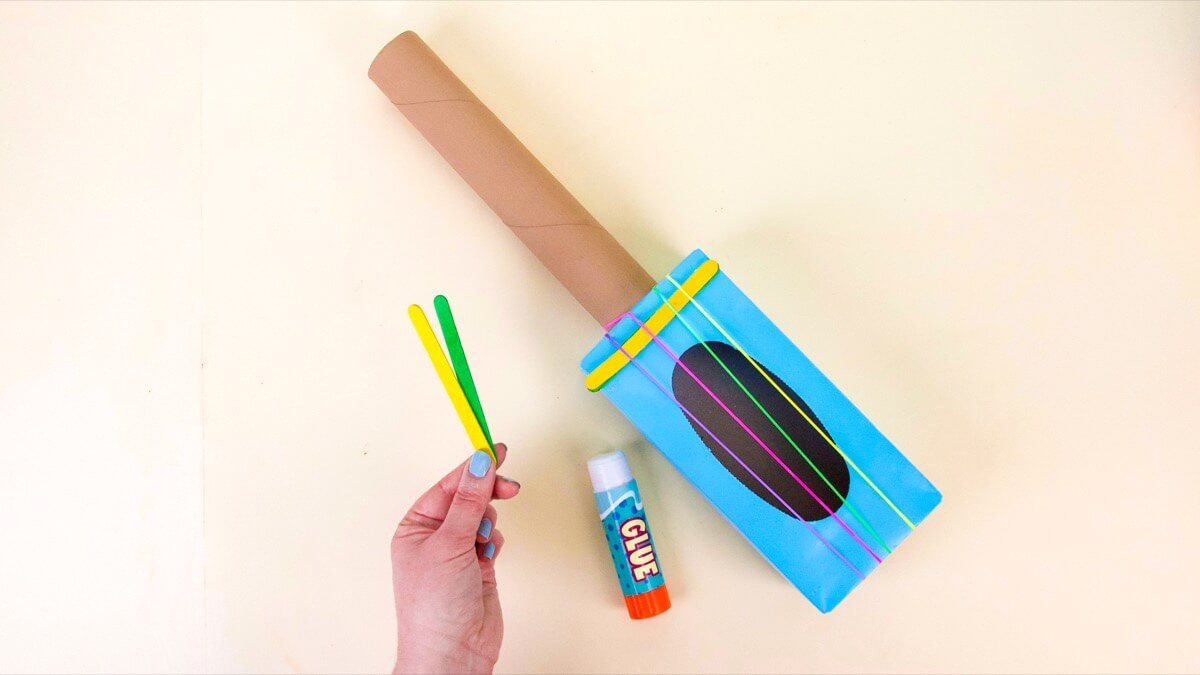
6. How To Improve The Sound Quality Of A Paper Guitar?
Enhance the guitar’s sound by lifting the strings off the body. Glue two popsicle sticks together to make them thicker, then slide them under the strings on either side of the guitar body.
- Reinforce Popsicle Sticks: Double layering provides better support.
- Position Strategically: Place sticks to maximize string vibration.
- Use Strong Glue: Ensure the sticks are securely attached.
- Test and Adjust: Fine-tune placement for optimal sound projection.
 Elevating Paper Guitar Strings
7. What Are Some Decorative Ideas For A Paper Guitar?
Once the guitar is assembled, it’s time to decorate. Use colorful tape to mark the frets on the neck. Add pom poms for the tuning pegs, and decorate the body with stickers and gems to personalize your instrument.
- Colorful Tape: Mark fret positions for visual appeal.
- Pom Poms: Simulate tuning pegs for a playful look.
- Stickers and Gems: Add personal touches to the guitar body.
- Consider Themes: Use themes like stars, music notes, or abstract designs.
 Decorating a Paper Guitar
8. Can You Provide Step-By-Step Instructions For Making A Paper Guitar?
Follow these detailed steps to create your paper guitar:
-
Prepare the Tissue Box: Remove any plastic parts from the tissue box opening.
-
Paint the Body: Paint the tissue box with your chosen color and let it dry. Multiple coats may be needed.
-
Prepare the Neck: Paint the paper towel tube brown to resemble a guitar neck and let it dry.
-
Create the Neck Hole: Determine the guitar’s orientation (right or left-handed). Draw an H-shaped opening on the side of the tissue box to fit the paper towel tube snugly.
-
Cut the Hole: Use a craft knife to carefully cut along the lines and push the tabs inward.
-
Insert the Neck: Slide the paper towel tube into the hole to create the guitar’s neck.
-
Attach the Strings: Stretch rubber bands around the tissue box, positioning them over the opening.
-
Elevate the Strings: Glue popsicle sticks together, slide them under the strings, and position them on either side of the body.
-
Mark the Frets: Use colorful tape to wrap around the neck, marking the frets.
-
Add Tuning Pegs: Glue pom poms to the head of the guitar to resemble tuning pegs.
-
Decorate the Body: Use stickers and gems to personalize the guitar’s appearance.
- Detailed Instructions: Each step requires careful attention to ensure proper assembly.
- Safety First: Always use safety precautions when using craft knives and glue.
- Customization: Feel free to adapt the design and decorations to your personal preferences.
- Enjoy the Process: This project is about creativity and fun, so enjoy each step.
9. What Are Some Creative Variations For Making A Paper Guitar?
There are numerous creative variations you can explore when making a paper guitar. Try using different types of paper, such as corrugated cardboard for a more robust body, or experiment with various neck designs. Instead of rubber bands, you could use fishing line for a different sound.
- Corrugated Cardboard: Offers enhanced durability and a unique look.
- Alternative Neck Designs: Explore curved or multi-piece necks.
- Fishing Line Strings: Provides a brighter, more resonant sound.
- Mixed Media Decorations: Combine paper with fabric, beads, or other materials.
10. How Can I Customize The Sound Of My Paper Guitar?
To customize the sound of your paper guitar, experiment with different types of rubber bands, adjusting their tension, and changing the bridge height with different thicknesses of popsicle sticks. You can also modify the soundhole size on the guitar’s body to alter the resonance.
- Vary Rubber Bands: Experiment with thickness and material for varied tones.
- Adjust String Tension: Tighter strings produce higher notes.
- Modify Bridge Height: Higher bridges increase string vibration and volume.
- Alter Soundhole Size: Larger holes enhance resonance.
11. What Types Of Paint Work Best On Paper Guitars?
Acrylic paints are the best choice for paper guitars due to their vibrant colors, quick drying time, and durability. Tempera paints are also a good option for younger crafters as they are washable and non-toxic, though less durable.
- Acrylic Paints: Best for vibrant, durable finishes.
- Tempera Paints: Safe, washable option for kids.
- Spray Paints: Offer smooth, even coverage but require careful handling.
- Watercolors: Create softer, more subtle effects.
12. How Do I Make The Frets On A Paper Guitar Look Realistic?
To make the frets look realistic, use thin strips of metallic tape or paint thin lines across the guitar’s neck. Ensure they are evenly spaced and consistent in width to mimic the appearance of real frets.
- Metallic Tape: Provides a shiny, realistic look.
- Fine-Tip Markers: Allow for precise, clean lines.
- Stencils: Ensure uniform spacing and width.
- Consider Fret Wire: Add small pieces of wire for a 3D effect.
13. What Are Some Advanced Techniques For Making Paper Guitars?
Advanced techniques for making paper guitars include creating a hollow body for enhanced resonance, using layered paper to increase structural integrity, and incorporating internal bracing to support the neck and body.
- Hollow Body Construction: Enhances sound projection.
- Layered Paper: Increases strength and durability.
- Internal Bracing: Provides support for the neck and body.
- Intricate Decorations: Use advanced paper cutting techniques for detailed designs.
14. Can I Create A Paper Guitar That Actually Plays Music?
While a paper guitar won’t sound like a professional instrument, it can produce recognizable musical notes. By carefully adjusting the tension and placement of the rubber band strings, you can create a playable instrument that is fun for kids and adults alike.
- Tuning the Strings: Adjust tension for specific notes.
- Amplification: Use a cardboard box to amplify the sound.
- Proper Construction: Ensure all components are securely attached.
- Realistic Expectations: Remember, it’s a toy, not a professional instrument.
15. Where Can I Find Templates For Making Paper Guitars?
Templates for making paper guitars can be found online through various crafting websites, DIY blogs, and printable template resources. These templates provide precise measurements and guidelines to help you construct your guitar accurately.
- Crafting Websites: Sites like Etsy and Instructables offer templates.
- DIY Blogs: Many blogs provide free templates and tutorials.
- Printable Resources: Search for printable guitar templates online.
- Books and Magazines: Crafting books often include templates for paper instruments.
16. How Do I Choose The Right Size Rubber Bands For My Paper Guitar?
Select rubber bands of varying sizes and thicknesses to create a range of tones on your paper guitar. Thicker rubber bands generally produce deeper sounds, while thinner ones create higher pitches. Experiment to find the combination that sounds best to you.
- Varying Thickness: Experiment with different thicknesses for varied tones.
- Different Sizes: Use different lengths for different string positions.
- Material Matters: Consider rubber band material for sound quality.
- Test and Adjust: Fine-tune the selection for the best sound.
17. What Tools Are Essential For Making A Paper Guitar?
Essential tools for making a paper guitar include scissors, a craft knife, a glue stick, a ruler, and paint brushes. Additionally, you may find decorative tapes, stickers, and pom poms useful for adding creative flair to your instrument.
- Scissors: For cutting various components.
- Craft Knife: For precise cuts.
- Glue Stick: For assembling parts.
- Ruler: For accurate measurements.
- Paint Brushes: For applying paint.
- Decorative Tapes: For marking frets.
- Stickers: For customization.
- Pom Poms: For decorative tuning pegs.
18. How Can I Make My Paper Guitar More Durable?
To enhance the durability of your paper guitar, use thicker cardboard for the body, reinforce the neck with extra layers of paper, and apply a clear coat of sealant to protect the paint and decorations.
- Thick Cardboard: Provides a sturdier base.
- Reinforced Neck: Strengthens the most vulnerable part.
- Clear Coat Sealant: Protects the paint and decorations.
- Proper Assembly: Ensures all components are securely attached.
19. What Are The Benefits Of Making A Paper Guitar?
Making a paper guitar offers numerous benefits, including fostering creativity, enhancing fine motor skills, and providing a fun, educational project for children and adults. It’s also an affordable way to explore music and crafting.
- Fosters Creativity: Encourages imaginative design and decoration.
- Enhances Fine Motor Skills: Develops precision and coordination.
- Educational Project: Introduces basic musical concepts.
- Affordable Fun: Uses readily available, inexpensive materials.
20. How Do I Troubleshoot Common Issues When Making A Paper Guitar?
Common issues when making a paper guitar include the neck not fitting properly, the strings breaking, or the paint peeling. Ensure accurate measurements and secure attachments to prevent these problems, and use high-quality paints and rubber bands for better results.
- Neck Fit Issues: Double-check measurements and adjust accordingly.
- String Breakage: Use stronger rubber bands.
- Paint Peeling: Apply a primer before painting and use a sealant afterward.
- Overall Instability: Reinforce weak points with extra cardboard or glue.
21. What Are Some Safety Tips For Making A Paper Guitar?
When making a paper guitar, always supervise children when using scissors or craft knives. Use non-toxic glue and paints, and ensure adequate ventilation when painting.
- Supervise Children: Prevent accidents with sharp tools.
- Use Non-Toxic Materials: Ensure safety for all ages.
- Ventilation: Avoid inhaling paint fumes.
- Proper Tool Handling: Teach safe usage of craft knives and scissors.
22. How Can I Scale Up The Paper Guitar Project For A Group Activity?
To scale up the paper guitar project for a group activity, pre-cut the cardboard and paper towel tubes, prepare individual kits with all necessary materials, and provide clear, step-by-step instructions.
- Pre-Cut Materials: Saves time and reduces complexity.
- Individual Kits: Ensures everyone has the necessary supplies.
- Clear Instructions: Simplifies the assembly process.
- Designated Workstations: Organizes the activity and promotes efficiency.
23. What Are Some Alternatives To Using Rubber Bands For The Strings?
Alternatives to using rubber bands for the strings of a paper guitar include fishing line, yarn, or even thin strips of plastic. Each material will produce a different sound, so experiment to find the best option.
- Fishing Line: Creates a brighter, more resonant sound.
- Yarn: Provides a softer, muted tone.
- Plastic Strips: Offers a unique, twangy sound.
- Wire: Produces a metallic, ringing tone.
24. How Can I Integrate Technology Into My Paper Guitar Project?
Integrate technology into your paper guitar project by adding a simple contact microphone to amplify the sound, or use a smartphone app to record and modify the sounds produced by your paper instrument.
- Contact Microphone: Amplifies the sound for better audibility.
- Smartphone Apps: Record and modify the sound.
- DIY Pickups: Create your own simple pickups.
- Digital Effects: Use apps to add reverb, delay, or other effects.
25. How Do I Store My Paper Guitar To Prevent Damage?
To prevent damage to your paper guitar, store it in a dry place away from direct sunlight. Avoid placing heavy objects on top of it, and consider storing it in a protective case or box.
- Dry Storage: Prevents warping and damage.
- Away From Sunlight: Prevents fading and weakening of materials.
- Protective Case: Shields the guitar from physical damage.
- Avoid Pressure: Prevents crushing or bending.
26. What Are Some Tips For Making A Miniature Paper Guitar?
To make a miniature paper guitar, use smaller cardboard pieces, thinner paper for the neck, and fine thread for the strings. Precision and patience are key when working with such small components.
- Smaller Components: Use appropriately sized materials.
- Fine Thread Strings: Provides a delicate sound.
- Precision: Accurate cutting and assembly are crucial.
- Patience: Miniature projects require careful attention to detail.
27. How Can I Use My Paper Guitar In A Music Lesson?
Use your paper guitar in a music lesson to teach basic concepts such as pitch, rhythm, and melody. Demonstrate how different string tensions create different notes, and use the guitar to accompany simple songs.
- Teach Pitch: Show how string tension affects the note.
- Demonstrate Rhythm: Strum patterns to create rhythm.
- Accompany Songs: Use the guitar to play simple melodies.
- Encourage Creativity: Allow students to customize their instruments.
28. What Are Some Books Or Websites That Offer More Ideas For Paper Crafts?
Explore websites like Pinterest, Instructables, and YouTube for a wealth of paper craft ideas. Additionally, numerous books on paper crafting offer detailed instructions and inspiration for various projects.
- Pinterest: A vast resource for visual inspiration.
- Instructables: Step-by-step guides for various projects.
- YouTube: Video tutorials for visual learners.
- Crafting Books: Offer detailed instructions and inspiration.
29. How Can I Make My Paper Guitar Look More Professional?
To make your paper guitar look more professional, pay close attention to detail, use high-quality materials, and apply a smooth, even finish. Consider adding decorative elements that mimic real guitars, such as binding or inlays.
- Attention to Detail: Ensure all components are precisely cut and assembled.
- High-Quality Materials: Use thicker cardboard and better paints.
- Smooth Finish: Apply multiple coats of paint and a clear sealant.
- Realistic Elements: Add binding, inlays, or other decorative features.
30. What Are Some Unique Paper Guitar Designs I Can Try?
Explore unique paper guitar designs such as creating a double-neck guitar, designing a guitar with a unique body shape, or incorporating intricate paper-cut patterns into the guitar’s body.
- Double-Neck Guitar: A complex and impressive design.
- Unique Body Shapes: Explore non-traditional guitar shapes.
- Paper-Cut Patterns: Add intricate decorative elements.
- Themed Designs: Create guitars based on specific themes or genres.
31. How To Protect Your Paper Guitar With Lamination?
Laminating individual paper components before assembly is a great way to protect your paper guitar. This adds durability and a water-resistant layer, ensuring the paint doesn’t peel and the paper doesn’t tear easily.
- Apply Heat Seal: Follow the lamination machine’s instructions for heat and time.
- Trim Excess: Cut away the excess lamination film, leaving a small border.
- Assemble as Usual: Proceed with assembling the guitar as outlined in the instructions.
- Reinforce Joints: Use strong adhesive at joints for added stability.
32. How To Add Functional Tuning Pegs To The Paper Guitar?
While pom poms add a decorative touch, functional tuning pegs can elevate your paper guitar. Use small bolts and nuts through the headstock.
- Gather Materials: Acquire small bolts, nuts, washers, and sturdy cardboard.
- Drill Holes: Carefully create holes in the headstock for the bolts.
- Insert Bolts: Place bolts through the holes, adding washers for stability.
- Secure with Nuts: Tighten nuts to hold bolts in place, allowing for string tension adjustment.
33. How To Make A Stand For Displaying A Paper Guitar?
Display your creation proudly by crafting a simple stand. A triangle of cardboard offers stability and aesthetic appeal.
- Cut Cardboard Triangle: Ensure equal sides for balance.
- Create Slots: Cut slots to interlock and form a sturdy base.
- Assemble the Stand: Slide pieces together, ensuring secure fit.
- Test Stability: Place guitar on stand, adjusting slots for stability.
34. How Can I Engage Kids In Making A Paper Guitar?
Involve children by simplifying the process and focusing on the fun aspects of customization. Pre-cut materials and provide stickers and paints to fuel their creativity.
- Prepare Materials: Pre-cut cardboard to appropriate sizes.
- Simplify Steps: Focus on decorating and basic assembly.
- Use Safe Tools: Provide child-safe scissors and non-toxic glue.
- Encourage Creativity: Let kids choose colors and decorations.
35. What Role Does Geometry Play In The Construction?
Geometry is crucial for ensuring accurate dimensions and proportions. Understanding angles and measurements helps in cutting precise shapes for the body, neck, and stand.
- Precise Measurements: Ensures proper fit and alignment.
- Angle Calculations: Vital for creating a balanced stand.
- Symmetry: Enhances aesthetics and structural integrity.
- Shape Recognition: Aids in cutting appropriate components.
36. Why Should You Consider Using Recycled Paper?
Using recycled paper for your paper guitar reduces environmental impact. It promotes sustainability by reusing materials that would otherwise end up in landfills.
- Environmental Benefit: Reduces waste and conserves resources.
- Promotes Sustainability: Encourages eco-friendly practices.
- Educational Value: Teaches about recycling and conservation.
- Creative Opportunity: Adds a unique touch with recycled materials.
37. How Does Humidity Affect A Paper Guitar?
Humidity can significantly impact the structural integrity of a paper guitar. High humidity may cause warping, bending, and weakening of the paper, while low humidity can make the paper brittle and prone to cracking.
- Warping and Bending: Paper absorbs moisture, causing it to lose shape.
- Weakening of Structure: Moisture breaks down fibers.
- Brittleness and Cracking: Dry air can cause paper to become fragile.
- Adhesive Failure: Humidity affects the glue.
38. What Steps Can I Take To Protect My Paper Guitar From Sun Exposure?
Prolonged exposure to sunlight can cause fading and weakening of the paper and paint. To protect your paper guitar, store it away from direct sunlight, apply a UV-resistant coating, or use UV-filtering display cases.
- Store Away from Sunlight: Reduces fading and material degradation.
- UV-Resistant Coating: Protects the surface from ultraviolet rays.
- UV-Filtering Display Cases: Shields the guitar from direct sunlight.
- Dark Storage: Prevents damage.
39. Are There Any Online Communities Where I Can Share My Paper Guitar Projects?
Yes, numerous online communities cater to crafting and DIY projects, where you can share your paper guitar projects. Websites like Reddit, Facebook groups dedicated to crafting, and platforms like Instructables are great places to connect with fellow enthusiasts.
- Reddit: Subreddits like r/DIY and r/crafts.
- Facebook Groups: Crafting and DIY groups.
- Instructables: A platform for sharing DIY projects.
- Pinterest: Share photos of your project.
40. How Can I Use A 3D Printer To Create A Paper Guitar Template?
Using a 3D printer to create a paper guitar template involves designing the template in a CAD software, printing it with a 3D printer, and then using the printed template as a guide for cutting the paper components. This ensures precision and consistency in your paper guitar construction.
- Design Template in CAD Software: Create accurate, detailed designs.
- Print Template with 3D Printer: Produce a physical template.
- Use as a Cutting Guide: Ensures consistent shapes and sizes.
- Refine Design: Adjust templates for better results.
41. What Are The Best Glues To Use When Making A Paper Guitar?
The best glues to use when making a paper guitar include PVA glue (also known as white glue or school glue), glue sticks, and hot glue. PVA glue is excellent for general paper crafting due to its strong bond and non-toxic nature. Glue sticks are convenient for quick, mess-free applications, and hot glue provides a strong, instant bond, ideal for securing parts that need immediate stability.
- PVA Glue: Strong bond and non-toxic.
- Glue Sticks: Quick and mess-free.
- Hot Glue: Strong and instant bond.
- Wood Glue: Provides more durability.
42. How To Design A Custom Headstock For Your Paper Guitar?
Designing a custom headstock for your paper guitar allows you to add a unique and personal touch to your instrument.
- Sketch Designs: Start by sketching various headstock shapes and styles.
- Consider Functionality: Ensure there is enough space for tuning pegs.
- Transfer Design to Cardboard: Draw the chosen design onto the cardboard.
- Cut and Attach: Carefully cut out the headstock shape and attach it to the neck.
43. What Sound Effects Can I Create With A Paper Guitar?
With a paper guitar, you can mimic various musical effects.
- Strumming: Simulate basic guitar strumming patterns.
- Tapping: Tap on the body for percussive sounds.
- String Bending: Alter the tension of strings.
- Harmonics: Lightly touch strings while plucking.
44. How To Add A Pickguard To A Paper Guitar?
Adding a pickguard to your paper guitar not only enhances its aesthetic appeal but also protects the body from wear and tear.
- Choose Material: Select a thin sheet of cardboard or plastic.
- Cut the Shape: Cut the pickguard shape.
- Decorate the Pickguard: Personalize with paint, stickers, or markers.
- Attach the Pickguard: Use glue or double-sided tape to attach it to the body.
45. Is There A Way To Make The Paper Guitar Electric?
Transform your paper guitar into an electric instrument.
- Install Piezo Pickup: Attach a piezo pickup to the body.
- Wire to Output Jack: Connect the pickup to an output jack.
- Connect to Amplifier: Plug the guitar into an amplifier.
- Test and Adjust: Fine-tune the pickup.
46. How To Teach Basic Chords On A Paper Guitar?
While a paper guitar is not a precise musical instrument, it can be used to teach the concept of chords.
- Assign String Combinations: Designate specific rubber band combinations.
- Label Chord Positions: Mark the “fretboard” to represent chord positions.
- Practice Strumming: Strum the designated strings to simulate playing a chord.
- Introduce Simple Songs: Use simple songs to demonstrate chord progressions.
47. Can A Paper Guitar Be Used In Music Therapy?
Yes, a paper guitar can be a valuable tool in music therapy, especially for children or individuals with limited mobility.
- Creative Expression: Allows for creative expression.
- Motor Skill Development: Aids in developing motor skills.
- Emotional Release: Facilitates emotional release through music.
- Accessibility: Provides an accessible musical outlet.
48. How To Design A Case For A Paper Guitar?
Protect your paper guitar.
- Measure Guitar: Accurately measure dimensions.
- Choose Material: Opt for sturdy cardboard.
- Cut and Fold: Cut and fold cardboard.
- Assemble Case: Secure with tape or glue.
49. What Other Paper Instruments Can I Build?
Expand your paper instrument collection by building other fun and creative instruments.
- Paper Drums: Construct simple drums from cardboard tubes and paper.
- Paper Flutes: Create flutes from paper tubes and precisely placed holes.
- Paper Banjos: Build banjos using paper plates and rubber bands.
- Paper Harmonicas: Design harmonicas using paper and combs.
50. How Can GuitarPlayers.Net Help Me Learn More About Guitars?
GuitarPlayers.net offers a treasure trove of resources for guitar enthusiasts of all levels. Whether you’re a beginner strumming your first chords or an experienced player seeking advanced techniques, GuitarPlayers.net has something for you. Discover a wide array of free and premium guitar lessons tailored to your skill level. Read in-depth reviews and comparisons of guitars and accessories from top brands. Access a vast library of guitar sheet music and tabs in various genres. Join a thriving online community to connect with fellow guitar players, share your experiences, and learn from others.
Ready to take your guitar journey to the next level? Visit guitarplayers.net today and explore a world of lessons, reviews, sheet music, and a vibrant community of guitar players. Don’t miss out on the opportunity to enhance your skills and connect with fellow music lovers!
Address: 1140 Boylston Street, Boston, MA 02215, United States. Phone: +1 (617) 747-2261. Website: guitarplayers.net.