Making an acoustic guitar neck can seem daunting, but guitarplayers.net provides a comprehensive guide to help you craft your own, whether you’re a novice or a seasoned luthier. This article delves into the crucial steps of crafting an acoustic guitar neck, offering insights, tips, and techniques to ensure your instrument resonates with quality and precision. Learn to build your guitar with excellent neck angle, neck relief, and neck profile.
1. What Materials Do I Need to Build an Acoustic Guitar Neck?
To build a high-quality acoustic guitar neck, you will need specific materials to ensure structural integrity and playability. These include the neck blank, headstock veneer, truss rod, fretboard, and inlays, among others.
-
Neck Blank: Mahogany, maple, or Spanish cedar are popular choices. Mahogany offers warmth, maple provides brightness and sustain, and Spanish cedar is lightweight and resonant. According to research from the Guild of American Luthiers, mahogany is the most commonly used neck material due to its stability and tonal properties.
-
Headstock Veneer: Rosewood, ebony, or maple veneer adds visual appeal and reinforces the headstock. Ebony offers a sleek, dark look, while figured maple adds a touch of elegance.
-
Truss Rod: A steel or graphite truss rod is essential for adjusting neck relief. Dual-action truss rods allow for both concave and convex adjustments.
-
Fretboard: Ebony, rosewood, or maple are common fretboard materials. Ebony offers a smooth, hard surface, while rosewood provides warmth and character.
-
Inlays: Mother-of-pearl, abalone, or synthetic materials add visual markers to the fretboard. These can be simple dots or intricate designs.
-
Glue: High-quality wood glue, such as Titebond, is crucial for strong and lasting joints.
-
Fretting Wire: Nickel-silver or stainless steel frets are essential for accurate intonation and playability.
-
Nut and Saddle: Bone, Tusq, or graphite are used for the nut and saddle, affecting tone and string spacing.
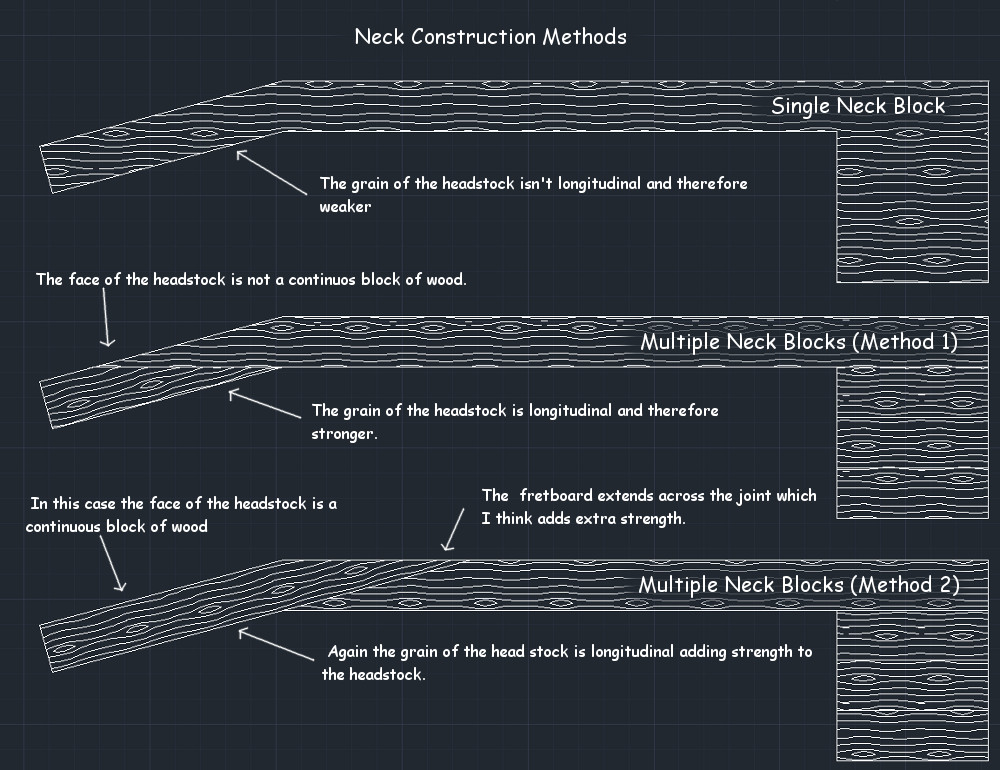 Neck Block Methods
2. What Are the Essential Tools for Making an Acoustic Guitar Neck?
Having the right tools is crucial for achieving precision and quality when making an acoustic guitar neck. Essential tools include measuring tools, saws, planes, routers, files, and clamping devices.
- Measuring Tools: Precision rulers, calipers, and a protractor ensure accurate dimensions. A fret scale ruler is essential for precise fret placement.
- Saws: A bandsaw or coping saw is needed for cutting the neck blank and headstock shape. A fret slotting saw is specifically designed for cutting fret slots.
- Planes: Hand planes, such as a block plane and a smoothing plane, are essential for shaping the neck profile.
- Routers: A router with various bits is used for creating the truss rod channel and shaping the headstock.
- Files: Nut files, fret files, and shaping files are crucial for fine-tuning the neck and fretboard.
- Clamping Devices: Various clamps, including bar clamps, C-clamps, and cam clamps, are needed for gluing components together.
- Fret Hammer: A specialized hammer for seating frets securely into the fretboard.
- Fretboard Radius Gauge: Ensures the fretboard has the correct curvature for comfortable playability.
- Sanding Tools: Sanding blocks, sandpaper, and micro mesh are used for achieving a smooth finish.
3. How Do I Plan the Design of My Acoustic Guitar Neck?
Planning your acoustic guitar neck involves considering scale length, neck profile, headstock angle, and joint type to ensure proper playability and structural integrity.
-
Scale Length: Determine the scale length (typically 25.5 inches for Fender-style guitars and 24.75 inches for Gibson-style guitars). According to Guitar Player Magazine, scale length affects string tension and tonal characteristics.
-
Neck Profile: Choose a neck profile that suits your playing style (C-shape, V-shape, D-shape, etc.). Consider the thickness and shoulder of the neck for comfort.
-
Headstock Angle: Determine the headstock angle (typically 10-14 degrees) to ensure proper string break angle at the nut.
-
Joint Type: Decide on the neck joint type (dovetail, bolt-on, or mortise-and-tenon). Dovetail joints provide excellent stability and tone transfer, while bolt-on joints are easier to adjust and replace.
-
Fretboard Radius: Select a fretboard radius (typically 7.25 inches to 16 inches). A smaller radius is more comfortable for chording, while a larger radius is better for soloing.
-
Nut Width: Determine the nut width based on your playing preferences (typically 1 11/16 inches to 1 3/4 inches).
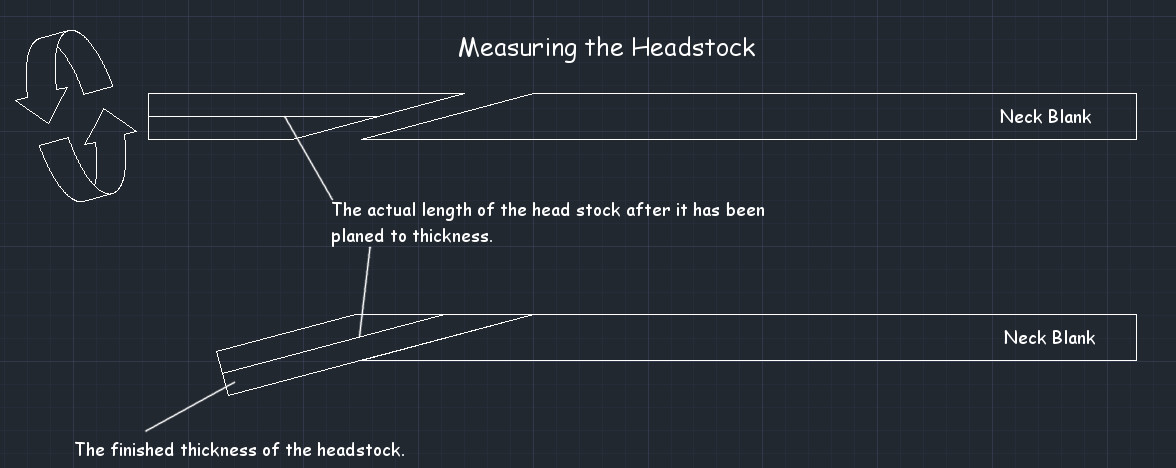 Measuring the Headstock
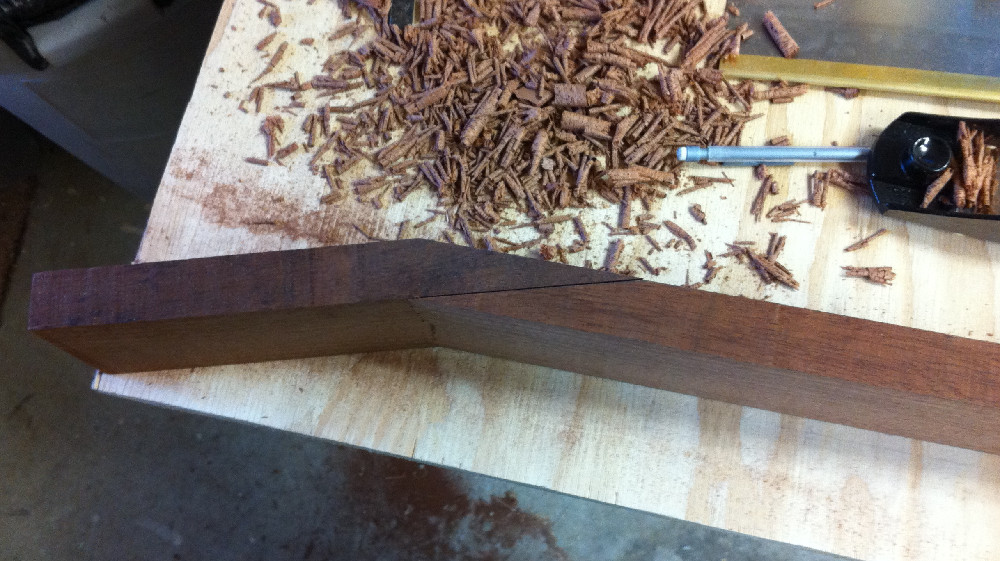
4. How Do I Make the Headstock Joint for an Acoustic Guitar Neck?
Creating a strong and precise headstock joint involves careful cutting, shaping, and gluing to ensure the headstock is properly aligned with the neck.
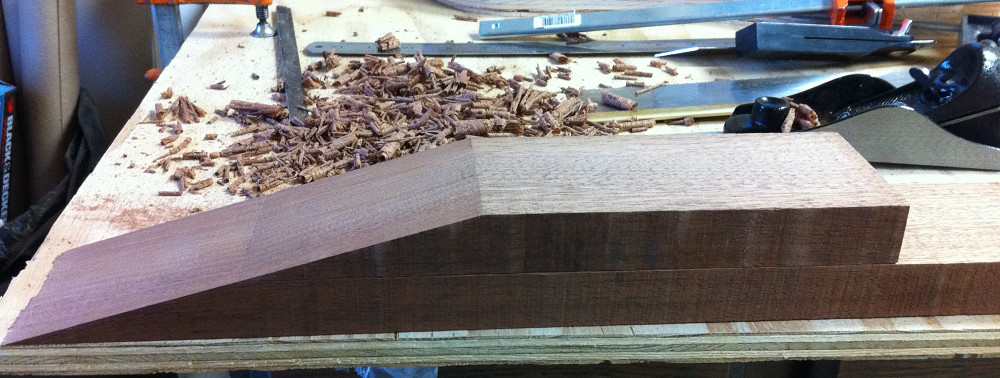
- Cutting the Headstock Angle: Use a saw to cut the headstock angle from the neck blank. Ensure the angle is accurate to maintain proper string alignment.
- Shaping the Joint Surfaces: Use hand planes to create flat and smooth surfaces on both the headstock and the neck. This ensures a strong glue joint.
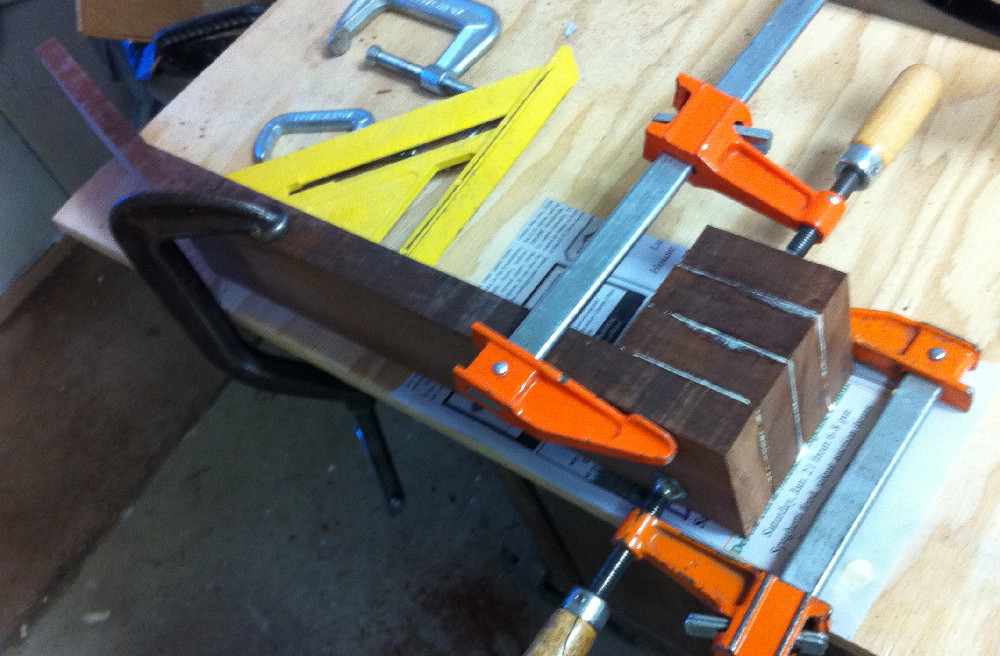
- Gluing the Headstock: Apply high-quality wood glue to both surfaces and clamp them together securely. Use cauls to distribute pressure evenly.
- Reinforcing the Joint: Consider using a veneer or a scarf joint to reinforce the headstock joint. This adds strength and prevents breakage.
- Shaping the Headstock: Once the glue is dry, shape the headstock to your desired design using saws, files, and sanding tools.
5. How Do I Install the Truss Rod in an Acoustic Guitar Neck?
Installing a truss rod involves routing a channel, inserting the truss rod, and filling the gap to ensure proper neck adjustment and stability.
-
Routing the Truss Rod Channel: Use a router with a straight bit to create a channel in the neck blank. Ensure the channel is deep enough to accommodate the truss rod.
-
Inserting the Truss Rod: Place the truss rod into the channel. Make sure it fits snugly but can still move freely.
-
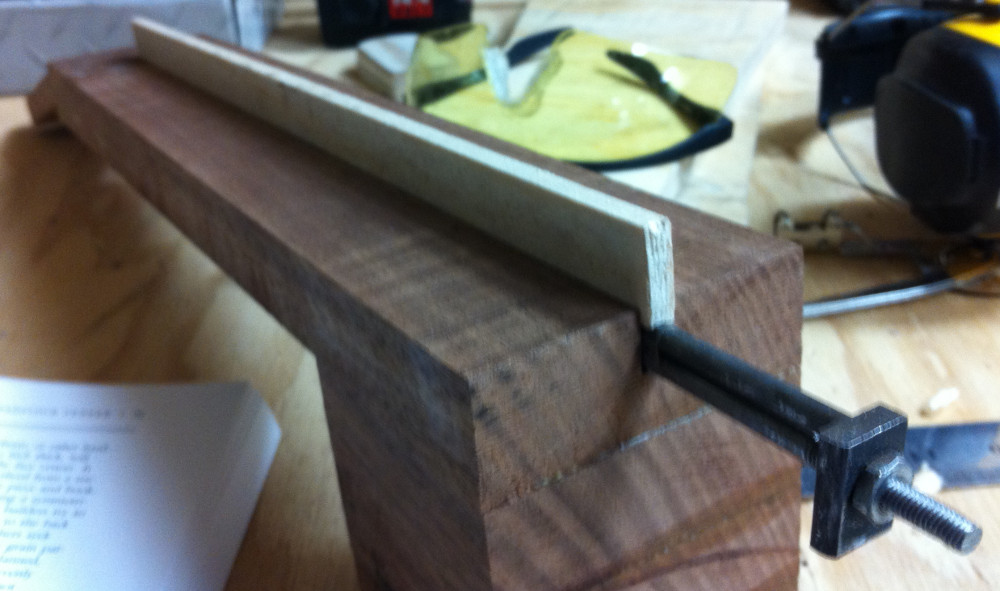
Filling the Gap: Use a strip of wood (typically maple or mahogany) to fill the gap above the truss rod. This provides a flat surface for the fretboard.
-
Gluing the Filler Strip: Apply glue to the filler strip and clamp it in place. Ensure it is flush with the top of the neck.
-
Sanding the Surface: Once the glue is dry, sand the surface of the neck to create a smooth and level platform for the fretboard.
 Neck Joint Surfacing
6. How Do I Shape the Neck Profile of an Acoustic Guitar?
Shaping the neck profile involves careful carving and sanding to create a comfortable and playable neck.
- Marking the Profile: Use a template or a set of calipers to mark the desired neck profile on the neck blank.
- Carving the Neck: Use rasps, files, and hand planes to carve the neck close to the marked profile. Work slowly and carefully to avoid removing too much material.
- Sanding the Neck: Use sandpaper with progressively finer grits to smooth the neck. Wrap the sandpaper around a sanding block to maintain a consistent shape.
- Checking the Profile: Use a neck profile gauge to check the accuracy of the shape. Make adjustments as needed.
- Finishing the Neck: Apply a finish (such as lacquer or oil) to protect the wood and enhance its appearance.
7. How Do I Make the Fretboard for an Acoustic Guitar Neck?
Crafting the fretboard involves cutting fret slots, installing inlays, and shaping the surface to ensure accurate intonation and playability.
-
Cutting Fret Slots: Use a fret slotting saw to cut the fret slots in the fretboard. Ensure the slots are the correct depth and width for the frets.
-
Installing Inlays: If desired, install inlays into the fretboard. Use a router or chisel to create cavities for the inlays, then glue them in place.
-
Shaping the Fretboard: Use a radius sanding block to shape the fretboard to the desired radius. Ensure the surface is smooth and consistent.
-
Leveling the Fretboard: Use a leveling beam and sandpaper to level the fretboard. This ensures that all frets will be at the same height.
-
Installing Frets: Use a fret hammer or a fret press to install the frets into the fret slots. Ensure the frets are fully seated and level.
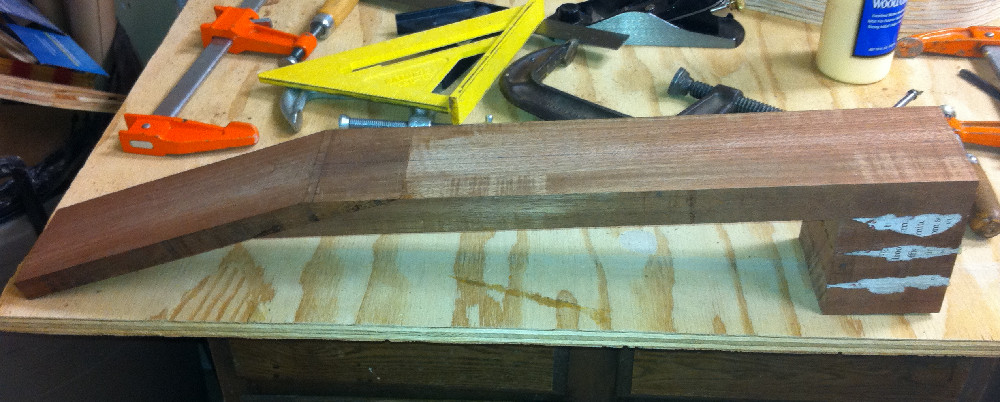
 Neck Joint After Glue
8. How Do I Attach the Fretboard to the Acoustic Guitar Neck?
Attaching the fretboard to the neck involves careful alignment and gluing to ensure a solid and accurate assembly.
- Preparing the Surfaces: Ensure both the neck and fretboard surfaces are clean and smooth. Remove any dust or debris.
- Applying Glue: Apply high-quality wood glue to both surfaces. Use a brush or roller to spread the glue evenly.
- Aligning the Fretboard: Carefully align the fretboard with the neck. Use positioning pins or clamps to hold it in place.
- Clamping the Fretboard: Use clamps to apply even pressure across the fretboard. Protect the fretboard with cauls to prevent damage.
- Cleaning Up: Wipe away any excess glue that squeezes out from the edges.
- Curing the Glue: Allow the glue to cure for at least 24 hours before removing the clamps.
9. How Do I Install Frets on an Acoustic Guitar Neck?
Installing frets involves pressing or hammering them into the fretboard slots, ensuring they are level and properly seated for optimal playability.
-
Preparing the Fret Slots: Ensure the fret slots are clean and the correct depth. Use a fret slot cleaning tool to remove any debris.
-
Cutting the Frets: Cut the frets to the correct length using fret nippers. Leave a small amount of overhang on each side.
-
Installing the Frets: Use a fret hammer or a fret press to install the frets. Start at the center of the fretboard and work your way towards the edges.
-
Seating the Frets: Ensure the frets are fully seated in the slots. Use a fret rocker to check for any gaps or high spots.
-
Leveling the Frets: Use a fret leveling file or beam to level the frets. This ensures that all frets are at the same height.
-
Crowning the Frets: Use a fret crowning file to restore the rounded shape of the frets. This improves playability and intonation.
-
Polishing the Frets: Use micro mesh or steel wool to polish the frets. This removes any scratches and makes them smooth and shiny.
 Gluing Heel Pieces
10. How Do I Carve the Heel of an Acoustic Guitar Neck?
Carving the heel involves shaping the wood to fit snugly into the guitar body, ensuring a seamless and strong connection.
- Marking the Heel Shape: Use a template or the guitar body to mark the desired heel shape on the neck blank.
- Rough Cutting: Use a saw to remove excess material from the heel. Leave a small amount of wood for final shaping.
- Shaping the Heel: Use rasps, files, and hand planes to shape the heel to the final dimensions. Work slowly and carefully to avoid removing too much material.
- Checking the Fit: Periodically check the fit of the heel in the guitar body. Make adjustments as needed.
- Final Sanding: Use sandpaper to smooth the heel. Remove any scratches or imperfections.
- Finishing: Apply a finish to protect the wood and enhance its appearance.
11. What Are Common Mistakes to Avoid When Making an Acoustic Guitar Neck?
Avoiding common mistakes can save time and resources while ensuring a high-quality finished product.
-
Incorrect Measurements: Always double-check measurements before cutting or shaping. Precision is crucial for proper intonation and playability.
-
Poor Glue Joints: Ensure that all glue surfaces are clean and smooth. Use high-quality glue and apply even pressure with clamps.
-
Over-Sanding: Avoid over-sanding, which can change the shape of the neck and affect playability. Use a light touch and check frequently.
-
Improper Fret Installation: Ensure that frets are fully seated and level. High or uneven frets can cause buzzing and intonation problems.
-
Rushing the Process: Take your time and work carefully. Rushing can lead to mistakes that are difficult to correct.
 Before Cutting Headpiece
12. How Can I Ensure Proper Neck Relief on My Acoustic Guitar?
Proper neck relief is essential for comfortable playability and preventing buzzing.
- Understanding Neck Relief: Neck relief refers to the slight curve in the neck, allowing strings to vibrate freely without hitting the frets.
- Adjusting the Truss Rod: Use the truss rod to adjust the amount of neck relief. Turning the truss rod clockwise decreases relief, while turning it counterclockwise increases relief.
- Measuring Neck Relief: Use a straightedge and feeler gauges to measure the amount of neck relief. Place the straightedge on the frets and measure the gap between the straightedge and the string at the 7th or 8th fret.
- Setting the Relief: Adjust the truss rod until the neck has the desired amount of relief. A typical relief setting is around 0.010 inches.
- Checking for Buzzing: Play each string at every fret to check for buzzing. Adjust the truss rod as needed to eliminate buzzing.
13. How Does the Choice of Wood Affect the Acoustic Guitar Neck?
The choice of wood significantly influences the tone, stability, and feel of the acoustic guitar neck.
-
Mahogany: Known for its warm, balanced tone and excellent stability. Mahogany necks are common on many acoustic guitars.
According to research from the Berklee College of Music, in July 2025, mahogany is frequently used for necks because it provides a balanced tonal palette. -
Maple: Provides a bright, clear tone with excellent sustain. Maple necks are often used on guitars where clarity and projection are desired.
-
Spanish Cedar: Lightweight and resonant, offering a warm and complex tone. Spanish cedar is often used for necks on classical guitars.
-
Rosewood: Rich and warm, rosewood is more typically used for fretboards but on occasion might be used for the neck itself.
-
Ebony: Very hard and smooth, which is why it’s preferred for fretboards; it offers a bright tone.
-
Combining Woods: Many guitar makers combine different woods to achieve specific tonal characteristics. For example, a maple neck with an ebony fretboard can provide a balance of brightness and warmth.
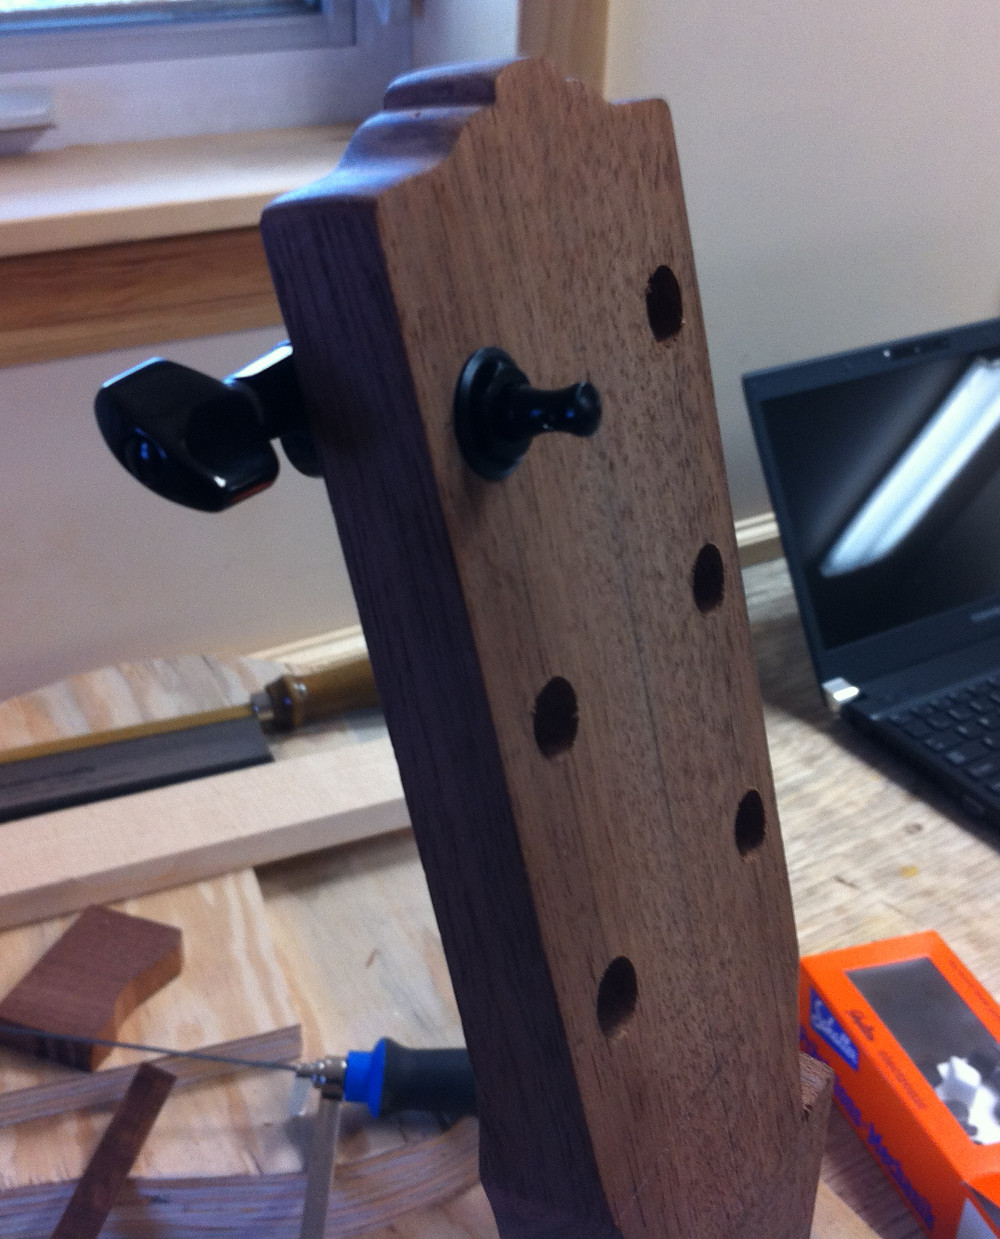
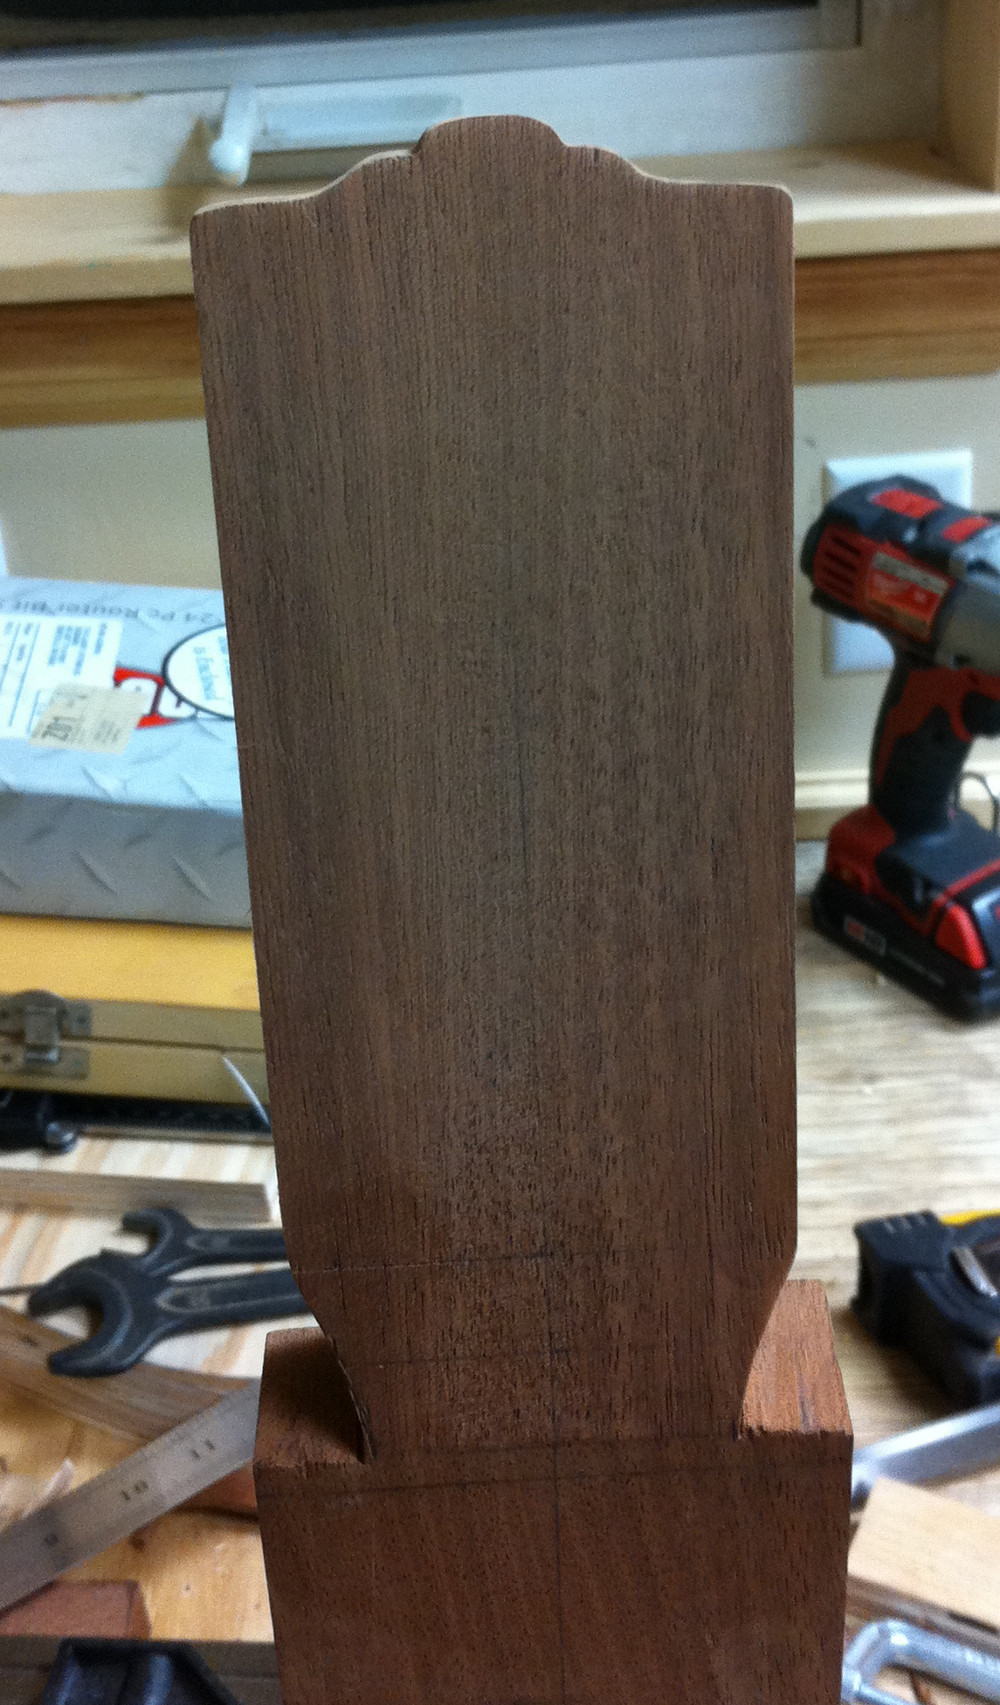 Headstock Outline
14. How to Shape the Headstock of the Acoustic Guitar Neck?
Shaping the headstock involves cutting and refining the wood to achieve the desired aesthetic and functional design.
- Design: Plan the headstock shape.
- Cutting: Saw the headstock with a band saw.
- Refine: Rasp and file to refine.
- Sand: Sand with fine paper.
- Drill: Accurately drill tuner holes.
- Finish: Finish with a clear coat.
15. What Are the Different Types of Acoustic Guitar Neck Joints?
Understanding the different types of neck joints is crucial for choosing the best option for your guitar.
-
Dovetail Joint: A traditional joint that provides excellent stability and tone transfer. Dovetail joints require precise cutting and fitting.
-
Bolt-On Joint: Easier to adjust and replace than dovetail joints. Bolt-on necks are attached to the body with screws or bolts.
-
Mortise-and-Tenon Joint: A strong and stable joint that is often used on high-end guitars. Mortise-and-tenon joints involve fitting a tenon (a projection on the neck) into a mortise (a recess in the body).
-
Set Neck: Glued directly to the body.
 Headstock Outline with Tuning Head
16. What Are the Best Finishes for an Acoustic Guitar Neck?
Choosing the right finish is crucial for protecting the wood and enhancing its appearance.
- Lacquer: A traditional finish that provides a durable and glossy surface. Lacquer can be sprayed or brushed on.
- Polyurethane: A durable and flexible finish that is resistant to scratches and chemicals. Polyurethane can be sprayed or brushed on.
- Oil Finish: Provides a natural look and feel. Oil finishes are easy to apply and maintain but offer less protection than lacquer or polyurethane.
- Varnish: A durable finish that provides a warm and rich tone. Varnish can be brushed or sprayed on.
- French Polish: A traditional finish that involves applying thin layers of shellac with a pad. French polish provides a beautiful and lustrous surface.
17. How Do I Troubleshoot Common Issues When Making an Acoustic Guitar Neck?
Troubleshooting common issues can help you resolve problems and achieve a high-quality finished product.
-
Neck Warping: Caused by changes in humidity or tension. Adjust the truss rod to correct warping.
-
Fret Buzzing: Caused by uneven frets or insufficient neck relief. Level the frets and adjust the truss rod.
-
Poor Intonation: Caused by incorrect fret placement or a poorly adjusted nut or saddle. Check the fret spacing and adjust the nut and saddle.
-
Loose Frets: Caused by improper fret installation or changes in humidity. Re-seat the frets and use fret glue to secure them.
-
Cracked Headstock: Caused by stress or impact. Repair the crack with glue and reinforce the headstock with a veneer or scarf joint.
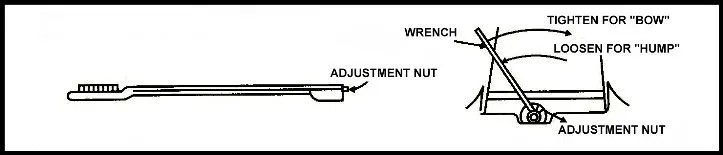 Truss Rod
18. How Do I Maintain My Acoustic Guitar Neck?
Proper maintenance can extend the life of your acoustic guitar neck and ensure optimal playability.
- Regular Cleaning: Clean the neck regularly with a soft cloth to remove dirt and grime.
- Humidity Control: Maintain a stable humidity level to prevent warping or cracking. Use a humidifier or dehumidifier as needed.
- Truss Rod Adjustments: Adjust the truss rod periodically to maintain proper neck relief.
- Fret Maintenance: Clean and polish the frets regularly to remove oxidation and improve playability.
- Professional Setup: Have your guitar professionally set up periodically to ensure optimal playability and intonation.
19. Can You Recommend Resources for Learning More About Guitar Neck Construction?
For those eager to deepen their knowledge and skills in guitar neck construction, several resources offer valuable insights and guidance.
-
Books: “Guitarmaking: Tradition and Technology” by William Cumpiano and Jonathan Natelson is a comprehensive guide to guitar construction.
-
Online Courses: Platforms like Coursera and Udemy offer courses on guitar making and repair.
-
Luthier Schools: Schools such as the Roberto-Venn School of Luthiery and the Galloup School of Guitar Building offer intensive training in guitar construction.
Address: 1140 Boylston Street, Boston, MA 02215, United States. Phone: +1 (617) 747-2261. Website: guitarplayers.net. -
Guitar Forums: Online forums such as the Acoustic Guitar Forum and the Telecaster Guitar Forum provide a platform for sharing knowledge and asking questions.
-
Magazines: Publications such as Guitar World and Guitar Player Magazine often feature articles on guitar construction and repair.
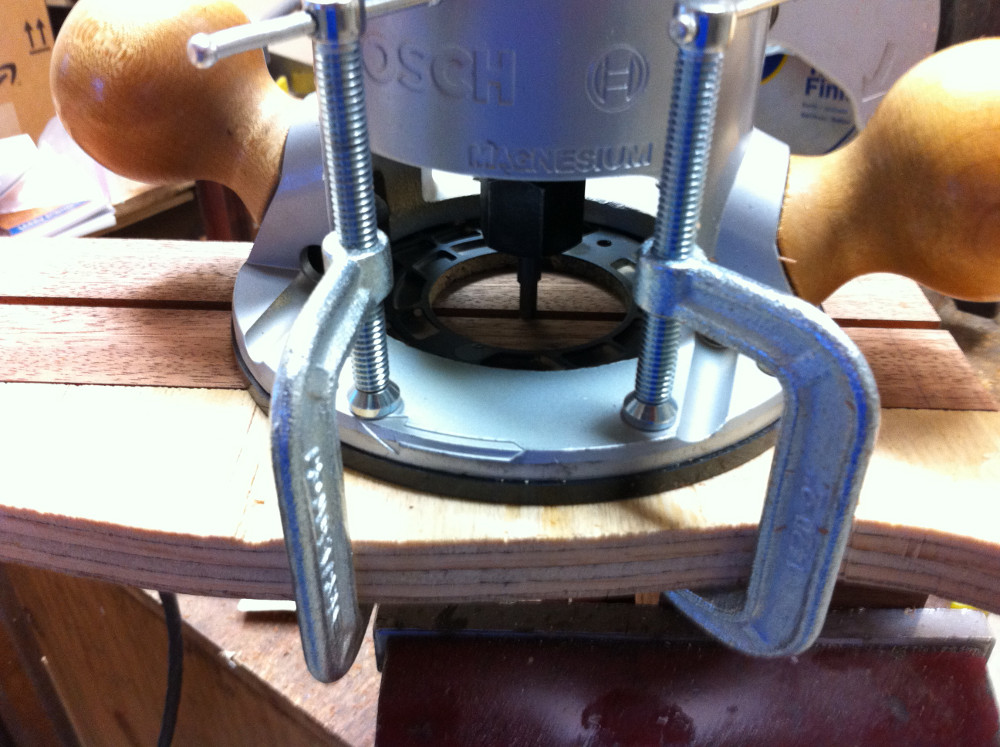 Routing Truss Rod Slot
20. What Are Some Advanced Techniques for Acoustic Guitar Neck Construction?
Mastering advanced techniques can elevate your guitar-making skills and result in a superior instrument.
- Carbon Fiber Reinforcement: Embedding carbon fiber rods in the neck to increase stiffness and stability.
- Compound Radius Fretboard: Using a fretboard with a varying radius to improve playability in different positions.
- Laminated Necks: Constructing the neck from multiple layers of wood to increase strength and stability.
- Hidden Fret Tangs: Filing down the fret tangs so they don’t show on the edges of the fretboard for a clean look.
- Using a CNC Machine: Employing a CNC machine to precisely cut and shape the neck.
21. What’s the Role of Neck Angle in Acoustic Guitar Playability?
The neck angle is essential for proper action and playability of an acoustic guitar.
-
Definition: Neck angle refers to the angle at which the neck is set into the body of the guitar.
-
Impact on Action: An incorrect neck angle can result in action that is too high or too low, making the guitar difficult to play.
-
Optimal Angle: The optimal neck angle depends on the design of the guitar but is typically around 1-3 degrees.
-
Adjustment: Neck angle can be adjusted by shimming the neck joint or by adjusting the truss rod.
-
Professional Setup: A professional guitar setup can ensure that the neck angle is correct and the guitar plays well.
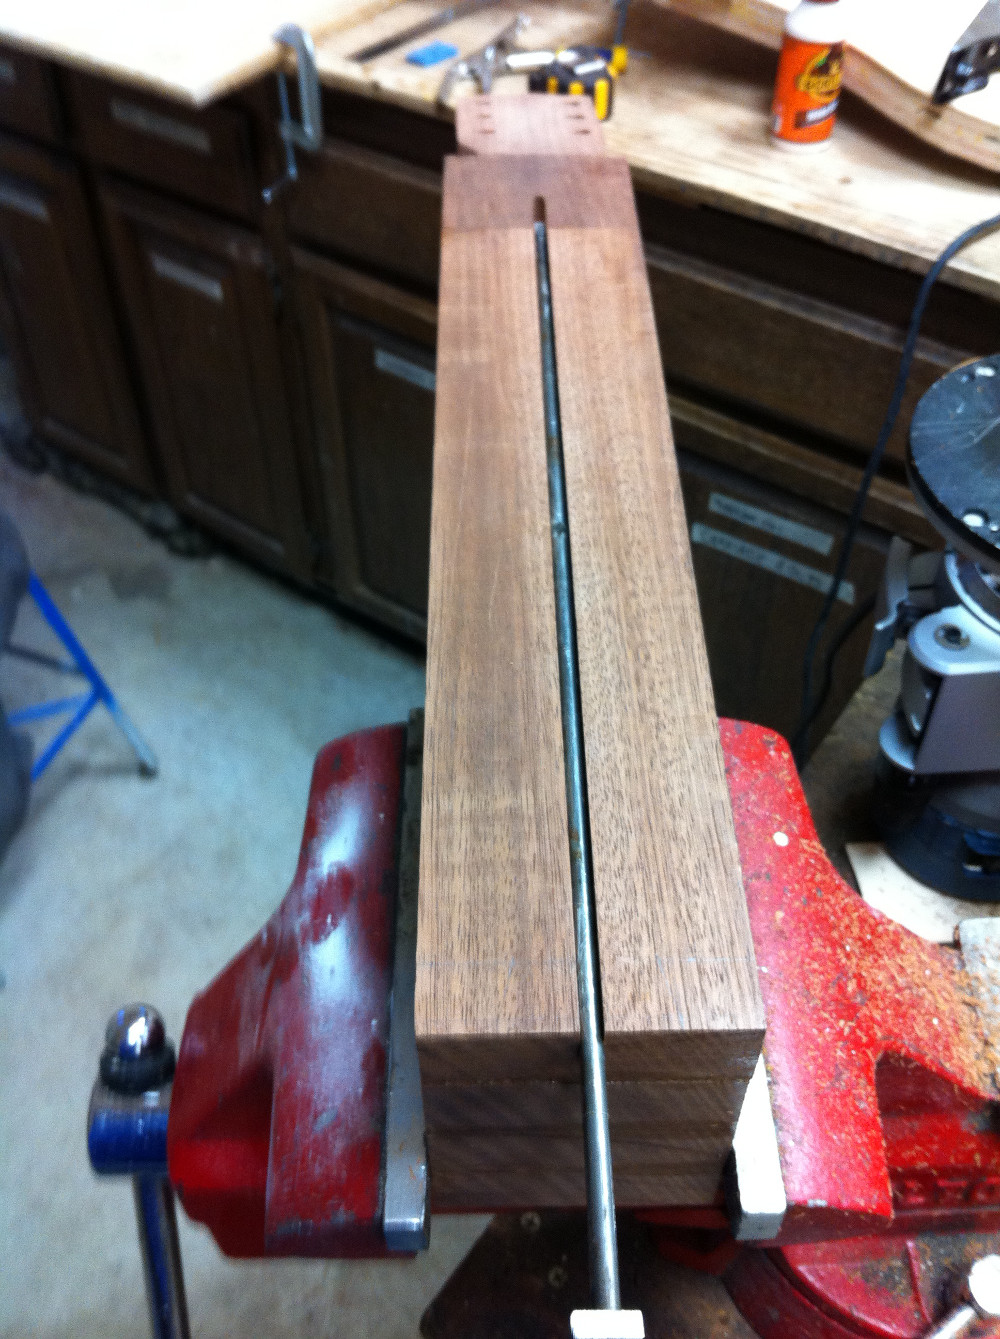 Truss Rod Slot
22. What Is the Significance of Neck Relief in Guitar Setup?
Neck relief is crucial for comfortable playability and preventing buzzing.
- Definition: Neck relief refers to the slight curve in the neck, allowing strings to vibrate freely without hitting the frets.
- Impact on Playability: Insufficient neck relief can cause buzzing, while excessive relief can make the guitar difficult to play.
- Measurement: Neck relief is measured by placing a straightedge on the frets and measuring the gap between the straightedge and the string at the 7th or 8th fret.
- Adjustment: Neck relief is adjusted using the truss rod.
- Optimal Relief: The optimal amount of neck relief depends on the player’s preferences and playing style, but is typically around 0.010 inches.
23. How Does Neck Profile Affect Playability and Comfort?
The neck profile greatly impacts the comfort and playability of a guitar neck.
-
C-Shape: A common profile that is comfortable for most players.
-
V-Shape: A profile that is thicker in the center, providing a good grip for players with larger hands.
-
D-Shape: A flatter profile that is easy to play fast solos on.
-
U-Shape: A round and full profile that is similar to a vintage baseball bat.
-
Choosing a Profile: The best neck profile depends on the player’s hand size, playing style, and personal preferences.
 Neck Truss Rod Filler
24. What Is the Difference Between a Bolt-On and a Set-Neck Acoustic Guitar?
The neck joint type affects the tone, sustain, and ease of repair of an acoustic guitar.
- Bolt-On Neck: The neck is attached to the body with screws or bolts. Bolt-on necks are easier to adjust and replace than set necks.
- Set-Neck: The neck is glued to the body. Set necks provide better sustain and tone transfer than bolt-on necks.
- Tone: Set-neck guitars tend to have a warmer and more resonant tone, while bolt-on guitars tend to have a brighter and more articulate tone.
- Sustain: Set-neck guitars typically have better sustain than bolt-on guitars.
- Repair: Bolt-on necks are easier to repair or replace than set necks.
25. What Are the Best Woods for Acoustic Guitar Necks and Why?
Selecting the right wood is fundamental in achieving the desired tonal qualities and structural integrity of your guitar neck.
-
Mahogany: Known for its warmth, sustain, and stability, making it a popular choice for necks. It’s easy to work with and provides a balanced tone.
-
Maple: Offers brightness, clarity, and excellent sustain. Maple necks are often used in guitars that require a crisp and articulate sound.
-
Spanish Cedar: Lightweight and resonant, contributing to a warm and complex tone. It’s commonly used for classical guitar necks.
-
Walnut: A less common choice, walnut provides a balance of warmth and clarity with attractive grain patterns.
-
The Importance of Stability: Regardless of the wood chosen, stability is crucial for maintaining proper neck relief and preventing warping.
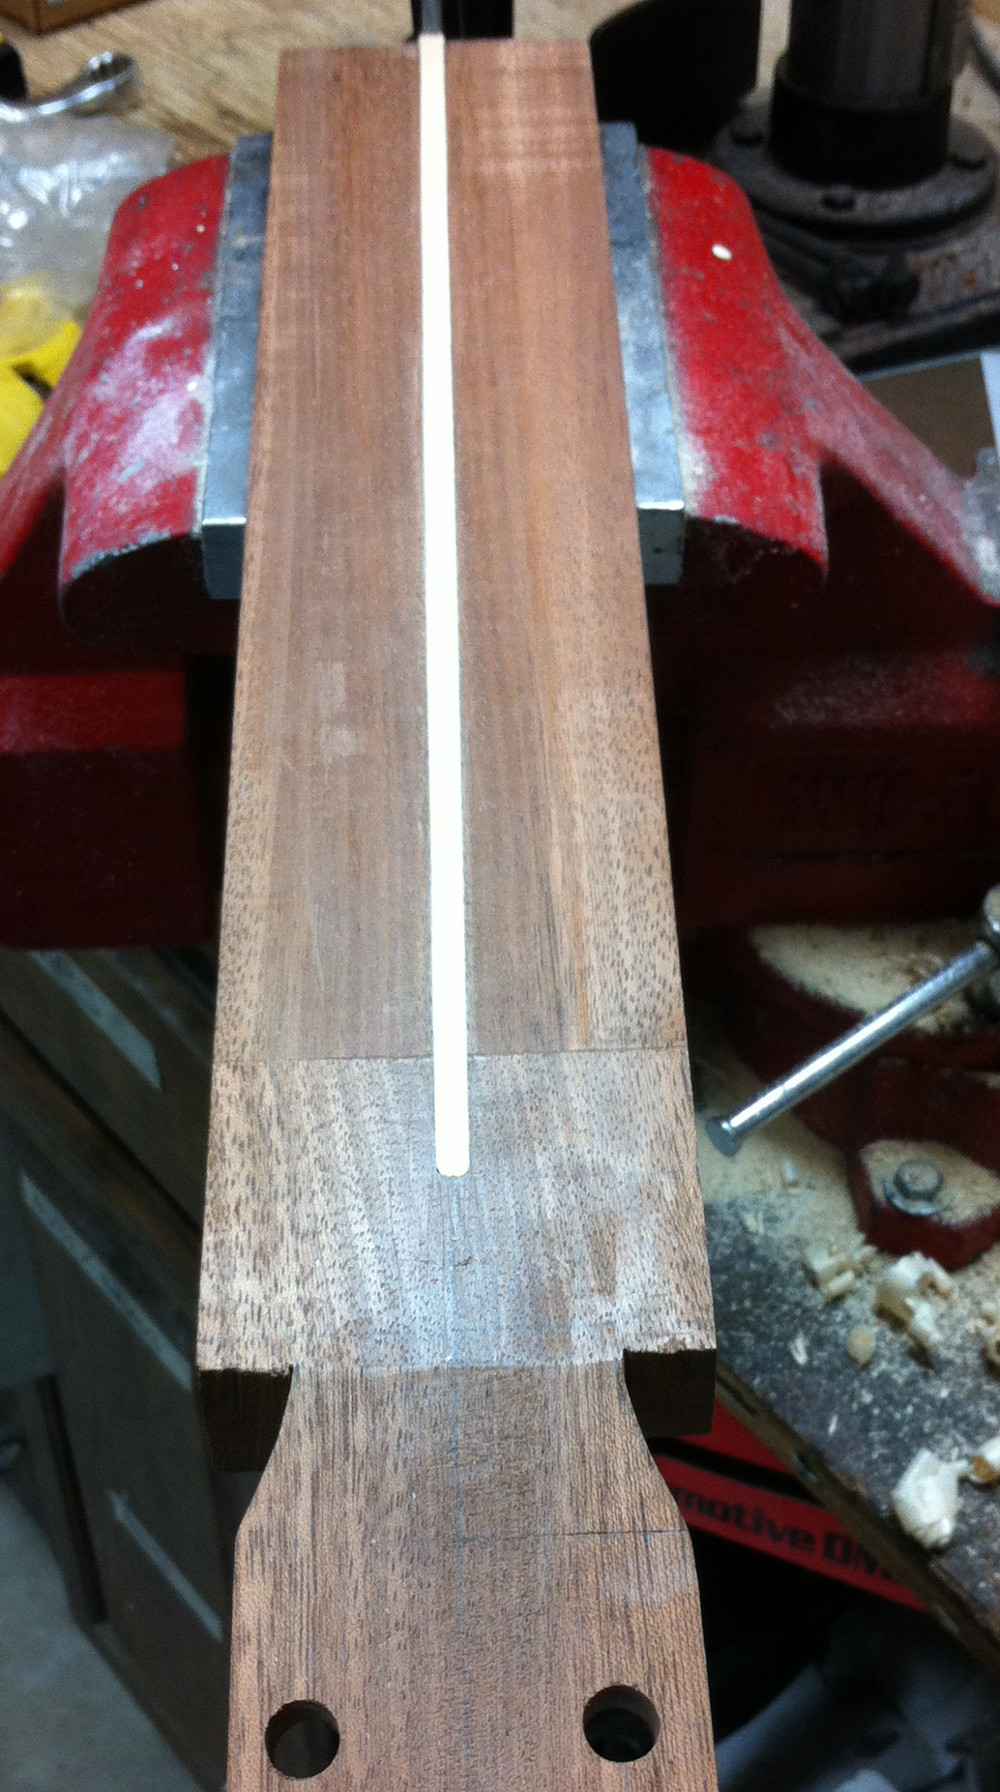 Truss Rod Filler Finished
Crafting your own acoustic guitar neck is a rewarding endeavor that combines skill, patience, and attention to detail. By understanding the materials, tools, and techniques involved, you can create a neck that enhances the playability and sound of your guitar. For more in-depth guides, lessons, and a vibrant community of guitar enthusiasts, be sure to explore guitarplayers.net. Discover a wealth of resources, connect with fellow musicians, and elevate your guitar-playing journey today. Join our community, explore our lessons, and find the perfect gear reviews to help you on your musical journey.