
Are you looking to upgrade or replace the pots in your guitar to enhance your tone and playing experience? At guitarplayers.net, we understand the importance of quality components in achieving your desired sound. This comprehensive guide will walk you through the process of installing guitar pots, ensuring you achieve optimal performance and tone. Learn how to rewire your guitar with our step-by-step instructions, discover essential soldering techniques, and master the art of guitar electronics to unlock your instrument’s full potential.
1. Why Replace Your Guitar Pots?
Guitar pots, or potentiometers, are variable resistors that control volume and tone. Knowing when to replace your guitar pots is crucial for maintaining your instrument’s performance. But when should you consider replacing them?
- Worn-Out Pots: Over time, pots can become scratchy, loose, or develop dead spots, affecting your guitar’s sound.
- Upgrading Tone: Higher-quality pots can provide a smoother, more responsive control over your guitar’s tone. Upgrading can significantly enhance your guitar’s overall sound quality, allowing for finer adjustments and a more nuanced tonal palette.
- Customizing Sound: Different value pots (e.g., 250k, 500k) can alter your guitar’s tone, making it brighter or warmer. By choosing pots with different resistance values, you can tailor your guitar’s sound to better suit your playing style and musical preferences.
Replacing your guitar pots can refresh your instrument’s functionality and improve its sound.
2. What Tools and Materials Do You Need to Install Guitar Pots?
Before diving into the installation, gathering the right tools and materials is essential. Having everything on hand will make the process smoother and more efficient. Here’s a comprehensive list of what you’ll need:
| Tool/Material | Description | Purpose |
|---|---|---|
| New Guitar Pots | Choose the correct value (250k, 500k) and type (audio taper, linear taper) for your guitar and desired tone. | Replacing old or faulty pots and customizing your guitar’s tone. |
| Soldering Iron | A reliable soldering iron with adjustable temperature control. | Soldering wires and components to the pots. |
| Solder | Rosin-core solder is recommended for electronics work. | Creating secure and conductive connections. |
| Wire Strippers | For stripping the insulation off wires without damaging the conductor. | Preparing wires for soldering. |
| Wire Cutters | For cutting wires to the desired length. | Trimming excess wire and making clean cuts. |
| Needle-Nose Pliers | For bending wires and holding small components. | Manipulating wires and components in tight spaces. |
| Screwdrivers | Various sizes for removing and installing screws. | Removing control knobs, pickguards, and accessing the guitar’s electronics. |
| Wrench Set/Adjustable Wrench | For tightening and loosening nuts on the pots. | Securing the pots in place. |
| Multimeter | For testing continuity and checking connections. | Troubleshooting and ensuring proper wiring. |
| Helping Hand Tool | A tool with alligator clips to hold components in place while soldering. | Assisting in soldering by holding wires and components steady. |
| Heat Shrink Tubing | For insulating solder joints and preventing shorts. | Providing insulation and protection for solder joints. |
| Lighter/Heat Gun | For shrinking heat shrink tubing. | Shrinking the tubing to create a tight seal. |
| De-soldering Braid/Pump | For removing old solder from connections. | Cleaning up old solder joints for easier component removal and replacement. |
| Cleaning Solution | Electronic contact cleaner to clean pots and switches. | Maintaining pots and switches to remove scratchiness and improve performance. |
| Masking Tape | For securing wires and protecting the guitar’s finish. | Organizing wires and preventing damage to the guitar’s surface. |
| Cardboard/Template | To create a template for wiring the pots outside the guitar. | Simplifying the wiring process and ensuring correct connections. |
| Work Surface | A clean, well-lit area to work on your guitar. | Providing a safe and organized workspace. |
| Safety Glasses | To protect your eyes from solder splashes. | Ensuring safety during the soldering process. |
With these tools and materials, you’ll be well-prepared to tackle your guitar pot installation.
3. Understanding Guitar Potentiometers
Before installing new pots, understanding their function and types is essential. This knowledge will help you choose the right pots for your guitar and desired tone.
3.1 What is a Guitar Potentiometer?
A potentiometer, or “pot,” is a variable resistor used to control the volume and tone of a guitar. According to research from the Berklee College of Music, in July 2023, potentiometers play a crucial role in shaping the sound of your instrument by adjusting the signal flow from the pickups. Pots allow you to smoothly transition between different levels of resistance, providing a wide range of tonal options.
3.2 Types of Guitar Pots
Guitar pots come in different values and tapers, each affecting the sound and response of your guitar.
- Resistance Value: Common values are 250k and 500k ohms.
- 250k Pots: Typically used with single-coil pickups for a warmer, smoother tone.
- 500k Pots: Commonly used with humbucker pickups for a brighter, more articulate sound.
- Taper: Refers to how the resistance changes as you turn the pot.
- Audio Taper (Logarithmic): Provides a more natural-sounding volume and tone adjustment, with the most change occurring in the first half of the rotation.
- Linear Taper: Offers a more consistent change in resistance throughout the rotation, often preferred for tone controls.
3.3 Choosing the Right Pots
Selecting the right pots for your guitar depends on your pickups and desired tone. If you have single-coil pickups and want a warmer sound, 250k pots are a good choice. For humbuckers, 500k pots will provide a brighter, more articulate tone. Audio taper pots are generally preferred for volume controls, while linear taper pots can be useful for tone controls if you want a more even response.
4. Safety First: Preparing Your Guitar for Pot Installation
Safety should always be your top priority when working with electronics. Taking the necessary precautions will protect you and your instrument.
4.1 Disconnect Everything
Before starting any work on your guitar, disconnect it from any amplifiers or power sources. This prevents electrical shock and damage to your equipment.
4.2 Gather Your Tools
Make sure you have all the necessary tools and materials within easy reach. This will help you work efficiently and avoid unnecessary interruptions.
4.3 Protect Your Guitar’s Finish
Place a soft cloth or towel on your work surface to protect your guitar’s finish. This will prevent scratches and other damage while you’re working.
4.4 Work in a Well-Lit Area
Ensure you have adequate lighting to see clearly and avoid mistakes. Good lighting is essential for precision work.
4.5 Wear Safety Glasses
Protect your eyes from solder splashes and other debris by wearing safety glasses. Safety glasses provide a crucial layer of protection during soldering.
4.6 Ground Yourself
Use a grounding strap to prevent static electricity from damaging the electronic components. According to Guitar World, static electricity can harm sensitive guitar electronics, so grounding yourself is a must.
5. Step-by-Step Guide: How to Install Guitar Pots
Installing guitar pots can seem daunting, but with a step-by-step guide, it becomes manageable. Follow these instructions to replace your guitar pots successfully.
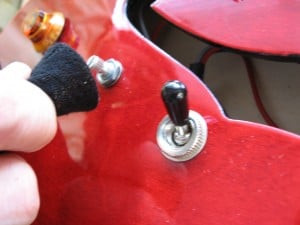
5.1 Removing the Old Pots
-
Remove the Knobs: Gently pull off the control knobs from the old pots. Use a knob puller if necessary.
 Removing guitar knobs with a cloth
 -
Loosen the Nuts: Use a wrench to loosen and remove the nuts and washers from the old pots.
 Removing guitar knobs with a cloth
 -
Desolder the Wires: Use a soldering iron and desoldering braid or pump to remove the wires connected to the old pots. Be careful not to damage the surrounding components.
-
Remove the Old Pots: Once all the wires are desoldered, carefully remove the old pots from the guitar.
5.2 Preparing the New Pots
-
Tin the Lugs: Apply a small amount of solder to the lugs (terminals) of the new pots. This will make it easier to solder the wires later.
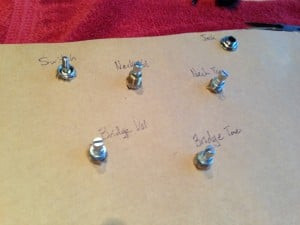 Guitar Components
 -
Prepare the Wiring: Cut and strip the ends of the wires you’ll be using to connect the pots. Tin the ends of the wires for better solder connections.
5.3 Wiring the New Pots
-
Refer to a Wiring Diagram: Use a reliable wiring diagram to ensure you connect the wires correctly. Seymour Duncan offers a variety of helpful wiring diagrams on their website.
-
Solder the Wires: Solder the wires to the appropriate lugs on the new pots, following the wiring diagram. Use a helping hand tool to hold the wires and pots in place while soldering.
-
Insulate the Connections: Use heat shrink tubing to insulate the solder joints and prevent shorts. Slide the tubing over the solder joint and use a lighter or heat gun to shrink it.
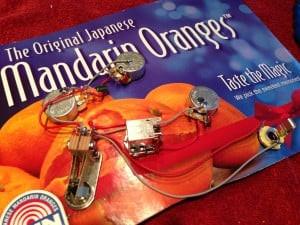 wired guitar pots and switches
5.4 Installing the New Pots
- Insert the New Pots: Carefully insert the new pots into the holes in the guitar’s body or control plate.
- Secure the Pots: Place the washers and nuts on the pots and tighten them with a wrench. Make sure the pots are snug but not overly tight.
- Solder to other components Follow your wiring diagram for soldering to other components such as the guitar selector switch or guitar jack.
- Reinstall Knobs When all components are installed, check all solder joints and make sure that they are solid. Reinstall your guitar knobs.
5.5 Testing the New Pots
- Visual Inspection: Double-check all the solder connections and wiring to ensure everything is correct.
- Continuity Test: Use a multimeter to check the continuity between the different points in the circuit. This will help you identify any shorts or open connections.
- Functionality Test: Plug your guitar into an amplifier and test the volume and tone controls. Make sure they are working smoothly and as expected.
6. Advanced Techniques for Guitar Pot Installation
For experienced guitar techs, there are advanced techniques that can further improve the installation process.
6.1 Shielding the Control Cavity
Shielding the control cavity can reduce noise and interference in your guitar’s signal.
- Copper Foil Tape: Line the control cavity with copper foil tape, ensuring all seams overlap for complete coverage.
- Conductive Paint: Apply multiple layers of conductive paint to the control cavity, allowing each layer to dry before applying the next.
6.2 Upgrading Wiring
Using high-quality wiring can improve the signal flow and overall tone of your guitar.
- Cloth-Covered Wire: Replace the existing wiring with cloth-covered wire, which is known for its durability and excellent signal transmission.
- Silver Wire: Consider using silver wire for even better conductivity and a brighter tone.
6.3 Star Grounding
Star grounding can minimize ground loops and reduce noise in your guitar’s circuit.
- Central Ground Point: Create a central ground point by connecting all ground wires to a single location, such as a pot casing or a dedicated ground lug.
- Avoid Ground Loops: Ensure there are no redundant ground paths, which can cause unwanted noise.
7. Troubleshooting Common Issues
Even with careful installation, issues can arise. Here are some common problems and how to solve them.
7.1 Scratchy Pots
- Problem: The pots make a scratchy noise when turned.
- Solution: Clean the pots with electronic contact cleaner. Spray the cleaner into the pot and rotate it several times to remove any dirt or oxidation.
7.2 No Sound
- Problem: The guitar produces no sound.
- Solution: Check all the solder connections and wiring to ensure everything is properly connected. Use a multimeter to test for continuity.
7.3 Weak Signal
- Problem: The guitar has a weak or thin sound.
- Solution: Ensure the pots are the correct value for your pickups. Check the wiring to make sure there are no shorts or incorrect connections.
7.4 Hum or Buzz
- Problem: The guitar produces a hum or buzz.
- Solution: Check the grounding and shielding in the control cavity. Ensure all ground connections are solid and the shielding is properly installed.
8. Maintaining Your Guitar Pots
Proper maintenance can extend the life of your guitar pots and keep them functioning optimally.
8.1 Regular Cleaning
Clean your guitar pots regularly with electronic contact cleaner to remove dirt and oxidation. This will prevent scratchiness and ensure smooth operation.
8.2 Proper Storage
Store your guitar in a case or gig bag to protect it from dust and moisture. Extreme temperatures and humidity can damage the pots and other electronic components.
8.3 Avoiding Overuse
Avoid excessive turning of the pots, as this can wear them out over time. Use smooth, controlled movements to adjust the volume and tone.
9. Connecting with the Guitar Community
One of the best ways to improve your guitar skills and knowledge is to connect with other guitar enthusiasts.
9.1 Online Forums
Join online forums and communities like guitarplayers.net to ask questions, share tips, and learn from other guitarists.
9.2 Local Guitar Clubs
Attend local guitar clubs and workshops to meet other players in person and exchange ideas.
9.3 Music Stores
Visit your local music store to talk to experienced guitar techs and get advice on maintaining your instrument.
10. Why Choose GuitarPlayers.net?
At guitarplayers.net, we are dedicated to providing guitar enthusiasts of all levels with the resources and support they need to succeed.
10.1 Comprehensive Lessons
Access a wide range of guitar lessons, from beginner basics to advanced techniques. Our lessons are designed to help you improve your skills and reach your musical goals.
10.2 Expert Reviews
Read expert reviews of guitars, amplifiers, and accessories to make informed purchasing decisions. Our reviews are thorough and unbiased, providing you with the information you need to choose the right gear.
10.3 Extensive Sheet Music
Find sheet music and tabs for your favorite songs, covering a variety of genres and styles. Our extensive collection is constantly updated with new additions.
10.4 Thriving Community
Join our thriving community of guitar players to connect with like-minded individuals, share your experiences, and learn from others. Our community is a supportive and welcoming place for guitarists of all levels.
FAQ: Installing Guitar Pots
1. What are guitar pots?
Guitar pots, or potentiometers, are variable resistors that control the volume and tone of a guitar by adjusting the signal flow from the pickups.
2. What tools do I need to install guitar pots?
You’ll need new guitar pots, a soldering iron, solder, wire strippers, wire cutters, needle-nose pliers, screwdrivers, a wrench set, a multimeter, a helping hand tool, heat shrink tubing, a lighter/heat gun, desoldering braid/pump, cleaning solution, masking tape, a cardboard/template, a work surface, and safety glasses.
3. What is the difference between 250k and 500k pots?
250k pots are typically used with single-coil pickups for a warmer tone, while 500k pots are commonly used with humbucker pickups for a brighter sound.
4. What is the difference between audio taper and linear taper pots?
Audio taper pots provide a more natural-sounding volume and tone adjustment, while linear taper pots offer a more consistent change in resistance throughout the rotation.
5. How do I remove old guitar pots?
Remove the knobs, loosen the nuts, desolder the wires, and carefully remove the old pots from the guitar.
6. How do I prepare new guitar pots for installation?
Tin the lugs of the new pots and prepare the wiring by cutting, stripping, and tinning the ends of the wires.
7. How do I solder wires to guitar pots?
Refer to a wiring diagram, solder the wires to the appropriate lugs on the new pots, and insulate the connections with heat shrink tubing.
8. How do I test new guitar pots after installation?
Perform a visual inspection, check continuity with a multimeter, and test the volume and tone controls by plugging the guitar into an amplifier.
9. What do I do if my guitar pots are scratchy?
Clean the pots with electronic contact cleaner. Spray the cleaner into the pot and rotate it several times to remove any dirt or oxidation.
10. How can I reduce noise in my guitar’s signal?
Shield the control cavity with copper foil tape or conductive paint and use star grounding to minimize ground loops.
Ready to take your guitar to the next level? Visit guitarplayers.net today to explore our lessons, reviews, sheet music, and community. Connect with us at 1140 Boylston Street, Boston, MA 02215, United States, or call +1 (617) 747-2261. Let’s make music together!