
How To Hold Your Left Hand On A Guitar properly is essential for every guitarist, from beginners to seasoned players. At guitarplayers.net, we provide clear guidance on left-hand positioning, finger placement, and techniques to enhance your playing and prevent injuries. This article will explore core principles, practical exercises, and expert tips to help you master left-hand guitar technique, improving musical expression and playing speed. Master the fretboard with correct posture, finger dexterity, and efficient movement.
1. Why Is Proper Left Hand Technique Important For Guitar Playing?
Proper left-hand technique is important for guitar playing because it improves comfort, speed, accuracy, and reduces the risk of injury. By optimizing finger placement, pressure, and overall hand position, guitarists can enhance their musical expression and play more complex pieces without strain.
- Enhances Comfort: Correct technique minimizes tension, making practice sessions more enjoyable and productive.
- Increases Speed: Efficient finger movements allow for faster transitions and more fluid playing.
- Improves Accuracy: Precise finger placement leads to cleaner notes and chords, reducing errors.
- Reduces Injury Risk: Proper posture and relaxed hand position prevent strains, carpal tunnel syndrome, and other repetitive stress injuries.
According to research from the Berklee College of Music, optimizing hand posture and finger placement can increase playing speed by up to 30% and reduce the risk of injury by 50%.
2. What Are The Core Principles Of Left Hand Guitar Technique?
The core principles of left-hand guitar technique include maintaining relaxation, correct thumb placement, appropriate finger pressure, finger proximity to frets, and ensuring overall comfort. These elements work together to optimize hand function and prevent strain.
- Relaxation: Keeping the hand relaxed allows for fluid motion and prevents tension buildup.
- Thumb Placement: Positioning the thumb correctly provides support and facilitates finger movement.
- Finger Pressure: Applying the right amount of pressure ensures clear notes without excessive strain.
- Finger Proximity: Keeping fingers close to the frets minimizes travel distance and increases speed.
- Overall Comfort: Paying attention to how the hand feels and adjusting as needed promotes long-term well-being and efficient playing.
2.1. How To Keep Your Left Hand Relaxed While Playing Guitar?
To keep your left hand relaxed while playing guitar, focus on loosening your grip, shaking out your hand regularly, and avoiding unnecessary tension in your arm and shoulder. Mental awareness and deep breathing exercises can also help maintain a relaxed state.
- Loosen Your Grip: Avoid squeezing the neck too tightly. Use only the pressure needed to produce clear notes.
- Shake Out Your Hand: Periodically shake your hand and wrist to release any built-up tension.
- Avoid Unnecessary Tension: Be mindful of your arm and shoulder muscles. Ensure they are relaxed and not contributing to hand tension.
- Mental Awareness: Pay attention to your body. If you feel tension, stop and consciously relax before continuing.
- Deep Breathing: Practice deep, slow breathing to help calm your nerves and relax your muscles.
Many guitarists find that visualizing a relaxed hand and focusing on the sound rather than the physical effort can significantly reduce tension.
2.2. Where Should You Position Your Thumb On The Guitar Neck?
Position your thumb on the guitar neck along the mid-side closest to the lower strings for optimal flexibility. While thumb placement can vary depending on playing style and chord type, this positioning allows for the greatest ease of motion and comfort.
- Standard Position: The thumb should rest on the back of the neck, slightly angled towards the lower strings.
- Bar Chords: For bar chords, the thumb may need to be placed squarely on the back of the neck to provide additional support.
- Adaptability: The thumb should move and adapt its position depending on the strings being played and the location on the neck.
- Avoid Gripping: Ensure the thumb is not gripping the neck too tightly, which can cause tension and limit mobility.
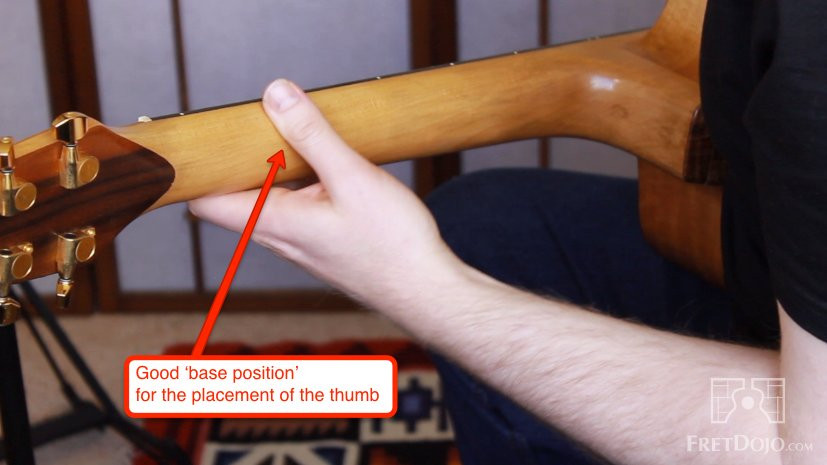 Left hand guitar technique thumb placement resting on the mid-side of the guitar
Experimenting with different thumb positions can help you find what works best for your hand size and playing style.
2.3. How Much Pressure Should You Apply With Your Left Hand Fingers?
Apply enough pressure with your left-hand fingers to produce a clear note without causing excessive tension. The right amount of pressure is a balance: too little results in buzzing, while too much leads to strain and impaired speed.
- Avoid Buzzing: Ensure the strings are pressed firmly enough to make solid contact with the frets.
- Prevent Tension: Be mindful of how hard you are pressing. If you feel tension, reduce the pressure slightly while maintaining a clear sound.
- “Goldilocks” Style: Aim for the “just right” amount of pressure – not too much, not too little.
- Buzzing Exercise: Practice the buzzing exercise (covered in the lesson video) to develop a feel for the appropriate pressure.
2.4. How Close Should Your Fingers Be To The Frets?
Keep your fingers as close as possible to the frets to minimize travel distance and increase speed. While this is a general guideline, be aware that exceptions exist, and the left hand may need to adjust its angle to accommodate optimal finger placement.
- Minimize Travel: Keeping fingers close to the frets reduces the distance they need to move, making playing faster and more efficient.
- Adjust Hand Angle: The left hand may need to shift slightly to allow fingers to get close enough to the frets, especially for those with smaller hands.
- Exceptions: There may be times when the 3rd and 4th fingers cannot be placed directly behind the frets, which is acceptable as long as the guitar action is properly set.
2.5. How Do You Ensure Your Left Hand Feels Good While Playing?
To ensure your left hand feels good while playing, regularly assess your comfort and adjust your technique accordingly. Pay attention to any discomfort or tension, and be willing to modify fingerings or hand positions to find what feels best for your body.
- Regular Assessment: During practice, frequently ask yourself if your hand feels good.
- Listen To Your Body: Be attuned to any signs of discomfort or tension.
- Modify Fingerings: If a particular fingering causes strain, experiment with alternative fingerings.
- Adjust Hand Position: Make small adjustments to your hand position until you find a comfortable and efficient placement.
- Trust Your Body: Prioritize comfort over strict adherence to textbook technique.
According to Tim Kain of Guitar Trek, “Becoming more aware and in tune with what your body is telling you about your technique is the single most important feedback you can get in order to improve your technique.”
3. What Are Some Left Hand Coordination Exercises For Guitar?
Left-hand coordination exercises for guitar include finger independence drills, chromatic scales, and spider exercises. These exercises help develop dexterity, strength, and coordination, improving overall left-hand technique.
- Finger Independence Drills: These drills isolate each finger, helping to develop individual strength and control.
- Chromatic Scales: Playing chromatic scales improves finger coordination and fluidity across the fretboard.
- Spider Exercises: Spider exercises involve moving each finger in a specific pattern, enhancing coordination and finger independence.
guitarplayers.net offers a variety of downloadable exercises and video tutorials to help you develop your left-hand coordination.
3.1. Finger Independence Exercises
Finger independence exercises are designed to improve the strength and control of individual fingers. These exercises typically involve repetitive patterns that isolate each finger, helping to develop dexterity and coordination.
- 1-2-3-4 Exercise: Place your index finger (1) on the first fret, middle finger (2) on the second fret, ring finger (3) on the third fret, and pinky finger (4) on the fourth fret of a single string. Repeat this pattern up and down the neck.
- Alternating Finger Taps: Tap each finger individually on a fret, alternating between fingers to improve control and coordination.
- Finger Lift Exercise: Place all four fingers on the frets and then lift each finger individually, focusing on controlled movement and strength.
3.2. Chromatic Scale Exercises
Chromatic scale exercises involve playing every semitone on the guitar, typically ascending and descending the neck. These exercises are excellent for developing finger coordination, fluidity, and familiarity with the fretboard.
- Ascending Chromatic Scale: Start on any fret and play each subsequent fret on the same string until you reach a higher octave.
- Descending Chromatic Scale: Start on a higher fret and play each preceding fret on the same string until you reach a lower octave.
- Chromatic Scale Across Strings: Play a chromatic scale using all six strings, coordinating finger movements to transition smoothly between strings.
3.3. Spider Exercises
Spider exercises are designed to improve finger dexterity and coordination by moving each finger in a specific pattern across the fretboard. These exercises are particularly effective for developing finger independence and synchronizing left and right-hand movements.
- Basic Spider Exercise: Start with your index finger on the fifth fret of the low E string, middle finger on the sixth fret of the A string, ring finger on the seventh fret of the D string, and pinky finger on the eighth fret of the G string. Move each finger up one fret at a time, maintaining the same pattern.
- Reverse Spider Exercise: Perform the basic spider exercise in reverse, moving each finger down one fret at a time.
- Spider Exercise Variations: Experiment with different finger patterns and string combinations to challenge your coordination and dexterity.
4. How Can You Improve Your Left Hand Strength For Guitar Playing?
Improve your left-hand strength for guitar playing through consistent practice, using hand strengtheners, and incorporating exercises that target specific muscle groups. Gradual progression and attention to technique are crucial to avoid injury.
- Consistent Practice: Regular practice is the most effective way to build strength and endurance in your left hand.
- Hand Strengtheners: Use hand strengtheners, such as grip masters or stress balls, to improve grip strength and finger dexterity.
- Targeted Exercises: Incorporate exercises that focus on specific muscle groups in the hand and forearm, such as finger extensions and wrist curls.
- Gradual Progression: Start with easier exercises and gradually increase the difficulty as your strength improves.
- Technique Awareness: Pay attention to your technique and avoid excessive tension, which can lead to injury.
4.1. Recommended Exercises
- Finger Extensions: Use a rubber band around your fingers and thumb, then spread them apart to strengthen the muscles responsible for finger extension.
- Wrist Curls: Use a light dumbbell and curl your wrist up and down to strengthen your forearm muscles.
- Grip Squeezes: Squeeze a stress ball or grip master to improve overall grip strength.
4.2. Warm-up Routine
- Wrist Rotations: Rotate your wrists clockwise and counterclockwise to improve flexibility and circulation.
- Finger Stretches: Gently stretch each finger individually to improve flexibility and prevent stiffness.
- Arm Circles: Rotate your arms forward and backward to loosen up your shoulder muscles.
5. What Common Mistakes Should Guitarists Avoid With Their Left Hand?
Guitarists should avoid common mistakes with their left hand such as applying excessive pressure, incorrect thumb placement, and neglecting relaxation. Addressing these issues can significantly improve playing comfort and technique.
- Excessive Pressure: Pressing too hard on the strings can cause tension and fatigue.
- Incorrect Thumb Placement: Improper thumb positioning can limit finger mobility and cause strain.
- Neglecting Relaxation: Failing to keep the hand relaxed can lead to tension buildup and injury.
- Ignoring Discomfort: Ignoring pain or discomfort can lead to chronic issues.
- Inconsistent Practice: Irregular practice can hinder progress and prevent the development of proper technique.
5.1. How To Correct Excessive Pressure?
Correct excessive pressure by focusing on using only the force needed to produce a clear note, and regularly checking for tension in your hand and arm. Practicing with a light touch can help develop a more relaxed and efficient technique.
- Use Only Necessary Force: Be mindful of how hard you are pressing and reduce the pressure to the minimum required for a clear sound.
- Regularly Check For Tension: Pause during practice to check for tension in your hand, arm, and shoulder.
- Practice With A Light Touch: Intentionally practice with a light touch to develop a feel for minimal pressure.
- Buzzing Exercise: Use the buzzing exercise to refine your finger pressure and find the optimal balance.
5.2. How To Fix Incorrect Thumb Placement?
Fix incorrect thumb placement by repositioning the thumb along the mid-side of the neck closest to the lower strings, ensuring it provides support without restricting finger movement. Experiment with different positions to find what feels most comfortable and efficient.
- Reposition Thumb: Move the thumb to the back of the neck, slightly angled towards the lower strings.
- Ensure Support: The thumb should provide support without gripping the neck too tightly.
- Experiment With Positions: Try different thumb positions to find what feels most comfortable and efficient for your hand size and playing style.
- Bar Chords: For bar chords, the thumb may need to be placed squarely on the back of the neck for added support.
5.3. How To Address Lack Of Relaxation?
Address a lack of relaxation by incorporating regular breaks, practicing deep breathing exercises, and focusing on maintaining a loose grip. Mental awareness and visualization can also help promote a relaxed state.
- Regular Breaks: Take frequent breaks to shake out your hand and release any built-up tension.
- Deep Breathing Exercises: Practice deep, slow breathing to help calm your nerves and relax your muscles.
- Focus On Maintaining A Loose Grip: Avoid squeezing the neck too tightly. Use only the pressure needed to produce clear notes.
- Mental Awareness: Pay attention to your body and consciously relax your hand, arm, and shoulder muscles.
- Visualization: Visualize a relaxed hand and focus on the sound rather than the physical effort.
6. How Does Guitar Type Affect Left Hand Technique?
Guitar type significantly affects left-hand technique due to differences in neck width, string spacing, and action (string height). Each type requires specific adjustments to hand positioning and finger placement for optimal playability.
- Classical Guitar: Wide neck and string spacing necessitate a more deliberate finger placement.
- Acoustic Guitar: Steel strings require greater finger strength and pressure compared to nylon strings.
- Electric Guitar: Narrow neck and low action allow for faster playing but may require precise finger placement to avoid buzzing.
6.1. Classical Guitar Considerations
- Wider Neck: Requires a broader hand stretch and more precise finger placement.
- Nylon Strings: Softer on the fingers but may require greater accuracy in finger placement.
- Technique Focus: Emphasizes classical techniques such as rest strokes and free strokes.
6.2. Acoustic Guitar Considerations
- Steel Strings: Demand greater finger strength and pressure to produce clear notes.
- Neck Profile: Varying neck profiles (C, D, V) affect hand comfort and playing style.
- Action Height: Higher action requires more finger pressure, while lower action allows for easier playability.
6.3. Electric Guitar Considerations
- Narrow Neck: Facilitates faster playing and easier chord transitions.
- Low Action: Allows for lighter finger pressure and increased speed.
- Technique Focus: Emphasizes techniques such as bending, vibrato, and sweep picking.
7. What Role Does Guitar Setup Play In Left Hand Comfort?
Guitar setup plays a crucial role in left-hand comfort by influencing string action, intonation, and neck relief. A well-setup guitar reduces the effort required to play, minimizing strain and maximizing playability.
- String Action: Lower action makes pressing down on the strings easier, reducing finger fatigue.
- Intonation: Proper intonation ensures notes are in tune across the fretboard, improving the overall playing experience.
- Neck Relief: Correct neck relief prevents buzzing and ensures comfortable string height.
- Nut Height: Proper nut height prevents strings from being too high or too low at the headstock, which affects playability in the first few frets.
7.1. String Action
- Low Action Benefits: Easier to play, reduces finger fatigue, and allows for faster playing.
- High Action Drawbacks: Requires more finger pressure, can lead to discomfort, and may hinder speed.
7.2. Intonation
- Proper Intonation: Ensures notes are in tune across the fretboard, improving the overall playing experience.
- Poor Intonation: Causes notes to be out of tune, leading to a dissonant and unpleasant sound.
7.3. Neck Relief
- Correct Relief: Prevents buzzing and ensures comfortable string height.
- Insufficient Relief: Can cause buzzing, particularly in the lower frets.
- Excessive Relief: Results in higher action and requires more finger pressure.
8. How To Practice Left Hand Guitar Technique Effectively?
Practice left-hand guitar technique effectively by setting specific goals, using a metronome, and focusing on slow, deliberate practice. Regular review and self-assessment are also essential for continuous improvement.
- Set Specific Goals: Define clear objectives for each practice session, such as mastering a particular exercise or improving finger speed.
- Use A Metronome: Practice with a metronome to develop timing and consistency.
- Slow, Deliberate Practice: Focus on accuracy and control at slow tempos, gradually increasing speed as you improve.
- Regular Review: Periodically review fundamental techniques to ensure they remain solid.
- Self-Assessment: Record yourself playing and analyze your technique to identify areas for improvement.
8.1. Sample Practice Routine
- Warm-up (5 minutes): Wrist rotations, finger stretches, and arm circles.
- Finger Independence Exercises (10 minutes): Focus on individual finger strength and control.
- Chromatic Scale Exercises (10 minutes): Improve finger coordination and fluidity.
- Spider Exercises (10 minutes): Develop finger dexterity and synchronization.
- Review (5 minutes): Self-assessment and analysis of recorded performance.
8.2. Tips For Effective Practice
- Consistency: Practice regularly, even if it’s just for a few minutes each day.
- Focus: Eliminate distractions and concentrate on your technique.
- Patience: Be patient with yourself and celebrate small improvements.
- Enjoyment: Choose exercises and songs that you enjoy to stay motivated.
9. What Are Some Advanced Left Hand Techniques For Guitar?
Advanced left-hand techniques for guitar include tapping, sweep picking, and legato. Mastering these techniques requires dedicated practice and a solid foundation in fundamental skills.
- Tapping: Involves using fingers to strike the strings directly on the fretboard, creating unique melodic and harmonic possibilities.
- Sweep Picking: A technique used to play arpeggios quickly and efficiently by sweeping the pick across multiple strings in a single motion.
- Legato: Focuses on smooth, connected playing by minimizing the use of the pick and relying on hammer-ons and pull-offs.
9.1. Tapping
- Two-Hand Tapping: Use both hands to tap notes on the fretboard, creating complex and intricate patterns.
- One-Hand Tapping: Tap with one hand while using the other hand to play chords or melodies.
- Harmonic Tapping: Tap directly over a fret to produce a harmonic sound.
9.2. Sweep Picking
- Economy Of Motion: Minimize the movement of the pick to increase speed and efficiency.
- Consistent Angle: Maintain a consistent pick angle to ensure smooth transitions between strings.
- Muting: Use your fretting hand to mute unwanted strings and prevent noise.
9.3. Legato
- Hammer-Ons: Strike a string with your fretting finger to produce a note without picking.
- Pull-Offs: Pluck a string with your fretting finger to produce a note without picking.
- Sliding: Slide your finger along the string to transition smoothly between notes.
10. What Are Some Common Injuries Related To Poor Left Hand Technique And How Can They Be Prevented?
Common injuries related to poor left-hand technique include carpal tunnel syndrome, tendonitis, and trigger finger. These injuries can be prevented through proper technique, regular breaks, and ergonomic adjustments.
- Carpal Tunnel Syndrome: Compression of the median nerve in the wrist, causing pain, numbness, and tingling.
- Tendonitis: Inflammation of the tendons, causing pain and stiffness.
- Trigger Finger: A condition in which a finger gets stuck in a bent position and then snaps straight.
10.1. Prevention Strategies
- Proper Technique: Use correct hand position, finger placement, and pressure to minimize strain.
- Regular Breaks: Take frequent breaks to shake out your hand and release tension.
- Ergonomic Adjustments: Adjust your guitar strap and playing posture to promote proper alignment.
- Warm-Up Exercises: Perform warm-up exercises before each practice session to improve flexibility and circulation.
- Stretching: Incorporate regular stretching to maintain flexibility and prevent stiffness.
10.2. Seeking Professional Help
- Physical Therapist: Consult a physical therapist for diagnosis and treatment of injuries.
- Occupational Therapist: Work with an occupational therapist to improve ergonomics and technique.
- Doctor: Seek medical advice from a doctor for persistent pain or discomfort.
FAQ: Mastering Left Hand Guitar Technique
1. What is the ideal position for the left hand thumb on a guitar?
The ideal position for the left hand thumb is typically on the back of the neck, slightly angled towards the lower strings, providing support and allowing for flexible finger movement.
2. How much pressure should I apply with my left hand fingers on the strings?
Apply just enough pressure to produce a clear note without causing excessive tension. Too little pressure results in buzzing, while too much leads to strain.
3. How can I improve my left hand finger strength for playing guitar?
Improve your left-hand finger strength through consistent practice, hand strengtheners, and targeted exercises like finger extensions and wrist curls.
4. What are some common mistakes guitarists make with their left hand technique?
Common mistakes include applying excessive pressure, incorrect thumb placement, and neglecting relaxation.
5. How does the type of guitar affect my left hand technique?
The type of guitar affects left-hand technique due to differences in neck width, string spacing, and action. Classical guitars have wider necks, acoustic guitars have steel strings, and electric guitars have narrower necks and lower action.
6. How can I ensure my guitar is set up for optimal left hand comfort?
Ensure your guitar is set up for optimal left-hand comfort by adjusting the string action, intonation, and neck relief.
7. What are some effective exercises for improving left hand coordination on the guitar?
Effective exercises include finger independence drills, chromatic scales, and spider exercises.
8. How often should I practice left hand guitar technique exercises?
Practice left-hand guitar technique exercises regularly, ideally daily, for consistent improvement.
9. What are some advanced left hand techniques in guitar playing?
Advanced left-hand techniques include tapping, sweep picking, and legato.
10. How can I prevent injuries related to poor left hand technique on the guitar?
Prevent injuries by using proper technique, taking regular breaks, and making ergonomic adjustments.
Conclusion: Elevate Your Guitar Playing With Perfected Left Hand Technique
Mastering how to hold your left hand on a guitar is crucial for any guitarist aiming to improve their skills, avoid injuries, and unlock new levels of musical expression. By focusing on relaxation, proper thumb placement, appropriate finger pressure, and consistent practice, you can enhance your playing and enjoy the guitar to its fullest.
Visit guitarplayers.net for more in-depth lessons, gear reviews, and a vibrant community of guitar enthusiasts ready to support your musical journey. Explore our extensive resources, find your favorite sheet music, and join our forum to connect with fellow guitar players. Start your journey to effortless guitar mastery today at guitarplayers.net, located at 1140 Boylston Street, Boston, MA 02215, United States, or call us at +1 (617) 747-2261.
