
Learning to hold your guitar correctly is the foundational step for any aspiring guitarist. Before you even begin to explore chords and strumming patterns, mastering the proper posture and grip is crucial. This guide is designed for both electric and acoustic guitar players, focusing on the nuances of holding a guitar right-handed. While acoustic guitars may have a larger body, the fundamental principles of how to hold the guitar remain consistent across both types.
One of the most vital pieces of advice for any guitarist, especially beginners, is to avoid hunching over your instrument. Developing a habit of hunching can lead to poor posture and potential back problems in the long run. Let’s delve into the correct techniques for holding a guitar while seated.
Mastering the Sitting Position for Guitar Playing
 Man sitting with good posture holding an acoustic guitar, right-handed playing position Man sitting with good posture holding an acoustic guitar, right-handed playing position |
A common and effective sitting posture involves keeping your legs slightly open. As a right-handed player, the guitar should rest comfortably on your right leg. Notice how the guitar sits just below chest level, promoting an upright posture. Crucially, the guitarist’s back is straight, and their left arm, the fretting arm, forms a right angle. This positioning minimizes wrist strain when reaching around the fretboard to press down on the strings. |
|---|
Finding a comfortable seated position is key to long practice sessions. Whether you prefer a classical guitar posture or a more relaxed stance, understanding the ergonomics is important.
Proper Sitting Posture Explained
The goal is to position the guitar so you can play comfortably and efficiently, minimizing strain and maximizing control. Good posture is not just about aesthetics; it directly impacts your ability to play for extended periods without discomfort and prevents long-term physical issues.
Leg Positions and Guitar Placement
 Woman sitting cross-legged holding a guitar, demonstrating right-handed guitar holding posture Woman sitting cross-legged holding a guitar, demonstrating right-handed guitar holding posture |
Many guitarists find crossing their legs to be a more comfortable alternative. If you strum with your right hand, crossing your right leg can provide a stable and comfortable base. Observe that her left arm forms a more acute angle, which is perfectly acceptable as long as she can comfortably reach across the fretboard and access all the strings. The essential point is to ensure your fretting arm is not at more than a 90-degree angle, as this can cause unnecessary wrist strain. The elbow of her strumming arm is positioned near the top corner of the guitar, creating an ideal pivot point for smooth strumming across the soundhole or pickups. |
|---|
Whether your legs are open or crossed, the key is to elevate your knees sufficiently to support the guitar at or slightly below chest height. This positioning naturally encourages a straight back and prevents hunching. The ‘waist’ or narrower part of the guitar body is designed to fit comfortably on your thigh. For right-handed players, this means resting it on your right thigh.
Back Straight and Elbow Position
Maintaining a straight back is paramount. Hunching not only looks unprofessional but also restricts your breathing and movement, hindering your playing in the long run. Imagine a straight line running from your ear, shoulder, and hip – this is the alignment you should aim for.
Your strumming arm’s elbow should naturally point towards the top corner of the guitar. This position allows your forearm and wrist to pivot smoothly across the strings while simultaneously supporting the guitar body against your own body. This balance is crucial for both stability and fluid strumming or picking.
Tilting the Guitar (Slightly)
 Man tilting electric guitar slightly towards himself for better fretboard view, right-handed playing posture Man tilting electric guitar slightly towards himself for better fretboard view, right-handed playing posture |
Especially when starting, tilting the guitar slightly towards you can offer a better view of the fretboard. This is perfectly acceptable and can aid in learning finger positions and chord shapes. As you become more experienced, you’ll rely less on visually checking the fretboard, but in the initial stages, a slight tilt can be beneficial. However, emphasize ‘slightly’ – avoid extreme angles that compromise your arm and wrist positions. |
|---|
Sitting on the Ground
 Man sitting on the ground holding a classical guitar, demonstrating proper right-handed posture Man sitting on the ground holding a classical guitar, demonstrating proper right-handed posture |
Playing guitar while sitting on the ground is another viable option. Again, the principle remains the same: position your legs to elevate the guitar body to chest height or just below, minimizing any need to hunch. Observe how the strumming arm maintains the top corner position, ensuring efficient movement. This posture is often adopted by classical guitarists and can be comfortable for extended practice. |
|---|
Humorous Interlude: Posture Faux Pas
 Man sitting on railway tracks playing guitar with good posture, humorous image about posture Man sitting on railway tracks playing guitar with good posture, humorous image about posture |
While this image highlights excellent posture, sitting on railway tracks is definitely not recommended! However, it serves as a humorous reminder of the importance of a straight back, even in unconventional settings. Prioritize safe and comfortable practice environments. |
|---|
Key takeaways for sitting position:
- Ensure your knees are high enough to bring the guitar to chest level, whether legs are crossed or uncrossed.
- Rest the guitar’s waist on your right lap (for right-handed players).
- Keep the guitar relatively flat against your chest, slight tilting is acceptable.
- Maintain a straight back at all times – avoid hunching.
- Position your strumming elbow towards the top corner of the guitar for optimal pivoting.
- Keep your fretting arm at a 90-degree angle or less to reduce wrist strain.
Standing Position: Adapting Your Guitar Hold
Once you’re comfortable playing while seated, it’s essential to practice standing up with your guitar. Using a guitar strap and playing in a standing position presents a different playing experience. If you aspire to perform live or play in a band, mastering the standing position is indispensable.
The Importance of a Strap
A guitar strap is not just an accessory; it’s a crucial tool for maintaining the correct guitar position while standing. Adjusting the strap to the right length is paramount. The goal is to position the guitar at a similar height to where it sits when you are seated, allowing for a seamless transition between sitting and standing practice.
Correct Standing Posture
 Man standing holding an electric guitar with good posture and strap, right-handed playing stance Man standing holding an electric guitar with good posture and strap, right-handed playing stance |
This guitarist demonstrates excellent standing posture. Notice how he has slightly tilted the guitar neck upwards. This is perfectly acceptable for improved fretboard visibility and doesn’t compromise other aspects of his posture or elbow position. His fretting arm maintains an acute angle (less than 90 degrees), ensuring minimal wrist strain. His back is straight, and the guitar body is positioned at a comfortable height for both strumming and picking. The strumming arm’s elbow is positioned forward, square with his body, providing an ideal pivot point. Also, observe his slightly bent left leg which provides balance. If he needs to lean in to view the fretboard better, this bent leg will bear the weight, preventing him from needing to hunch over. |
|---|
Strap Height and Guitar Position
Avoid setting your guitar strap too low. While a low-slung guitar might look ‘cool’ to some, it severely compromises your playing technique. When the guitar is too low (down near your knees), it becomes incredibly challenging to wrap your fingers correctly around the neck to form chords. Functionality should always outweigh aesthetics when it comes to guitar strap height.
Aim to position the guitar so that it sits at roughly the same height as when you are seated. This consistency will make switching between sitting and standing practice much easier and maintain muscle memory.
Avoiding Hunching and Elbow Position
Just as in the seated position, hunching is a major no-no when standing. A properly adjusted strap should allow you to stand straight with your shoulders relaxed. Regularly check your posture in a mirror to ensure you’re not falling into the hunching habit.
Ensure your strumming forearm remains square-on and angled towards the top corner of the guitar. This positioning is vital for maintaining a smooth pivot motion for strumming and picking, regardless of whether you are sitting or standing.
Incorrect Standing Posture Example
 Woman standing holding a guitar with poor posture, incorrect right-handed playing stance Woman standing holding a guitar with poor posture, incorrect right-handed playing stance |
This image illustrates common mistakes in standing posture. Firstly, the guitar strap is too loose, causing the guitar to hang too low, forcing her to hunch over to reach the fretboard. Secondly, her fretting arm is at an obtuse angle (greater than 90 degrees), which can lead to wrist strain as she struggles to reach around the neck. Her strumming arm’s elbow is also pushed back, eliminating any effective pivot point for strumming and picking. This posture is not conducive to comfortable or efficient playing. |
|---|
Key points for standing position:
- Do not loosen your strap too much; keep the guitar at a playable height.
- Position the guitar so your fretting arm is at no more than a 90-degree angle.
- Maintain a straight back and avoid hunching.
- Keep your strumming forearm square-on and angled towards the top corner of the guitar.
Hand Position on the Guitar Neck: The Fret Hand
Correct hand positioning on the guitar neck is another fundamental aspect of guitar basics. Proper technique from the beginning will make learning chords significantly easier and prevent bad habits from forming.
Thumb Placement and Wrist Relaxation
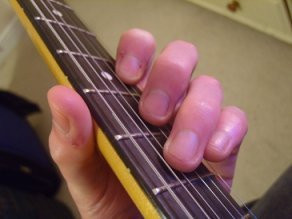 Thumb wrapped over the top of the guitar neck, alternative thumb position Thumb wrapped over the top of the guitar neck, alternative thumb position |
Ideally, your thumb should rest comfortably on the back of the guitar neck, towards the top edge. Your wrist should be relaxed, not hanging too low, and bent only slightly. Excessive wrist bending can lead to discomfort and injury over time. For players with smaller hands, the thumb might naturally position itself more towards the center of the neck’s back. The initial focus should be on achieving a relaxed and comfortable hand position. As you progress to learning chords, your fingers will naturally adopt various positions. For now, concentrate on getting comfortable with this general hand placement. Note: Guitarists with larger hands may find it more comfortable to bring their wrist up and slightly curl their thumb over the top edge of the neck (as shown in the left photo). Comfort is paramount, but be aware that this thumb-over technique might require you to move your thumb back to the center for certain chord shapes. It introduces a trade-off of increased thumb mobility versus initial comfort. |
|---|
Adjustments for Hand Size
Hand size plays a role in optimal thumb placement. Experiment to find what feels most natural and allows you to reach across the fretboard without excessive stretching or strain. The goal is a relaxed hand that can move fluidly along the neck.
Thumb Over Neck (Advanced Technique)
The ‘thumb-over’ technique, where the thumb wraps over the top of the fretboard, is sometimes used for specific techniques like bending strings or playing certain chord voicings. While it can offer advantages in certain situations, for beginners, focusing on the thumb behind the neck position is generally recommended. You can explore the thumb-over technique as your playing progresses.
How to Hold the Guitar Pick (Plectrum)
Holding the guitar pick correctly is crucial for both strumming and picking efficiency. The primary principle is to maintain a relaxed grip, allowing the pick to move fluidly over the strings.
The Importance of a Relaxed Grip
A death grip on the pick will result in stiff, uneven playing and can cause fatigue. A relaxed grip allows the pick to flex and glide across the strings, producing a smoother, more controlled sound.
Index Finger and Thumb Technique
| Personally, I like to create an elongated circle like this… 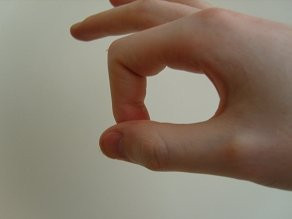 Hand holding a guitar pick with index finger and thumb forming a relaxed grip |
|—|—|
| With pick in hand, we can see how the straightness of the thumb supports the base of the pick, and the index finger supports more towards the tip of the plectrum. 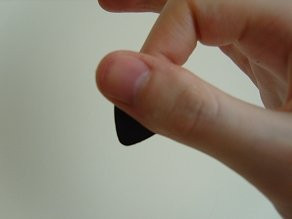 Front view of hand holding a guitar pick with relaxed thumb and finger grip |
|—|—|
The most effective way to hold the pick is between the tip of your index finger and thumb. Imagine forming a relaxed ‘O’ shape with your index finger and thumb. The pick is then held lightly between the pad of your thumb and the side of your index finger’s tip. The thumb remains relatively straight to support the base of the pick, while the index finger provides support closer to the pick’s tip.
Visual Guide to Pick Holding
Refer to the accompanying images for a visual demonstration of the correct pick-holding technique. Practice holding the pick in this relaxed manner until it becomes second nature. This grip will significantly improve your strumming and picking fluidity.
Time to Move On: Building on Your Foundation
Hopefully, you now have a solid understanding of how to hold a guitar correctly. Mastering these basic postures and grips is essential for avoiding common beginner errors and setting yourself up for success. With these fundamentals in place, you are ready to progress to other guitar basics, such as fingering chords and developing basic picking and strumming techniques.
Remember to practice both standing and sitting regularly. Playing while standing can initially feel quite different and perhaps more challenging, but it’s a crucial skill to develop, especially if you envision performing on stage one day.
Related: