
Getting ready to learn guitar? That’s awesome! But before you dive into chords and riffs, there’s a super important first step: knowing How To Hold A Guitar correctly. It might seem obvious, but mastering this from the start will make your learning journey smoother, more comfortable, and prevent bad habits (and backaches!) down the line. This guide is for everyone, whether you’re picking up an electric guitar or an acoustic guitar. While acoustic guitars can be a bit bulkier, the fundamental holding position is the same for both.
If there’s one golden rule to remember every time you grab your guitar, it’s this: ditch the hunch!
Hunching over your guitar is a common mistake, and trust me, it’s a pain. It messes with your posture and can lead to back problems later on. Let’s break down the right way to hold your guitar while sitting down, and then we’ll cover standing up.
Sitting Position: Setting the Foundation
 Man sitting holding an acoustic guitar, legs open, guitar resting on right leg Man sitting holding an acoustic guitar, legs open, guitar resting on right leg |
This is a classic sitting posture. Notice how the guitar rests comfortably on the right leg because he strums with his right hand – he’s right-handed! The guitar body sits nicely just below his chest. Crucially, his back is straight, and his left arm (fretting hand arm) forms a right angle. This minimizes wrist strain when reaching around the fretboard to press the strings. |
 Woman sitting cross-legged holding a guitar, guitar resting on right leg Woman sitting cross-legged holding a guitar, guitar resting on right leg |
Here, she’s crossed her legs, which some find more comfortable. If you strum with your right arm, crossing your right leg can feel natural. Her left arm angle is a bit sharper than a right angle, but that’s okay because she can comfortably reach all the strings without straining. The key is to avoid having your fretting hand arm at more than a 90-degree angle, as that can stress your wrist. Also, see how her strumming arm elbow is near the top corner of the guitar? That’s creating a perfect pivot point for strumming across the soundhole or pickups. |
 Electric guitar tilted slightly back towards the player Electric guitar tilted slightly back towards the player |
This guitarist has tilted his electric guitar slightly towards himself. This can give you a better view of the fretboard, especially when you’re starting. While you’ll eventually play without constantly looking at the fretboard, tilting the guitar a bit is perfectly fine when you need to see what you’re doing. |
 Man sitting on the ground playing a classical guitar, legs positioned to support the guitar Man sitting on the ground playing a classical guitar, legs positioned to support the guitar |
You can even play sitting on the ground! Again, the leg position is adjusted to bring the guitar body up to chest height or just below, keeping hunching to a minimum. And, yep, the strumming arm is in that ideal top-corner position. |
 Man sitting on a railway track playing guitar with a straight back Man sitting on a railway track playing guitar with a straight back |
Okay, this guy is sitting on a railway track, which is definitely not recommended! Safety first! But, on the plus side, check out that straight back! Perfect posture, wrong location. |
Key takeaways for sitting posture:
- Leg Position: Whether you prefer legs crossed or uncrossed, make sure your knees are high enough to support the guitar at or just below chest level. This helps prevent you from hunching.
- Guitar Placement: Rest the narrowest part of the guitar’s body (the “waist”) on your lap. Place it on the leg on the same side as your strumming hand (right leg for right-handed players, left leg for left-handed players).
- Body Contact: The guitar should rest relatively flat against your chest. Some players slightly tilt the guitar towards them for better fretboard visibility, and that’s okay, but keep it slight.
- Posture: No hunching! Keep your back straight to avoid strain and develop good playing habits.
- Strumming Arm Position: Your strumming arm’s elbow should point out towards the top corner of the guitar body. This position allows your forearm and wrist to pivot smoothly over the strings while also providing support for the guitar against your body.
- Fretting Arm Angle: Your fretting hand arm (the one pressing the strings) should be at a 90-degree angle or less. A more acute angle (less than 90 degrees) actually reduces wrist strain when you’re reaching around the fretboard.
Standing Position: Taking it Upright
Once you’re comfortable sitting, it’s crucial to practice playing while standing. Use a guitar strap and get used to this different playing experience. If you plan to perform or jam with others, you’ll likely be standing and moving around.
Here are examples of good and bad standing guitar posture:
 Man standing holding an electric guitar, guitar strap positioned for comfortable playing Man standing holding an electric guitar, guitar strap positioned for comfortable playing |
This guitarist has it right. He’s tilted the guitar neck up a bit for easier fretboard access, which is fine because it doesn’t compromise his elbow position or posture. His fretting hand elbow is at a good angle (less than 90 degrees). His back is straight, and the guitar body is at a comfortable height for strumming and picking. Notice how his strumming arm elbow is forward and square with his body, creating that essential pivot point. Subtly, he also has his left leg slightly bent for balance. If he needs to lean in to see the fretboard better, he can shift weight to that bent leg instead of hunching. |
 Woman standing holding a guitar with incorrect posture, strap too loose, hunching over Woman standing holding a guitar with incorrect posture, strap too loose, hunching over |
Oh dear, this guitarist is making a few common mistakes. First, the guitar strap is way too loose, forcing her to hunch over to reach the fretboard. Second, her fretting hand arm angle is obtuse (more than 90 degrees), which can cause wrist strain. Her strumming arm is also positioned poorly, with the elbow pushed back, eliminating a smooth pivot point for strumming and picking. It’s going to be tough to play comfortably like this! |
Key points for standing posture:
- Strap Height is Key: Don’t make your strap too loose! If your guitar hangs too low (down near your knees), you’ll struggle to wrap your fingers around the neck properly to play chords. Forget about looking “cool” – comfortable playing is what matters.
- Fretting Arm Angle (Again): Aim to position the guitar so your fretting hand arm is at a 90-degree angle or less.
- Avoid Hunching (Still!): Keep that back straight!
- Strumming Arm Position (Consistent): Ensure your forearm is square-on and angled towards the top corner of your guitar body, not tucked back behind you. This provides the necessary pivot for smooth strumming.
Holding the Guitar Neck: Fret Hand Fundamentals
Proper hand positioning on the guitar neck is another fundamental skill. Getting this right from the start will make learning chords significantly easier.
Let’s look at how your fretting hand should look from different angles:
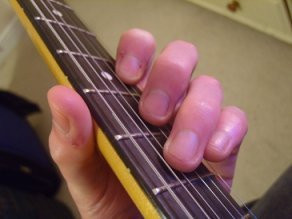 Close up of a thumb wrapping over the top of a guitar neck Close up of a thumb wrapping over the top of a guitar neck |
||
| As you can see, your thumb should rest comfortably near the top edge of the guitar neck. Your wrist should be relaxed and not hanging too low. A slight bend in the wrist is natural, but avoid excessive bending, which can cause problems later. If you have smaller hands, your thumb might be positioned more towards the center of the back of the neck. The important thing is to establish this relaxed initial position. As you learn chords, your fingers will move to various positions, but for now, focus on getting comfortable with this general hand placement. Note: Guitarists with larger hands sometimes find it comfortable to bring their wrist up and curl the top of their thumb slightly over the top edge of the neck (as shown in the rightmost photo). Comfort is paramount, but be aware that if you use the “thumb-over” technique, you might need to move your thumb back to the center for certain chords. This just means a bit more thumb movement will be required. | ||
How to Hold the Guitar Pick: The Strumming Secret
The key to holding a guitar pick (plectrum) is to avoid gripping it too tightly. It needs to be able to flex and move smoothly across the strings.
Holding the pick between the tips of your index finger and thumb is generally the most effective way to achieve this flexibility.
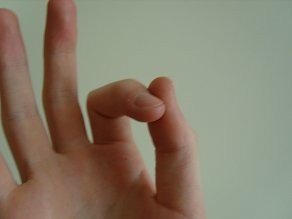 Hand forming an elongated circle with index finger and thumb Hand forming an elongated circle with index finger and thumb |
Like this, make an “O” shape with your index finger and thumb, almost like you’re making the “okay” sign, but a bit more elongated. |
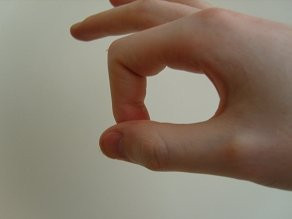 Front view of index finger and thumb forming an O shape Front view of index finger and thumb forming an O shape |
From the front, it looks like this. |
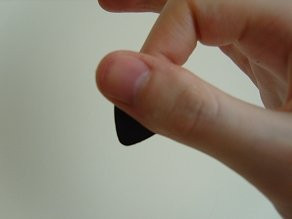
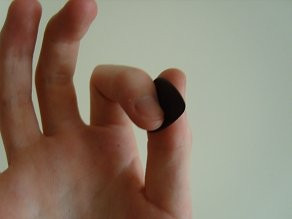 Hand holding a guitar pick with thumb supporting the base and index finger supporting the tip Hand holding a guitar pick with thumb supporting the base and index finger supporting the tip |
With the pick in place, you can see how the straightness of the thumb supports the base of the pick, and the index finger provides support closer to the tip. |
 Front view of hand holding a guitar pick, thumb relatively straight Front view of hand holding a guitar pick, thumb relatively straight |
Notice how the thumb remains relatively straight. |
Holding your pick in this way will make strumming and picking smoother and more fluid when you get to those lessons. You’ll glide over the strings instead of jabbing at them!
Time to Play!
Hopefully, you now have a solid understanding of how to hold a guitar correctly! By focusing on good posture and hand positioning from the beginning, you’ll avoid common beginner errors and set yourself up for comfortable and efficient playing. Now you’re ready to move on to other guitar basics like learning chords and basic picking techniques.
Remember to practice both sitting and standing regularly. You might find standing a bit different or even more challenging at first, but it’s essential to get comfortable playing in both positions, especially if you dream of playing on stage someday!