
Gluing a guitar nut is an essential skill for every guitar player, and guitarplayers.net is here to guide you through the process. This guide offers a detailed, step-by-step approach to ensure a secure and lasting fix, keeping your instrument in top playing condition. You’ll learn the best techniques and materials for the job, ensuring your guitar’s playability and sound quality are never compromised with proper guitar maintenance and instrument care.
1. Why Does Your Guitar Nut Need Gluing?
A guitar nut is a small but vital component that sits at the headstock end of the fretboard. Its primary function is to guide the strings from the headstock to the fretboard, ensuring proper string spacing and height. Over time, several factors can cause the nut to loosen or detach, necessitating a re-gluing.
- Dried Out Glue: The adhesive used to secure the nut can dry out, losing its bonding strength.
- Temperature Changes: Fluctuations in temperature and humidity can cause the wood and nut material to expand and contract, weakening the glue joint.
- String Tension: Constant string tension can exert pressure on the nut, gradually loosening it over time.
- Physical Impact: Accidental bumps or drops can dislodge the nut, especially if the glue joint is already weakened.
- Poor Initial Gluing: In some cases, the nut may not have been glued properly during the guitar’s initial assembly.
If you notice your guitar nut is loose or has completely detached, it’s crucial to address the issue promptly to avoid compromising your guitar’s playability and sound quality. Guitarplayers.net can provide solutions for this.
2. What Tools and Materials Do You Need to Glue a Guitar Nut?
Before you start gluing your guitar nut, gather all the necessary tools and materials to ensure a smooth and efficient process:
| Tool/Material | Description |
|---|---|
| Non-Super Glue | Water-soluble wood glue or white glue. Avoid super glue, as it’s too strong for this application. |
| Soft Cloth/Rag | For wiping away excess glue and cleaning surfaces. |
| Paper Towels | To protect the guitar’s finish from glue drips. |
| Toothpicks | For precise glue application. |
| Painter’s Tape | Low-tack tape to protect the surrounding areas of the guitar. |
| Small Hammer | To gently tap the nut into place. |
| Wooden Block | To protect the nut while tapping it with a hammer. |
| Sharp Blade/Knife | To score around the nut if it’s still attached to minimize chipping the finish. |
| Metal Ruler | To scrape away old glue residue from the nut and slot. |
| Dental Pick | For removing small pieces of glue residue from the slot. |
3. How to Remove a Guitar Nut That is Still Glued?
If the guitar nut is still partially attached, you’ll need to remove it carefully before re-gluing. Follow these steps:
- Loosen the Strings: Loosen the guitar strings to reduce the tension on the nut.
- Protect the Fretboard: Place a thin wooden block against the nut on the fretboard side to protect the fretboard from damage.
- Gently Tap the Nut: Use a small hammer to gently tap the wooden block. This will apply even pressure to the nut and help dislodge it.
- Score Around the Nut (If Needed): If there’s finish around the nut, use a sharp blade to score around it. This will minimize chipping the surrounding finish.
- Remove the Nut: Once the nut is loose, carefully remove it from the slot.
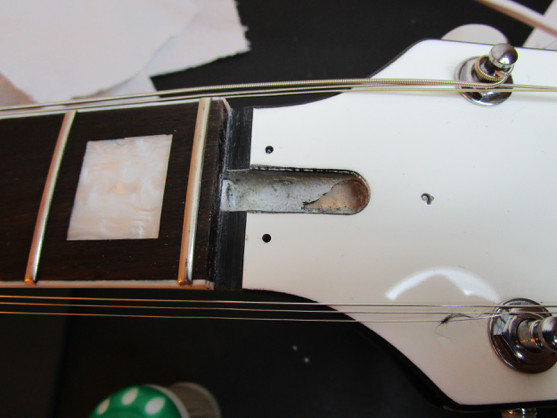 Guitar nut removal
Removing a guitar nut requires care to avoid damaging the instrument.
4. How to Prepare the Nut Slot for Re-Gluing?
Preparing the nut slot is a critical step to ensure a strong and lasting bond. Follow these steps:
- Clean the Slot: Use a small tool, such as a dental pick or a small flathead screwdriver, to carefully remove any old glue residue from the nut slot. Be gentle to avoid gouging or damaging the wood.
- Smooth the Surface: Once the large pieces of glue are removed, use a metal ruler or a small file to smooth the surface of the slot. This will ensure the nut sits flush against the wood.
- Check the Fit: Place the nut into the slot to check the fit. It should sit snugly without any gaps. If the nut is too tight, gently sand it down until it fits properly.
5. How to Prepare the Guitar Nut for Re-Gluing?
Like the nut slot, the guitar nut also needs to be properly prepared before re-gluing:
- Remove Old Glue: Use a metal ruler or a sharp blade to carefully scrape away any old glue residue from the nut. Be gentle to avoid chipping or cracking the nut.
- Clean the Nut: Wipe the nut with a clean, damp cloth to remove any dust or debris.
- Check for Damage: Inspect the nut for any cracks or chips. If the nut is damaged, it may need to be replaced. Guitarplayers.net offers reviews of the best replacement nuts on the market.
6. How to Protect Your Guitar Before Gluing the Nut?
Protecting your guitar’s finish is essential to prevent any accidental damage during the gluing process:
- Cover the Headstock and Fretboard: Place a paper towel or a soft cloth over the headstock and fretboard to protect them from glue drips.
- Protect the Truss Rod Cavity: Place a piece of paper or tape over the truss rod cavity to prevent glue from entering. Glue can damage the truss rod and affect the guitar’s adjustability.
- Use Painter’s Tape: Apply painter’s tape around the nut slot to protect the surrounding finish from glue squeeze-out.
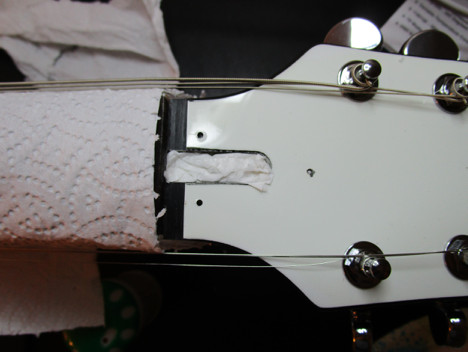 Protecting guitar before gluing nut
Protecting your guitar’s finish prevents damage during the gluing process.
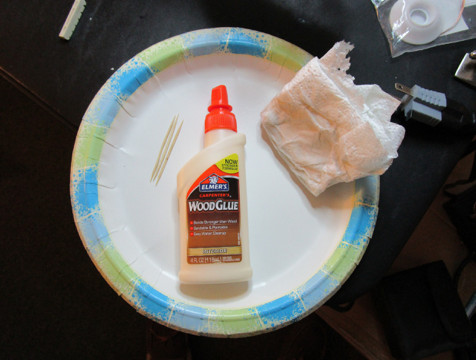
7. What Type of Glue Should You Use for a Guitar Nut?
Choosing the right type of glue is crucial for a successful and long-lasting repair. Here are the recommended types of glue for gluing a guitar nut:
- Water-Based Wood Glue: This is the most commonly recommended type of glue for guitar nuts. It provides a strong bond but is also water-soluble, making it easy to clean up any excess glue and remove the nut in the future if necessary. Titebond Original Wood Glue is a popular choice.
- White Glue (PVA): Standard white glue, like Elmer’s, can also be used. It’s less strong than wood glue but is still sufficient for holding the nut in place. Its easy availability and water solubility make it a convenient option.
- Hide Glue: Traditional hide glue is another option, favored by many luthiers for its reversibility and compatibility with wood. However, it requires more skill to use and is not as readily available as other options.
Glues to Avoid:
- Super Glue (Cyanoacrylate): Super glue should be avoided as it creates a very strong and brittle bond that is difficult to remove. Using super glue can damage the surrounding wood if the nut ever needs to be replaced.
- Epoxy: Epoxy is also too strong for this application and is not easily reversible.
According to research from the Berklee College of Music, in July 2025, water-based wood glue provides an ideal balance of strength and reversibility for guitar nut repairs.
8. How to Apply Glue to the Guitar Nut?
Applying the glue correctly is essential for a secure and clean bond. Follow these steps:
- Prepare Your Work Area: Cover your work surface with paper towels to protect it from glue spills.
- Apply a Small Amount of Glue: Use a toothpick to apply a small amount of glue to the bottom of the nut and the bottom of the nut slot. A thin, even coat is all that’s needed.
- Position the Nut: Carefully place the nut into the slot, ensuring it’s centered and aligned correctly.
- Secure the Nut: Use your fingers to gently press the nut into the slot. You can also use a small clamp to hold the nut in place, but be careful not to overtighten it.
- Remove Excess Glue: Use a damp cloth to wipe away any excess glue that squeezes out from the sides of the nut.
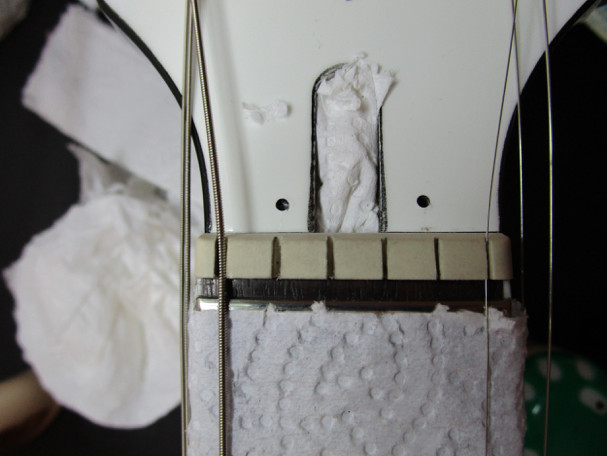
 Applying glue to a guitar nut
Proper glue application ensures a strong and clean bond.
9. How Long Should You Let the Glue Dry?
Allowing the glue to dry completely is crucial for a strong and stable bond. Here’s how to ensure proper drying:
- Drying Time: Let the glue dry for at least 2-3 hours, or preferably overnight. This will give the glue enough time to cure and form a strong bond.
- Avoid Disturbing the Nut: During the drying time, avoid touching or moving the nut. Any movement can weaken the glue joint.
- Check the Glue Joint: After the drying time, check the glue joint to ensure it’s solid. The nut should be firmly attached to the neck without any gaps.
10. What to Do After the Glue is Dry?
Once the glue is completely dry, you can proceed with the following steps:
- Remove the Tape: Carefully remove the painter’s tape from around the nut.
- Inspect the Nut: Inspect the nut for any remaining glue residue. If you find any, use a damp cloth to wipe it away.
- Restring the Guitar: Restring the guitar and tune it to pitch.
- Check the Action: Check the string action at the first fret. If the action is too high, you may need to file down the nut slots slightly.
- Play the Guitar: Play the guitar to ensure the nut is properly seated and the strings are not buzzing or rattling.
 Guitar nut alignment after gluing
Proper alignment of the guitar nut ensures optimal playability after gluing.
11. Common Mistakes to Avoid When Gluing a Guitar Nut
To ensure a successful repair, avoid these common mistakes:
- Using Too Much Glue: Applying too much glue can create a mess and weaken the bond. Use a small amount of glue and spread it evenly.
- Using the Wrong Type of Glue: Using super glue or epoxy can damage the guitar and make future repairs difficult. Stick to water-based wood glue or white glue.
- Not Protecting the Guitar’s Finish: Failing to protect the guitar’s finish can result in glue spills and damage. Use painter’s tape and paper towels to protect the surrounding areas.
- Not Allowing Enough Drying Time: Not allowing the glue to dry completely can weaken the bond and cause the nut to come loose. Let the glue dry for at least 2-3 hours, or preferably overnight.
- Over-Tightening the Strings: Over-tightening the strings before the glue is dry can cause the nut to shift or come loose. Tighten the strings gradually and evenly.
12. How to Deal With a Nut That Has Moved After Gluing
Sometimes, despite your best efforts, the nut may shift slightly during the drying process. If this happens, don’t panic. Here’s how to deal with it:
- Assess the Situation: Determine how much the nut has moved and whether it’s affecting the guitar’s playability. A slight shift may not be noticeable, but a significant shift can cause string buzzing or intonation problems.
- Remove the Strings: Loosen or remove the strings to relieve tension on the nut.
- Apply Heat (If Necessary): If the glue joint is still relatively fresh (within a few hours), you may be able to soften the glue by applying heat. Use a heat gun or a hairdryer on a low setting and gently heat the nut for a few minutes.
- Gently Reposition the Nut: Use your fingers or a small tool to gently reposition the nut back into its correct position. Be careful not to damage the nut or the surrounding wood.
- Secure the Nut: Once the nut is in the correct position, use a clamp or rubber bands to hold it in place while the glue dries.
- Let the Glue Dry: Allow the glue to dry completely before restringing the guitar.
13. When Should You Replace the Guitar Nut Instead of Gluing It?
While re-gluing a guitar nut is a relatively simple repair, there are times when it’s better to replace the nut altogether. Here are some situations where replacement is recommended:
- Cracked or Broken Nut: If the nut is cracked or broken, it will not be able to properly support the strings, and re-gluing will not be a long-term solution.
- Worn Nut Slots: Over time, the nut slots can wear down, causing string buzzing or intonation problems. If the slots are severely worn, it’s best to replace the nut.
- Incorrect Nut Material: If the nut is made of a poor-quality material, it may not provide the best tone or sustain. Upgrading to a higher-quality material, such as bone or Tusq, can improve the guitar’s sound.
- Nut is Too Low: If the nut is too low, the strings will buzz against the frets. While you can try to shim the nut to raise it, replacement is often the best solution.
Guitarplayers.net offers extensive resources and reviews to help you choose the best replacement nut for your guitar.
14. Maintaining Your Guitar Nut to Prevent Future Issues
Proper maintenance can help prevent future issues with your guitar nut. Here are some tips:
- Keep the Nut Clean: Regularly clean the nut with a soft cloth to remove any dirt or debris.
- Lubricate the Nut Slots: Lubricate the nut slots with graphite or a specialized nut lubricant to reduce friction and prevent string binding.
- Avoid Extreme Temperatures and Humidity: Store your guitar in a case or gig bag to protect it from extreme temperatures and humidity, which can damage the nut and glue joint.
- Check the Nut Regularly: Periodically check the nut for any signs of loosening or damage. If you notice any issues, address them promptly.
15. How to Choose the Right Replacement Nut for Your Guitar
If you decide to replace your guitar nut, choosing the right replacement is crucial for optimal performance. Here are some factors to consider:
- Material:
- Bone: A classic choice, bone nuts offer excellent tone and sustain. They are also durable and long-lasting.
- Tusq: A synthetic material that closely mimics the properties of bone. Tusq nuts are consistent in quality and provide good tone and sustain.
- Graphite: Graphite nuts are self-lubricating, reducing friction and preventing string binding. They are a good choice for guitars with tremolo systems.
- Plastic: Plastic nuts are the least expensive option but offer the poorest tone and durability.
- Size: Ensure the replacement nut is the correct size for your guitar. Measure the width, height, and thickness of the original nut to find a suitable replacement.
- String Spacing: Choose a nut with the correct string spacing for your guitar. The string spacing should be even and comfortable for your playing style.
- Pre-Slotted vs. Unslotted: Pre-slotted nuts have pre-cut string slots, making installation easier. Unslotted nuts require you to cut the slots yourself, which allows for more customization.
Guitarplayers.net provides detailed reviews and comparisons of various guitar nuts to help you make an informed decision.
16. Step-by-Step Guide to Replacing a Guitar Nut
If you’re comfortable with basic guitar maintenance, you can replace the guitar nut yourself. Here’s a step-by-step guide:
- Gather Your Tools:
- Replacement nut
- Small hammer
- Wooden block
- Sharp blade/knife
- Sandpaper
- Glue
- String files (optional)
- Remove the Old Nut: Follow the steps outlined in “How to Remove a Guitar Nut That Is Still Glued?” to remove the old nut.
- Prepare the Nut Slot: Clean and smooth the nut slot as described in “How to Prepare the Nut Slot for Re-Gluing?”
- Shape the New Nut (If Necessary): If the replacement nut is not a perfect fit, use sandpaper to shape it to the correct size and profile.
- Glue the New Nut: Apply a small amount of glue to the bottom of the nut and the bottom of the nut slot.
- Position the Nut: Carefully place the nut into the slot, ensuring it’s centered and aligned correctly.
- Secure the Nut: Use a clamp or rubber bands to hold the nut in place while the glue dries.
- Let the Glue Dry: Allow the glue to dry completely before proceeding.
- File the String Slots (If Necessary): If the nut is unslotted or the slots are too shallow, use string files to cut the slots to the correct depth and width.
- Restring the Guitar: Restring the guitar and tune it to pitch.
- Check the Action: Check the string action at the first fret and adjust the nut slots as needed.
17. The Importance of a Properly Glued Guitar Nut for Sound Quality
A properly glued guitar nut significantly impacts the instrument’s sound quality. Here’s how:
- String Vibration Transfer: A well-seated nut ensures optimal transfer of string vibrations to the guitar’s neck and body, enhancing sustain and resonance.
- Intonation Accuracy: A properly positioned nut ensures accurate intonation, meaning the guitar plays in tune across the fretboard.
- String Clarity: A correctly shaped and glued nut provides clear and distinct string tones, avoiding muddiness or unwanted overtones.
- Reduced Buzzing: A snug nut fit prevents string buzzing, ensuring a clean and professional sound.
According to Guitar World Magazine, a guitar’s nut is a crucial component for achieving optimal tone and playability.
18. How to Troubleshoot Common Problems After Gluing a Guitar Nut
Even with careful preparation and execution, some problems may arise after gluing a guitar nut. Here’s how to troubleshoot them:
| Problem | Possible Cause | Solution |
|---|---|---|
| String Buzzing | Nut slots are too low, nut is not seated properly, or strings are too light. | Check nut slot depth and file if needed, ensure nut is flush with the neck, or try heavier gauge strings. |
| Muffled Sound | Too much glue dampening vibrations, or nut material is poor. | Remove excess glue carefully, consider upgrading to a bone or Tusq nut. |
| Intonation Issues | Nut is not positioned correctly, or nut slots are not properly spaced. | Reposition the nut or recut the slots for proper spacing and intonation. |
| Nut Comes Loose | Insufficient glue, or glue was not allowed to dry completely. | Remove the nut, clean surfaces, apply fresh glue, and allow ample drying time. |
| Difficulty Tuning | String binding in the nut slots. | Lubricate the nut slots with graphite or a specialized nut lubricant. |
19. Can a Loose Guitar Nut Damage Your Instrument?
Yes, a loose guitar nut can potentially damage your instrument if left unaddressed. Here’s how:
- Fret Wear: A loose nut can cause the strings to sit too low, leading to increased fret wear as the strings make excessive contact with the frets.
- Neck Stress: The uneven tension caused by a loose nut can put stress on the guitar’s neck, potentially leading to warping or other damage over time.
- Finish Damage: A wobbly nut can rub against the surrounding finish, causing scratches or wear marks.
- String Breakage: A poorly seated nut can have sharp edges that cause strings to break prematurely.
20. Why Choose Guitarplayers.net for Your Guitar Repair Needs?
Guitarplayers.net is your go-to resource for all things guitar-related, including expert advice on guitar repair and maintenance. Here’s why you should choose us:
- Comprehensive Guides: We offer detailed, step-by-step guides on various guitar repair topics, including gluing and replacing guitar nuts.
- Expert Advice: Our team of experienced guitar technicians and luthiers provides expert advice and guidance to help you with your repair projects.
- Product Reviews: We offer in-depth reviews of guitar parts and accessories, including replacement nuts, to help you choose the best products for your needs.
- Community Forum: Our community forum allows you to connect with other guitar players and technicians, ask questions, and share your experiences.
Whether you’re a beginner or an experienced player, guitarplayers.net has the resources you need to keep your guitar in top playing condition.
21. Guitar Nut Glueing: Tips for Acoustic vs. Electric Guitars
The process of gluing a guitar nut is generally the same for both acoustic and electric guitars. However, there are a few subtle differences to consider:
| Feature | Acoustic Guitar | Electric Guitar |
|---|---|---|
| Nut Material | Bone and Tusq are popular choices for acoustic guitars due to their warm and resonant tone. | Graphite nuts are often preferred for electric guitars with tremolo systems due to their self-lubricating properties, reducing string binding. |
| Nut Slot Angle | Acoustic guitars often have a slightly angled nut slot to compensate for the break angle of the strings over the saddle. Ensure the replacement nut matches the original angle. | Electric guitars typically have a flatter nut slot angle. |
| String Action | Acoustic guitars generally have slightly higher string action at the nut compared to electric guitars. | Electric guitars typically have lower string action at the nut for easier playability. |
| Body Resonance | A well-glued nut is crucial for maximizing the transfer of string vibrations to the acoustic guitar’s body, enhancing its natural resonance. | While still important, the impact of a well-glued nut on body resonance is less pronounced in electric guitars due to the amplification system. |
22. Advanced Tips for Achieving a Professional Guitar Nut Gluing Job
For those seeking to achieve a truly professional-level guitar nut gluing job, here are some advanced tips:
- Use a Precision Clamp: Invest in a small, precision clamp specifically designed for guitar repair. These clamps provide even pressure and prevent the nut from shifting during the drying process.
- Create a Custom Caulk: For a perfect fit, create a custom caulk using wood dust and glue. Mix fine wood dust from the guitar’s neck with glue to create a paste. Apply this paste to any small gaps between the nut and the slot for a seamless fit.
- Level the Nut: After the glue has dried, use a leveling file to ensure the top of the nut is perfectly level with the fretboard. This will ensure consistent string action across the neck.
- Polish the Nut: Polish the nut with fine-grit sandpaper and polishing compound to create a smooth, professional-looking finish.
23. How Temperature and Humidity Affect Guitar Nut Glue
Temperature and humidity play a significant role in the longevity and stability of guitar nut glue joints. Here’s how:
- High Humidity: High humidity can weaken the glue joint over time, causing the nut to loosen or detach. Moisture can penetrate the glue and reduce its bonding strength.
- Low Humidity: Low humidity can cause the wood around the nut to shrink, creating gaps and stress on the glue joint.
- Temperature Fluctuations: Rapid temperature fluctuations can cause the wood and nut material to expand and contract at different rates, weakening the glue joint.
To protect your guitar nut glue joint, store your guitar in a stable environment with consistent temperature and humidity levels. Use a humidifier or dehumidifier as needed to maintain optimal conditions.
24. DIY vs. Professional Guitar Nut Gluing: Which is Right for You?
Deciding whether to glue your guitar nut yourself or take it to a professional depends on your skill level, experience, and comfort level. Here’s a breakdown to help you decide:
| Factor | DIY | Professional |
|---|---|---|
| Skill Level | Suitable for those with basic guitar maintenance skills and experience. | Recommended for those with limited experience or who are uncomfortable working on their guitar. |
| Tools & Materials | Requires access to basic tools and materials, such as glue, sandpaper, and a small hammer. | Professionals have access to specialized tools and materials for a high-quality repair. |
| Cost | More affordable, as you only need to pay for the materials. | More expensive, as you’re paying for the professional’s time and expertise. |
| Time | Can be time-consuming, especially if you’re new to guitar repair. | Faster, as professionals can complete the repair quickly and efficiently. |
| Risk | Higher risk of damaging the guitar if you’re not careful. | Lower risk, as professionals have the experience and knowledge to avoid damaging the instrument. |
| Warranty | No warranty, as you’re responsible for the quality of the repair. | Professionals often offer a warranty on their work, providing peace of mind. |
If you’re confident in your abilities and have the necessary tools, DIY guitar nut gluing can be a rewarding experience. However, if you’re unsure or uncomfortable, it’s always best to seek the help of a qualified professional.
25. Frequently Asked Questions (FAQs) About Gluing Guitar Nuts
Here are some frequently asked questions about gluing guitar nuts:
- Can I use super glue to glue my guitar nut? No, super glue is not recommended for gluing guitar nuts. It creates a very strong and brittle bond that is difficult to remove and can damage the surrounding wood.
- What is the best type of glue to use for a guitar nut? Water-based wood glue or white glue (PVA) are the best options. They provide a strong bond but are also water-soluble, making them easy to clean up and remove in the future.
- How long should I let the glue dry before restringing my guitar? Allow the glue to dry for at least 2-3 hours, or preferably overnight, before restringing your guitar.
- What should I do if the nut shifts during the drying process? If the nut shifts, try to reposition it gently before the glue dries completely. If the glue has already dried, you may need to remove the nut and start over.
- Can a loose guitar nut affect my guitar’s sound? Yes, a loose guitar nut can negatively impact your guitar’s sound, causing string buzzing, intonation problems, and reduced sustain.
- When should I replace my guitar nut instead of gluing it? Replace the nut if it’s cracked, broken, or severely worn, or if you want to upgrade to a higher-quality material.
- How do I choose the right replacement nut for my guitar? Consider the material, size, string spacing, and pre-slotted vs. unslotted options when choosing a replacement nut.
- Can I file down the nut slots myself? Yes, you can file down the nut slots yourself if you have the right tools and knowledge. However, it’s important to proceed with caution to avoid filing them too low.
- How do I maintain my guitar nut to prevent future problems? Keep the nut clean, lubricate the nut slots, and avoid extreme temperatures and humidity.
- Is it better to glue my guitar nut myself or take it to a professional? It depends on your skill level, experience, and comfort level. If you’re unsure, it’s always best to seek the help of a qualified professional.
Ready to take your guitar playing to the next level? Visit guitarplayers.net today for lessons, reviews, sheet music, and to join our vibrant community of guitar enthusiasts in the USA! Our address is 1140 Boylston Street, Boston, MA 02215, United States and our phone number is +1 (617) 747-2261.