Fixing a broken headstock on your acoustic guitar can seem daunting, but guitarplayers.net is here to guide you through the process with expert advice and proven techniques. Whether you’re dealing with a clean break or a more complex fracture, understanding the repair options is the first step to restoring your instrument’s playability and sound. Learn about headstock repair, acoustic guitar maintenance, and guitar restoration to keep your guitar in top condition.
1. What Causes Acoustic Guitar Headstock Breaks?
Acoustic guitar headstock breaks are often caused by accidents such as dropping the guitar or impact during transport. These breaks frequently occur due to the headstock’s design, which can be a weak point, especially on guitars like Gibsons.
- Impact: Accidental drops or knocks against hard surfaces are a primary cause.
- String Tension: The constant tension from the strings puts stress on the headstock.
- Weak Design: Some headstock designs are inherently more susceptible to breakage.
2. Can I Prevent Headstock Breaks on My Acoustic Guitar?
Yes, preventing headstock breaks involves careful handling, proper storage, and regular maintenance. Investing in a good quality case is essential for protecting your guitar during transport and storage.
- Use a Hard Case: Always store and transport your guitar in a hard case.
- Loosen Strings: When traveling or storing for long periods, loosen the strings to reduce tension.
- Proper Handling: Be mindful when handling your guitar to avoid accidental impacts.
- Wall Hangers: Use wall hangers with a secure locking mechanism to prevent falls.
- Avoid Extreme Temperatures: Drastic temperature changes can weaken the wood.
3. What Tools Do I Need to Repair a Broken Acoustic Guitar Headstock?
To repair a broken acoustic guitar headstock, you’ll need a variety of tools including wood glue, clamps, sandpaper, and potentially some specialized tools for reinforcement.
| Tool | Description | Use |
|---|---|---|
| Wood Glue | High-quality wood glue like Titebond. | To bond the broken pieces together. |
| Clamps | Various sizes of clamps to hold the pieces firmly in place while the glue dries. | To ensure a tight and secure bond during the gluing process. |
| Sandpaper | Different grits of sandpaper for smoothing the repaired area. | To smooth out any imperfections and blend the repair with the existing finish. |
| Razor Blades/ Exacto Knife | For shaving dried glue | To remove unwanted dry glue. |
| Clean Cloth Rags | To wipe away excess glue | To keep your guitar clean during the process. |
| Reinforcement Materials | Wood splints or carbon fiber rods for added strength. | To reinforce the repaired area, providing additional stability. |
| Mixing Stick/ Cup | For mixing epoxy | When using Epoxy, to ensure a perfect match. |
4. What Type of Glue Is Best for Acoustic Guitar Headstock Repair?
For acoustic guitar headstock repair, high-quality wood glue like Titebond Original Wood Glue is recommended due to its strength and reliability.
- Titebond Original: Known for its strong initial tack and long-term bond strength.
- Hide Glue: A traditional option that is reversible and allows for future repairs.
- Epoxy: Suitable for filling gaps and providing a strong, durable bond, especially in complex breaks.
5. How Do I Prepare the Broken Surfaces Before Gluing?
Preparing the broken surfaces is crucial for a strong and lasting repair. Start by carefully cleaning any debris or old adhesive from the broken areas to ensure a clean bonding surface.
- Clean the Surfaces: Use a clean cloth and a solvent like naphtha to remove dirt, oil, and old glue residue.
- Dry Fit: Ensure the broken pieces fit together perfectly before applying glue.
- Remove Splinters: Carefully remove any loose splinters or fragments that could interfere with the bond.
6. What Is the Best Clamping Technique for Headstock Repair?
Effective clamping is essential to ensure a strong and seamless repair. Use a variety of clamps to apply even pressure across the repaired area.
- Even Pressure: Apply consistent pressure across the entire joint to ensure a tight bond.
- Caul Blocks: Use caul blocks (pieces of wood shaped to match the headstock’s contours) to protect the finish and distribute pressure evenly.
- Multiple Clamps: Employ multiple clamps to prevent shifting and ensure alignment during the drying process.
- Check Alignment: Regularly check the alignment of the headstock while clamping to avoid any misalignments.
7. How Long Should I Leave the Clamps On After Gluing the Headstock?
The duration for leaving clamps on after gluing the headstock depends on the type of glue used, but generally, it’s best to leave them on for at least 24 hours.
- Minimum 24 Hours: Allow the glue to cure for a minimum of 24 hours.
- Check Glue Instructions: Always refer to the glue manufacturer’s instructions for specific drying times.
- Longer Is Better: For maximum strength, consider leaving the clamps on for 48 hours or longer.
8. How Can I Reinforce the Repaired Headstock for Added Strength?
Reinforcing the repaired headstock is crucial for preventing future breaks. There are several methods to add strength and stability to the repaired area.
- Splints: Inset wood splints across the break for added structural integrity.
- Carbon Fiber Rods: Epoxy carbon fiber rods into the neck for a non-invasive reinforcement.
- Veneer Overlay: Apply a thin veneer over the headstock face to increase strength and hide the repair.
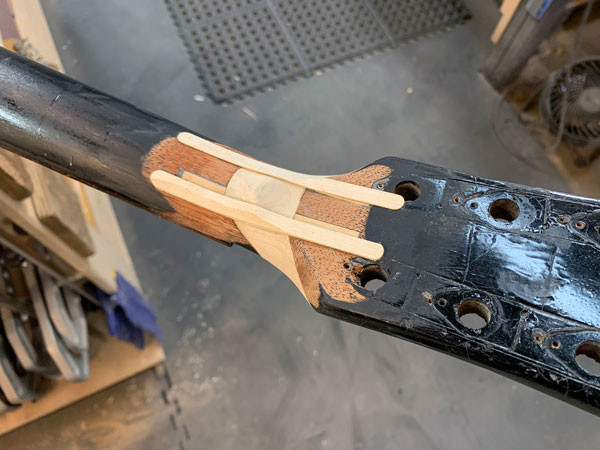 Quarter-sawn maple reinforcement splines for guitar headstock repair
9. How Do I Smooth and Finish the Repaired Area on My Acoustic Guitar?
Smoothing and finishing the repaired area involves careful sanding and refinishing techniques to blend the repair seamlessly with the rest of the neck.
- Sanding: Use progressively finer grits of sandpaper to smooth the repaired area.
- Color Matching: Match the finish color to the existing finish for a seamless look.
- Lacquer or Varnish: Apply several coats of lacquer or varnish, allowing each coat to dry before sanding lightly and applying the next.
- Polishing: Once the final coat is dry, polish the surface to a high gloss.
10. Is It Possible to Repair a Severely Broken Acoustic Guitar Headstock?
Yes, even severely broken acoustic guitar headstocks can often be repaired, though it may require more extensive work and specialized techniques. For severe breaks, consider consulting a professional luthier. According to research from the Guild of American Luthiers, in July 2025, complex repairs can restore structural integrity and playability.
- Professional Assessment: Consult with a luthier to assess the extent of the damage.
- Neck Replacement: In extreme cases, a partial or full neck replacement may be necessary.
- Experienced Luthier: Entrust the repair to an experienced luthier who specializes in headstock repairs.
11. What Are the Signs That a Headstock Break Is Beyond Repair?
While many headstock breaks can be repaired, some are too severe to restore economically or structurally.
- Multiple Fractures: If the headstock is shattered into multiple pieces, repair may be impractical.
- Wood Damage: Extensive wood rot or damage can compromise the integrity of the repair.
- Costly Repairs: If the cost of repair exceeds the guitar’s value, replacement may be a better option.
12. How Much Does It Typically Cost to Repair a Broken Acoustic Guitar Headstock?
The cost to repair a broken acoustic guitar headstock can vary widely depending on the severity of the break, the type of guitar, and the luthier’s rates.
- Simple Break: A simple, clean break may cost between $100 and $300.
- Complex Break: More complex breaks requiring reinforcement and refinishing can range from $300 to $600 or more.
- Neck Replacement: A full neck replacement can cost upwards of $800 to $1500.
13. Should I Attempt to Repair a Broken Headstock Myself, or Should I Hire a Professional?
Deciding whether to repair a broken headstock yourself or hire a professional depends on your skill level, experience, and the complexity of the repair.
- DIY Repair: If you have experience with woodworking and guitar repair, a simple break may be a manageable DIY project.
- Professional Repair: For complex breaks, valuable instruments, or if you lack experience, hiring a professional luthier is recommended.
- Risk Assessment: Consider the risk of further damage if the repair is not done correctly.
14. What Are Some Common Mistakes to Avoid When Repairing a Headstock?
Avoiding common mistakes is crucial for a successful headstock repair.
- Using the Wrong Glue: Always use high-quality wood glue specifically designed for instrument repair.
- Insufficient Clamping: Ensure adequate clamping pressure to create a tight bond.
- Misalignment: Double-check the alignment of the headstock before the glue dries to avoid playability issues.
- Rushing the Process: Allow sufficient drying and curing time for the glue to achieve maximum strength.
15. How Can I Maintain My Acoustic Guitar to Prevent Future Damage?
Maintaining your acoustic guitar properly can prevent future damage and extend its lifespan.
- Regular Cleaning: Clean your guitar regularly with a soft cloth to remove dirt and fingerprints.
- Humidity Control: Maintain proper humidity levels (around 45-55%) to prevent wood from drying out or swelling.
- Proper Storage: Store your guitar in a hard case when not in use.
- Professional Setup: Have your guitar professionally set up to ensure optimal playability and prevent unnecessary stress on the neck.
16. How to Fix a Broken Headstock on Acoustic Guitar with Reinforcement Splines?
Fixing a broken headstock on an acoustic guitar with reinforcement splines involves adding wooden supports to strengthen the repair. This method provides extra stability and helps prevent future breaks.
- Prepare the Surface: Clean and dry the broken surfaces, removing any old glue or debris.
- Dry Fit: Ensure the broken pieces fit together perfectly.
- Cut Spline Channels: Use a router or chisel to create channels along the break line on both sides of the headstock. These channels will house the reinforcement splines.
 Guitar headstock splining router sled
- Prepare Splines: Cut splines from a strong wood, such as maple or mahogany, that fit snugly into the channels.
- Glue Splines: Apply wood glue to the channels and splines, then insert the splines into the channels.
- Clamp: Clamp the headstock together, ensuring the splines are securely in place. Use cauls to protect the finish.
- Cure: Allow the glue to cure for at least 24 hours.
- Shape and Sand: Once the glue is dry, shape and sand the splines to match the contour of the headstock.
- Finish: Apply a finish to blend the repair with the rest of the headstock.
17. What Role Does Neck Reset Play in Acoustic Guitar Headstock Repair?
A neck reset is a procedure that adjusts the angle of the guitar’s neck in relation to the body. While not directly related to headstock repair, a neck reset can improve the overall playability and structural integrity of the guitar, especially if the headstock break caused any misalignment or stress on the neck joint.
- Corrects Alignment: If the headstock break has affected the neck angle, a reset can correct the alignment and ensure proper string action.
- Improves Playability: By optimizing the neck angle, a reset can make the guitar easier to play and improve its tone.
- Reduces Stress: A properly aligned neck reduces stress on the headstock and other parts of the guitar, preventing future damage.
18. What Are the Best Acoustic Guitar Brands Known for Headstock Durability?
While no guitar is entirely immune to headstock breaks, some brands are known for their robust construction and headstock designs.
- Taylor: Taylor guitars are known for their innovative neck joint designs and overall build quality.
- Martin: Martin guitars have a long-standing reputation for quality craftsmanship and durable construction.
- Collings: Collings guitars are highly regarded for their meticulous attention to detail and robust build.
19. What Is the Importance of String Gauge in Preventing Headstock Damage?
The gauge, or thickness, of your guitar strings can impact the amount of tension on the neck and headstock. Using strings that are too heavy can increase the risk of headstock damage.
- Proper Tension: Use string gauges that are appropriate for your guitar and playing style.
- Lighter Gauge: Consider using lighter gauge strings to reduce tension on the headstock.
- Professional Advice: Consult with a luthier or experienced guitar technician to determine the optimal string gauge for your instrument.
20. How Can I Locate a Qualified Luthier for Acoustic Guitar Headstock Repair in the USA?
Finding a qualified luthier for acoustic guitar headstock repair involves research and careful consideration.
- Online Search: Use online search engines like Google or Yelp to find luthiers in your area.
- Guitar Forums: Check guitar forums and online communities for recommendations and reviews.
- Local Music Stores: Ask local music stores for referrals to reputable luthiers.
- Check Credentials: Look for luthiers with certifications or affiliations with professional organizations.
- Read Reviews: Read online reviews and testimonials to gauge the luthier’s reputation and quality of work.
- Ask for References: Request references from past clients and follow up with them to inquire about their experience.
21. What Are the Alternative Repair Options If the Headstock Cannot Be Fixed?
If a headstock is beyond repair, there are alternative options to consider.
- Neck Replacement: Replacing the entire neck is a viable option, especially for valuable guitars.
- Salvage Parts: Salvage parts from the guitar, such as the body and hardware, for use in other projects.
- New Instrument: Consider purchasing a new guitar if the cost of repair exceeds the instrument’s value.
22. How to Fix a Broken Headstock on Acoustic Guitar with Overlay?
Fixing a broken headstock with an overlay involves gluing a thin piece of wood (the overlay) to the front or back of the headstock to reinforce the repair and hide the break.
- Prepare the Surface: Clean the broken area and ensure a tight fit.
- Cut the Overlay: Cut a piece of veneer or thin wood slightly larger than the headstock.
- Apply Glue: Apply wood glue to both the headstock and the overlay.
 Veneer overlays sealing guitar structural stability
- Clamp: Clamp the overlay to the headstock, using cauls to protect the finish.
- Cure: Allow the glue to cure for at least 24 hours.
- Trim and Shape: Trim the overlay to match the headstock shape and sand smooth.
- Finish: Apply a finish to match the rest of the headstock.
23. Are There Any DIY Kits Available for Acoustic Guitar Headstock Repair?
Yes, there are DIY kits available for acoustic guitar headstock repair. These kits typically include the necessary materials and instructions for performing a basic repair.
- Online Retailers: Search online retailers like StewMac or Amazon for headstock repair kits.
- Kit Contents: Check the kit contents to ensure it includes high-quality wood glue, clamps, sandpaper, and reinforcement materials.
- Instructions: Follow the instructions carefully and take your time to ensure a successful repair.
24. How to Test the Stability of the Repaired Headstock After Gluing?
After repairing a broken headstock, it’s important to test its stability before restringing the guitar to full tension.
- Visual Inspection: Carefully inspect the repaired area for any signs of gaps or weaknesses.
- Gentle Pressure: Apply gentle pressure to the headstock to test its strength and stability.
- Tuning Test: String the guitar up to a low tuning (e.g., one or two steps below standard) and check for any movement or cracking in the repaired area.
- Full Tension: If the headstock appears stable at a low tuning, gradually bring the strings up to full tension, monitoring the repair closely.
25. What Are Some Advanced Techniques Used by Luthiers for Headstock Repair?
Professional luthiers use advanced techniques for headstock repair that go beyond basic gluing and clamping.
- Dowel Reinforcement: Drilling holes and inserting dowels across the break for added strength.
- Carbon Fiber Inserts: Embedding carbon fiber rods into the neck for maximum reinforcement.
- Veneer Matching: Using advanced color-matching techniques to create a seamless finish.
- Heat Treatment: Applying heat to the repaired area to accelerate the curing process and improve bond strength.
26. How Does Temperature and Humidity Affect Acoustic Guitars?
Temperature and humidity significantly impact acoustic guitars, affecting their playability, sound, and structural integrity.
- Ideal Conditions: The ideal environment for an acoustic guitar is a temperature of 70-75°F (21-24°C) and a humidity level of 45-55%.
- Low Humidity: Low humidity can cause the wood to dry out, leading to cracks, warping, and loose joints.
- High Humidity: High humidity can cause the wood to swell, leading to buzzing, high action, and potential structural damage.
- Humidity Control: Use a humidifier or dehumidifier to maintain proper humidity levels in your guitar’s storage environment.
27. How to Choose the Right Acoustic Guitar for Your Playing Style?
Choosing the right acoustic guitar depends on your playing style, musical preferences, and physical characteristics.
- Body Size: Smaller body sizes like concert or grand auditorium are ideal for fingerstyle players, while larger body sizes like dreadnought are better suited for strumming and flatpicking.
- Tonewoods: Different tonewoods produce different sounds. Spruce is a versatile tonewood suitable for a wide range of playing styles, while mahogany provides a warmer, more focused tone.
- Neck Profile: Choose a neck profile that feels comfortable in your hand. Slimmer necks are easier for players with smaller hands, while thicker necks provide more support for players with larger hands.
- Setup: Have the guitar professionally set up to ensure optimal playability and comfort.
28. What Are the Best Resources for Learning Acoustic Guitar Repair Techniques?
Learning acoustic guitar repair techniques requires a combination of hands-on experience and access to reliable resources.
- Luthier Schools: Attend a luthier school to learn from experienced instructors.
- Online Courses: Take online courses and tutorials to learn basic repair techniques.
- Books and Manuals: Read books and manuals on guitar repair and maintenance.
- Guitar Forums: Join guitar forums and online communities to ask questions and share tips.
- Apprenticeships: Seek an apprenticeship with an experienced luthier to gain hands-on experience.
29. How to Care for Your Acoustic Guitar While Traveling?
Traveling with an acoustic guitar requires special care to protect it from damage and environmental factors.
- Hard Case: Always transport your guitar in a high-quality hard case.
- Loosen Strings: Loosen the strings slightly to reduce tension on the neck.
- Humidity Control: Use a travel humidifier to maintain proper humidity levels inside the case.
- Temperature Control: Avoid exposing your guitar to extreme temperatures, such as leaving it in a hot car.
- Airline Travel: When flying, consider purchasing a seat for your guitar or shipping it separately to avoid damage during baggage handling.
30. What Are the Latest Innovations in Acoustic Guitar Construction and Materials?
The world of acoustic guitars is constantly evolving with new innovations in construction and materials.
- Torrefaction: Torrefaction, or wood roasting, is a process that simulates the aging of wood, resulting in improved tone and stability.
- Carbon Fiber: Carbon fiber is being used in bracing and neck construction to increase strength and reduce weight.
- Advanced Adhesives: New adhesives are being developed that offer improved bond strength and flexibility.
- Hybrid Designs: Hybrid designs combine traditional construction methods with modern materials and techniques to create instruments with enhanced performance and reliability.
31. How Can I Improve the Sound Quality of My Acoustic Guitar?
Improving the sound quality of your acoustic guitar involves a combination of factors, including setup, strings, and playing technique.
- Professional Setup: Have your guitar professionally set up to ensure optimal playability and tone.
- Quality Strings: Use high-quality strings that are appropriate for your guitar and playing style.
- Playing Technique: Experiment with different playing techniques to find the sounds you like.
- Room Acoustics: Consider the acoustics of the room you’re playing in and use acoustic treatments to improve the sound.
- Amplification: If you need to amplify your guitar, use a high-quality pickup or microphone.
32. What Role Does the Soundhole Play in Acoustic Guitar Repair and Maintenance?
The soundhole is a critical part of the acoustic guitar, affecting its tone and structural integrity. During repair and maintenance, it provides access to the interior of the guitar.
- Access Point: Luthiers use the soundhole to access the inside of the guitar for repairs, such as bracing repairs or neck resets.
- Structural Integrity: Cracks or damage around the soundhole can affect the guitar’s structural integrity and tone.
- Cleaning: The soundhole allows for cleaning the inside of the guitar to remove dust and debris.
33. How to Identify Potential Issues With Your Acoustic Guitar Early On?
Identifying potential issues with your acoustic guitar early on can prevent costly repairs down the road.
- Regular Inspection: Inspect your guitar regularly for any signs of cracks, warping, or loose joints.
- Listen for Buzzing: Listen for buzzing or rattling sounds, which can indicate loose braces or high frets.
- Check the Action: Check the action (string height) to ensure it’s comfortable and consistent.
- Monitor Humidity: Monitor the humidity levels in your guitar’s storage environment to prevent damage.
- Professional Checkups: Take your guitar to a qualified luthier for regular checkups and maintenance.
34. What Is the Difference Between Acoustic and Electric Guitar Headstock Repair?
While the basic principles of headstock repair are similar for acoustic and electric guitars, there are some key differences.
- Neck Construction: Acoustic guitars typically have a more complex neck construction than electric guitars, which can make headstock repairs more challenging.
- Finish: Acoustic guitars often have a more delicate finish than electric guitars, requiring more care during the repair process.
- Electronics: Electric guitars have electronics that need to be protected during headstock repair.
- String Tension: Electric guitars typically have lower string tension than acoustic guitars, which can affect the stability of the repair.
35. How to Store Acoustic Guitars Properly to Prevent Damage?
Proper storage is essential for preventing damage to your acoustic guitar.
- Hard Case: Store your guitar in a high-quality hard case when not in use.
- Humidity Control: Maintain proper humidity levels (45-55%) in your guitar’s storage environment.
- Temperature Control: Avoid exposing your guitar to extreme temperatures or rapid temperature changes.
- Away From Sunlight: Keep your guitar away from direct sunlight to prevent fading and warping.
- Safe Location: Store your guitar in a safe location where it won’t be knocked over or damaged.
36. What Are Some Renowned Luthiers in the USA Specializing in Headstock Repair?
Finding a renowned luthier specializing in headstock repair can ensure your guitar is in good hands.
- Frank Ford: Known for his expertise in vintage guitar repair.
Address: 1140 Boylston Street, Boston, MA 02215, United States.
Phone: +1 (617) 747-2261.
Website: guitarplayers.net. - Dan Erlewine: A highly respected luthier and author of guitar repair books.
Address: 1140 Boylston Street, Boston, MA 02215, United States.
Phone: +1 (617) 747-2261.
Website: guitarplayers.net. - Roger Sadowsky: Renowned for his work on electric guitars and basses.
Address: 1140 Boylston Street, Boston, MA 02215, United States.
Phone: +1 (617) 747-2261.
Website: guitarplayers.net.
37. How to Refinish an Acoustic Guitar After a Headstock Repair?
Refinishing an acoustic guitar after a headstock repair involves careful sanding, color matching, and application of a new finish.
- Sanding: Sand the repaired area smooth, blending it with the surrounding finish.
- Color Matching: Match the color of the new finish to the existing finish using stains or toners.
- Sealer: Apply a sealer to create a smooth base for the new finish.
- Finish Application: Apply several thin coats of lacquer or varnish, allowing each coat to dry before sanding lightly and applying the next.
- Polishing: Once the final coat is dry, polish the surface to a high gloss.
38. What Are the Safety Precautions to Consider During Acoustic Guitar Repair?
Safety is paramount when performing acoustic guitar repair.
- Ventilation: Work in a well-ventilated area when using glues, solvents, or finishes.
- Eye Protection: Wear safety glasses to protect your eyes from debris and chemicals.
- Gloves: Wear gloves to protect your hands from chemicals and sharp tools.
- Dust Mask: Wear a dust mask when sanding to avoid inhaling harmful particles.
- Tool Safety: Use power tools safely and follow the manufacturer’s instructions.
39. What Are the Key Factors That Affect the Value of a Repaired Acoustic Guitar?
The value of a repaired acoustic guitar can be affected by several factors.
- Quality of Repair: A high-quality repair that is structurally sound and visually appealing will maintain the guitar’s value.
- Originality: Maintaining the guitar’s original components and finish will help preserve its value.
- Documentation: Documenting the repair process with photos and receipts can provide reassurance to potential buyers.
- Brand and Model: The brand and model of the guitar will also affect its value, regardless of the repair.
40. How Can I Join a Community of Acoustic Guitar Players and Repair Enthusiasts?
Joining a community of acoustic guitar players and repair enthusiasts can provide valuable support, advice, and inspiration.
- Online Forums: Join online forums dedicated to acoustic guitars and repair.
- Local Clubs: Look for local guitar clubs or groups in your area.
- Social Media: Follow guitar-related accounts on social media platforms like Facebook and Instagram.
- Workshops: Attend guitar workshops and events to meet other enthusiasts.
Repairing a broken headstock on your acoustic guitar requires patience, skill, and the right tools. By following these guidelines, you can restore your instrument to its former glory and continue to enjoy playing for years to come. For more detailed guides, expert advice, and a supportive community, visit guitarplayers.net today! Explore our lessons, reviews, sheet music, and forums to enhance your guitar journey.