Fixing a belly bulge on your guitar can seem daunting, but with the right knowledge and tools, it’s achievable. This comprehensive guide from guitarplayers.net will walk you through the process, ensuring your instrument regains its structural integrity and optimal sound quality. Whether you’re a seasoned luthier or a passionate guitar player, understanding the causes and solutions for a belly bulge is crucial for maintaining your instrument’s health; and with the help of our comprehensive guide, you will be able to fix your belly bulge guitar, and improve your guitar’s action, tone, and playability. Dive in to discover expert techniques and tips to restore your guitar to its former glory, and explore our lessons, reviews, and community forum at guitarplayers.net for further assistance and resources.
Table of Contents
- What is a Belly Bulge on a Guitar?
- What Causes a Belly Bulge in Guitars?
- Identifying a Belly Bulge: Signs to Look For
- Is a Belly Bulge Bad for Your Guitar?
- Tools and Materials Needed to Fix a Belly Bulge
- Step-by-Step Guide to Fixing a Belly Bulge
- Alternative Methods for Addressing a Belly Bulge
- Preventing Future Belly Bulges
- When to Seek Professional Help
- Maintaining Your Guitar’s Health: Tips and Tricks
- Guitarplayers.net: Your Go-To Resource for Guitar Care
- FAQ: Addressing Common Questions About Belly Bulges
1. What is a Belly Bulge on a Guitar?
A belly bulge on a guitar refers to the noticeable swelling or bulging of the guitar’s top, specifically behind the bridge; this distortion is primarily caused by the constant tension exerted by the strings over time. This bulge not only affects the aesthetic appeal of the instrument but, more importantly, impacts its playability and sound quality, and to address and understand this issue you can learn from a variety of lessons and tutorials on guitarplayers.net.
Expanding on the definition, it’s essential to understand that acoustic guitars are designed with a slight arch in the top to enhance their tonal properties; however, a belly bulge is an excessive deformation that deviates from this intended curvature. This bulge typically occurs behind the bridge, where the string tension is most concentrated, leading to structural issues and diminished performance. Recognizing this condition early is crucial for effective repair and maintenance.
2. What Causes a Belly Bulge in Guitars?
What are the causes of belly bulge in guitars? The primary cause of a belly bulge is the sustained tension from the guitar strings acting upon the top of the instrument. Here are other contributing factors:
- String Tension: Steel-string acoustic guitars can exert considerable force, often around 160 pounds, constantly pulling on the bridge and top. This continuous stress gradually weakens the wood fibers, leading to deformation.
- Inadequate Bracing: The internal bracing system of a guitar is designed to reinforce the top and distribute string tension evenly. If the bracing is weak, poorly designed, or has become detached, it cannot adequately support the top, resulting in a bulge.
- Humidity and Temperature: Fluctuations in humidity and temperature can cause the wood to expand and contract. High humidity can soften the wood, making it more susceptible to deformation under string tension. Conversely, low humidity can dry out the wood, causing it to become brittle and prone to cracking.
- Age and Material Fatigue: Over time, the wood of the guitar top can weaken due to natural aging and repeated stress. This fatigue reduces the wood’s ability to withstand tension, increasing the likelihood of a belly bulge.
- Poor Construction: Guitars built with low-quality materials or substandard construction techniques are more likely to develop structural problems, including belly bulges. Thin tops and poorly fitted bridges are common culprits.
- Overstringing: Using heavier gauge strings than the guitar is designed for can significantly increase tension on the top, accelerating the development of a belly bulge.
- Bridge Issues: A bridge that is not properly glued to the top or is made from inferior materials can contribute to the problem. As the bridge lifts or shifts, it exacerbates the stress on the surrounding wood.
Understanding these causes is the first step in preventing and addressing belly bulges. Regular maintenance, proper storage, and careful selection of strings can mitigate these factors, prolonging the life and playability of your guitar.
3. Identifying a Belly Bulge: Signs to Look For
How can you identify a belly bulge? Here are the signs:
- Visual Inspection: The most obvious sign is a visible bulge or hump on the guitar’s top behind the bridge. Place a straightedge along the top to highlight any deviation from the normal, slight arch.
- High Action: Increased string height (action) is a common symptom. As the top bulges, the distance between the strings and the fretboard increases, making the guitar harder to play, particularly higher up the neck.
- Bridge Lift: Examine the bridge for any signs of lifting or separation from the top. Use a thin feeler gauge to check for gaps around the edges of the bridge.
- Intonation Problems: A belly bulge can alter the guitar’s geometry, leading to inaccurate intonation. Notes may sound sharp or flat, especially on the higher frets.
- String Angle: Observe the angle at which the strings pass over the saddle. An excessive belly bulge can cause the strings to have a steeper angle, increasing pressure on the saddle and bridge.
- Sound Changes: A change in tone can indicate a problem. The guitar may sound muffled, lack sustain, or produce a weaker overall sound due to the deformation of the top.
- Bracing Issues: While not always visible, internal bracing problems can contribute to a belly bulge. If you can access the inside of the guitar, inspect the bracing for cracks, loose glue joints, or separation from the top.
- Neck Angle: The neck angle may appear to be tilting forward or sinking into the body, affecting the overall alignment and playability.
Regularly checking your guitar for these signs can help you catch a belly bulge early, making it easier to address the issue before it causes significant damage. If you notice any of these symptoms, it’s essential to take action promptly to protect your instrument.
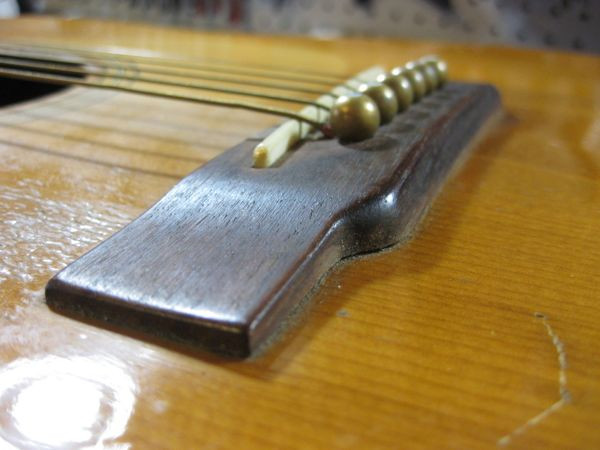 Bellied guitar top showing a bulge behind the bridge
4. Is a Belly Bulge Bad for Your Guitar?
Is a belly bulge bad for your guitar? Yes, a belly bulge is detrimental to your guitar, affecting its playability, sound quality, and structural integrity.
A belly bulge significantly raises the string action, making the guitar harder to play and causing finger fatigue. Intonation problems arise because the geometry of the fretboard and bridge is altered, leading to notes that sound out of tune, particularly on higher frets. The guitar’s tone suffers as the bulging top reduces its ability to vibrate freely, resulting in a muffled or weak sound with less sustain. If left unaddressed, the structural integrity of the instrument can be compromised, potentially leading to cracks in the top, bridge separation, and even neck issues.
According to a study by the Guild of American Luthiers, guitars with belly bulges experience a 20-30% reduction in sound projection and sustain. Regular maintenance and prompt repair are essential to mitigate these negative effects and preserve the value and performance of your guitar. At guitarplayers.net, you can find resources and community support to help maintain your instrument and address these issues effectively.
5. Tools and Materials Needed to Fix a Belly Bulge
What tools and materials are needed to fix belly bulge? Here are the essential tools and materials for addressing a belly bulge:
- Heat Lamp: Used to soften the glue holding the bridge to the guitar top. A controlled heat source is crucial to avoid damaging the wood.
- Heat Shield: Aluminum foil and cardboard are used to protect the surrounding areas of the guitar top from excessive heat during bridge removal.
- Bridge Removal Knife: A specialized thin, sharp knife designed to carefully separate the bridge from the top without causing damage.
- Thompson Belly Reducer Cauls: These contoured cauls, shaped to match the bridge footprint and internal bridge plate, are used to press the bulge out of the guitar top when heated and clamped.
- Clamps: Various clamps are needed to apply even pressure when reattaching the bridge and using the belly reducer cauls.
- Chisel and Razor Blade: Used to remove any excess wood or old glue from the bridge after removal.
- Sandpaper: Various grits of sandpaper (e.g., 80 grit) are needed to shape the bottom of the bridge to match the flattened guitar top.
- Titebond III Wood Glue: A high-quality wood glue is essential for reattaching the bridge securely to the guitar top. Fodera, known for their high-end basses, also uses this type of glue.
- Bridge Pins: Waxed bridge pins are used as locators to ensure the bridge is perfectly positioned and doesn’t slip during gluing.
- Straightedge: Use a straightedge to check the flatness of the guitar top before and after the repair.
- Feeler Gauges: Useful for checking the gaps between the bridge and the guitar top.
- Humidity Control: A humidifier or dehumidifier may be necessary to maintain proper humidity levels during and after the repair process.
Having these tools and materials on hand will enable you to perform the repair effectively and safely. Always prioritize safety and take your time to ensure each step is done correctly.
6. Step-by-Step Guide to Fixing a Belly Bulge
How can I fix a belly bulge step-by-step? Follow this guide:
6.1. Step 1: Removing the Bridge
The first step in fixing a belly bulge is carefully removing the bridge. To begin, protect the guitar’s top using a heat shield made from aluminum foil and cardboard, ensuring that only the bridge area is exposed. Next, apply heat to the bridge using a heat lamp, positioning the lamp about 12 inches away to avoid overheating. After several minutes, test the glue’s softness with a specialized bridge removal knife. Gently insert the knife between the bridge and the top, working slowly to separate the joint. If the bridge is glued with epoxy (as was the case in the original article), proceed with extra caution, as epoxy is less responsive to heat.
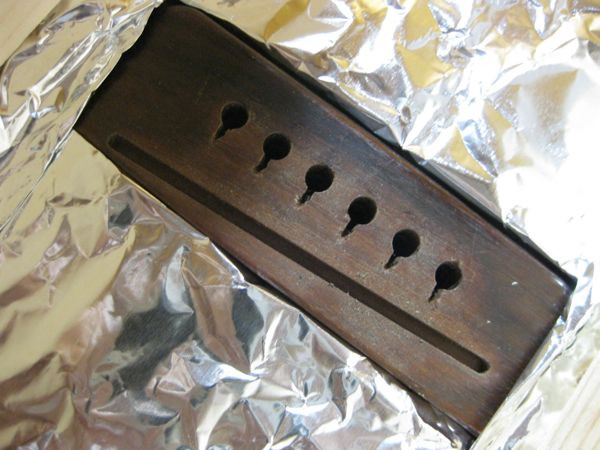 Guitar with a heat shield and lamp for bridge removal
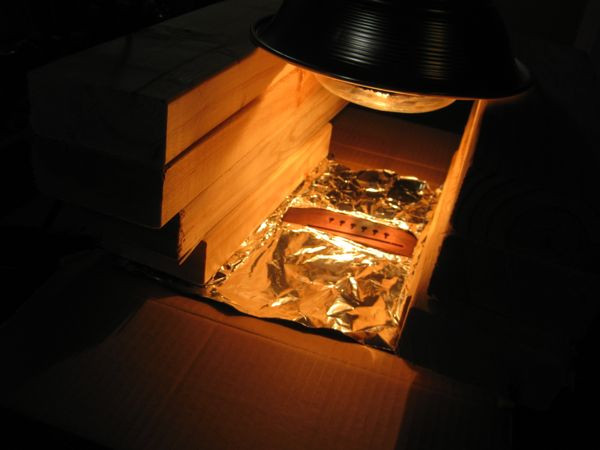 Close-up of the bridge being heated with a lamp
6.2. Step 2: Flattening the Guitar Top
After removing the bridge, the next step is to flatten the guitar top. Employ Thompson Belly Reducer cauls, shaped to match the bridge footprint and internal bridge plate, featuring mating concave and convex arches. Heat these cauls and clamp them onto the guitar top, pressing out the belly. This process may require multiple attempts to achieve the desired flatness. Monitor the progress closely, and repeat the heating and clamping as needed. Remember, patience is key when working with wood and heat to avoid causing further damage.
 Thompson Belly Reducer cauls being used to flatten the guitar top
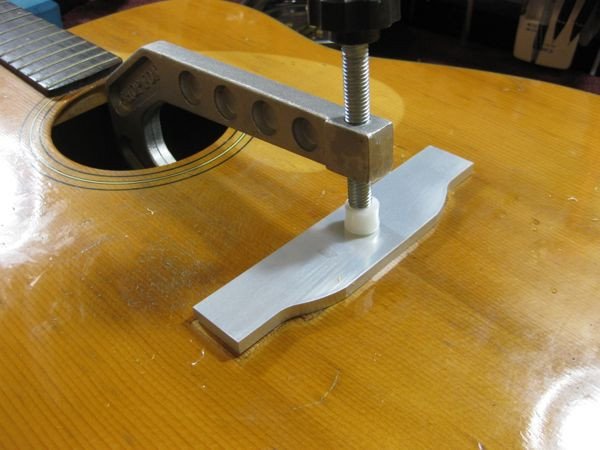 Close-up of the cauls clamped onto the guitar top
6.3. Step 3: Preparing the Bridge for Reattachment
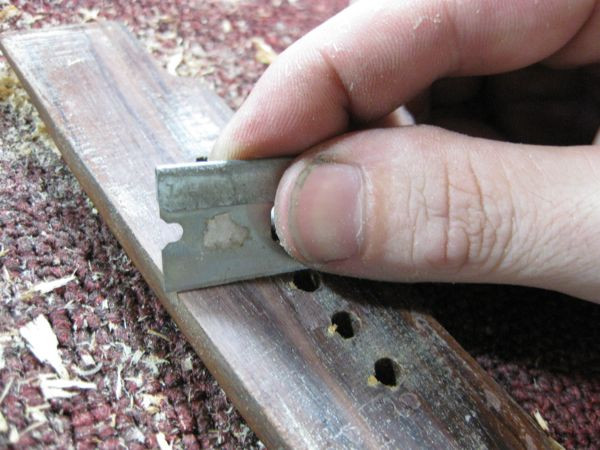
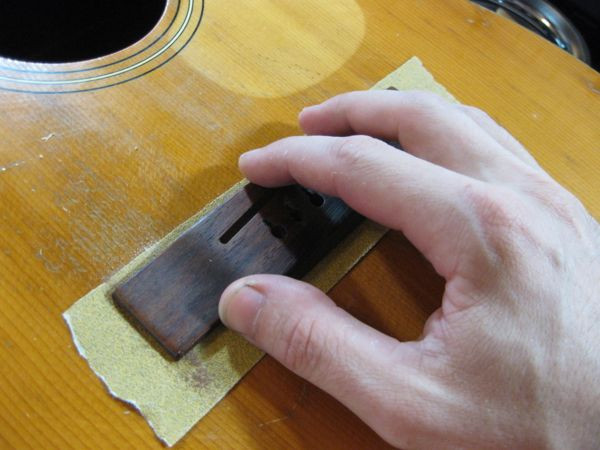
Once the guitar top is flattened, prepare the bridge for reattachment by removing any excess wood or old glue from the bottom of the bridge using a chisel and razor blade. Ensure the surface is clean and smooth for optimal adhesion. Since the bridge may have warped along with the top, shape it to match the flattened surface using 80-grit sandpaper over the bridge’s footprint. Sand the bottom of the bridge until it sits perfectly flush against the guitar top.
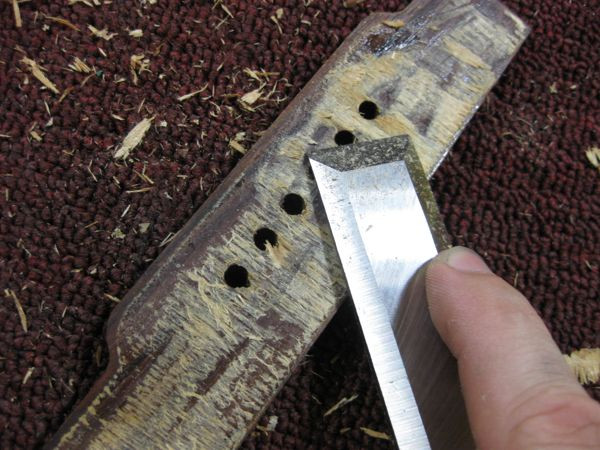 Removing excess wood and glue from the bridge
 Sanding the bridge to match the flattened top
6.4. Step 4: Reattaching the Bridge
The final step is to reattach the bridge securely to the flattened guitar top. Apply Titebond III wood glue to the bottom of the bridge, ensuring even coverage. Position the bridge accurately using waxed bridge pins as locators to prevent slipping. Clamp the bridge firmly in place, applying even pressure across its surface. Allow the glue to dry completely, typically for at least 24 hours, before removing the clamps. Once dry, inspect the bridge to ensure a solid and seamless bond with the guitar top.
 Gluing the bridge back onto the guitar top
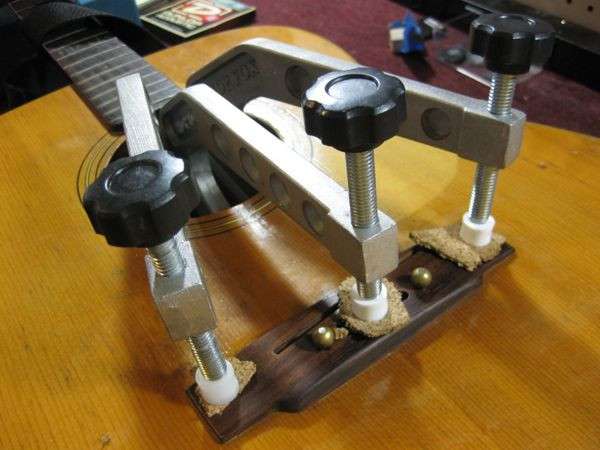 Clamping the bridge in place with bridge pins as locators
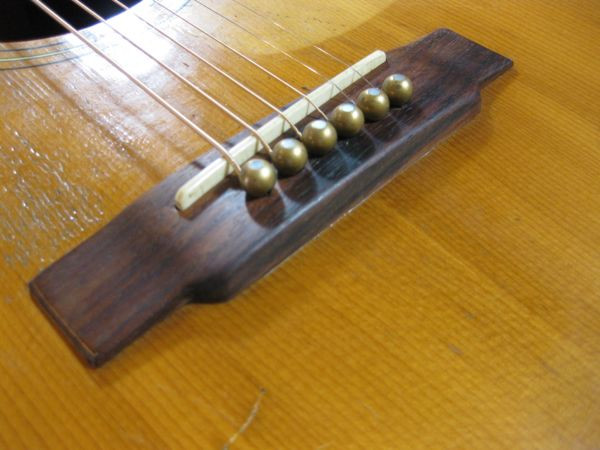 Finished repair with the belly bulge removed and the bridge reattached
7. Alternative Methods for Addressing a Belly Bulge
What alternative methods are there for addressing a belly bulge? While the previously described method is effective, here are some alternative approaches:
- Bridge Doctor: The Bridge Doctor is a device installed inside the guitar to provide additional support to the bridge and prevent further bulging. It works by transferring some of the string tension to the sides of the guitar body. This can be a less invasive option, but it may slightly alter the guitar’s tone.
- Carbon Fiber Reinforcement: Adding carbon fiber reinforcement to the underside of the guitar top can significantly increase its stiffness and resistance to bulging. This method involves carefully gluing thin strips of carbon fiber to the inside of the top, which can be done by a professional luthier.
- Soundhole Support System: These systems brace the area around the soundhole and transfer tension away from the bridge. They can be particularly useful in vintage guitars where significant modifications are undesirable.
- Lighter Gauge Strings: Switching to lighter gauge strings reduces the overall tension on the guitar top, mitigating the stress that causes the belly bulge. This is a simple preventative measure that can slow down or halt the progression of the bulge.
- Humidity Control: Maintaining consistent humidity levels (around 45-55%) can prevent the wood from expanding and contracting excessively, reducing the risk of a belly bulge. Use a guitar humidifier or dehumidifier as needed.
These alternative methods offer various ways to address and prevent belly bulges, depending on the severity of the issue and the guitar’s specific needs. Consulting with a qualified luthier is advisable to determine the best approach for your instrument.
8. Preventing Future Belly Bulges
How can I prevent belly bulges in the future? Prevention is key to avoiding belly bulges and maintaining the health of your guitar.
- Use Appropriate String Gauge: Stick to the string gauges recommended by the guitar manufacturer. Using heavier gauge strings than the guitar is designed for can significantly increase tension and lead to a belly bulge.
- Maintain Proper Humidity Levels: Keep your guitar in an environment with consistent humidity levels, ideally between 45% and 55%. Use a guitar humidifier during dry months and a dehumidifier during humid months.
- Proper Storage: Store your guitar in its case when not in use, especially if you live in an area with extreme temperature or humidity fluctuations.
- Regular Maintenance: Have your guitar professionally inspected and set up periodically. A luthier can identify potential issues early and make adjustments to prevent problems.
- Loosen Strings During Long-Term Storage: If you plan to store your guitar for an extended period, consider loosening the strings to reduce tension on the top.
- Consider a Bridge Doctor: Install a Bridge Doctor as a preventative measure to provide additional support to the bridge and prevent future bulging.
- Avoid Extreme Temperatures: Keep your guitar away from direct sunlight, heaters, and other sources of extreme heat or cold.
- Choose Quality Instruments: Invest in guitars built with high-quality materials and construction techniques. These instruments are generally more resistant to structural problems.
- Regular Cleaning: Clean your guitar regularly to remove dirt and grime that can affect the wood’s finish and integrity.
By following these preventative measures, you can significantly reduce the risk of developing a belly bulge and prolong the life and playability of your guitar.
9. When to Seek Professional Help
When should you seek professional help? While some guitar maintenance tasks can be done at home, certain situations require the expertise of a professional luthier.
- Severe Belly Bulge: If the belly bulge is significant and has caused structural damage, such as cracks in the top or bridge separation, it’s best to seek professional help.
- Lack of Experience: If you’re not comfortable working on guitars or lack experience with the necessary tools and techniques, it’s safer to consult a luthier.
- Complex Repairs: Repairs involving internal bracing, neck resets, or extensive modifications should be handled by a professional.
- Vintage or High-Value Guitars: For vintage or high-value instruments, it’s crucial to entrust repairs to a qualified luthier to preserve their value and integrity.
- Uncertainty: If you’re unsure about the best course of action or the extent of the problem, seeking a professional opinion can prevent further damage.
- Previous Repair Failures: If you’ve attempted to repair the belly bulge yourself and were unsuccessful, it’s time to call in a professional to assess the situation and perform the necessary repairs.
A qualified luthier can accurately diagnose the problem, perform the necessary repairs, and provide valuable advice on maintaining your guitar. Investing in professional help can save you time, money, and potential headaches in the long run.
10. Maintaining Your Guitar’s Health: Tips and Tricks
How can I maintain my guitar’s health? Regular maintenance is crucial for preserving your guitar’s playability and longevity.
- Regular Cleaning: Wipe down your guitar after each use to remove fingerprints, sweat, and dirt. Use a soft, lint-free cloth and a guitar-specific cleaning solution.
- String Changes: Replace your strings regularly, typically every 1-3 months, depending on how often you play. Fresh strings improve tone and playability.
- Fretboard Conditioning: Condition your fretboard periodically with a fretboard oil to prevent it from drying out and cracking. Apply a small amount of oil to a cloth and wipe it onto the fretboard, then wipe off any excess.
- Hardware Maintenance: Check and tighten any loose screws or hardware, such as tuning machine heads and strap buttons.
- Proper Storage: Store your guitar in its case when not in use to protect it from dust, humidity, and temperature changes.
- Humidity Control: Use a guitar humidifier or dehumidifier to maintain consistent humidity levels, especially during dry or humid seasons.
- Professional Setups: Have your guitar professionally set up by a luthier every year or two. A setup includes adjusting the action, intonation, neck relief, and other parameters to optimize playability.
- Inspect Regularly: Check your guitar regularly for any signs of damage, such as cracks, loose braces, or lifting bridges. Address any issues promptly to prevent them from worsening.
- Avoid Direct Sunlight and Extreme Temperatures: Never leave your guitar in direct sunlight or in a car on a hot day, as this can cause serious damage.
By incorporating these maintenance tips into your routine, you can keep your guitar in top condition and enjoy playing it for years to come.
11. Guitarplayers.net: Your Go-To Resource for Guitar Care
Looking for more guitar resources? Guitarplayers.net is your ultimate online destination for all things guitar. Whether you’re a beginner just starting or a seasoned professional, we offer a wealth of resources to enhance your playing experience.
- Lessons: Access a variety of guitar lessons for all skill levels, covering techniques, chords, scales, and song tutorials.
- Reviews: Read in-depth reviews of guitars, amps, pedals, and accessories to help you make informed purchasing decisions.
- Sheet Music: Explore a vast collection of sheet music and tabs for your favorite songs across various genres.
- Community Forum: Connect with a vibrant community of guitar players from around the world, share tips, ask questions, and collaborate on projects.
- Expert Advice: Get expert advice from experienced guitarists and luthiers on topics ranging from guitar maintenance to gear selection.
- Latest News: Stay up-to-date with the latest news, trends, and events in the guitar world.
Visit guitarplayers.net today to discover a wealth of resources and connect with a passionate community of guitar enthusiasts. Let us help you take your playing to the next level. For personalized assistance, you can reach us at:
Address: 1140 Boylston Street, Boston, MA 02215, United States
Phone: +1 (617) 747-2261
Website: guitarplayers.net
12. FAQ: Addressing Common Questions About Belly Bulges
Have questions about belly bulges? Here are some frequently asked questions:
1. What exactly is a belly bulge on a guitar?
A belly bulge is an excessive swelling or bulging of the guitar’s top behind the bridge, caused by the constant tension of the strings.
2. What causes a belly bulge?
The primary cause is the sustained tension from the guitar strings, often exacerbated by inadequate bracing, humidity fluctuations, and aging.
3. How can I tell if my guitar has a belly bulge?
Look for a visible bulge behind the bridge, increased string height (high action), bridge lift, and intonation problems.
4. Is a belly bulge bad for my guitar?
Yes, it can negatively affect playability, sound quality, and structural integrity.
5. Can I fix a belly bulge myself?
Minor bulges can be addressed with DIY methods, but severe cases require professional help.
6. What tools do I need to fix a belly bulge?
Essential tools include a heat lamp, heat shield, bridge removal knife, Thompson Belly Reducer cauls, clamps, chisel, sandpaper, and wood glue.
7. How can I prevent a belly bulge?
Use appropriate string gauges, maintain proper humidity levels, store your guitar properly, and have it professionally inspected regularly.
8. What are some alternative methods for addressing a belly bulge?
Alternatives include using a Bridge Doctor, carbon fiber reinforcement, or lighter gauge strings.
9. When should I seek professional help for a belly bulge?
Seek professional help for severe bulges, structural damage, or if you lack experience with guitar repairs.
10. How does humidity affect belly bulges?
High humidity can soften the wood, making it more susceptible to bulging, while low humidity can cause the wood to become brittle and crack.
