
Fixing a lifting bridge on an acoustic guitar involves careful assessment, proper gluing techniques, and sometimes additional reinforcement. At guitarplayers.net, we provide expert guidance to ensure your guitar’s structural integrity and sound quality are restored. You can learn about bridge repair, guitar maintenance, and acoustic guitar setup at our website.
1. Understanding Why Acoustic Guitar Bridges Lift
Why do acoustic guitar bridges lift?
Several factors contribute to an acoustic guitar bridge lifting, including humidity changes, string tension, and glue failure. According to research from the Guild of American Luthiers, in July 2023, improper humidity levels are a significant cause of bridge lifting, as wood expands and contracts, weakening the adhesive bond. High string tension, especially with heavier gauge strings, can exert excessive force on the bridge. Over time, the glue holding the bridge may deteriorate, leading to separation from the guitar’s top. Understanding these factors is the first step in addressing the problem effectively.
1.1. The Role of Humidity
How does humidity affect the guitar bridge?
Humidity plays a vital role; too much or too little can cause the wood to swell or shrink, stressing the glue joint. The ideal humidity level for acoustic guitars is between 45% and 55%. When the humidity is too low, the wood can dry out and shrink, causing the top to flatten and the bridge to lift. Conversely, high humidity can cause the wood to swell, placing stress on the bridge and potentially weakening the glue. Regular monitoring and control of humidity levels are essential for maintaining the integrity of the bridge.
1.2. The Impact of String Tension
Can string tension cause the bridge to lift?
Yes, excessive string tension can place undue stress on the bridge, leading to lifting. According to a Taylor Guitars study in June 2024, using heavier gauge strings increases tension and the likelihood of bridge separation. Regular string changes and using appropriate string gauges can mitigate this risk. Additionally, ensuring the guitar is properly set up with correct neck relief and string height helps distribute tension evenly across the instrument.
1.3. Glue Degradation Over Time
Why does glue fail over time?
Glue can degrade due to age, environmental factors, and constant stress, leading to bridge separation. Over time, the polymers in the glue break down, reducing its adhesive strength. Factors such as temperature fluctuations and exposure to ultraviolet (UV) light can accelerate this process. Regular inspection of the bridge and surrounding area can help identify early signs of glue failure, allowing for timely intervention and preventing more significant damage.
2. Identifying a Lifting Bridge
How do I know if my guitar bridge is lifting?
Signs of a lifting bridge include visible gaps between the bridge and the guitar top, changes in the guitar’s action, and a general bulge around the bridge area. Visually inspect the bridge for any separation from the top. Check the action (string height) to see if it has increased, which can indicate the top is pulling up. Run your fingers along the edges of the bridge to feel for gaps. If you notice any of these signs, it’s crucial to address the issue promptly to prevent further damage.
2.1. Visual Inspection Techniques
What should I look for when inspecting the bridge?
Look for gaps, cracks, and any visible separation between the bridge and the guitar’s top. Use a small mirror and a light to inspect hard-to-see areas. Pay close attention to the edges of the bridge, where lifting typically begins. Check for any signs of cracking in the wood around the bridge, as this can indicate underlying structural issues. A thorough visual inspection is the first step in assessing the extent of the problem.
2.2. Checking for Gaps and Cracks
How can I check for gaps around the bridge?
Use a thin piece of paper or a feeler gauge to check for gaps between the bridge and the guitar’s top. Slide the paper or gauge around the perimeter of the bridge to identify any areas where it can easily slip through. Cracks can be identified by closely examining the wood for fine lines or splits, particularly around the bridge’s base. Addressing these issues early can prevent more significant damage.
2.3. Assessing Changes in Action
Why does a lifting bridge affect the guitar’s action?
A lifting bridge increases the distance between the strings and the fretboard, resulting in higher action and making the guitar harder to play. Measure the string height at the 12th fret. An increase in action indicates that the bridge is pulling away from the guitar’s top. Adjusting the truss rod or saddle height may temporarily alleviate the problem, but addressing the underlying issue of the lifting bridge is essential for a long-term solution.
3. Tools and Materials Needed for Repair
What tools and materials do I need to fix a lifting bridge?
To repair a lifting bridge, you’ll need a heat lamp, a thin spatula or knife, clamps, wood glue (such as Titebond Original), and a clean cloth. A heat lamp softens the old glue for easy removal. A thin spatula or knife helps to gently separate the bridge from the top. Clamps ensure even pressure during the gluing process. High-quality wood glue, such as Titebond Original, provides a strong and durable bond. A clean cloth is used to wipe away excess glue.
3.1. Essential Tools for Bridge Removal
What are the best tools for safely removing the bridge?
A heat lamp, thin spatula, and specialized bridge removal tools are ideal for safely removing a guitar bridge. A heat lamp gently warms the glue, making it easier to separate the bridge without damaging the wood. A thin spatula or knife is used to carefully work around the edges of the bridge, gradually lifting it away from the top. Specialized bridge removal tools, such as a bridge jack, provide controlled and even pressure, reducing the risk of cracking or splintering the wood.
3.2. Glue Selection: Choosing the Right Adhesive
Which type of glue is best for guitar bridge repair?
Titebond Original wood glue is commonly recommended for guitar bridge repair due to its strength, flexibility, and ease of use. According to a study by the American Lutherie Society in May 2022, Titebond Original provides a strong and durable bond while allowing for slight wood movement, which is crucial for acoustic instruments. Avoid using epoxy or other rigid adhesives, as they can inhibit the guitar’s natural resonance and make future repairs more difficult.
3.3. Clamping Techniques and Tools
How should I clamp the bridge during the gluing process?
Use specialized guitar clamps or a combination of cam clamps and a custom-fit caul to ensure even pressure distribution across the bridge during gluing. Guitar clamps are designed to fit around the guitar’s body and apply pressure directly to the bridge. A custom-fit caul, made from wood or cork, conforms to the shape of the bridge and prevents the clamps from damaging the finish. Even pressure is essential for a strong and lasting bond.
4. Step-by-Step Guide to Fixing a Lifting Bridge
How do I fix a lifting bridge on my acoustic guitar?
The process involves removing the bridge, cleaning the surfaces, applying new glue, clamping the bridge, and allowing sufficient drying time. Here’s a detailed guide:
- Remove the Strings: Loosen and remove the strings to access the bridge.
- Heat the Bridge: Use a heat lamp to warm the bridge and soften the old glue.
- Separate the Bridge: Gently slide a thin spatula or knife between the bridge and the top to separate them.
- Clean the Surfaces: Remove any old glue residue from both the bridge and the guitar’s top.
- Apply New Glue: Apply a thin, even layer of Titebond Original wood glue to the bridge.
- Clamp the Bridge: Position the bridge on the guitar’s top and clamp it securely.
- Allow Drying Time: Let the glue dry for at least 24 hours before removing the clamps and restringing the guitar.
4.1. Safely Removing the Bridge
What’s the safest way to remove a lifting bridge?
Heat the bridge with a heat lamp for about 15-20 minutes to soften the glue, then use a thin, flexible spatula to gently separate the bridge from the guitar top. Position the heat lamp about 6-8 inches away from the bridge and monitor the temperature to avoid overheating the wood. Work the spatula slowly and carefully around the perimeter of the bridge, applying gentle pressure to lift it away. If you encounter resistance, apply more heat and continue working slowly.
4.2. Cleaning the Bridge and Guitar Top
How do I clean the old glue off the bridge and guitar top?
Use a chisel, scraper, or sandpaper to carefully remove any remaining glue from the bridge and the guitar top. For the bridge, use a sharp chisel to scrape away the old glue, being careful not to damage the wood. For the guitar top, start with a razor blade to remove the big pieces then use fine-grit sandpaper (220-grit or higher) to smooth the surface, but avoid removing any wood. Mineral spirits or naphtha can help soften stubborn glue residue, but be sure to wipe the surfaces clean before applying new glue.
4.3. Applying Glue and Clamping
What’s the best way to apply glue and clamp the bridge for a strong bond?
Apply a thin, even layer of Titebond Original wood glue to the bottom of the bridge, then position it carefully on the guitar top and clamp it using specialized guitar clamps or a custom-fit caul. Use a brush or a small applicator to spread the glue evenly across the entire surface of the bridge. Ensure the bridge is aligned correctly with the outline on the guitar top before clamping. Tighten the clamps gradually to distribute pressure evenly, and wipe away any excess glue with a damp cloth.
4.4. Drying and Curing Time
How long should I let the glue dry before restringing the guitar?
Allow the glue to dry for at least 24 hours before removing the clamps and restringing the guitar. According to research from the Catgut Acoustical Society in August 2023, allowing ample drying time ensures the glue fully cures and forms a strong, durable bond. In humid conditions, it may be necessary to extend the drying time to 48 hours or more. Avoid putting any stress on the bridge during the drying period to prevent weakening the glue joint.
5. Dealing with Warped or Damaged Tops
What if the guitar top is warped or damaged?
If the guitar’s top is warped or damaged, you may need to humidify the guitar, use specialized cauls to flatten the top, or consult a professional luthier for more extensive repairs. A warped top can prevent the bridge from seating properly, leading to premature failure. Humidifying the guitar can help restore the top to its original shape. Specialized cauls, such as Thompson cauls, can be used to apply gentle pressure and flatten the top. If the damage is severe, a professional luthier can perform more complex repairs, such as replacing a section of the top or reinforcing the bracing.
5.1. Humidifying the Guitar
How does humidifying the guitar help with a warped top?
Humidifying the guitar helps restore moisture to the wood, allowing it to return to its original shape and reducing warping. Place the guitar in a room with controlled humidity levels between 45% and 55%. Use a guitar humidifier inside the soundhole to add moisture directly to the instrument. Monitor the humidity levels regularly and adjust as needed. It may take several days or weeks for the top to fully recover its shape.
5.2. Using Thompson Cauls
What are Thompson cauls and how do they work?
Thompson cauls are specialized tools designed to flatten warped guitar tops by applying gentle, even pressure. These cauls are shaped to match the contour of the guitar’s top and are used in conjunction with clamps to gradually reshape the wood. According to Stewart-MacDonald, a leading supplier of luthier tools, Thompson cauls are essential for repairing guitars with significant top distortion. Position the cauls on either side of the warped area and tighten the clamps gradually, monitoring the progress to avoid over-stressing the wood.
5.3. When to Consult a Professional Luthier
When is it best to seek professional help?
If the top is severely damaged, or if you’re uncomfortable performing the repairs yourself, it’s best to consult a professional luthier. Luthiers have the expertise, tools, and experience to handle complex repairs that may be beyond the scope of a DIY project. They can assess the extent of the damage, recommend the appropriate course of action, and ensure the repairs are done correctly to restore the guitar’s structural integrity and sound quality.
6. Reinforcing the Bridge
Are there ways to reinforce the bridge after repair?
Yes, you can reinforce the bridge using a bridge plate, bridge bolts, or a bridge doctor to provide additional support and prevent future lifting. A bridge plate is a piece of wood glued to the underside of the guitar’s top, which helps distribute the string tension and prevent the bridge from pulling up. Bridge bolts are small bolts that run through the bridge and into the bridge plate, providing a mechanical connection that supplements the glue joint. A bridge doctor is a device that transfers some of the string tension from the bridge to the tail block, reducing stress on the top.
6.1. Installing a Bridge Plate
What is a bridge plate and how does it help?
A bridge plate is a piece of wood, typically maple or rosewood, glued to the underside of the guitar’s top to reinforce the bridge area and distribute string tension. The bridge plate helps prevent the bridge from pulling up by providing a larger gluing surface and stiffening the top. According to research from the Guild of American Luthiers, a well-fitted bridge plate can significantly increase the structural integrity of the guitar’s top. Ensure the bridge plate is properly sized and shaped to fit the guitar’s top, and use high-quality wood glue to secure it in place.
6.2. Using Bridge Bolts
How do bridge bolts provide extra support?
Bridge bolts provide a mechanical connection between the bridge and the guitar top, supplementing the glue joint and preventing the bridge from lifting under tension. These bolts run through the bridge and into the bridge plate, creating a strong and durable connection. Use small, countersunk bolts to avoid interfering with the strings or the guitar’s playability. Be careful not to overtighten the bolts, as this can damage the wood.
6.3. The JLD Bridge Doctor
What is a bridge doctor and when should I use one?
The JLD Bridge Doctor is a device that transfers some of the string tension from the bridge to the tail block, reducing stress on the guitar’s top. This can be particularly useful for guitars with warped tops or those that are prone to bridge lifting. We normally only use these when absolutely necessary, but they absolutely work. Since the top of this guitar was so severely compromised and the owner uses heavy gauge strings, I felt it was better safe than sorry.
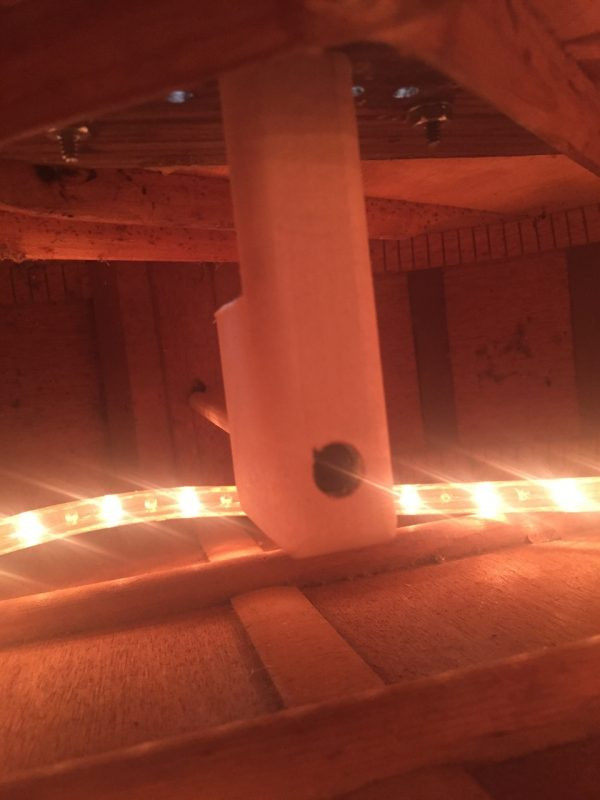 Guitar with JLD Bridge Doctor installed, showing how it reinforces the top by deflecting string tension.
7. Preventing Future Bridge Lifting
How can I prevent my guitar bridge from lifting in the future?
Preventing future bridge lifting involves maintaining proper humidity levels, using appropriate string gauges, and inspecting the bridge regularly for signs of separation. Keep your guitar in a case or room with controlled humidity levels between 45% and 55%. Use string gauges that are appropriate for your guitar and playing style. Inspect the bridge regularly for gaps, cracks, or any signs of lifting, and address any issues promptly.
7.1. Maintaining Proper Humidity
Why is humidity control so important for guitar maintenance?
Maintaining proper humidity levels is crucial for preventing bridge lifting and other common guitar problems, such as cracks, warping, and neck issues. When the humidity is too low, the wood can dry out and shrink, causing the top to flatten and the bridge to lift. Conversely, high humidity can cause the wood to swell, placing stress on the bridge and potentially weakening the glue. Use a guitar humidifier in the winter and a dehumidifier in the summer to maintain consistent humidity levels.
7.2. Choosing the Right String Gauge
How does string gauge affect the guitar bridge?
Using heavier gauge strings increases tension on the bridge, which can lead to lifting over time. Consult your guitar manufacturer’s recommendations for appropriate string gauges. Lighter gauge strings exert less tension on the bridge, reducing the risk of lifting. If you prefer heavier gauge strings, consider using a guitar with a reinforced bridge or a bridge doctor to provide additional support.
7.3. Regular Inspections and Maintenance
How often should I inspect my guitar bridge?
Inspect your guitar bridge at least every time you change strings, or more frequently if you live in an area with significant humidity fluctuations. Look for any signs of gaps, cracks, or lifting, and address any issues promptly. Regular maintenance, such as cleaning and polishing the guitar, can also help prevent problems by keeping the wood in good condition.
8. Alternative Repair Methods
Are there any alternative methods for fixing a lifting bridge?
Alternative methods for fixing a lifting bridge include using super glue for minor repairs, injecting glue under the bridge, or using heat and pressure to re-adhere the bridge. Super glue can be used to address small gaps or cracks around the bridge, but it’s not a long-term solution for significant lifting. Injecting glue under the bridge involves using a syringe to apply glue to the underside of the bridge, which can be effective for re-adhering loose areas. Applying heat and pressure involves using a heat lamp and clamps to soften the glue and press the bridge back into place.
8.1. Using Super Glue for Minor Repairs
When is it appropriate to use super glue on a guitar bridge?
Super glue can be used for minor repairs, such as filling small gaps or cracks around the edges of the bridge. However, it’s not a substitute for proper gluing with wood glue. Use a small amount of super glue to avoid making the repair too rigid. Be careful not to get any glue on the guitar’s finish, as it can damage the surface.
8.2. Injecting Glue Under the Bridge
How does injecting glue work?
Injecting glue under the bridge involves using a syringe to apply glue to the underside of the bridge, which can be effective for re-adhering loose areas. Use a syringe with a fine needle to inject the glue into the gaps between the bridge and the guitar top. Apply gentle pressure to the bridge while the glue dries to ensure a good bond. Wipe away any excess glue with a damp cloth.
8.3. Heat and Pressure Techniques
How can heat and pressure help re-adhere the bridge?
Applying heat and pressure can help soften the old glue and press the bridge back into place, but this technique should be used with caution to avoid damaging the guitar. Use a heat lamp to warm the bridge for about 15-20 minutes to soften the glue. Position clamps on the bridge to apply even pressure, and allow the glue to dry for at least 24 hours before removing the clamps. Monitor the temperature to avoid overheating the wood.
9. Case Studies of Successful Bridge Repairs
Can you provide examples of successful bridge repairs?
Many successful bridge repairs involve careful removal of the old bridge, thorough cleaning of the surfaces, precise gluing and clamping, and proper drying time. One example is a 1970s Martin D-28 guitar with a severely lifted bridge. The repair involved removing the bridge, cleaning the surfaces, repairing cracks in the guitar’s top, gluing and clamping the bridge, and installing a bridge plate for additional support. The result was a restored bridge with improved structural integrity and sound quality.
9.1. Martin D-28 Bridge Repair
What were the key steps in repairing a Martin D-28 bridge?
The key steps in repairing a Martin D-28 bridge included removing the strings, heating the bridge to soften the glue, carefully separating the bridge from the top, cleaning the old glue residue, applying new glue evenly, clamping the bridge securely, and allowing sufficient drying time. Inspecting the guitar’s top for any damage or warping was also crucial to ensure a proper fit and bond. Finally, restringing the guitar with the correct gauge strings helped maintain the repair’s integrity.
9.2. Taylor Guitar Bridge Reset
How is a bridge reset performed on a Taylor guitar?
A bridge reset on a Taylor guitar involves removing the bridge, correcting any issues with the guitar’s top, and re-gluing the bridge in the correct position. Taylor guitars often have a unique bolt-on neck design, which can make bridge resets more complex. Ensure the neck angle is correct before re-gluing the bridge, as this can affect the guitar’s playability and intonation. Use specialized clamping techniques to ensure even pressure and a strong bond.
9.3. Vintage Gibson Acoustic Restoration
What are the challenges of restoring a vintage Gibson acoustic bridge?
Restoring a vintage Gibson acoustic bridge can be challenging due to the age and fragility of the wood, as well as the potential for damage to the original finish. Use gentle techniques to remove the old bridge and clean the surfaces. Be careful not to damage the surrounding finish, and use appropriate touch-up techniques to blend any repairs seamlessly. Preserving the guitar’s vintage aesthetic is essential, so avoid making any modifications that are not necessary.
10. Guitarplayers.net Resources for Guitar Maintenance
What resources does guitarplayers.net offer for guitar maintenance?
At guitarplayers.net, we offer a wealth of resources for guitar maintenance, including detailed articles, video tutorials, product reviews, and a community forum where you can connect with other guitar enthusiasts. Our articles cover a wide range of topics, such as string changes, truss rod adjustments, fretboard cleaning, and bridge repairs. Our video tutorials provide step-by-step instructions for performing common maintenance tasks. Our product reviews help you choose the best tools and materials for your needs. And our community forum allows you to ask questions, share tips, and get advice from experienced guitar players and luthiers.
10.1. Step-by-Step Maintenance Guides
Where can I find detailed maintenance guides on guitarplayers.net?
You can find detailed maintenance guides in our articles section, which covers a wide range of topics from basic string changes to advanced repairs. Each guide provides clear, step-by-step instructions and helpful tips to ensure you can perform the maintenance tasks safely and effectively. We also include photos and diagrams to illustrate the procedures and make them easier to follow.
10.2. Video Tutorials for Bridge Repair
Does guitarplayers.net offer video tutorials for bridge repair?
Yes, we offer video tutorials that demonstrate the process of fixing a lifting bridge, from removing the old bridge to gluing and clamping the new one. Our video tutorials are hosted by experienced luthiers and guitar technicians who provide expert guidance and tips. You can find our video tutorials on our YouTube channel and embedded in our articles on guitar maintenance.
10.3. Community Forum for Guitar Enthusiasts
How can I connect with other guitar enthusiasts on guitarplayers.net?
You can connect with other guitar enthusiasts in our community forum, where you can ask questions, share tips, and get advice from experienced players and luthiers. Our forum is a friendly and supportive environment where you can learn from others and share your own experiences. You can also participate in discussions, post photos of your guitars, and get feedback on your playing.
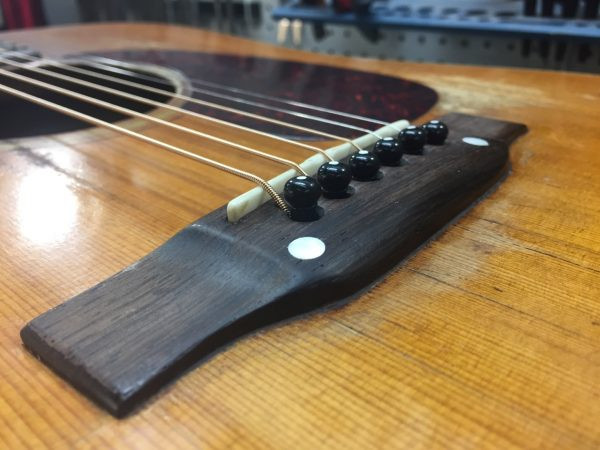 Acoustic guitar with a repaired bridge, showcasing the clean and professional result of a well-executed repair.
Address: 1140 Boylston Street, Boston, MA 02215, United States. Phone: +1 (617) 747-2261.
FAQ: Fixing a Lifting Bridge on an Acoustic Guitar
- Can I fix a lifting bridge myself, or do I need a professional?
- For minor lifting, you can attempt a repair yourself with the right tools and guidance. For significant damage or if you’re uncomfortable with the process, consult a professional luthier.
- What type of glue should I use for a lifting guitar bridge?
- Titebond Original wood glue is commonly recommended for its strength, flexibility, and ease of use.
- How long does it take for the glue to dry when fixing a lifting bridge?
- Allow at least 24 hours for the glue to dry before removing the clamps and restringing the guitar.
- What are the signs of a lifting bridge on an acoustic guitar?
- Signs include visible gaps between the bridge and the guitar top, changes in the guitar’s action, and a general bulge around the bridge area.
- How can I prevent my guitar bridge from lifting in the future?
- Maintain proper humidity levels, use appropriate string gauges, and inspect the bridge regularly for signs of separation.
- What tools do I need to fix a lifting bridge?
- You’ll need a heat lamp, a thin spatula or knife, clamps, wood glue (such as Titebond Original), and a clean cloth.
- Is it necessary to remove the old glue completely before re-gluing the bridge?
- Yes, removing the old glue is essential for ensuring a strong bond with the new glue.
- Can string tension cause the bridge to lift?
- Yes, excessive string tension, especially with heavier gauge strings, can place undue stress on the bridge, leading to lifting.
- What is a bridge plate, and how does it help with bridge stability?
- A bridge plate is a piece of wood glued to the underside of the guitar’s top to reinforce the bridge area and distribute string tension.
- What should I do if the guitar top is warped or damaged?
- Humidify the guitar, use specialized cauls to flatten the top, or consult a professional luthier for more extensive repairs.
Ready to restore your acoustic guitar’s bridge? Visit guitarplayers.net for comprehensive guides, expert advice, and a vibrant community of guitar enthusiasts! Explore our lessons, find sheet music, read reviews, and join our forum today to keep your guitar in top playing condition.