Fixing a broken guitar bridge starts with understanding the issue and implementing a careful repair process to restore your instrument to its optimal playing condition. At guitarplayers.net, we’re here to help you diagnose and repair a damaged acoustic guitar bridge. From loose bridges to complete breaks, we’ll guide you through each step, ensuring your guitar sounds and plays its best. With our guide, you will understand everything about guitar bridge repair, acoustic guitar maintenance, and guitar setup.
1. What Causes Damage To An Acoustic Guitar Bridge?
An acoustic guitar’s bridge can be damaged by several factors, including environmental conditions and improper maintenance.
Extreme weather conditions are a major threat to any guitar, impacting its appearance, sound quality, and structural integrity. According to research from the Berklee College of Music, in July 2023, fluctuations in temperature and humidity can significantly affect the wood and adhesives used in guitars.
1.1. Can Extreme Temperatures Damage A Guitar Bridge?
Yes, extreme temperatures can damage a guitar bridge.
High heat can melt the glue, loosening the acoustic guitar’s braces and warping the body due to string tension. This can detach the bridge. Also, high temperatures can soften the glue, leading to bridge sliding and affecting intonation. Leaving your guitar in a hot car can cause significant damage due to the greenhouse effect. Checking the acoustic quality during summer travel can help prevent temperature-related issues.
1.2. How Does Humidity Affect A Guitar Bridge?
Humidity can severely impact your guitar bridge.
High humidity causes the guitar to absorb moisture and swell, leading to cracks and affecting sound quality. Low humidity is more harmful because it shrinks the wood beneath the finish, bending the guitar’s top and loosening the bridge. According to Guitar Player Magazine, a humidity level of 50% is ideal for stringed instruments.
Tip: Using a humidifier in the guitar case during dry winter months can prevent wood shrinkage.
1.3. Can Poor Glue Quality Damage A Guitar Bridge?
Yes, bad glue quality or improper application can lead to a loose bridge.
If the glue used is not of good quality or the pasting procedure is not followed correctly, the bridge is likely to loosen. Cleaning and sanding the area before applying glue is essential. Therefore, it’s important to buy guitars from reputable brands and ensure proper gluing techniques are used during bridge replacements.
1.4. Can Warping Or Cracking Damage A Guitar Bridge?
Yes, warping or cracking can damage a guitar bridge.
While attached, the bridge doesn’t usually warp or crack, but these issues can arise once detached. Without connection to the guitar, string tension can crack or warp the bridge. Extreme dryness can also cause cracking. Additionally, the bridge plate, supporting string tension, can also be damaged.
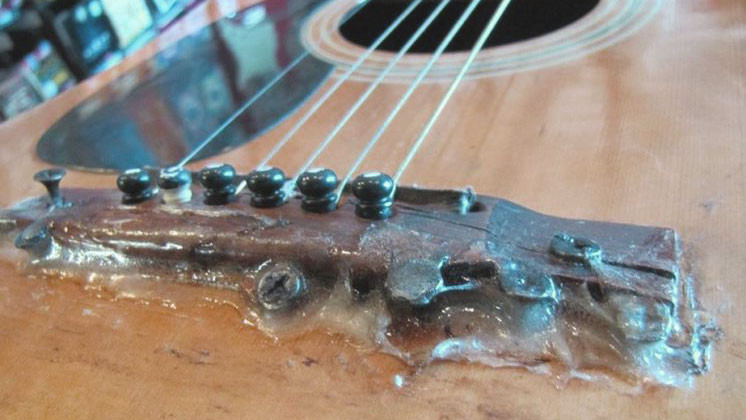 Cracked Acoustic Guitar Bridge
2. How To Prepare To Fix A Loose Acoustic Guitar Bridge?
To prepare to fix a loose acoustic guitar bridge, gather the necessary tools and assess the extent of the damage. Here are the things you need to do:
2.1. How To Determine If The Guitar Bridge Is Loose?
To determine if your guitar bridge is loose, look for gaps between the bridge and the guitar body. If the gap is small, try sliding a piece of paper into the joint to check for looseness. If there’s a gap, you’ll need to remove and refix the bridge.
2.2. How To Prepare For Bridge Removal?
To prepare for bridge removal, trace the bridge on card stock and cut it out to protect the guitar’s finish. This template helps prevent damage during removal.
3. How To Remove A Damaged Acoustic Guitar Bridge?
Removing a damaged acoustic guitar bridge involves carefully applying heat to loosen the glue and gently prying the bridge away from the guitar body.
3.1. How To Apply Heat To Loosen The Guitar Bridge?
Applying heat helps loosen the glue, making bridge removal easier. You can use a heating pad or a hot iron with a towel, being careful not to overheat and damage the guitar.
3.2. What Is The Correct Way To Remove The Bridge After Applying Heat?
After heating, use a blunt putty knife to gently remove the bridge. Take care not to disfigure the guitar or bridge by overheating or applying too much force. The bridge should loosen enough to avoid excessive force on the knife.
 Removing Acoustic Guitar Bridge
4. How To Prepare The Joint Before Gluing A Guitar Bridge?
Preparing the joint involves cleaning the guitar body and bridge surfaces thoroughly to ensure a strong bond with the new glue.
4.1. How To Clean The Guitar Body For Bridge Repair?
Cleaning the guitar body is critical for proper adhesion.
- Align the bridge using dowel pins.
- Temporarily attach it with double-sided tape.
- Outline the bridge with an X-acto knife.
- Protect the surrounding finish with masking tape.
- Remove the bridge and clean excess glue with a chisel and sandpaper.
Be cautious to avoid slipping with the chisel.
4.2. How To Clean The Guitar Bridge For Re-Attachment?
Cleaning the bridge involves scraping off old glue with sandpaper, ensuring the surface curvature remains unchanged. Use a radius block matching your guitar top’s radius to maintain the correct shape.
4.3. When Should You Consider Replacing The Guitar Bridge Instead Of Repairing It?
If the bridge is severely cracked or warped, consider replacing it. Replacement bridges are available from suppliers like StewMac.
5. How To Correctly Place The Bridge On The Guitar?
Proper placement of the bridge is essential for accurate intonation and playability.
5.1. How To Ensure Accurate Guitar Bridge Placement?
To ensure accuracy, mark the centerline of the bridge on both the guitar body and the front of the bridge. Use the existing bridge pin holes to align the bridge accurately, inserting wooden dowels through the string holes for precise positioning. These dowels can be drilled out after the bridge is secured.
6. Why Is A Trial Run Important Before Gluing The Guitar Bridge?
A trial run is crucial to test the fit and clamping setup before applying glue, ensuring everything aligns correctly.
6.1. How To Perform A Trial Run Before Gluing The Guitar Bridge?
Clamp the cleaned bridge in place without glue to test the setup. Use a deep C-clamp and a board cutout (caul) to apply even pressure. This step helps avoid repeating the entire procedure.
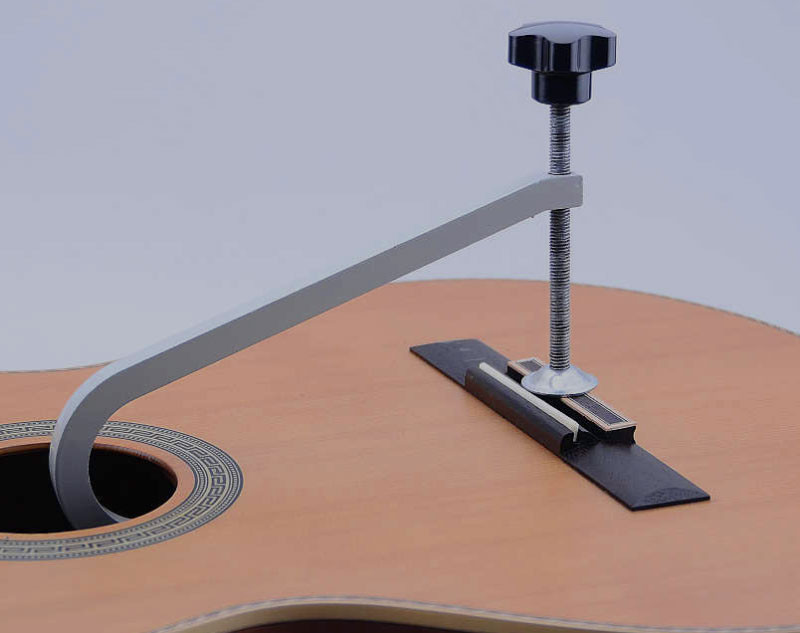 Acoustic Guitar Bridge C Clamp
7. What Is The Best Way To Apply Glue For Guitar Bridge Repair?
The best way to apply glue involves using a high-quality wood glue like Titebond and ensuring adequate coverage for a tight, secure connection.
7.1. What Type Of Glue Should Be Used For Gluing A Guitar Bridge?
Titebond is recommended as one of the best wood glues for guitar bridge repair due to its strong bonding properties.
7.2. How To Properly Apply Glue To The Guitar Bridge?
Apply an adequate amount of glue to the cleaned surfaces of the bridge and guitar body. Clamp the bridge to the body as in the trial run, ensuring it is properly aligned.
7.3. How Much Should The Clamp Be Tightened?
Tighten the clamp until some glue starts to squeeze out, indicating a secure bond.
8. How To Finish The Guitar Bridge Repair Process?
Finishing the guitar bridge repair involves cleaning excess glue, allowing the bridge to set, and restringing the guitar.
8.1. How To Clean Excess Glue After Clamping The Guitar Bridge?
Clean the excess glue with a paper towel or a damp, soft cloth immediately to prevent damage to the finish.
8.2. How Long Should The Guitar Bridge Be Clamped?
Allow the bridge to set by leaving it clamped overnight.
8.3. What Precautions Should Be Taken When Removing The Clamp?
Take precautions when removing the caul and clamp to prevent dents in the guitar.
8.4. What Is The Final Step After The Glue Has Dried?
Restring the guitar and tune it up. Your guitar should be as good as new.
9. What Are The Key Considerations For Maintaining An Acoustic Guitar To Prevent Bridge Damage?
Maintaining an acoustic guitar involves protecting it from extreme environmental conditions and ensuring proper care.
9.1. How To Protect A Guitar From Extreme Temperatures?
Avoid leaving your guitar in hot cars and monitor its condition during summer travel to prevent heat-related damage.
9.2. How To Maintain Proper Humidity Levels For A Guitar?
Use a humidifier in the guitar case during dry months to prevent wood shrinkage and maintain a humidity level of around 50%.
9.3. How To Inspect A Guitar Bridge Regularly?
Regularly inspect the bridge for any signs of loosening or damage. Address any issues promptly to prevent further problems.
10. What Are Some Advanced Repair Techniques For Guitar Bridges?
Advanced repair techniques include using specialized tools and materials for more complex bridge repairs, such as bridge plate reinforcement or complete bridge replacement.
10.1. What Is Bridge Plate Reinforcement And When Is It Necessary?
Bridge plate reinforcement involves adding a layer of material to the bridge plate to strengthen it against string tension. This is necessary when the bridge plate shows signs of wear or cracking.
10.2. What Tools Are Required For Advanced Guitar Bridge Repair?
Advanced repairs may require tools such as bridge removal jigs, precision clamps, and specialized glue applicators.
10.3. When Should A Professional Luthier Be Consulted For Guitar Bridge Repair?
Consult a professional luthier for complex issues such as severe cracking, warping, or when you are uncomfortable performing the repairs yourself. Luthiers have the expertise and tools to handle intricate repairs and ensure the guitar’s structural integrity.
FAQ: Repairing A Broken Guitar Bridge
1. Can I fix a broken guitar bridge myself?
Yes, you can fix a broken guitar bridge yourself if you have the right tools and follow the correct procedures. For minor issues like a loose bridge, the steps outlined above can be followed.
2. What is the best glue to use for repairing a guitar bridge?
Titebond Original Wood Glue is often recommended by luthiers for its strong bond and suitability for wood-to-wood connections.
3. How much does it cost to have a guitar bridge professionally repaired?
Professional guitar bridge repair costs vary depending on the extent of the damage and the luthier’s rates. A simple re-gluing might cost around $50 to $100, while a complete bridge replacement can range from $150 to $300 or more.
4. How do I prevent my guitar bridge from cracking?
Prevent guitar bridge cracking by maintaining proper humidity levels (around 50%), avoiding extreme temperature changes, and regularly inspecting the bridge for any signs of loosening or damage.
5. Is it better to repair or replace a damaged guitar bridge?
Whether to repair or replace depends on the severity of the damage. If the bridge is only slightly loose or has minor cracks, repair may be sufficient. However, if the bridge is severely cracked, warped, or structurally compromised, replacement is usually the better option.
6. Can a loose guitar bridge affect the sound of my guitar?
Yes, a loose guitar bridge can significantly affect the sound of your guitar. It can cause buzzing, reduced sustain, and poor intonation.
7. How often should I inspect my guitar bridge?
You should inspect your guitar bridge every time you change your strings or at least every few months. Regular inspections can help catch minor issues before they become major problems.
8. What are the signs of a failing guitar bridge?
Signs of a failing guitar bridge include visible gaps between the bridge and the guitar body, cracks in the bridge, lifting of the bridge edges, and changes in the guitar’s sound.
9. Can I use any type of clamp for gluing a guitar bridge?
No, you should use a deep C-clamp or specialized luthier’s clamps that can apply even pressure without damaging the guitar. It’s also important to use a caul (a shaped piece of wood or other material) to distribute the pressure evenly across the bridge.
10. What do I do if I accidentally damage the finish while removing the bridge?
If you accidentally damage the finish while removing the bridge, consult a professional luthier for touch-up or refinishing. Attempting to fix it yourself without the proper tools and knowledge could worsen the damage.
At guitarplayers.net, we’re dedicated to providing you with the resources and guidance you need to keep your guitar in top condition. Whether you’re looking for lessons, reviews, sheet music, or a community of fellow guitar enthusiasts, we’ve got you covered.
Ready to take your guitar playing to the next level? Visit guitarplayers.net today to explore our extensive library of lessons, discover in-depth gear reviews, find your favorite sheet music, and connect with a vibrant community of guitar players across the USA. Don’t wait—start your journey to guitar mastery with us now! Address: 1140 Boylston Street, Boston, MA 02215, United States. Phone: +1 (617) 747-2261. Website: guitarplayers.net.