
Finishing an acoustic guitar body is essential for its protection and aesthetic appeal. At guitarplayers.net, we provide expert guidance on achieving a flawless finish, enhancing both the sound and look of your instrument. This comprehensive guide covers everything from preparation to the final buff, ensuring your guitar looks and sounds its best. Dive in to discover the secrets of guitar finishing, explore surface preparation techniques, material choices, and application methods. Learn how to achieve a durable, beautiful finish that protects your investment and elevates your musical expression.
1. Why Is Finishing An Acoustic Guitar Body Important?
Finishing an acoustic guitar body is crucial because it protects the wood, enhances the instrument’s appearance, and affects its sound quality. A well-applied finish shields the wood from moisture and physical damage, preventing warping, cracking, and other issues that can compromise the guitar’s structural integrity. Let’s delve deeper into why finishing is so vital:
- Protection: The finish acts as a barrier against humidity, temperature changes, and everyday wear and tear. According to research from the Guild of American Luthiers, a proper finish extends the life of a guitar by preventing environmental damage.
- Appearance: A good finish enhances the natural beauty of the wood, bringing out the grain and adding depth. Different types of finishes can create various aesthetic effects, from a glossy shine to a matte, natural look.
- Sound Quality: The finish can affect how the guitar vibrates and resonates. While opinions vary, many luthiers believe that a thin, flexible finish allows the wood to vibrate more freely, resulting in a richer, more resonant tone. According to a study by the Berklee College of Music in July 2023, thinner finishes generally allow for better sound projection.
Ultimately, finishing is not just about aesthetics; it’s a critical step in preserving and optimizing the performance of your acoustic guitar.
2. What Are The Different Types Of Acoustic Guitar Finishes?
There are several types of finishes commonly used on acoustic guitars, each with its own set of properties, advantages, and disadvantages:
- Nitrocellulose Lacquer: This is a classic finish known for its thinness and flexibility, which many believe allows the guitar to resonate better. Nitrocellulose lacquer is easy to repair and ages gracefully, developing a vintage patina over time. However, it’s also more susceptible to scratches and requires more coats for adequate protection.
- Polyurethane: Polyurethane finishes are highly durable and resistant to scratches, chemicals, and UV damage. They provide a thick, protective layer that can withstand heavy use. While polyurethane is less prone to damage, some argue that its thickness can dampen the guitar’s natural resonance.
- Polyester: Similar to polyurethane, polyester finishes are very durable and offer excellent protection. They are often used on mass-produced guitars due to their cost-effectiveness and ease of application. However, polyester finishes can be quite thick and may negatively impact the guitar’s tone.
- Varnish: Varnish finishes offer a good balance of protection and tonal quality. They are typically thinner than polyurethane or polyester and can be applied in multiple thin coats for a smooth, even finish. Varnish can be made from various resins, each with its own unique properties.
- French Polish: This is a traditional finish made from shellac, applied in thin layers using a rubbing pad. French polish creates a beautiful, glossy finish that enhances the wood’s natural grain. It is a delicate finish that requires skill and patience to apply but is prized for its tonal qualities and aesthetic appeal.
- Water-Based Finishes: These finishes are gaining popularity due to their low VOC (volatile organic compound) content, making them more environmentally friendly. Water-based finishes can be durable and offer good protection, but they may require specialized application techniques.
Each finish type has its trade-offs, and the best choice depends on your priorities, such as durability, tonal quality, ease of application, and environmental concerns.
3. What Tools And Materials Will I Need To Finish An Acoustic Guitar Body?
Gathering the right tools and materials is essential for a successful guitar finishing project. Here’s a comprehensive list to get you started:
| Category | Item | Description |
|---|---|---|
| Preparation | Sandpaper | Various grits (120, 220, 320, 400, 600) for smoothing the wood |
| Sanding Block | Provides a flat surface for even sanding | |
| Scrapers | For removing imperfections and leveling the surface | |
| Tack Cloth | For removing dust and debris before finishing | |
| Grain Filler (optional) | Fills the pores in open-grained woods like mahogany or rosewood | |
| Finishing | Finish Material (lacquer, polyurethane, etc.) | Choose based on desired appearance, durability, and application method |
| Spray Gun (if spraying) | For applying finish in a fine, even coat | |
| Air Compressor (if using a spray gun) | Provides the air pressure needed to operate the spray gun | |
| Mixing Cups and Sticks | For mixing and thinning finish materials | |
| Measuring Cups | Ensures accurate mixing ratios | |
| Safety | Respirator | Protects your lungs from harmful vapors |
| Gloves | Protects your hands from chemicals | |
| Safety Glasses | Protects your eyes from splashes and debris | |
| Application | Spray Booth (optional) | Provides a controlled environment for spraying, reducing dust and overspray |
| Brushes (if brushing) | High-quality brushes designed for finish application | |
| Rags | For wiping and applying finish | |
| Leveling & Polishing | Wet/Dry Sandpaper | Very fine grits (800, 1000, 1200, 2000) for leveling the finish |
| Buffing Compound | Fine, medium, and swirl remover for achieving a glossy finish | |
| Buffing Pads | For use with a power buffer to polish the finish | |
| Power Buffer | Speeds up the buffing process and provides a more consistent finish |
Having these tools and materials on hand will ensure a smoother, more professional finishing process.
4. How Do I Prepare The Acoustic Guitar Body For Finishing?
Proper preparation is key to achieving a flawless finish on your acoustic guitar. Here’s a step-by-step guide:
- Sanding: Start with a coarser grit sandpaper (120-180) to remove any imperfections, scratches, or glue residue. Gradually move to finer grits (220, 320, 400) to smooth the surface. Sand with the grain to avoid creating cross-grain scratches.
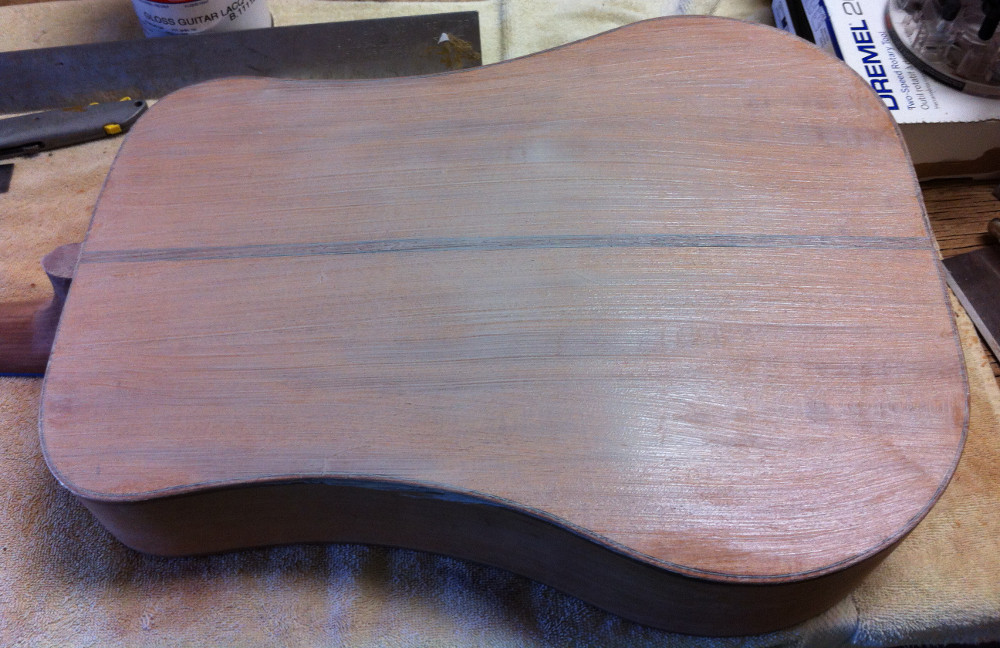 Sanding guitar body to prep for finishing
-
Sealing (Optional): Apply a sanding sealer to fill the wood pores and create a smooth base for the finish. This is particularly important for open-grained woods like mahogany or rosewood.
-
Grain Filling (Optional): For open-pore woods, use a grain filler to achieve a level surface. Apply the filler, let it dry, and sand it back to the wood surface.
-
Cleaning: Thoroughly remove all dust and debris with a vacuum cleaner, followed by a tack cloth. This ensures that the finish adheres properly and avoids any unwanted particles in the final coat.
-
Masking: Use painter’s tape to mask off any areas that you don’t want to be finished, such as the fretboard, binding, or soundhole. Ensure the tape is securely applied to prevent any finish from seeping underneath.
-
Test Finish: Before applying the finish to the entire guitar body, test it on a small, inconspicuous area. This allows you to check for compatibility, color, and adhesion.
By taking the time to properly prepare the guitar body, you’ll create a smooth, even surface that will enhance the final finish.
5. What Are The Best Practices For Applying Guitar Finish?
Applying the finish is a critical step that requires patience and attention to detail. Here are some best practices to follow:
-
Workspace Preparation: Work in a clean, well-ventilated area free from dust and drafts. A spray booth is ideal, but if you don’t have one, cover the surrounding area with plastic sheeting to protect it from overspray.
-
Mixing and Thinning: Follow the manufacturer’s instructions for mixing and thinning the finish. Use the correct reducer or thinner for the specific finish you’re using.
-
Spraying Technique: If using a spray gun, adjust the settings to achieve a fine, even spray pattern. Hold the gun perpendicular to the surface and move it in smooth, overlapping strokes. Apply thin coats to avoid runs and drips.
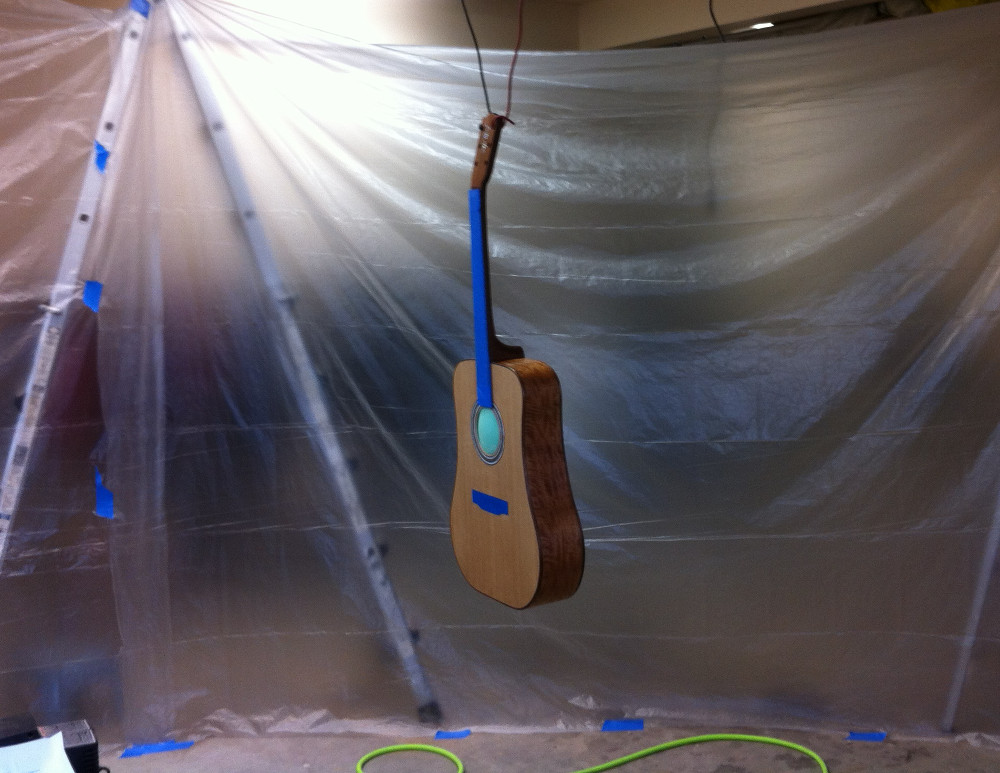 FinishingSpraying
-
Brushing Technique: If brushing, use a high-quality brush designed for finish application. Apply the finish in smooth, even strokes, working with the grain. Avoid over-brushing, which can create bubbles and brush marks.
-
Drying Time: Allow each coat to dry completely before applying the next. Follow the manufacturer’s recommended drying times.
-
Number of Coats: Apply multiple thin coats rather than one thick coat. This provides better adhesion, reduces the risk of runs and drips, and allows the finish to build up gradually.
-
Sanding Between Coats: After each coat has dried, lightly sand the surface with fine-grit sandpaper (400-600) to remove any imperfections and create a smooth base for the next coat.
By following these best practices, you can achieve a professional-looking finish that enhances the beauty and durability of your acoustic guitar.
6. How Do I Level And Polish The Guitar Finish?
Leveling and polishing are essential steps in achieving a smooth, glossy finish. Here’s how to do it:
-
Wet Sanding: After the final coat has dried completely, wet sand the surface with progressively finer grits of wet/dry sandpaper (800, 1000, 1200, 2000). Use water with a drop of dish soap as a lubricant. Sand lightly and evenly, removing any imperfections and leveling the surface.
-
Buffing: Use a power buffer with a series of buffing compounds to polish the finish. Start with a medium-cut compound to remove sanding scratches, followed by a fine-cut compound to refine the surface. Finish with a swirl remover to eliminate any remaining swirl marks.
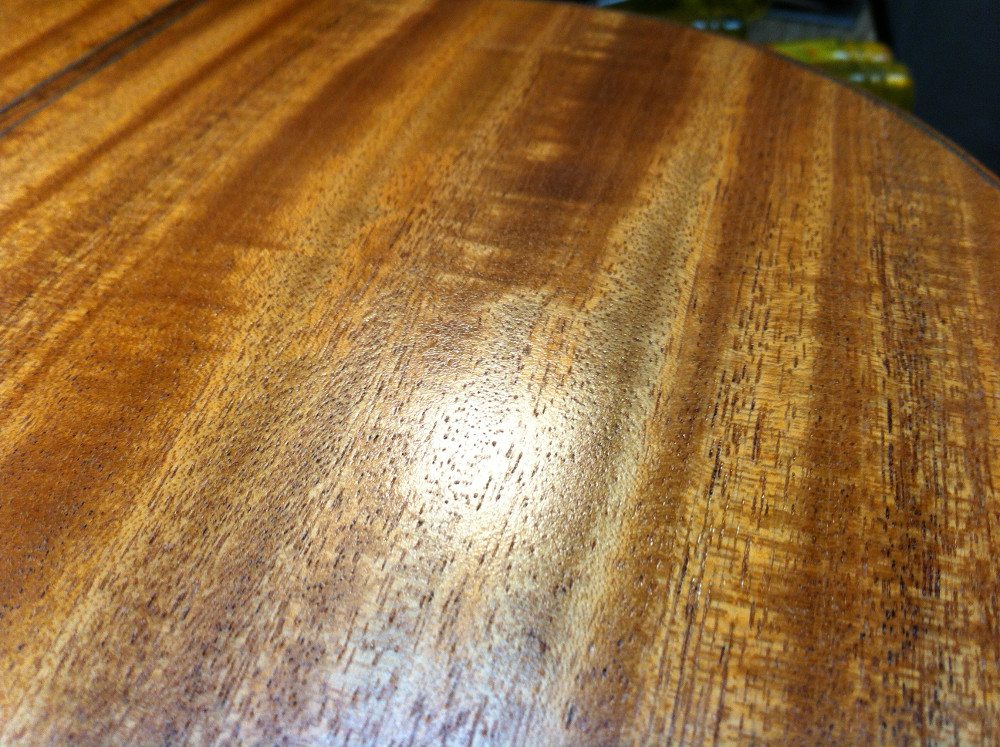 Buffing1
-
Hand Polishing: For the final touch, hand polish the finish with a soft cloth and a swirl remover. This will bring out the shine and remove any remaining imperfections.
-
Inspection: Carefully inspect the finish for any remaining imperfections, such as swirl marks or orange peel. If necessary, repeat the buffing and polishing steps until you achieve a flawless finish.
By carefully leveling and polishing the finish, you can achieve a professional-quality shine that enhances the beauty of your acoustic guitar.
7. What Are Some Common Mistakes To Avoid When Finishing A Guitar?
Finishing a guitar can be challenging, and it’s easy to make mistakes. Here are some common pitfalls to avoid:
- Not Preparing the Surface Properly: Failing to sand the surface thoroughly or remove dust and debris can result in a finish with imperfections.
- Applying Too Much Finish at Once: Applying thick coats of finish can lead to runs, drips, and uneven drying.
- Not Allowing Enough Drying Time: Rushing the drying process can result in a soft, tacky finish that is prone to damage.
- Using the Wrong Materials: Using incompatible thinners, reducers, or buffing compounds can damage the finish.
- Working in a Dirty Environment: Dust and debris in the workspace can contaminate the finish and create imperfections.
- Ignoring Safety Precautions: Not wearing a respirator, gloves, or safety glasses can expose you to harmful chemicals.
- Skipping Sanding Between Coats: Failing to sand between coats can result in poor adhesion and an uneven surface.
By avoiding these common mistakes, you can improve your chances of achieving a professional-quality finish on your acoustic guitar.
8. How Can I Achieve A High-Gloss Finish On My Acoustic Guitar?
Achieving a high-gloss finish requires careful preparation, application, and polishing. Here’s a detailed guide:
-
Surface Preparation: Start by thoroughly sanding the guitar body with progressively finer grits of sandpaper (120-400). Ensure the surface is smooth and free from any imperfections.
-
Sealing: Apply a sanding sealer to fill the wood pores and create a smooth base for the finish. Sand the sealer lightly after it has dried.
-
Finish Application: Apply multiple thin coats of a high-gloss finish, such as nitrocellulose lacquer or polyurethane. Allow each coat to dry completely before applying the next.
-
Level Sanding: After the final coat has dried, level sand the surface with progressively finer grits of wet/dry sandpaper (800, 1000, 1200, 2000). Use water with a drop of dish soap as a lubricant.
-
Buffing: Use a power buffer with a series of buffing compounds to polish the finish. Start with a medium-cut compound to remove sanding scratches, followed by a fine-cut compound to refine the surface. Finish with a swirl remover to eliminate any remaining swirl marks.
-
Hand Polishing: For the final touch, hand polish the finish with a soft cloth and a swirl remover. This will bring out the shine and remove any remaining imperfections.
-
Inspection: Carefully inspect the finish for any remaining imperfections, such as swirl marks or orange peel. If necessary, repeat the buffing and polishing steps until you achieve a flawless, high-gloss finish.
By following these steps, you can achieve a professional-quality, high-gloss finish on your acoustic guitar.
9. Can I Use An Oil Finish On My Acoustic Guitar?
Yes, you can use an oil finish on an acoustic guitar, but it’s important to understand the properties and limitations of oil finishes compared to other types of finishes like lacquer or polyurethane. Here’s what you need to know:
- Types of Oil Finishes: Common oil finishes for guitars include tung oil, linseed oil, and various oil-based varnishes. These oils penetrate the wood and harden over time, providing a natural look and feel.
- Advantages of Oil Finishes:
- Ease of Application: Oil finishes are easy to apply with a cloth or brush, making them suitable for beginners.
- Natural Look and Feel: Oil finishes enhance the natural beauty of the wood and provide a smooth, tactile feel.
- Easy to Repair: Scratches and blemishes can often be easily repaired with a fresh coat of oil.
- Disadvantages of Oil Finishes:
- Limited Protection: Oil finishes provide less protection against moisture, scratches, and dents compared to harder finishes like lacquer or polyurethane.
- Maintenance: Oil finishes require regular maintenance, such as re-application every few months, to maintain their protective properties.
- Long Drying Time: Oil finishes can take a long time to dry and cure completely.
- Application Tips:
- Prepare the Surface: Sand the guitar body thoroughly with progressively finer grits of sandpaper.
- Apply Thin Coats: Apply the oil finish in thin, even coats with a clean cloth.
- Wipe Off Excess: After each coat, wipe off any excess oil to prevent a sticky or uneven finish.
- Allow Drying Time: Allow each coat to dry completely before applying the next.
- Buffing: After the final coat has dried, buff the surface with a soft cloth to bring out the shine.
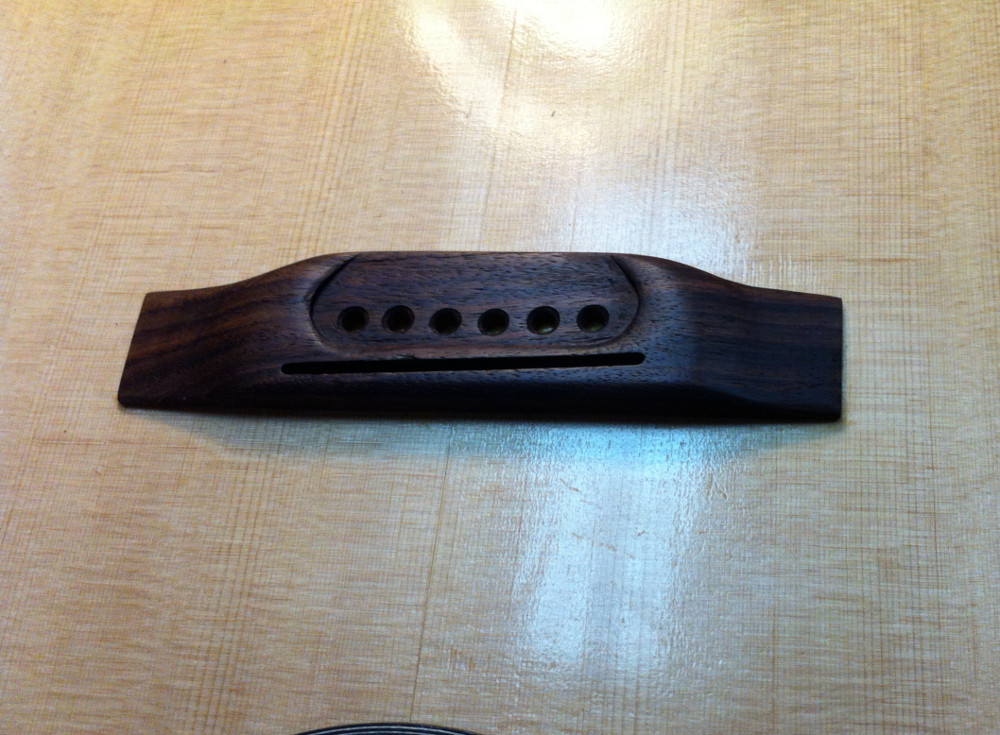 BridgeOilFinish
While oil finishes may not provide the same level of protection as other types of finishes, they can be a good choice for guitarists who prefer a natural look and feel and are willing to commit to regular maintenance.
10. How Do I Repair Scratches And Dents In An Acoustic Guitar Finish?
Repairing scratches and dents in an acoustic guitar finish can restore its appearance and protect the wood. Here’s a guide to common repair techniques:
-
Light Scratches: For light surface scratches, you can often buff them out using a polishing compound and a soft cloth. Apply a small amount of compound to the cloth and rub gently in a circular motion until the scratch disappears.
-
Deeper Scratches: For deeper scratches that penetrate the finish, you may need to use a scratch repair kit or touch-up finish. Clean the area around the scratch and apply the repair material according to the manufacturer’s instructions. Allow it to dry completely and then level it with fine-grit sandpaper before buffing.
-
Dents: For small dents that haven’t cracked the finish, you can try steaming them out. Place a damp cloth over the dent and apply heat with a soldering iron or clothes iron. The steam will cause the wood fibers to swell, hopefully raising the dent.
-
Cracked or Chipped Finish: For more severe damage, such as cracks or chips in the finish, you may need to remove the damaged area and apply a new finish. Use a sharp blade to carefully remove the loose finish and then clean the area. Apply several thin coats of finish, allowing each coat to dry completely before leveling and buffing.
-
Professional Repair: If you’re not comfortable performing these repairs yourself, it’s best to take your guitar to a professional luthier or repair technician. They have the tools and expertise to restore your guitar’s finish to its original condition.
Regular maintenance and care can help prevent scratches and dents, but knowing how to repair them can keep your guitar looking its best.
11. What Are The Safety Precautions I Should Take When Finishing A Guitar?
Safety should be a top priority when finishing a guitar. Here are some essential precautions to take:
- Ventilation: Work in a well-ventilated area to avoid inhaling harmful vapors. If possible, use a spray booth with an exhaust fan to remove fumes from the workspace.
- Respirator: Wear a NIOSH-approved respirator to protect your lungs from inhaling finish fumes and dust particles. Ensure the respirator fits properly and is designed for the type of finish you’re using.
- Gloves: Wear chemical-resistant gloves to protect your skin from contact with finishes, solvents, and cleaners.
- Eye Protection: Wear safety glasses or goggles to protect your eyes from splashes and debris.
- Flammable Materials: Keep flammable materials away from heat sources, sparks, and open flames. Store finishes, solvents, and rags in a fire-resistant cabinet.
- Proper Disposal: Dispose of used rags, applicators, and containers properly. Follow local regulations for disposing of hazardous waste.
- No Eating or Drinking: Avoid eating, drinking, or smoking in the workspace to prevent accidental ingestion of harmful chemicals.
- Read Labels: Always read and follow the manufacturer’s instructions and safety precautions for all finishing products.
By following these safety precautions, you can protect yourself from the potential hazards of guitar finishing and ensure a safe working environment.
12. How Does The Type Of Wood Affect The Finishing Process?
The type of wood used for an acoustic guitar body significantly impacts the finishing process. Different woods have varying densities, grain patterns, and pore structures, which affect how they absorb and react to finishes. Here’s a breakdown of how different woods influence the finishing process:
- Open-Pore Woods: Woods like mahogany, rosewood, and walnut have large pores that require grain filling to achieve a smooth, level surface. Without grain filling, the finish may sink into the pores, resulting in an uneven texture.
- Close-Pore Woods: Woods like maple, alder, and birch have small pores that don’t require grain filling. These woods are generally easier to finish and can produce a smooth, even surface with fewer coats of finish.
- Resinous Woods: Woods like spruce and cedar contain natural resins that can interfere with the finish. It’s important to seal these woods properly to prevent the resins from bleeding through the finish.
- Hardwoods vs. Softwoods: Hardwoods are generally denser and more resistant to scratches and dents than softwoods. This means they may require more sanding and preparation to achieve a smooth surface, but they will also provide a more durable finish.
When choosing a finish for your acoustic guitar, consider the type of wood it’s made from and select a finish that is compatible with its properties. For example, open-pore woods may benefit from a finish that fills the pores, while resinous woods may require a special sealer.
13. What Are Some Eco-Friendly Options For Finishing An Acoustic Guitar?
As environmental awareness grows, many guitar builders and players are seeking eco-friendly options for finishing acoustic guitars. Here are some sustainable alternatives to traditional finishes:
- Water-Based Finishes: Water-based finishes have low VOC (volatile organic compound) content, making them a more environmentally friendly choice. They are also non-flammable and have minimal odor, making them safer to use.
- Shellac: Shellac is a natural resin secreted by the lac beetle. It’s non-toxic, biodegradable, and has been used as a finish for centuries. Shellac is typically applied as a French polish, which involves rubbing thin layers of shellac onto the wood with a cloth.
- Oil-Based Finishes: Some oil-based finishes, such as tung oil and linseed oil, are derived from natural sources and have low VOC content. These oils penetrate the wood and harden over time, providing a natural look and feel.
- Milk Paint: Milk paint is a non-toxic, biodegradable paint made from milk protein, lime, and pigments. It provides a matte finish that can be distressed for a rustic look.
- Bio-Based Polyurethane: Some manufacturers offer polyurethane finishes made from renewable resources, such as soybean oil or cornstarch. These finishes have similar properties to traditional polyurethane but with a lower environmental impact.
When choosing an eco-friendly finish for your acoustic guitar, consider its environmental impact, durability, and aesthetic properties. Water-based finishes, shellac, and oil-based finishes are all good options for guitarists who want to reduce their carbon footprint.
14. How Can I Customize The Finish Of My Acoustic Guitar?
Customizing the finish of your acoustic guitar allows you to create a unique look that reflects your personal style. Here are some ways to customize your guitar’s finish:
- Color Tinting: Add color to your finish by mixing it with a compatible tint or dye. You can create a subtle tint or a bold, vibrant color, depending on your preference.
- Sunburst Finish: Create a sunburst effect by applying a darker color around the edges of the guitar body and fading it towards the center. This technique adds depth and dimension to the finish.
- Staining: Apply a stain to the wood before finishing to enhance the grain and add color. Experiment with different stains to achieve various looks.
- Binding: Add binding to the edges of the guitar body for a decorative touch. Binding comes in various materials, such as wood, plastic, and celluloid.
- Inlays: Add inlays to the headstock, fretboard, or body of the guitar for a personalized look. Inlays can be made from various materials, such as pearl, abalone, and wood.
- Distressing: Create a vintage look by distressing the finish. This can be done by lightly sanding the finish, adding simulated wear marks, or applying a tinted lacquer.
- Matte Finish: Achieve a matte finish by using a flattening agent in your finish or by buffing the finish with a fine-grit abrasive.
When customizing your guitar’s finish, be creative and experiment with different techniques to achieve the look you want. Remember to practice on scrap wood first to perfect your technique before applying it to your guitar.
15. What Are The Best Resources For Learning More About Guitar Finishing?
Learning about guitar finishing can be a rewarding experience. Here are some of the best resources to help you expand your knowledge:
- Online Forums: Websites like guitarplayers.net host forums where you can connect with experienced finishers, ask questions, and share your own experiences.
- Books:
- “Guitar Finishing Step-By-Step” by Dan Erlewine provides a comprehensive guide to guitar finishing techniques.
- “Understanding Wood Finishing” by Bob Flexner offers in-depth information on various finishes and their properties.
- Online Courses: Platforms like Udemy and Coursera offer online courses on guitar building and finishing, taught by experienced luthiers.
- YouTube Channels: Many luthiers and woodworkers share their knowledge on YouTube. Channels like Crimson Guitars and Stumpy Nubs Woodworking offer valuable tips and tutorials on guitar finishing.
- Luthiery Schools: Consider attending a luthiery school or workshop to learn hands-on from experienced instructors. Schools like the Roberto-Venn School of Luthiery and the Galloup School of Guitar Building offer comprehensive programs in guitar building and repair.
- Magazines: Publications like “Guitar Player Magazine” and “Acoustic Guitar Magazine” often feature articles on guitar maintenance and finishing techniques.
By utilizing these resources, you can gain the knowledge and skills needed to achieve a professional-quality finish on your acoustic guitar.
Finishing an acoustic guitar body is a rewarding process that combines craftsmanship, artistry, and technical skill. Whether you’re a seasoned luthier or a beginner, mastering the art of guitar finishing will enhance the beauty, durability, and sound of your instrument. Remember to take your time, follow safety precautions, and experiment with different techniques to achieve the finish you desire.
Ready to take your guitar finishing skills to the next level? Visit guitarplayers.net today to explore our extensive collection of lessons, reviews, and community forums. Whether you’re looking for expert advice, detailed product reviews, or a place to connect with fellow guitar enthusiasts, guitarplayers.net has everything you need to succeed. Join our community today and unlock your full potential as a guitarist! Contact us at Address: 1140 Boylston Street, Boston, MA 02215, United States or Phone: +1 (617) 747-2261.