Changing your acoustic guitar strings is a fundamental skill for any guitar player. Fresh strings not only make your guitar sound brighter and more resonant but also ensure better tuning stability and overall playability. This step-by-step guide will walk you through the process of restringing your acoustic guitar, making it easy even for beginners. Let’s get started and revitalize your guitar’s sound!
First, before we dive into the steps, it’s a good practice to take this opportunity to clean your guitar. With the strings off, you can reach areas that are normally inaccessible.
This is STEP 6 in the process. Now is the perfect time to give your guitar a thorough cleaning. Dust and grime can accumulate in areas that are hard to reach with the strings on. Pay special attention to the fretboard, saddle, bridge, and pickguard (if your guitar has one). A clean guitar not only looks better but can also contribute to the longevity of your instrument.
 Close-up of acoustic guitar bridge and saddle being cleaned, emphasizing guitar maintenance
STEP 7 involves fretboard care. If your acoustic guitar has a dark wood fretboard, like rosewood or ebony, using lemon oil can help keep the wood hydrated and prevent it from drying out and cracking.
Apply a few drops of lemon oil to a clean cloth. Ensure you are using genuine lemon oil specifically designed for guitars, as household cleaners can damage the wood.
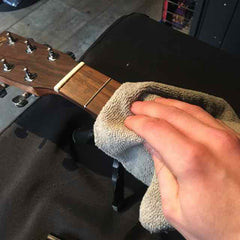
 Applying lemon oil to a rosewood fretboard of an acoustic guitar for conditioning
STEP 8 focuses on the application of lemon oil. Gently work the lemon oil into the fretboard wood, moving along the grain of the wood. Don’t wipe it away immediately; allow a small amount to soak into the wood for about 30 seconds. This allows the oil to penetrate and nourish the fretboard.
 Close-up of lemon oil being worked into the acoustic guitar fretboard
STEP 9 extends the hydration to the bridge. If your acoustic guitar bridge appears dry, you can also lightly hydrate it with lemon oil. However, it’s crucial to remove the saddle first or avoid applying lemon oil directly to it. Lemon oil on the saddle can cause the strings to slip, affecting tuning stability and performance.
Moving onto STEP 10, it’s time to prepare your new strings. Open your new pack of acoustic guitar strings and take a moment to familiarize yourself with the string order. Acoustic guitar strings are typically ordered from thickest to thinnest, and it’s crucial to install them in the correct positions for proper tuning and playability. Knowing the string order beforehand will make the restringing process smoother.
STEP 11 is about preparing the string end that goes into the bridge. Create a 45-degree bend at the ball end of the string. This small bend is a helpful trick to ensure the ball end sits securely against the bridge plate inside the guitar body. This proper seating improves tuning stability and string resonance.
In STEP 12, insert the string into the bridge. Push the ball end of the string into the bridge hole, and then insert the bridge pin to secure it. Make sure the string’s tail sits in the groove of the bridge pin. Crucially, ensure that this groove is pointing straight down towards the guitar neck. This alignment is vital for proper string tension and prevents buzzing or string slippage.
STEP 13 is repetition for the remaining strings. Repeat the process from Step 12 for the other five strings. After inserting each string and pin, gently pull on the tail of the string to ensure the ball end is firmly seated against the bottom of the bridge plate inside the guitar. This ensures all strings are anchored correctly at the bridge.
Now we move to the headstock in STEP 14. Before threading the strings through the machine heads, make sure the holes in each machine head are oriented straight down the neck. This starting position makes string insertion easier and sets up for optimal winding direction in later steps.
STEP 15 involves threading the string to the machine head. Draw the string across the saddle, over the nut, and then thread it through the hole in the corresponding machine head. Ensure the string sits properly in the nut slot and on the saddle to maintain correct string spacing and action.
STEP 16 deals with measuring string length for winding. Pull the string taut and measure the length up to the next machine head along the headstock. This measurement provides the correct amount of slack to create a sufficient number of winds around the machine head post. This proper string winding technique is crucial for tuning stability.
STEP 17 is about winding the string onto the machine head. Pull the excess string length you measured back through the machine head post. Begin winding the machine head counter-clockwise for the lower strings (E, A, D) and clockwise for the higher strings (G, B, e). Maintain slight tension on the string as you wind to keep your measurement and ensure neat wraps. The string coming from the nut should always be on the inside of the machine head post.
In STEP 18, focus on neat winding technique. Make sure the new string wraps go under the previous wrap, effectively pushing the previous wrap upwards towards the top of the machine head post. This technique creates a clean and secure string winding, further enhancing tuning stability and preventing string slippage.
STEP 19 is the initial tightening of the string. Begin tightening the string by turning the machine head, increasing tension gradually. A couple of winds around the post at this stage should be sufficient to hold the string in place and start bringing it up to pitch later. Avoid over-tightening at this stage, as it can put unnecessary stress on the neck before all strings are installed.
STEP 20 is trimming excess string. Take wire cutters and trim off the excess string extending beyond the machine head post. Cut as close to the post as safely possible to achieve a neat and professional look and prevent the sharp ends from poking you or anything else.
STEP 21 is repeating for all strings. Repeat steps 15 through 20 for the remaining five strings. It’s generally a good practice to work from the thickest string to the thinnest, or vice versa, to maintain a balanced tension on the guitar neck throughout the restringing process.
In STEP 22, it’s time to tune up. Once all the strings are installed, begin bringing them up to pitch. Tune gradually, moving back and forth between each string. This prevents uneven tension build-up on the neck. Using a clip-on guitar tuner makes this process accurate and easy.
Finally, STEP 23 is crucial for tuning stability: stretching the strings. New strings need to be stretched to hold their tuning properly. After tuning to pitch, firmly grasp each string near the soundhole and gently pull upwards a few times. You’ll hear the pitch drop as the string stretches. Retune the guitar after stretching each string. Repeat this stretch-and-tune process a few times until the strings hold their pitch after stretching. This step is vital to avoid constant retuning and ensure your guitar is ready to play. After stretching and retuning, your acoustic guitar is now freshly strung and ready to play!

