Changing your acoustic guitar strings is a fundamental skill for any guitarist. Fresh strings not only revitalise your guitar’s sound, making it brighter and more resonant, but also improve tuning stability and playability. This guide provides a comprehensive, step-by-step walkthrough on how to change acoustic guitar strings, ensuring your instrument sounds its best.
Preparing Your Guitar for New Strings
Before installing new strings, take advantage of the opportunity to clean and condition your guitar.
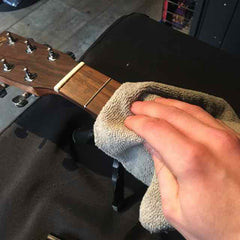
Step 1: Deep Clean Your Guitar
With the old strings removed, you have full access to areas that are usually hard to reach. Now is the perfect time for a deep clean. Use a soft, dry cloth to wipe down the fretboard, saddle, bridge, and soundboard. Pay attention to removing dust and grime buildup, especially around the bridge and soundhole. If your guitar has a pickguard (scratchplate), clean under and around it as well.
 Cleaning the guitar body and bridge
Step 2: Condition the Fretboard with Lemon Oil
If your acoustic guitar has a dark wood fretboard like rosewood or ebony, conditioning it with lemon oil is beneficial. Apply a few drops of lemon oil to a clean cloth.
 Applying lemon oil to the fretboard
Step 3: Hydrate the Fretboard Wood
Gently rub the lemon oil into the fretboard wood, working it up and down the neck. Allow a small amount of oil to soak in for about 30 seconds to nourish the wood and prevent it from drying out. Don’t wipe it all away immediately, as the wood needs time to absorb the moisture.
 Working lemon oil into the acoustic guitar fretboard
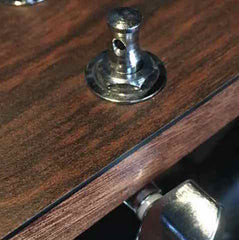
Step 4: Condition the Bridge (Optional)
If your guitar bridge appears dry, you can also lightly hydrate it with lemon oil. However, be cautious and avoid getting oil on the saddle, or remove the saddle beforehand. Lemon oil on the saddle can cause the strings to slip, affecting tuning stability.
 Hydrating the acoustic guitar bridge with lemon oil
Installing New Acoustic Guitar Strings
Now that your guitar is clean and prepped, it’s time to install the new strings.
Step 5: Prepare Your New Strings
Open your new set of acoustic guitar strings. Familiarize yourself with the string order – usually indicated on the packaging, from thickest (low E) to thinnest (high E). Understanding this order is crucial for correctly restringing your guitar.
 New set of acoustic guitar strings packaging
Step 6: Bend the String End
Take the thickest string (low E) and create a 45-degree bend at the ball end. This bend helps secure the string’s ball end against the bridge plate inside the guitar body, improving tuning stability and preventing slippage.
 Bending the end of a new acoustic guitar string
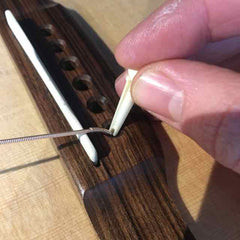
Step 7: Insert String and Bridge Pin
Insert the ball end of the string into the correct bridge hole. Place the bridge pin back into the hole, ensuring the string’s tail sits in the pin’s groove. The groove should be facing towards the soundhole, directly down the guitar neck, to properly secure the string.
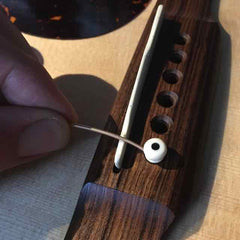 Inserting the string and bridge pin into the guitar bridge
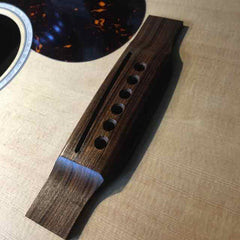
Step 8: Secure the Bridge Pins
Repeat steps 6 and 7 for the remaining five strings, working from thickest to thinnest. After inserting each string and pin, gently pull on the tail of each string to ensure the ball end is firmly seated against the bridge plate.
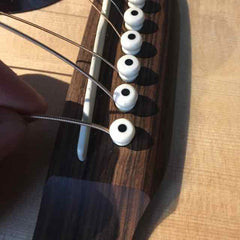 All bridge pins inserted with new strings
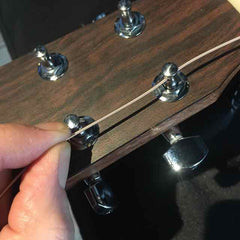
Step 9: Prepare Machine Heads
Ensure the holes in each machine head (tuning peg) are aligned straight down the neck. This positioning makes string insertion easier and helps with winding consistency.
 Machine heads aligned straight down the neck
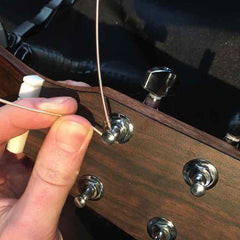
Step 10: Thread Strings Through Machine Heads
Take the low E string and guide it over the saddle, across the nut, and thread it through the hole in its corresponding machine head.
 Threading the string through the machine head
Step 11: Measure String Length for Winding
Pull the string taut and measure approximately two machine heads past its designated tuning peg. This length provides enough string to wrap around the post several times, enhancing tuning stability.
 Measuring string length for winding around machine head
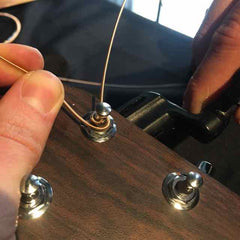
Step 12: Begin Winding the String
Pull the excess string back through the machine head post. Begin winding the tuning peg counter-clockwise (for the lower strings – E, A, D; and clockwise for the higher strings – G, B, e). Maintain tension on the string as you wind, ensuring the measured length remains consistent. The string coming from the nut should be on the inside of the post.
 Winding the string around the machine head post
Step 13: Ensure Proper String Wraps
As you wind, make sure the new string wraps go below the previous wraps, effectively pushing them downwards. This technique helps to lock the string in place and further improves tuning stability.
 Proper string wraps on the machine head post
Step 14: Initial String Tension
Continue tightening the string until it has a slight amount of tension. A couple of winds around the post at this stage should be sufficient to hold the string in place while you proceed with the rest.
 Initial tension on the new guitar string
Step 15: Trim Excess String
Using wire cutters, trim off the excess string length. Cutting close to the machine head makes for a neater appearance and prevents the sharp ends from getting in the way.
 Trimming excess acoustic guitar string
Step 16: Restring Remaining Strings
Repeat steps 10-15 for the remaining five strings, working your way from the thickest to the thinnest.
 All six new strings installed on the acoustic guitar
Tuning and Stretching Your New Strings
With all the strings installed, the final steps are tuning and stretching.
Step 17: Tune to Pitch
Once all strings are on, use a tuner to bring them up to the correct pitch. Gradually increase tension on each string, moving back and forth between them. This ensures even tension across the guitar neck, preventing stress and potential damage. A clip-on tuner is particularly handy for acoustic guitars.
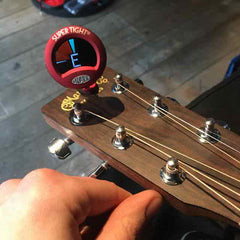 Tuning new guitar strings with a clip-on tuner
Step 18: Stretch the Strings
Stretching new strings is crucial to prevent them from constantly going out of tune. Gently stretch each string by pulling it away from the fretboard in the middle, then retune. Repeat this process several times until the strings hold their pitch consistently. This step saves considerable time and frustration by minimizing retuning needs later. After stretching and re-tuning, your guitar should be ready to play!
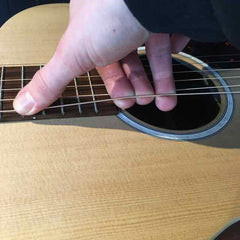 Stretching the new acoustic guitar strings
By following these steps, you can confidently change your acoustic guitar strings and enjoy the refreshed sound and feel of your instrument. Regular string changes are a vital part of guitar maintenance, ensuring optimal performance and longevity.