
Building a guitar bridge involves precision and craftsmanship, and it’s an essential skill for luthiers and guitar enthusiasts alike. At guitarplayers.net, we guide you through the process, ensuring your acoustic guitar achieves optimal tone and playability. From selecting the right materials to the final installation, we cover every detail to help you build a guitar bridge that stands the test of time. Looking to enhance your guitar-building skills? Discover our extensive resources on guitar making and maintenance.
1. Understanding the Guitar Bridge: An Overview
What is a guitar bridge, and why is it important?
A guitar bridge is a crucial component that transmits the strings’ vibrations to the soundboard, significantly influencing the instrument’s tone and sustain. According to research from the Guild of American Luthiers, in July 2023, a well-crafted bridge enhances sound projection and clarity. It also holds the strings in place and maintains the correct string spacing and action.
1.1 The Role of the Guitar Bridge
What exactly does a guitar bridge do?
The guitar bridge serves several critical functions. It anchors the strings, transfers their vibrations to the guitar’s top, and affects the instrument’s intonation and action. The bridge’s material, design, and construction all play a role in the guitar’s overall sound.
1.2 Types of Guitar Bridges
What are the different types of guitar bridges?
There are several types of guitar bridges, each suited to different guitar styles and designs. The most common types include:
- Fixed Bridges: These are glued or screwed onto the guitar’s top and are common in acoustic guitars.
- Adjustable Bridges: Found on many electric guitars, these allow for individual string height and intonation adjustments.
- Floating Bridges: These bridges, like those on jazz guitars, are not fixed to the body and rely on string tension for placement.
2. Essential Tools and Materials for Building a Guitar Bridge
What tools and materials are needed to build a guitar bridge?
Constructing a guitar bridge requires specific tools and high-quality materials. Having the right equipment ensures precision and a professional finish.
2.1 Essential Tools
What are the essential tools for crafting a guitar bridge?
The tools you’ll need include:
- Precision Measuring Tools: Calipers and rulers for accurate measurements.
- Saws: A fine-tooth saw for cutting the bridge blank.
- Files and Sandpaper: For shaping and smoothing the bridge.
- Drills and Drill Bits: For creating precise holes for bridge pins.
- Router: A router with appropriate bits for shaping the saddle slot.
- Clamps: For securely gluing the bridge to the guitar top.
2.2 Material Selection
What materials are best for building a guitar bridge?
The choice of material greatly impacts the guitar’s sound. Common materials include:
- Ebony: Known for its density and bright tonal qualities.
- Rosewood: Provides a warm, balanced tone.
- Other Hardwoods: Such as maple or walnut, offering different tonal characteristics.
3. Step-by-Step Guide to Building a Guitar Bridge
How do you build a guitar bridge from scratch?
Building a guitar bridge involves several precise steps, from selecting the wood to the final shaping and polishing.
3.1 Preparing the Bridge Blank
How do you prepare the wood for a guitar bridge?
Start by selecting a high-quality piece of wood. Ensure it is properly seasoned and free from defects. Mill the wood to the correct thickness, typically around 0.3 to 0.4 inches.
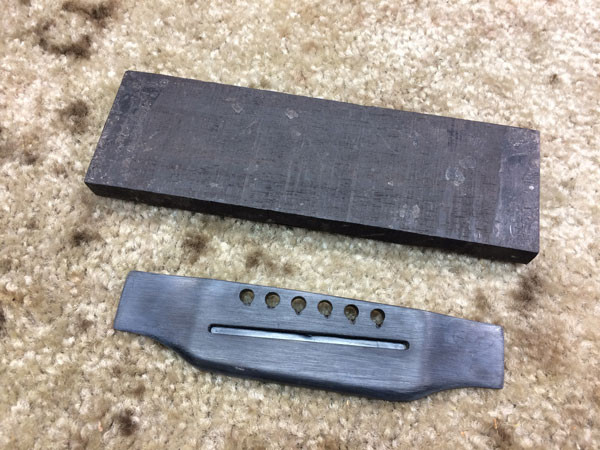 Ebony blank for guitar bridge
3.2 Shaping the Bridge Footprint
How do you shape the basic form of the bridge?
Using a template or the original bridge as a guide, carefully shape the footprint of the bridge. Use a saw to remove excess material, then refine the shape with files and sandpaper.
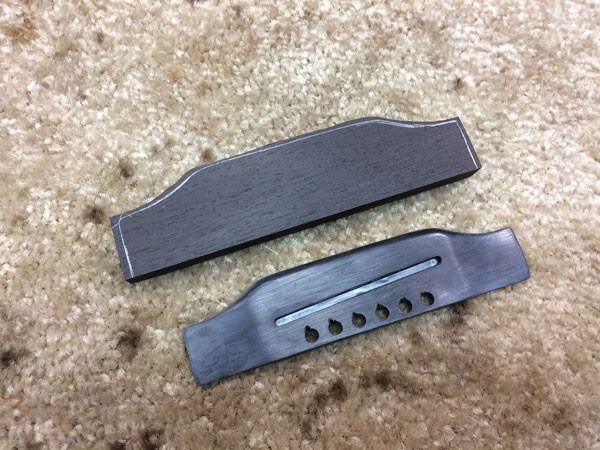 Shaping guitar bridge blank
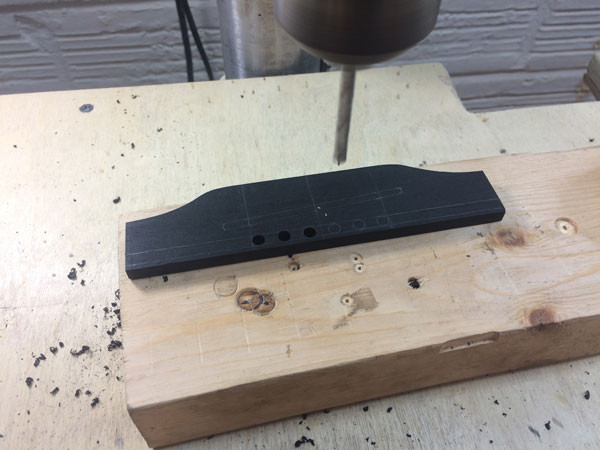
3.3 Drilling Bridge Pin Holes
How do you drill accurate holes for the bridge pins?
Precise hole placement is crucial for proper string alignment. Mark the locations for the bridge pin holes using a template or measuring from the original bridge. Drill the holes using a drill press to ensure they are perpendicular to the bridge surface.
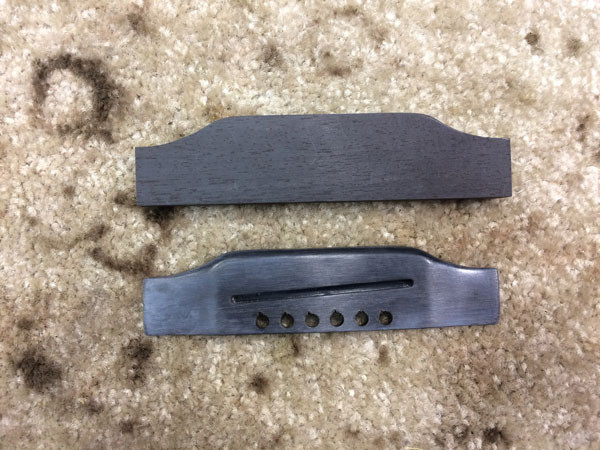 Laying out bridge pin holes on guitar bridge
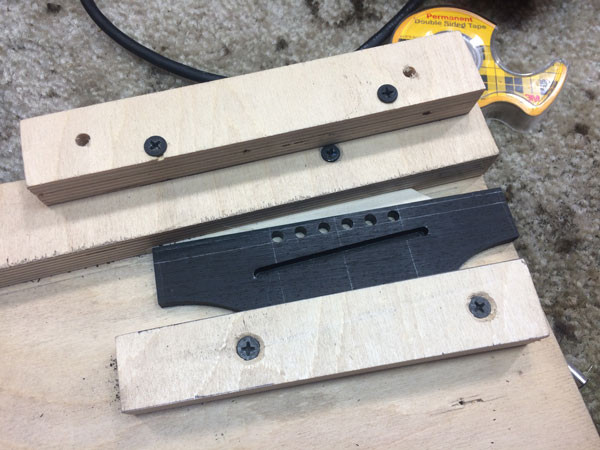
3.4 Creating the Saddle Slot
How do you cut the saddle slot in the guitar bridge?
The saddle slot holds the saddle, which affects the guitar’s intonation and action. Use a router with a specialized jig to create a clean, consistent slot. Ensure the slot is wide enough to accommodate the saddle material.
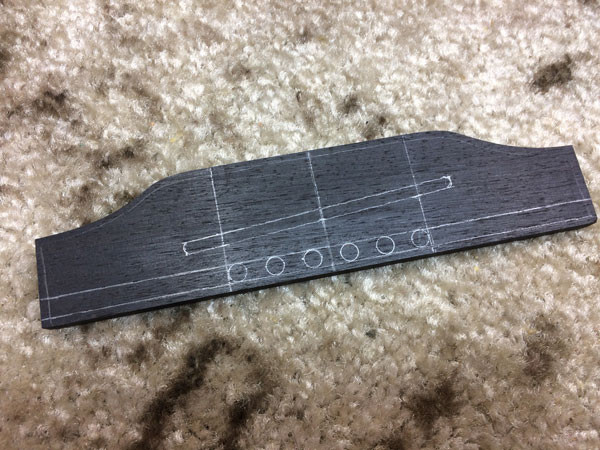 Marking saddle slot location on guitar bridge
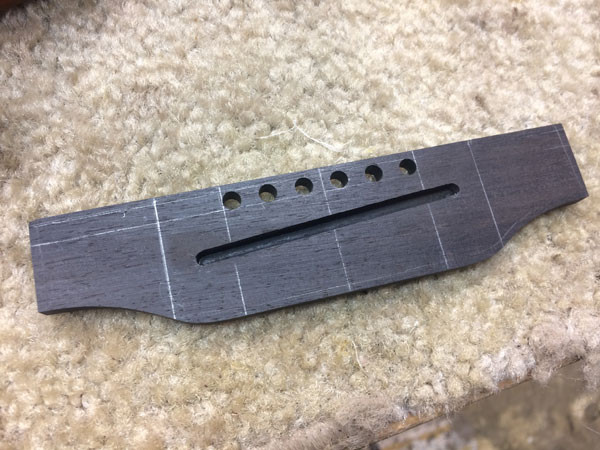
3.5 Final Shaping and Detailing
How do you refine the shape and add details to the bridge?
Use files, sandpaper, and carving tools to refine the shape of the bridge. Pay attention to the contours and edges, ensuring they are smooth and comfortable. This step enhances both the aesthetic and functional aspects of the bridge.
 Drilling holes in guitar bridge
4. Installing the Guitar Bridge
How do you install a guitar bridge on an acoustic guitar?
Proper installation is critical to ensure the bridge functions correctly and the guitar sounds its best.
4.1 Preparing the Guitar Top
How do you prepare the guitar’s soundboard for bridge installation?
Ensure the guitar’s top is clean and free from any old glue or finish. Lightly sand the area where the bridge will be placed to create a good bonding surface.
4.2 Gluing the Bridge
What is the best way to glue the bridge to the guitar top?
Apply a thin, even layer of high-quality wood glue to the bottom of the bridge. Position the bridge accurately on the guitar top, using locating pins to prevent shifting. Clamp the bridge firmly in place, using cauls to distribute pressure evenly.
 Ensuring aligned holes on guitar bridge
4.3 Clamping and Curing
How long should the bridge be clamped, and what glue is recommended?
Clamp the bridge for at least 24 hours to allow the glue to fully cure. Titebond II or similar high-quality wood glues are recommended for their strength and reliability.
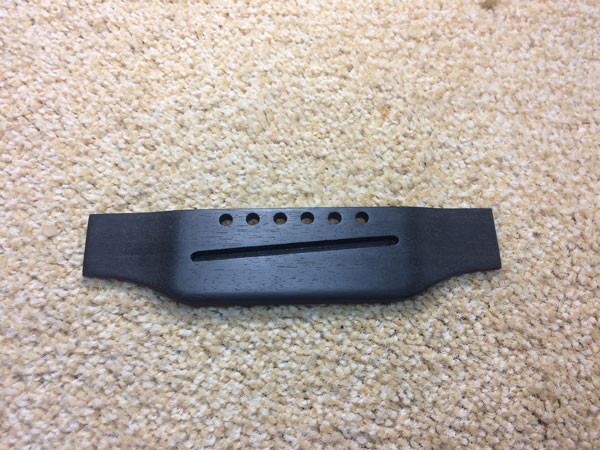
4.4 Finishing Touches
What are the final steps after the glue has cured?
Once the glue has cured, remove the clamps and clean up any excess glue. Install the saddle and bridge pins. String up the guitar and check the intonation and action. Make any necessary adjustments to the saddle height.
5. Troubleshooting Common Issues
What are some common problems encountered when building a guitar bridge, and how can they be solved?
Even with careful planning, issues can arise. Here are some common problems and their solutions.
5.1 Bridge Lifting
What causes a guitar bridge to lift, and how can it be prevented?
Bridge lifting is often caused by insufficient glue, improper clamping, or a poorly prepared surface. Ensure the surface is clean and lightly sanded, use a high-quality glue, and apply even clamping pressure.
5.2 Intonation Problems
How do you correct intonation issues related to the bridge?
Intonation problems can arise from an incorrectly positioned saddle. Adjust the saddle position or angle to correct the intonation. A compensated saddle can also help improve intonation.
 Clean cut for guitar bridge saddle slot
5.3 Cracking or Warping
What causes a bridge to crack or warp, and how can it be avoided?
Cracking or warping can be caused by using improperly seasoned wood or exposing the bridge to extreme humidity changes. Ensure the wood is properly seasoned and store the guitar in a stable environment.
6. Customizing Your Guitar Bridge
How can you customize a guitar bridge to achieve a specific tone or aesthetic?
Customizing your guitar bridge can significantly enhance your instrument’s sound and appearance.
6.1 Material Choices
How does the choice of material affect the guitar’s tone?
Different materials offer unique tonal characteristics. Ebony provides a bright, clear tone, while rosewood offers warmth and sustain. Experiment with different materials to find the sound that suits your playing style.
6.2 Bridge Design
How does the design of the bridge influence the guitar’s sound?
The shape and size of the bridge can affect the guitar’s resonance and sustain. A larger bridge may increase sustain, while a smaller bridge may offer a more focused tone.
6.3 Aesthetic Details
What aesthetic details can be added to a guitar bridge?
You can add decorative elements such as inlays, carvings, or unique finishes to personalize your bridge. These details can enhance the guitar’s overall appearance and make it a unique piece.
 Final shaping of guitar bridge
7. The Importance of Precision in Guitar Bridge Building
Why is precision so critical when building a guitar bridge?
Precision is paramount in guitar bridge building because even small errors can significantly impact the instrument’s playability and sound quality.
7.1 Impact on Playability
How does precision affect the guitar’s playability?
Accurate string spacing, saddle height, and bridge placement are essential for comfortable playability. Errors in these areas can lead to buzzing strings, difficulty fretting notes, and poor intonation.
7.2 Impact on Sound Quality
How does precision influence the guitar’s sound quality?
The bridge’s contact with the guitar’s top is crucial for sound transmission. A poorly fitted bridge can dampen vibrations and reduce sustain. Precise placement and a tight fit ensure optimal sound quality.
7.3 Tools for Precision
What tools are essential for achieving precision in bridge building?
Precision measuring tools such as calipers and rulers are essential. A drill press ensures accurate hole placement, and a router with a jig allows for precise shaping of the saddle slot.
8. Maintaining Your Guitar Bridge
How should you maintain a guitar bridge to ensure longevity and optimal performance?
Proper maintenance is essential to prolong the life of your guitar bridge and maintain its performance.
8.1 Regular Cleaning
Why is regular cleaning important for the guitar bridge?
Regularly clean the bridge to remove dirt, sweat, and grime. Use a soft cloth and a mild cleaner to keep the bridge in good condition.
8.2 Humidity Control
How does humidity affect the guitar bridge, and how can it be controlled?
Extreme humidity changes can cause the bridge to crack or warp. Store your guitar in a case with a humidifier to maintain a stable humidity level.
8.3 Inspections and Repairs
How often should the guitar bridge be inspected, and what repairs might be needed?
Inspect the bridge regularly for signs of lifting, cracking, or warping. Address any issues promptly to prevent further damage. Minor repairs can often be done at home, while more significant repairs may require a professional luthier.
9. Advanced Techniques in Guitar Bridge Building
What are some advanced techniques that experienced luthiers use when building guitar bridges?
Experienced luthiers employ advanced techniques to create high-quality, customized bridges.
9.1 Bridge Voicing
What is bridge voicing, and how does it affect the guitar’s tone?
Bridge voicing involves carefully shaping the bridge to optimize its vibrational characteristics. This technique can enhance the guitar’s overall tone and response.
9.2 Compensation Techniques
What compensation techniques can be used to improve intonation?
Compensation techniques involve adjusting the saddle position or angle to correct intonation issues. A compensated saddle can improve intonation accuracy across the fretboard.
9.3 Exotic Materials
What exotic materials can be used for guitar bridges, and what tonal qualities do they offer?
Exotic materials such as fossilized ivory, African Blackwood, or alternative materials can offer unique tonal qualities and aesthetic appeal. Experiment with different materials to find the perfect sound for your guitar.
10. Resources for Learning More About Guitar Bridge Building
Where can you find more information and resources for learning about guitar bridge building?
Numerous resources are available to help you expand your knowledge and skills in guitar bridge building.
10.1 Online Forums and Communities
What online forums and communities are helpful for learning about guitar building?
Online forums and communities such as the Guild of American Luthiers and guitarplayers.net offer a wealth of information, tutorials, and expert advice.
10.2 Books and Publications
What books and publications provide detailed information on guitar bridge building?
Books such as “Guitarmaking: Tradition and Technology” by William Cumpiano and Jonathan Natelson offer comprehensive guidance on guitar construction, including bridge building.
10.3 Luthier Schools and Workshops
Where can you attend luthier schools and workshops to learn guitar building techniques?
Luthier schools such as the Roberto-Venn School of Luthiery and workshops offered by experienced luthiers provide hands-on training in guitar building techniques.
Ready to take your guitar-building skills to the next level? Visit guitarplayers.net for in-depth tutorials, expert advice, and a vibrant community of guitar enthusiasts. Whether you’re a beginner or an experienced luthier, we have the resources you need to succeed. Explore our lessons, reviews, sheet music, and join our forum today! Contact us at 1140 Boylston Street, Boston, MA 02215, United States, or call +1 (617) 747-2261. Visit guitarplayers.net now!
 Guitar bridge ready for installation
FAQ: Building a Guitar Bridge
1. What is the primary function of a guitar bridge?
The primary function of a guitar bridge is to transmit the strings’ vibrations to the soundboard, influencing the instrument’s tone and sustain. The guitar bridge also anchors the strings and maintains correct string spacing and action.
2. What materials are commonly used for guitar bridges?
Common materials include ebony, rosewood, and other hardwoods like maple or walnut, each offering different tonal characteristics.
3. What tools are essential for building a guitar bridge?
Essential tools include precision measuring tools, saws, files, sandpaper, drills, drill bits, a router, and clamps.
4. How do you prepare the guitar’s soundboard for bridge installation?
Ensure the guitar’s top is clean and free from old glue or finish. Lightly sand the area where the bridge will be placed to create a good bonding surface.
5. What type of glue is recommended for attaching a guitar bridge?
Titebond II or similar high-quality wood glues are recommended for their strength and reliability.
6. How long should the bridge be clamped after gluing?
The bridge should be clamped for at least 24 hours to allow the glue to fully cure.
7. What causes a guitar bridge to lift?
Bridge lifting is often caused by insufficient glue, improper clamping, or a poorly prepared surface.
8. How can intonation problems related to the bridge be corrected?
Adjust the saddle position or angle to correct the intonation. A compensated saddle can also help improve intonation.
9. What is bridge voicing?
Bridge voicing involves carefully shaping the bridge to optimize its vibrational characteristics, enhancing the guitar’s overall tone and response.
10. Where can I find resources for learning more about guitar bridge building?
Online forums and communities, books and publications, and luthier schools and workshops offer a wealth of information and training opportunities.
 Cleaning up glue on guitar bridge
 Gibson LG-0 with new guitar bridge