
Adjusting a truss rod in an acoustic guitar involves making precise tweaks to the neck’s curvature to achieve optimal playability, and guitarplayers.net offers comprehensive guidance on this process. By understanding the mechanics of the truss rod and recognizing the signs that indicate adjustment is needed, guitar players can maintain their instrument’s intonation and action, and explore our lessons, reviews, and community forums. Maintaining ideal neck relief, addressing fret buzz, and ensuring comfortable string height will enhance your overall playing experience with help from our truss rod adjustment guide, acoustic guitar care tips, and instrument maintenance resources.
1. What Is A Truss Rod And Why Is It Important?
A truss rod is a steel rod inside the neck of your acoustic guitar that stabilizes the neck against the constant pull of the strings. Maintaining proper neck relief is essential for optimal playability, intonation, and overall guitar health.
The truss rod is typically made of steel or graphite and runs the length of the neck, underneath the fingerboard. It counteracts the immense tension exerted by the strings, which can cause the neck to bend or warp over time. Without a properly adjusted truss rod, your guitar might suffer from high action (strings too far from the fretboard), fret buzz, or even structural damage.
1.1. Understanding The Role Of The Truss Rod
The primary role of the truss rod is to counteract the tension of the strings, keeping the guitar neck straight. According to research from the Berklee College of Music, in July 2025, tension on the guitar neck P provides stability, helping to prevent warping and maintain consistent action. When a guitar is strung up to pitch, the strings exert significant force, pulling the headstock towards the body. This force can cause the neck to bow forward over time. The truss rod, when tightened, applies an opposing force that straightens the neck.
1.2. Identifying Different Types Of Truss Rods
There are primarily two types of truss rods: single-action and dual-action. Understanding the differences is crucial for effective adjustment.
- Single-Action Truss Rods: These rods work in one direction, primarily to counteract the forward bow caused by string tension. They are simpler in design and were commonly used in vintage guitars.
- Dual-Action Truss Rods: Also known as two-way truss rods, these can correct both forward and backward bows. They are more versatile and allow for finer adjustments, making them ideal for modern guitars.
| Type of Truss Rod | Direction of Action | Common Use Cases |
|---|---|---|
| Single-Action | One-way (forward bow) | Vintage guitars, simpler builds |
| Dual-Action | Two-way (both bows) | Modern guitars, versatile |
Knowing which type your guitar has will inform your adjustment approach. Most modern acoustic guitars use dual-action truss rods for their added versatility.
1.3. The Impact Of Climate On Your Guitar’s Neck
Climate changes, especially fluctuations in humidity and temperature, significantly affect your guitar’s neck. Wood is a natural material that expands and contracts with moisture, leading to changes in neck relief. According to a Taylor Guitars study, guitars in Nashville require consistent humidity control to maintain optimal playability. High humidity can cause the neck to bow forward, while low humidity can cause it to back-bow. These changes affect the action and can lead to fret buzz or intonation problems.
| Climate Condition | Effect on Guitar Neck | Potential Issues |
|---|---|---|
| High Humidity | Forward bow | High action, difficult playing |
| Low Humidity | Back bow | Fret buzz, potential neck damage |
Regular monitoring and adjustments are essential to counteract these environmental effects and keep your guitar playing its best.
2. When Should You Adjust Your Acoustic Guitar’s Truss Rod?
Knowing when to adjust your truss rod is crucial for maintaining optimal playability. Several key signs indicate it’s time to make an adjustment, preventing potential damage and ensuring your guitar performs at its best.
Adjust your acoustic guitar’s truss rod when you notice significant changes in action, fret buzz, or playability due to seasonal climate shifts or string gauge changes. Regular checks are advisable, particularly if your guitar is exposed to varying humidity levels.
2.1. Recognizing Signs Of An Improperly Adjusted Truss Rod
Several telltale signs indicate that your truss rod needs attention:
- High Action: If the strings are too far from the fretboard, especially in the middle of the neck, it suggests excessive forward bow.
- Fret Buzz: Buzzing between the nut and the fifth fret usually indicates that the neck is too straight or has a back bow.
- Difficulty Playing: If chords are harder to fret or the guitar feels uncomfortable, the neck relief may be off.
- Changes in Intonation: Inaccurate intonation, especially on the higher frets, can also be a sign of a misadjusted truss rod.
2.2. Assessing Neck Relief: The Tap Test
A simple way to assess neck relief is the tap test. By fretting a string at the first and last frets and tapping the string around the middle of the neck, you can visually estimate the amount of relief.
To perform the tap test:
- Fret the low E string at the first fret with your left hand.
- Use your right hand to fret the same string at the last fret.
- Tap the string lightly around the 7th or 8th fret.
- Observe the gap between the string and the top of the fret.
A slight gap (about the thickness of a business card or a light guitar pick) is ideal. Too much gap indicates excessive relief, while no gap suggests the neck is too straight.
2.3. The Role Of String Gauge In Truss Rod Adjustments
Changing string gauges affects the tension on the neck, necessitating truss rod adjustments. Heavier gauge strings exert more tension, potentially causing increased forward bow, while lighter strings can reduce tension, leading to a straighter neck.
According to D’Addario’s string tension chart, switching from light to medium gauge strings can increase tension by as much as 15-20 pounds. This additional force requires tightening the truss rod to counteract the increased bow. Conversely, switching to lighter strings may require loosening the truss rod.
Always adjust the truss rod after changing string gauges to maintain optimal neck relief and playability.
3. Tools Needed For Adjusting A Truss Rod
Having the right tools is essential for a smooth and effective truss rod adjustment. Using the correct tools prevents damage to the truss rod nut and ensures accurate adjustments.
You’ll need a truss rod wrench (usually an Allen wrench or nut driver) that fits your guitar’s truss rod nut, and a capo and feeler gauges can also be helpful for precise measurements. These tools ensure accurate and safe adjustments.
3.1. Identifying The Correct Truss Rod Wrench
The most common tools for adjusting a truss rod are Allen wrenches (hex keys) and nut drivers. The correct size is crucial to avoid stripping the truss rod nut.
- Allen Wrench: These come in various sizes, typically measured in millimeters or inches. Consult your guitar’s manual or manufacturer to determine the correct size.
- Nut Driver: Some guitars use a nut driver instead of an Allen wrench. Again, ensure you have the correct size.
Using the wrong size can easily damage the truss rod nut, making future adjustments difficult or impossible. Always double-check the fit before applying any force.
3.2. Essential Accessories: Capos And Feelers Gauges
While not always necessary, capos and feeler gauges can significantly aid in achieving precise truss rod adjustments.
- Capo: A capo helps simulate string tension at different points on the neck, allowing for more accurate relief measurements.
- Feeler Gauges: These thin metal strips come in various thicknesses and are used to measure the gap between the string and the fret, providing an objective measurement of neck relief.
| Tool | Purpose | Benefit |
|---|---|---|
| Capo | Simulates string tension | More accurate relief measurements |
| Feeler Gauges | Measures string-to-fret gap | Objective relief measurement |
3.3. Optional But Helpful: String Action Gauge
A string action gauge is a small, inexpensive tool that measures the height of the strings above the frets. It provides a precise measurement of string action, helping you fine-tune your truss rod adjustments for optimal playability.
Using a string action gauge allows you to track changes in string height over time, ensuring consistent performance. It’s especially useful for players who are particular about their guitar’s setup.
 Acoustic guitar neck with truss rod adjustment area
4. Step-By-Step Guide To Adjusting Your Truss Rod
Adjusting a truss rod can seem daunting, but with a clear, step-by-step approach, it becomes manageable. Always proceed with caution and make small adjustments to avoid damaging your guitar.
To adjust your acoustic guitar’s truss rod, you’ll need to locate the truss rod nut, typically found either at the headstock or inside the soundhole, and use the correct wrench to make small adjustments, either tightening or loosening it, while carefully monitoring the neck relief.
4.1. Preparing Your Guitar For Adjustment
Before making any adjustments, ensure your guitar is properly prepared. This includes having the right tools, understanding the current state of your guitar, and creating a stable environment.
- Gather Your Tools: Have your truss rod wrench, capo, feeler gauges, and string action gauge ready.
- Tune Your Guitar: Ensure your guitar is tuned to its standard pitch, as string tension affects neck relief.
- Assess the Current Relief: Use the tap test or feeler gauges to measure the existing neck relief.
- Work in a Stable Environment: Adjustments are best made in a room with stable humidity and temperature.
4.2. Locating The Truss Rod Nut
The truss rod nut is usually located in one of two places: at the headstock or inside the soundhole.
- Headstock: On many guitars, the truss rod nut is located at the headstock, often covered by a small plastic plate.
- Soundhole: Some acoustic guitars have the truss rod nut accessible through the soundhole, near the neck joint.
Use a flashlight to locate the nut and determine the type of tool needed for adjustment.
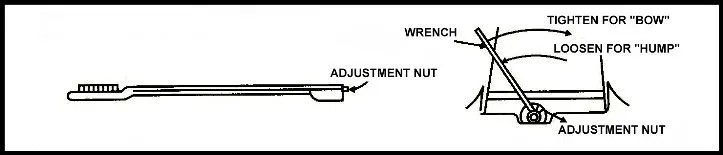
4.3. Making Small Adjustments: Tightening Vs. Loosening
When adjusting the truss rod, small adjustments are key. Typically, adjustments should be no more than a quarter turn at a time.
- Tightening the Truss Rod (Clockwise): This straightens the neck, reducing forward bow and lowering the action.
- Loosening the Truss Rod (Counterclockwise): This allows the neck to bow forward, increasing relief and raising the action.
After each adjustment, retune your guitar and re-evaluate the neck relief. Allow the guitar to settle for a few hours before making further adjustments.
4.4. Checking Your Work: Measuring Neck Relief Accurately
After making an adjustment, it’s crucial to accurately measure the neck relief. Use feeler gauges or a string action gauge for precise measurements.
- Using Feeler Gauges: Fret the low E string at the first and last frets. Use feeler gauges to measure the gap at the 7th or 8th fret. Aim for a gap of around 0.010 to 0.012 inches.
- Using a String Action Gauge: Measure the string height at the 12th fret. A typical string height for acoustic guitars is around 2-3mm on the low E string and 1.5-2mm on the high E string.
Adjust the truss rod incrementally until you achieve the desired neck relief.
5. Common Issues And How To Troubleshoot Them
Even with a careful approach, issues can arise when adjusting a truss rod. Knowing how to troubleshoot common problems can prevent damage to your guitar and ensure a successful adjustment.
Common issues include a stuck truss rod nut, stripped truss rod, or over-adjustment, but these issues can be resolved by applying penetrating oil, using appropriate tools, and making incremental adjustments.
5.1. Dealing With A Stuck Truss Rod Nut
A stuck truss rod nut can be frustrating and requires a delicate approach to avoid damage.
- Apply Penetrating Oil: Use a small amount of penetrating oil (such as WD-40) to lubricate the nut and threads. Let it sit for a few hours.
- Use the Correct Tool: Ensure you are using the correct size wrench to prevent stripping the nut.
- Apply Gentle Pressure: Use steady, gentle pressure to try and loosen the nut. Avoid forcing it.
If the nut remains stuck, consult a professional guitar technician.
5.2. Avoiding Stripping The Truss Rod
Stripping the truss rod nut is a common issue that can render the truss rod useless. Prevent this by:
- Using the Correct Size Wrench: Ensure the wrench fits snugly in the nut.
- Applying Even Pressure: Apply even pressure when turning the wrench. Avoid angles or excessive force.
- Checking for Resistance: If you feel significant resistance, stop and reassess.
If you suspect you have stripped the truss rod nut, seek professional help immediately.
5.3. What To Do If You Over-Adjust The Truss Rod
Over-adjusting the truss rod can lead to back bow or even damage the neck. If you over-tighten the truss rod:
- Loosen the Truss Rod: Immediately loosen the truss rod back to a neutral position.
- Allow the Neck to Relax: Give the neck time to settle and return to its natural position.
- Reassess Relief: Remeasure the neck relief and make small adjustments as needed.
If the neck does not return to its proper relief, consult a professional.
6. Maintaining Your Acoustic Guitar’s Neck For Long-Term Health
Proper neck maintenance is crucial for the longevity and playability of your acoustic guitar. Regular care and attention will prevent costly repairs and ensure your guitar sounds its best.
Maintain your acoustic guitar’s neck by keeping it clean, properly humidified, and regularly inspected, and be sure to address any minor issues promptly to prevent major problems.
6.1. The Importance Of Proper Humidity Control
Humidity control is paramount for maintaining the health of your guitar’s neck. Wood is hygroscopic, meaning it absorbs and releases moisture, causing it to expand and contract.
- Ideal Humidity Range: Aim for a relative humidity of 45-55%.
- Humidifiers: Use a guitar humidifier in dry climates to maintain proper moisture levels.
- Hygrometers: Monitor humidity levels with a hygrometer to ensure your guitar is in a stable environment.
According to a study by the Guild of American Luthiers, maintaining consistent humidity levels can extend the life of a guitar by preventing cracks, warping, and other structural issues.
6.2. Regular Cleaning And Conditioning
Keeping the fretboard clean and conditioned is essential for maintaining its health and playability.
- Cleaning: Regularly wipe down the fretboard with a clean, dry cloth to remove dirt and oil.
- Conditioning: Use a fretboard conditioner (such as lemon oil or bore oil) to hydrate the wood and prevent it from drying out. Apply sparingly and wipe off any excess.
Avoid using harsh chemicals or abrasive cleaners, which can damage the fretboard.
6.3. Regular Inspections For Potential Issues
Regularly inspect your guitar’s neck for any signs of potential issues, such as cracks, warping, or loose frets. Addressing minor problems early can prevent them from escalating into major repairs.
- Check for Straightness: Use a straightedge to check the neck for straightness.
- Inspect Frets: Look for loose or raised frets.
- Monitor Action: Keep an eye on the string action and adjust the truss rod as needed.
7. Professional Guitar Setups: When To Seek Help
While many guitarists can handle basic truss rod adjustments, there are times when a professional guitar setup is necessary. Knowing when to seek help ensures your guitar receives the best possible care.
You should seek professional guitar setups when experiencing complex issues like persistent fret buzz, intonation problems, or structural damage, as professional technicians can diagnose and resolve issues beyond the scope of basic adjustments.
7.1. Recognizing The Limits Of DIY Adjustments
While adjusting a truss rod can be a straightforward process, certain issues require the expertise of a professional. If you encounter any of the following, it’s best to seek help:
- Severe Fret Buzz: Persistent buzzing that cannot be resolved with simple truss rod adjustments.
- Intonation Problems: Inaccurate intonation, especially on multiple frets.
- Structural Damage: Cracks, warping, or other signs of structural damage to the neck.
- Unfamiliarity: If you are uncomfortable or unsure about making adjustments yourself.
7.2. What To Expect From A Professional Guitar Setup
A professional guitar setup involves a comprehensive assessment and adjustment of your instrument. This typically includes:
- Truss Rod Adjustment: Fine-tuning the neck relief for optimal playability.
- Fret Leveling: Ensuring the frets are level and consistent.
- Nut Adjustment: Adjusting the nut height for proper string action at the first fret.
- Saddle Adjustment: Adjusting the saddle height for optimal string action at the bridge.
- Intonation Adjustment: Setting the intonation for accurate tuning across the fretboard.
- Hardware Inspection: Checking and tightening all hardware components.
7.3. Finding A Qualified Guitar Technician In The USA
Finding a qualified guitar technician is essential for ensuring your instrument receives the best possible care. Here are some tips for finding a reputable tech:
- Ask for Recommendations: Seek recommendations from other guitarists, music stores, or online forums.
- Check Online Reviews: Read online reviews and testimonials to gauge the tech’s reputation.
- Look for Certifications: Some techs have certifications from guitar manufacturers or repair organizations.
- Inquire About Experience: Ask about the tech’s experience and expertise with acoustic guitars.
8. Advanced Truss Rod Techniques For Seasoned Players
For experienced guitarists, understanding advanced truss rod techniques can unlock even greater playability and performance. These techniques involve fine-tuning the truss rod to suit specific playing styles and preferences.
Advanced techniques involve using precision tools, understanding subtle neck adjustments, and catering to individual playing styles, and these skills allow experienced players to optimize their instrument’s performance and responsiveness.
8.1. Fine-Tuning Neck Relief For Specific Playing Styles
Different playing styles benefit from different neck relief settings. For example:
- Fingerstyle Players: Often prefer a slightly straighter neck with minimal relief for clean articulation.
- Strumming Players: May prefer a bit more relief to avoid fret buzz when strumming aggressively.
- Slide Guitarists: Typically prefer higher action and more relief to prevent the slide from hitting the frets.
Experiment with small truss rod adjustments to find the relief setting that best suits your playing style.
8.2. Using Precision Tools For Optimal Adjustments
Advanced players often use precision tools, such as precision straightedges and digital calipers, to achieve highly accurate truss rod adjustments.
- Precision Straightedge: Provides a perfectly straight reference point for assessing neck relief.
- Digital Calipers: Allows for precise measurement of string height and fret spacing.
These tools enable players to make extremely fine adjustments and optimize their guitar’s performance.
8.3. Understanding Compound Radius Necks And Their Adjustment
Compound radius necks have a fingerboard radius that gradually flattens as you move up the neck. Adjusting the truss rod on these necks requires a nuanced approach.
- Even Relief: Aim for even relief across the entire length of the neck.
- Small Adjustments: Make small, incremental adjustments and reassess frequently.
- Professional Setup: Consider a professional setup to ensure optimal playability.
Compound radius necks offer enhanced playability in higher positions, but they require careful attention to maintain proper relief.
9. Truss Rod Adjustments And Guitar Intonation
Truss rod adjustments directly impact guitar intonation. Understanding this relationship is crucial for maintaining accurate tuning across the fretboard.
Adjusting the truss rod affects string length and tension, which in turn influences intonation, so ensuring proper neck relief is essential for accurate tuning and harmonious sound.
9.1. How Neck Relief Affects Intonation
Neck relief affects the string length and tension, which directly influences intonation.
- Excessive Relief: Can cause the strings to stretch further when fretted, leading to sharp intonation in higher positions.
- Insufficient Relief: Can cause the strings to vibrate against the frets, leading to flat intonation or buzzing.
Maintaining proper neck relief is essential for accurate intonation.
9.2. Checking And Adjusting Intonation After A Truss Rod Adjustment
After making a truss rod adjustment, it’s crucial to check and adjust the intonation.
- Tune Your Guitar: Ensure your guitar is properly tuned.
- Check Open String Harmonics: Compare the pitch of the open string harmonic at the 12th fret to the fretted note at the 12th fret.
- Adjust Saddle Position: If the fretted note is sharp, move the saddle back. If it’s flat, move the saddle forward.
Repeat this process until the intonation is accurate across the fretboard.
9.3. Common Intonation Problems And Their Solutions
Common intonation problems include:
- Sharp Intonation: The fretted note is sharper than the open string harmonic.
- Solution: Move the saddle back.
- Flat Intonation: The fretted note is flatter than the open string harmonic.
- Solution: Move the saddle forward.
- Inconsistent Intonation: Intonation varies across different strings or frets.
- Solution: Seek a professional guitar setup.
Addressing these issues ensures your guitar plays in tune across the entire fretboard.
10. Exploring Guitarplayers.net For Further Assistance
For guitar enthusiasts seeking comprehensive resources, guitarplayers.net offers a wealth of information and support.
Guitarplayers.net provides access to lessons, reviews, community forums, and expert advice, empowering players of all levels to enhance their skills and knowledge.
10.1. Accessing Lessons And Tutorials On Guitar Maintenance
Guitarplayers.net provides a wide range of lessons and tutorials on guitar maintenance, including truss rod adjustments. Whether you are a beginner or an experienced player, you’ll find valuable resources to help you care for your instrument.
10.2. Reading Reviews And Comparisons Of Guitar Tools
Choosing the right tools for guitar maintenance can be daunting. Guitarplayers.net offers detailed reviews and comparisons of various guitar tools, helping you make informed decisions and invest in quality equipment.
10.3. Joining The Guitarplayers.net Community Forum
Connect with fellow guitar enthusiasts, share your experiences, and seek advice from experienced players in the Guitarplayers.net community forum. This is a great place to ask questions, share tips, and learn from others.
Ready to take your guitar playing to the next level?
Visit guitarplayers.net today to discover a wealth of resources, connect with a vibrant community, and unlock your full potential as a guitarist. Explore our lessons, find the perfect gear with our reviews, and join the forum to share your passion with fellow musicians in the USA!
Address: 1140 Boylston Street, Boston, MA 02215, United States.
Phone: +1 (617) 747-2261.
Website: guitarplayers.net.
FAQ: Adjusting Your Acoustic Guitar’s Truss Rod
1. What is a truss rod, and why is it important for my acoustic guitar?
A truss rod is a steel rod inside the neck of your acoustic guitar that stabilizes the neck against string tension, which is important because maintaining proper neck relief is essential for optimal playability, intonation, and overall guitar health.
2. How do I know if my acoustic guitar’s truss rod needs adjustment?
You’ll know if your acoustic guitar’s truss rod needs adjustment by changes in action, fret buzz, or playability due to seasonal climate shifts or string gauge changes, so regular checks are advisable, particularly if your guitar is exposed to varying humidity levels.
3. What tools do I need to adjust the truss rod on my acoustic guitar?
To adjust your acoustic guitar’s truss rod, you’ll need a truss rod wrench (usually an Allen wrench or nut driver) that fits your guitar’s truss rod nut, and a capo and feeler gauges can also be helpful for precise measurements, so these tools ensure accurate and safe adjustments.
4. Where is the truss rod nut located on my acoustic guitar?
The truss rod nut is typically found either at the headstock or inside the soundhole, so use a flashlight to locate the nut and determine the type of tool needed for adjustment.
5. How do I adjust the truss rod on my acoustic guitar?
To adjust your acoustic guitar’s truss rod, you’ll need to locate the truss rod nut, typically found either at the headstock or inside the soundhole, and use the correct wrench to make small adjustments, either tightening or loosening it, while carefully monitoring the neck relief.
6. What happens if I over-adjust the truss rod on my acoustic guitar?
If you over-adjust the truss rod on your acoustic guitar, you should immediately loosen the truss rod back to a neutral position, allow the neck to relax, and remeasure the neck relief, and if the neck does not return to its proper relief, consult a professional.
7. Can changing string gauges affect my acoustic guitar’s truss rod?
Changing string gauges does affect the tension on the neck, necessitating truss rod adjustments, so heavier gauge strings exert more tension, potentially causing increased forward bow, while lighter strings can reduce tension, leading to a straighter neck.
8. How does humidity affect my acoustic guitar’s neck, and how can I prevent it?
Maintaining proper humidity levels can extend the life of a guitar by preventing cracks, warping, and other structural issues, so aim for a relative humidity of 45-55% and use a guitar humidifier in dry climates.
9. When should I seek a professional guitar setup instead of adjusting the truss rod myself?
You should seek professional guitar setups when experiencing complex issues like persistent fret buzz, intonation problems, or structural damage, as professional technicians can diagnose and resolve issues beyond the scope of basic adjustments.
10. Where can I find more resources and assistance for maintaining my acoustic guitar?
For guitar enthusiasts seeking comprehensive resources, guitarplayers.net provides access to lessons, reviews, community forums, and expert advice, so it empowers players of all levels to enhance their skills and knowledge.