
Learning how to tune your acoustic guitar is the first essential step for any aspiring guitarist. Playing a guitar that’s out of tune is not only unpleasant to the ear, but it can also hinder your progress and ear training. Fortunately, tuning an acoustic guitar is a skill that can be mastered quickly with the right guidance and practice.
In this guide, we’ll explore various methods to tune your acoustic guitar, from using electronic tuners and smartphone apps to training your ear to tune by ear. Whether you’re a complete beginner or looking to refine your tuning skills, this article will provide you with the knowledge and techniques you need to keep your acoustic guitar sounding its best.
Understanding Guitar Tuning Basics
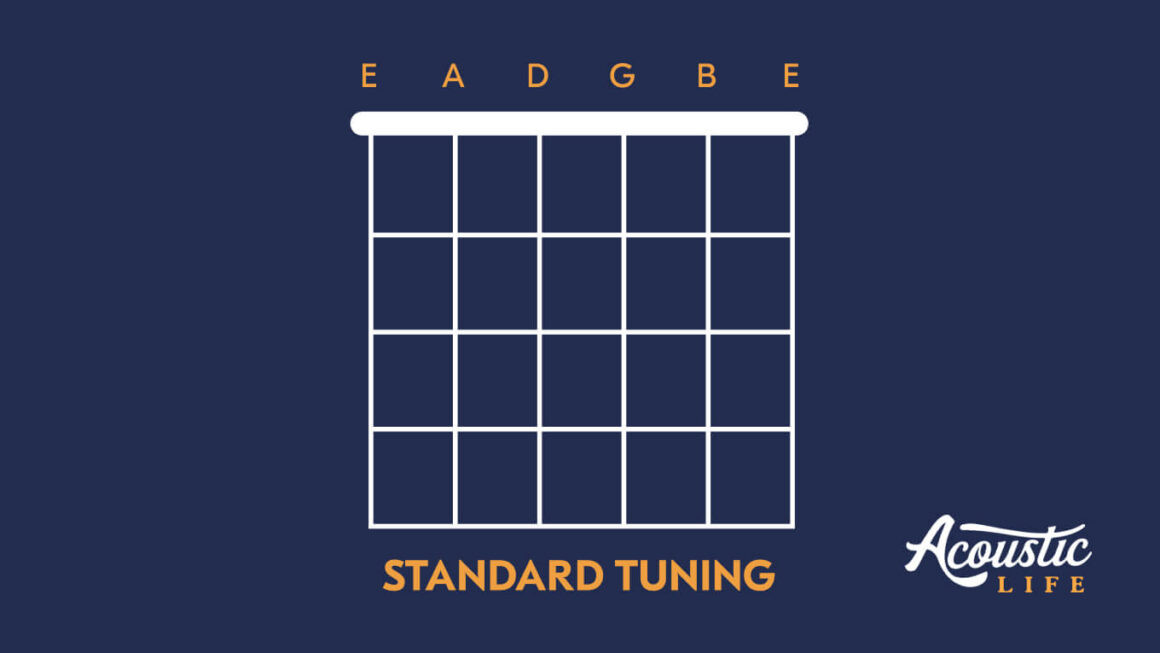
Before diving into the tuning methods, let’s cover some fundamental concepts about guitar tuning. Standard guitar tuning, used in most genres of music, is EADGBE. This refers to the notes each of the six strings should be tuned to, starting from the thickest string (lowest pitch) to the thinnest string (highest pitch).
- E (6th string) – The thickest, lowest sounding string.
- A (5th string)
- D (4th string)
- G (3rd string)
- B (2nd string)
- E (1st string) – The thinnest, highest sounding string.
A helpful mnemonic to remember the string order is “Every Adult Dog Growls Bites Ears.” You can also create your own memorable phrase!
Understanding sharps and flats is also crucial for tuning. In music, notes can be sharp (#) or flat (b), which means slightly higher or lower in pitch than a natural note (A, B, C, D, E, F, G). Electronic tuners will often indicate if your string is sharp or flat, guiding you to adjust the tuning peg accordingly.
Essential Tuning Tips for Beginners
Before we explore specific tuning methods, keep these tips in mind:
- Tune the Right String: Double-check that you are adjusting the tuning peg for the string you intend to tune. Follow the string from the fretboard to the tuning peg to ensure accuracy.
- Use Common Sense: If a string feels excessively tight or sounds too high-pitched, it likely is. Don’t hesitate to loosen the string first and start again.
- Tune Up, Not Down: When tuning, aim to tune up to the correct pitch rather than tuning down. Tuning up helps stabilize the string and keeps it in tune for longer. If you overshoot the note, tune slightly below it and then tune up to the correct pitch.
 Guitar Tuning Pegs
Make sure you are always turning the correct tuning peg for the string you intend to tune to avoid frustration and string breakage.
Tuning Your Acoustic Guitar with an Electronic Tuner
Electronic tuners are the most accurate and user-friendly tools for tuning a guitar, especially for beginners. They come in various forms, including clip-on tuners, handheld tuners, and pedal tuners. Smartphone apps also function as excellent electronic tuners.
Steps to Tune with an Electronic Tuner:
- Power On and Calibrate: Turn on your electronic tuner. Most tuners are calibrated to A440 Hz, the standard concert pitch. Check the tuner’s display to ensure it reads “A=440Hz” or similar. If calibration is needed, consult your tuner’s manual. Many modern tuners are pre-calibrated.
- Select the String: Begin with the thickest string (low E string). Pluck the string once and let it ring.
- Observe the Tuner: The tuner will display the note you are playing and indicate whether it’s sharp (too high) or flat (too low). Most tuners use a needle or lights to show pitch accuracy. A needle to the right or lights on the right usually indicate sharpness, while the left indicates flatness.
- Adjust Tuning Peg: If the string is flat, turn the corresponding tuning peg away from you (counter-clockwise) to raise the pitch. If the string is sharp, turn the tuning peg towards you (clockwise) to lower the pitch.
- Fine-Tune: Continue plucking the string and making small adjustments to the tuning peg until the tuner indicates the note is in tune. This is usually indicated by a centered needle, a green light, or a similar visual cue, depending on your tuner.
- Repeat for All Strings: Tune each string in the order E-A-D-G-B-E, using the tuner as your guide.
- Double-Check Tuning: Once you’ve tuned all strings, go back and check each string again. Adjusting one string can sometimes slightly affect the tuning of others. Fine-tune as needed until all strings are perfectly in tune.
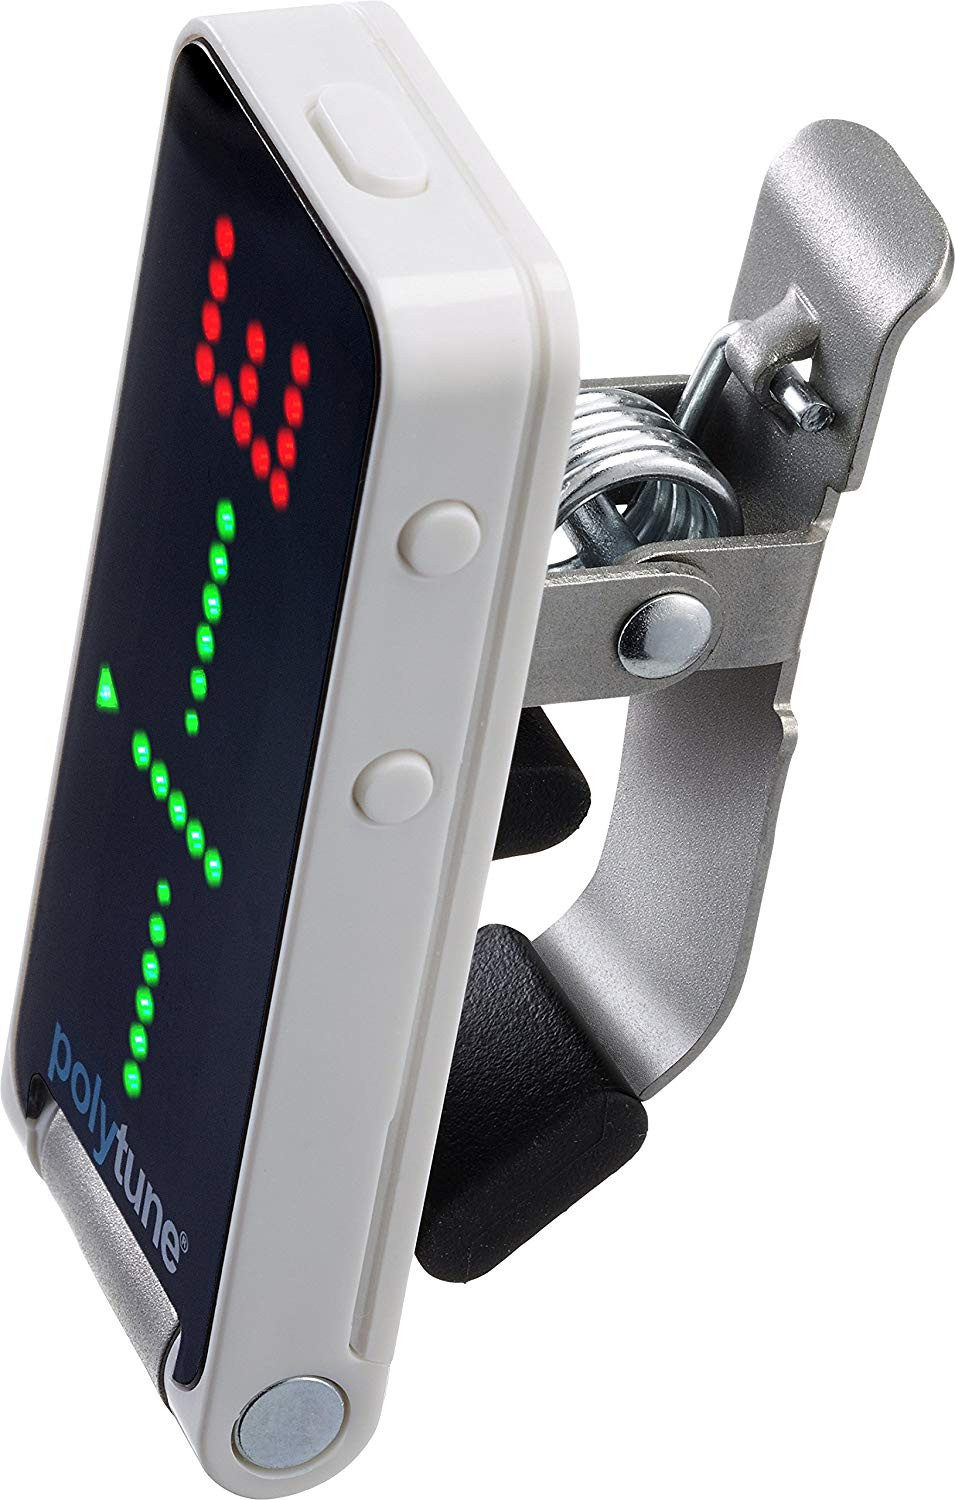 Clip-on Guitar Tuner
Clip-on tuners are convenient and accurate, vibrating against the guitar’s headstock to detect pitch, even in noisy environments.
Tuning Your Acoustic Guitar with a Smartphone App
Smartphone tuning apps are readily available and offer a convenient, often free, alternative to dedicated electronic tuners. These apps utilize your phone’s microphone to detect the pitch of your guitar strings.
Using a Guitar Tuning App:
- Download and Install: Download a guitar tuning app from your phone’s app store (e.g., Simply Tune, GuitarTuna, Fender Guitar Tuner). Many excellent free options exist.
- Open the App: Launch the tuning app. Most apps have a user-friendly interface and guide you through the tuning process.
- Select Tuning: Ensure the app is set to standard tuning (EADGBE). Most apps default to standard tuning, but it’s worth verifying.
- Tune String by String: The app will typically indicate which string to tune first (usually starting with the low E string). Pluck the indicated string.
- Follow Visual Feedback: The app will display the note and provide visual feedback on whether the string is sharp or flat, similar to a traditional electronic tuner.
- Adjust Tuning Pegs: Adjust the tuning pegs as directed by the app until the app indicates the string is in tune (e.g., needle centered, display turns green).
- Proceed to the Next String: Follow the app’s prompts to tune each string in the standard EADGBE order.
- Double-Check: As with electronic tuners, always double-check the tuning of all strings after the initial tuning process.
 Guitar Tuning App Interface
Guitar tuning apps are a great on-the-go solution, using your phone’s microphone to help you achieve accurate tuning.
Tuning Your Acoustic Guitar by Ear
Tuning by ear is a valuable skill for any guitarist. It develops your musical ear and allows you to tune your guitar even when you don’t have an electronic tuner or app available. Tuning by ear relies on relative tuning, meaning you tune each string in relation to a correctly tuned reference string. You’ll need at least one string to be in tune to begin, which you can obtain from another instrument, a tuning fork, or a pitch pipe initially.
Method 1: Tuning by Ear Using the 5th Fret Method
This method uses the principle that the note at the 5th fret of a string (except for the G string) is the same as the open note of the next higher string.
- Reference String (Low E): Ensure your low E string is in tune. You can use a piano, keyboard, or another in-tune guitar to get your initial E pitch.
- 5th Fret of E String (A Note): Fret the 5th fret of the low E string. This note is an A.
- Tune the A String: Pluck the 5th fret of the E string (A note) and then pluck the open A string. Listen carefully to both notes.
- Match the Pitch: Adjust the tuning peg of the A string until the open A string sounds exactly the same pitch as the note at the 5th fret of the E string. Listen for “beats” – a wavering sound that indicates the strings are slightly out of tune. As you get closer to being in tune, the beats will slow down and eventually disappear when the pitches match.
- Repeat for D String: Fret the 5th fret of the A string (D note) and tune the open D string to match.
- Repeat for G String: Fret the 5th fret of the D string (G note) and tune the open G string to match.
- 4th Fret for B String: The exception is tuning the B string. Fret the 4th fret of the G string (B note) and tune the open B string to match.
- 5th Fret for High E String: Fret the 5th fret of the B string (high E note) and tune the open high E string to match.
- Double-Check: Play a chord and listen to the overall tuning. Make any fine adjustments as needed.
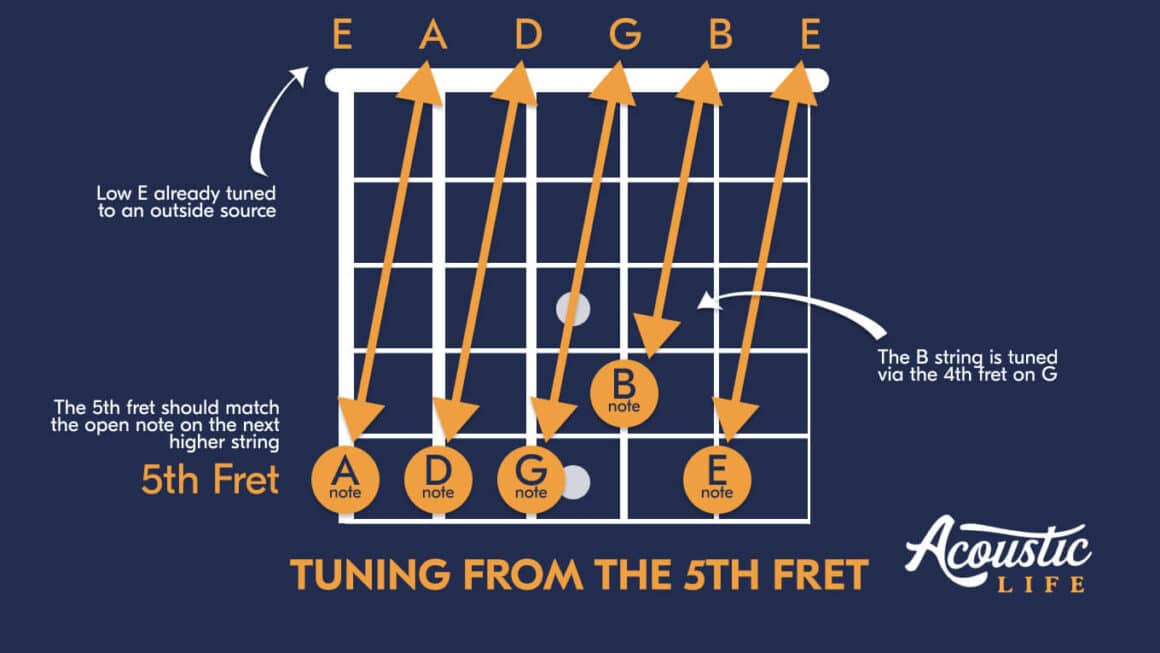 Tuning Guitar by 5th Fret
The 5th fret method is a classic technique for tuning by ear, relying on the consistent intervals between guitar strings.
Method 2: Tuning by Ear Using Harmonics
Harmonics are bell-like tones produced by lightly touching a string at certain points (like above the 5th, 7th, or 12th frets) and plucking it. Harmonics at specific fret locations on different strings can be used to tune by ear.
- Reference String (Low E): Ensure your low E string is in tune.
- E String 5th Fret Harmonic & A String 7th Fret Harmonic: Lightly touch the string above the 5th fret of the low E string and pluck to produce a harmonic. Then, lightly touch above the 7th fret of the A string and pluck a harmonic.
- Match Harmonics: These two harmonics should be the same pitch. Adjust the tuning peg of the A string until the two harmonics sound identical. Listen for the absence of a wavering or “beating” sound.
- A String 5th Fret Harmonic & D String 7th Fret Harmonic: Repeat the process, comparing the harmonic at the 5th fret of the A string to the harmonic at the 7th fret of the D string. Tune the D string accordingly.
- D String 5th Fret Harmonic & G String 7th Fret Harmonic: Tune the G string by comparing the harmonics on the D and G strings.
- E String 7th Fret Harmonic & Open B String: Compare the harmonic at the 7th fret of the low E string to the open B string. Tune the B string.
- A String 7th Fret Harmonic & Open High E String: Compare the harmonic at the 7th fret of the A string to the open high E string. Tune the high E string.
- Double-Check: Play a chord and fine-tune as needed.
 Tuning Guitar with Harmonics
Harmonic tuning utilizes the pure, bell-like tones of harmonics to achieve very accurate tuning by ear.
Exploring Alternate Tunings: Drop D Tuning
While standard tuning (EADGBE) is the most common, alternate tunings offer different sonic landscapes and can be used for specific musical styles and techniques. Drop D tuning is a popular and easy-to-learn alternate tuning.
What is Drop D Tuning?
Drop D tuning involves lowering the low E string down a whole step (two frets) from E to D. The other strings remain in standard tuning. This results in the tuning DADGBE.
How to Tune to Drop D:
- Tune Standard First (Optional but Recommended): It’s helpful to have your guitar in standard tuning initially.
- Tune Down the Low E String: Using an electronic tuner or by ear, tune down the low E string until it matches the pitch of the open D string (4th string). You can also play the D note at the 5th fret of the A string as a reference.
- Listen to the Low E String: Pluck the low E string. It should now sound lower and resonate more deeply than in standard tuning.
- Check Against D String: Play the open D string and then the retuned low E string. They should sound an octave apart (the low E string will be lower).
- Verify Tuning: Play a D chord or power chord to hear the characteristic sound of Drop D tuning.
 Drop D Tuning Diagram
Drop D tuning is easily achieved by tuning down just the low E string, opening up a richer lower register and easier power chords.
Frequently Asked Questions About Guitar Tuning
How often should I tune my guitar?
Ideally, you should tune your guitar every time you play it. Guitars can easily go out of tune due to changes in temperature, humidity, playing style, and even just moving the instrument.
How can I keep my guitar in tune longer?
- Stable Environment: Avoid drastic temperature and humidity changes.
- Regular Maintenance: Keep your guitar in good condition with regular check-ups and maintenance.
- Play Regularly: Strings settle over time with regular playing.
- Lubricate Nut and Bridge: Use graphite from a pencil to lubricate the nut and bridge slots where the strings rest. This reduces friction and prevents strings from sticking and going out of tune.
- New Strings: New strings stretch and go out of tune more frequently initially. Stretch new strings carefully when installing them and expect to tune more often for the first few days.
What are the three main ways to tune a guitar?
The three classic ways to tune a guitar are:
- By ear
- Using an electronic tuner
- Using a tuning fork or pitch pipe (as a reference pitch for tuning by ear)
What is standard guitar tuning?
Standard guitar tuning is E – A – D – G – B – E, from thickest to thinnest string.
Conclusion: Staying in Tune and Enjoying Your Guitar
Mastering guitar tuning is a fundamental skill that unlocks a world of musical enjoyment. Whether you choose the accuracy of an electronic tuner, the convenience of a smartphone app, or the ear-training benefits of tuning by ear, consistent practice will make tuning quick and easy.
Remember to be patient, especially when starting out. With practice, you’ll develop a feel for tuning and your ear will become more attuned to pitch. Keeping your guitar in tune ensures a more rewarding playing experience and allows you to fully appreciate the beautiful sounds your acoustic guitar can create. Now that you know how to tune, pick up your guitar and start playing!