Keeping your acoustic guitar in top playing condition is crucial for any guitarist, and a vital part of that is knowing how to restring it properly. Fresh strings can dramatically improve your guitar’s tone, making it sound brighter and more resonant. Whether you’re a beginner just learning the ropes or a seasoned player, mastering the art of restringing is a valuable skill. This guide will walk you through each step, ensuring your acoustic guitar is ready to play its best.
Before we dive into the steps, it’s worth noting why regular string changes are important. Over time, guitar strings lose their vibrancy due to dirt, oils from your fingers, and general wear and tear. Old strings can sound dull, intonation can suffer, and they are more prone to breaking. Ideally, you should aim to restring your acoustic guitar every 1-3 months depending on how often you play. If you play daily, more frequent changes are beneficial.
Let’s get started on how to restring your acoustic guitar and bring it back to its optimal sound.
Step 1: Prepare Your Workspace and Clean Your Guitar
Before you even think about new strings, this is the perfect opportunity to give your guitar some much-needed attention. With the strings off, you have full access to areas that are normally hard to reach.
Take a soft cloth and gently wipe down the entire guitar, including the fretboard, the bridge, and the soundboard. Pay special attention to the areas around the bridge and soundhole where dust and grime tend to accumulate. If you have a scratchplate (or pickguard), clean under and around it as well.
 Cleaning acoustic guitar body during restringing process
Step 2: Condition the Fretboard with Lemon Oil
If your acoustic guitar has a fretboard made of rosewood or ebony – typically darker woods – now is a great time to hydrate it. These woods can dry out over time, especially in drier climates, which can lead to cracks or fret sprout (where the fret ends become sharp and protrude from the edge of the fretboard).
Apply a few drops of lemon oil to a clean cloth. Be sure to use actual lemon oil specifically designed for guitars and not household cleaning products.
 Applying lemon oil to acoustic guitar fretboard
Step 3: Apply Lemon Oil to the Fretboard
Gently rub the lemon oil into the fretboard wood, working it in along the grain from one end to the other. Don’t saturate the fretboard; a little lemon oil goes a long way. Let the oil sit for about 30 seconds to allow it to soak into the wood.
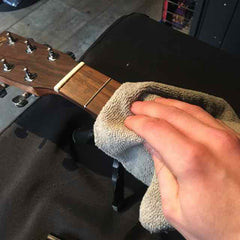 Working lemon oil into acoustic guitar fretboard
Step 4: Hydrate the Bridge (Optional)
While you’re at it, take a look at your guitar’s bridge. If it appears dry, you can also apply a tiny amount of lemon oil to hydrate it. However, be very careful to avoid getting lemon oil on the saddle itself, or remove the saddle completely before applying oil to the bridge. Lemon oil on the saddle can cause the strings to slip, affecting tuning stability.
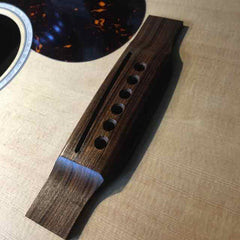 Hydrating acoustic guitar bridge with lemon oil
Step 5: Prepare Your New Strings
Now it’s time to get your hands on your new set of acoustic guitar strings. Before you even open the packet, take a moment to understand the string gauges and their order. Acoustic guitar strings are ordered by thickness, from thickest (lowest pitch, usually the 6th string or low E) to thinnest (highest pitch, usually the 1st string or high E). String packs are typically arranged in this order within the packaging. Familiarize yourself with this order; it will make the restringing process smoother.
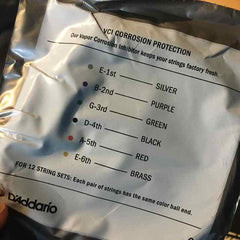 New acoustic guitar string pack showing string order
Step 6: Bend the String End for Bridge Insertion
Take the thickest string (usually the low E). At the ball end of the string (the end with the small metal ball), create a slight 45-degree bend. This bend isn’t strictly necessary, but it helps to ensure the ball end sits correctly against the bridge plate inside the guitar, improving tuning stability and preventing string slippage.
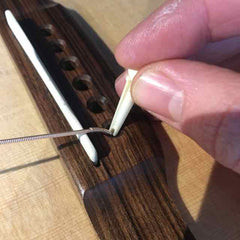 Bending the ball end of an acoustic guitar string
Step 7: Insert the String and Bridge Pin
Insert the ball end of the string into the correct bridge hole (furthest from the neck for the low E string). Now, take a bridge pin and carefully push it into the hole to secure the string. Make sure the string’s tail sits in the groove of the bridge pin and that this groove is facing directly towards the guitar’s neck. This alignment is crucial for proper string tension and preventing buzzing. Push the pin in firmly but gently; you should feel it snug and secure.
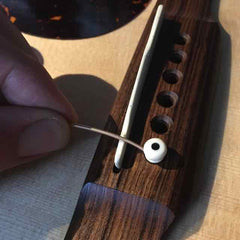 Inserting acoustic guitar string and bridge pin
Step 8: Repeat for All Bridge Pins
Repeat steps 6 and 7 for the remaining five strings, working your way from the thickest to thinnest. After inserting each string and pin, gently tug on the tail of the string near the bridge to ensure the ball end is firmly seated against the bridge plate. This confirms that the string is properly anchored.
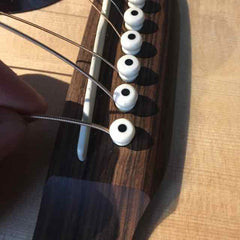 All acoustic guitar strings inserted at the bridge
Step 9: Prepare the Machine Heads
Now, move to the headstock of your guitar. Ensure that the holes in each machine head post are aligned straight down the neck. This starting position makes string insertion easier and more efficient.
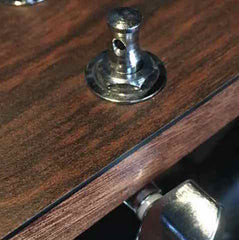 Acoustic guitar machine heads aligned straight down the neck
Step 10: Thread the String to the Machine Head
Take the string you just inserted at the bridge, and carefully guide it over the saddle, then over the nut, and finally through the hole in the corresponding machine head post. Make sure the string sits properly in the nut slot.
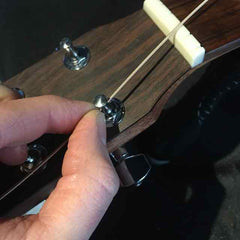 Threading acoustic guitar string through machine head
Step 11: Measure String Length for Winding
Pull the string taut and measure approximately two machine heads’ distance beyond the machine head you are currently threading. This extra length will provide enough string to wind around the post and ensure good tuning stability. This measurement is a rule of thumb; you can adjust it slightly based on your preference, but this is a good starting point.
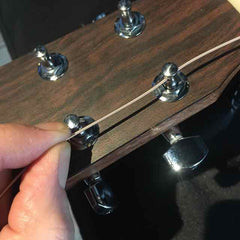 Measuring acoustic guitar string length for winding
Step 12: Begin Winding the String
Pull the excess string length you measured back through the machine head post. Now, start winding the machine head key counter-clockwise (when looking from the top of the headstock). As you wind, maintain some tension on the string to keep your measured length consistent. The string section running down the neck should always be positioned on the inside of the machine head post, closest to the center of the headstock. This helps maintain a straight string path over the nut.
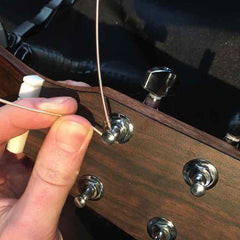 Winding acoustic guitar string onto machine head post
Step 13: Ensure Proper String Wraps
As you continue winding, ensure that the new string wraps go under the previous wrap, pushing the older wrap upwards towards the top of the machine head post. This technique creates neat, downward-stacking string wraps, which increases downward pressure on the nut and enhances tuning stability.
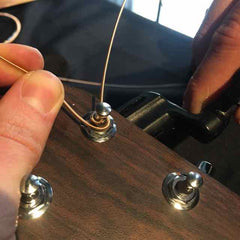 Proper string wraps on acoustic guitar machine head
Step 14: Initial String Tension
Wind the string until there is a small amount of tension. You don’t need to bring it up to pitch yet. A couple of winds around the machine head post at this stage should be sufficient to hold the string in place.
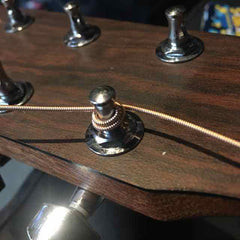 Initial tension on acoustic guitar string after winding
Step 15: Trim Excess String
Using wire cutters, trim off the excess string extending beyond the machine head post. Cut as close to the post as you can while still leaving a small tail – this keeps things neat and prevents the sharp string end from poking you.
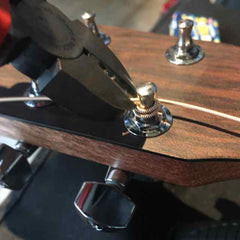 Trimming excess acoustic guitar string
Step 16: Repeat for Remaining Strings
Repeat steps 10 through 15 for the remaining five strings, again working from the thickest to thinnest. Take your time and ensure each string is properly inserted, wound, and trimmed.
 All acoustic guitar strings restrung
Step 17: Tune Up and Stretch the Strings
Once all the strings are on, it’s time to bring them up to pitch. Use a tuner (a clip-on tuner is very handy for this) and tune each string to its correct pitch. It’s best to tune up gradually, moving back and forth between strings. Don’t tune one string fully to pitch immediately, but rather bring all strings up in small increments to distribute the tension evenly across the guitar neck.
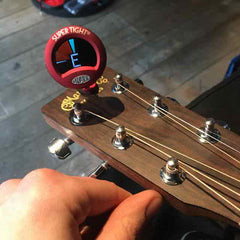 Tuning acoustic guitar with clip-on tuner
Step 18: Stretch the Strings for Tuning Stability
New strings need to be stretched. This is a vital step to prevent your guitar from constantly going out of tune. To stretch the strings, tune the guitar up to pitch, then firmly grasp each string near the middle of the fretboard and gently pull upwards a few times. You will hear the pitch drop. Retune the string back to pitch and repeat this stretching process several times for each string until the pitch remains stable after stretching.
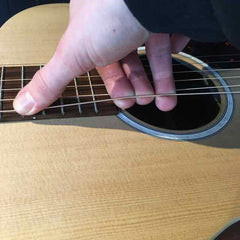 Stretching new acoustic guitar strings
After stretching and retuning, your acoustic guitar is now properly restrung and ready to play! Enjoy the bright, clear tone of your freshly strung guitar. Regular restringing, combined with proper technique, will keep your instrument sounding its best and inspire you to play more often.

