
Introduction
Hey there, aspiring guitarists! Are you ready to learn a timeless acoustic classic? In this lesson, we’ll break down how to play “Hey There Delilah” by Plain White T’s, focusing on fingerstyle guitar. This song is perfect for acoustic guitar and utilizes a beautiful fingerpicking pattern with a variety of chords and their variations. While it might seem intricate at first, with our step-by-step guide, you’ll find it surprisingly easy to learn and impress your friends with.
 Plain White T's Hey There Delilah Guitar Lesson
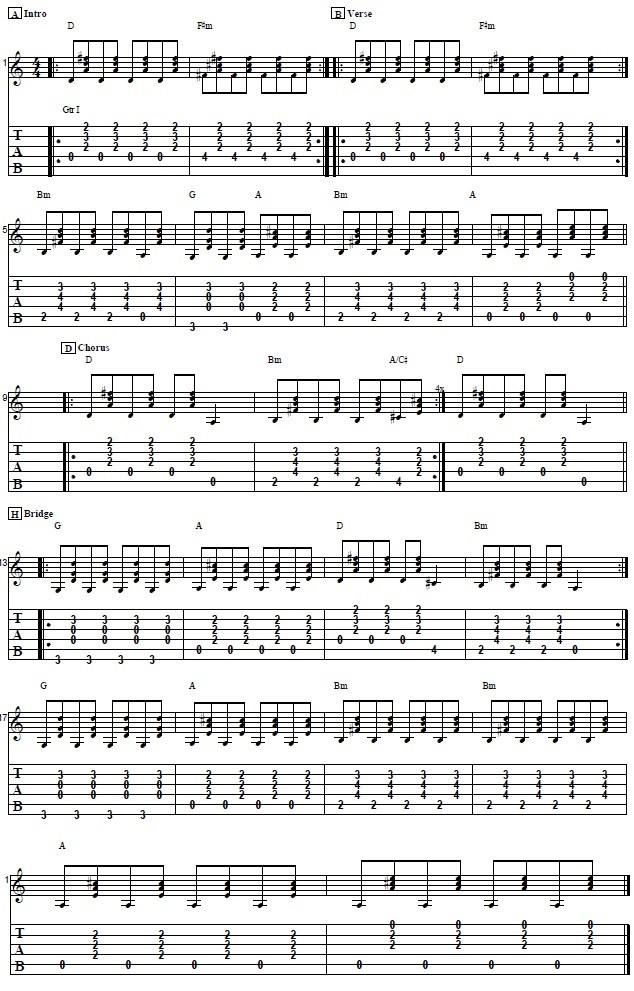
Hey There Delilah Intro and Verse Guitar Tabs Breakdown
Let’s start at the beginning with the intro and verse of “Hey There Delilah”. The foundation here is a regular open D chord. We’ll be using a fingerstyle technique, but with a distinctive alternating bassline. This means your thumb will handle the bass notes, while your index, middle, and ring fingers (P-I-M-A technique, though the A finger is not explicitly used here) will play the melody notes within the chord.
For the D chord, you’ll typically play the top four strings. In our fingerstyle approach, your thumb will pluck the 4th string (D string), followed by your index finger on the 3rd string (G string), middle finger on the 2nd string (B string), and ring finger on the 1st string (high E string). This sequence is played in eighth notes. So, it’s thumb on the 4th string, then fingers on strings 3, 2, and 1 in quick succession. This completes the first measure.
Next, we transition to an F sharp minor chord (F#m). Instead of a full barre chord, we use a simpler voicing. Barre your first finger across the first three strings at the 2nd fret. Then, use your third finger to fret the 4th fret of the 4th string. This F#m shape is reminiscent of the very first chord in “Stairway to Heaven,” just moved down the neck. The fingerpicking pattern remains the same as with the D chord. These two measures (D and F#m) form the intro and are repeated twice.
The verse follows the same chord progression and fingerpicking pattern as the intro for the first two measures. So, essentially, what you’ve learned for the intro is played a total of four times to cover the initial part of the verse. This section serves as the backdrop for the beginning of the vocals.
Now, we move to a B minor chord (Bm). This is a barre chord: barre across all five strings at the 2nd fret with your first finger. Then, place your second finger on the 3rd fret of the 2nd string, third finger on the 4th fret of the 4th string, and fourth finger on the 4th fret of the 3rd string. The fingerpicking pattern is slightly adjusted here. Instead of strings 4-3-2-1, we shift up to strings 5-4-3-2. Your thumb now plays the 5th string (A string) for the bass note, and your fingers play strings 4, 3, and 2 for the melody. For the first three beats of this Bm measure, you maintain this pattern. On the fourth beat, lift your first finger off the barre. This opens up the 5th string, creating a nice variation in the bassline.
Following the B minor, we go to a G chord. Use a standard open G chord, but ensure you’re using the variation that includes the 3rd fret on the 2nd string, not the open 2nd string. Maintain your finger positions on strings 4, 3, and 2 for the melody notes. Shift the bass note from the 5th string to the 6th string (low E string).
Next is an A chord. Keep the melody notes on strings 4, 3, and 2, and revert the bass note back to the 5th string.
After the A chord, we return to the B minor chord, picked in the same way as before, but this time, we don’t change the bass note on the fourth beat; it remains consistent throughout the measure.
Finally, we go back to an A chord. For the last two beats of this section, we shift our fingerpicking pattern. Keep the bass note on the 5th string, but move your fingers to strings 3, 2, and 1 for the melody notes. This completes the intro and verse section of “Hey There Delilah”.
Hey There Delilah Chorus Guitar Chords
The chorus of “Hey There Delilah” introduces a slight variation. It begins with the familiar open D chord. For the first three beats, we use the same fingerpicking pattern as before. However, on the fourth beat, instead of the usual fingerpicked note, we play the open 5th string (A string) as a quarter note. This acts as a transition into the next chord, B minor.
For the B minor in the chorus, we apply the same fingerpicking pattern we used in the verse for the first three beats. Then, on the fourth beat, we transition to an A over C sharp chord (A/C#). For this chord, barre your first finger across the 4th, 3rd, and 2nd strings. Place your third finger on the 4th fret of the 5th string. We continue using strings 5, 4, 3, and 2 for the fingerpicking, similar to the B minor pattern, just with the new chord shape.
This sequence of D, Bm, and A/C# is repeated four times. Following this repetition, the chorus section briefly returns to a D chord for a measure before transitioning back into another verse.
Hey There Delilah Bridge Guitar Tutorial
The bridge section of “Hey There Delilah” offers a slightly different chord progression. It begins with a G chord. Use the same G chord voicing as in the verse, ensuring you have the 3rd fret on the 2nd string. Your thumb plays the bass note on the 6th string, and your fingers play the melody notes on strings 4, 3, and 2. Play a full measure of G.
Next, move to an A chord. Maintain the melody notes on strings 4, 3, and 2, and switch the bass note to the 5th string. Play a full measure of A.
Then, transition to a D chord. Move all your fretting hand fingers up so that the bass note is on the 4th string and the melody notes are on strings 3, 2, and 1. Play this for three beats.
The fourth beat of this measure introduces a slightly trickier transition. Play a quarter note on the 4th fret of the 5th string (C#). This note serves as a transition into a B minor chord.
The transition from the D chord with the C# bass note to the B minor chord is arguably the most challenging part of the entire song. It’s recommended to practice this transition separately to smooth it out.
After the D chord measure with the C# transition note, you proceed to a B minor chord. Play the B minor for three beats and then play the open 5th string (A string) on the fourth beat. This open 5th string bass note helps transition out of the B minor and back into the next section of the song, which is typically a return to the chorus or verse.
Tips for Mastering “Hey There Delilah” Fingerstyle Guitar
- Start Slow: Begin practicing each section slowly to internalize the fingerpicking patterns and chord changes. Gradually increase the tempo as you become more comfortable.
- Focus on the Bassline: Pay close attention to the alternating bassline. Ensure your thumb is consistently and cleanly plucking the bass notes.
- Chord Transitions: Smooth chord transitions are crucial for a fluid sound. Practice moving between chords efficiently, especially the trickier transitions like the D to Bm in the bridge.
- Listen Carefully: Listen to the original Plain White T’s recording frequently. This will help you grasp the rhythm, timing, and nuances of the fingerstyle arrangement.
- Practice Regularly: Consistent practice, even in short sessions, is more effective than infrequent long sessions. Aim for daily practice to build muscle memory and improve your technique.
Conclusion
Learning to play “Hey There Delilah” on guitar is a rewarding endeavor. This song is not only beautiful but also a fantastic way to develop your fingerstyle guitar skills. By breaking down the song into sections and practicing each part diligently, you’ll be playing this modern classic in no time. So grab your acoustic guitar, follow these guitar tabs and instructions, and start practicing “Hey There Delilah” today! Happy playing from guitarplayers.net!
Click Here to Learn More Guitar Songs