Guitar tablature, often shortened to “guitar tabs,” is a revolutionary system for writing music that makes learning guitar songs accessible and straightforward, even for complete beginners. Think of guitar tabs as a secret code that unlocks your ability to play your favorite tunes quickly and easily. While they share some similarities with traditional music notation, the beauty of guitar tabs lies in their simplicity: they show you exactly where to place your fingers on the guitar neck to play specific notes and chords.
This is incredibly beneficial because, unlike other instruments, the guitar allows you to play the same note in multiple positions on the fretboard. For aspiring guitarists, learning to read guitar tablature is a game-changer. It allows you to dive into playing actual songs right away, bypassing the often-steep learning curve of standard musical notation. You can learn to play guitar and a vast library of guitar songs without needing to read traditional sheet music.
At guitarplayers.net, we champion Guitar Songs Tablature as the most direct and rewarding path for beginners to learn. Guitar tabs are versatile, capable of notating both complex chords and single-note melodies. This makes them the fastest route to playing the songs you love. The best part? Understanding guitar tabs requires no prior musical knowledge – just a basic understanding of your guitar’s strings and frets.
Ready to demystify guitar tabs and discover how they can unlock a world of musical possibilities? Let’s get started and explore the world of guitar songs tablature.
What is Guitar Tablature?
Guitar tablature is essentially a visual map of the notes in a song, specifically designed for guitar. Imagine it as a guitar-centric language for music. A standard guitar tab is composed of six horizontal lines, each representing one of the six strings on your guitar. When you learn guitar songs tablature, you read it from top to bottom, just like you look at your guitar strings while holding the instrument. The topmost line represents the high E string (the thinnest string), followed by lines for the B, G, D, A, and low E strings (the thickest string).
Think of guitar tablature as your personal roadmap to musical fluency on the guitar. It provides the most direct path to learning guitar songs tablature and quickly playing songs you love.
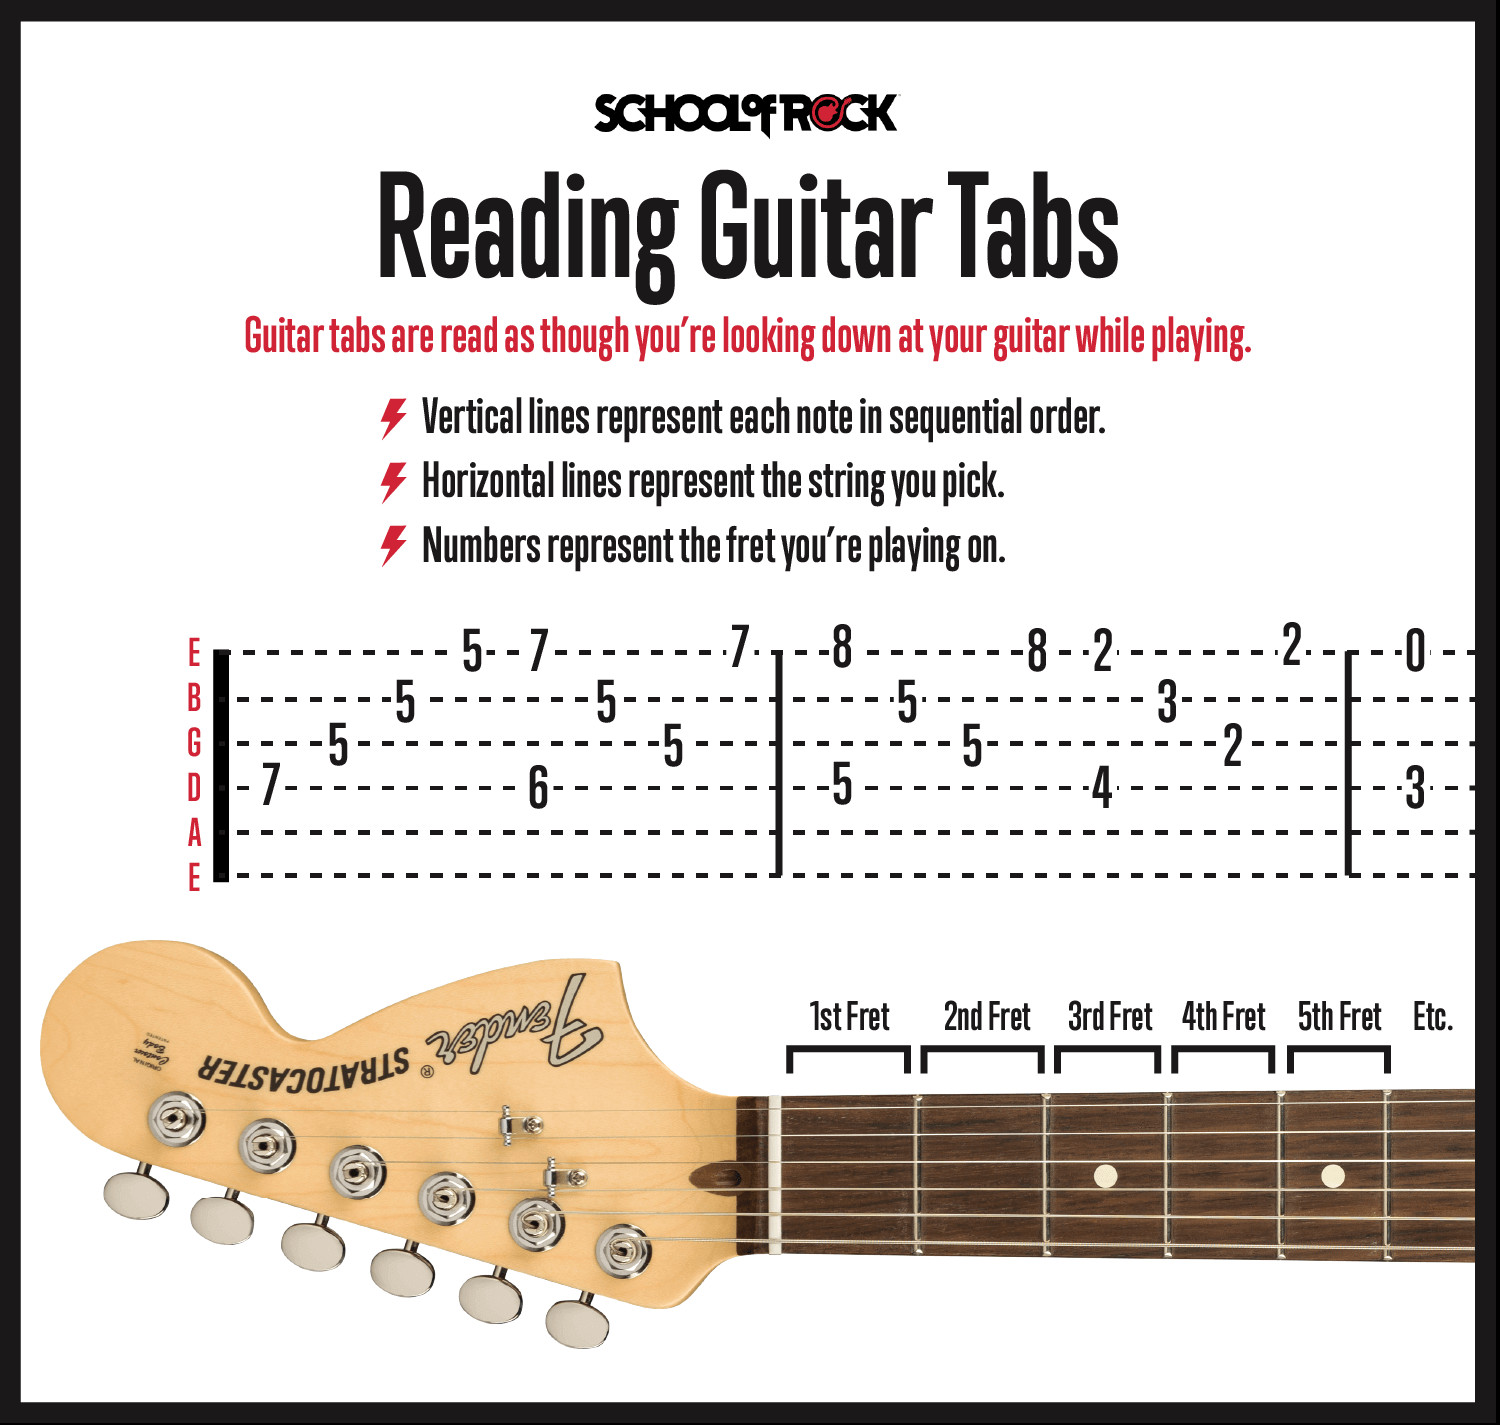 A close-up view of guitar tablature, showing six horizontal lines representing guitar strings and numbers indicating frets.
Understanding the Lines and Numbers
Within guitar tablature, you’ll notice numbers placed on each of the six lines. These numbers are crucial – they represent the frets on your guitar’s fretboard. Frets are the metal strips that run perpendicular to the strings along the neck of your guitar. They are numbered from 0 upwards, starting at the nut (the white piece near the headstock) and extending down the guitar neck.
A ‘0’ on a string in guitar tablature signifies playing that string “open,” meaning you pluck or pick the string without pressing down on any fret with your fretting hand. If you see a ‘1’, it means you need to press down the string at the first fret to play that note. Similarly, ‘2’ indicates the second fret, ‘3’ the third fret, and so on. When learning to decipher guitar songs tablature, remember that these numbers directly correspond to the fret numbers on your guitar.
How to Read Guitar Tablature: The Basics
Reading guitar songs tablature is intuitive and follows a left-to-right progression, just like reading text. The notes displayed in the tab are presented in the order they are played in the song. A key element to recognize is when numbers are stacked vertically on top of each other. This vertical alignment signifies a chord. A chord is played by strumming all the strings indicated by the vertically aligned numbers simultaneously. Guitar tab notation excels for beginners because it not only shows you the notes that comprise a chord but also pinpoints exactly where to play them on your guitar neck.
Essential Knowledge for Reading Guitar Tabs
To effectively learn guitar songs tablature, beginners should first become familiar with the names and order of the 6 guitar strings and understand the layout of the frets on the fretboard. Being able to quickly locate strings and frets is fundamental. This basic familiarity will allow you to use guitar tabs as a practical guide, translating the tab notation into finger placements on your guitar to play actual music.
Deeper Dive into Guitar Tablature Elements
Once you grasp the basic concept of lines and numbers, understanding the other elements within guitar songs tablature will further enhance your reading and playing abilities.
The Guitar Tab Staff Explained
The structure of a guitar tab staff visually resembles the staff used in standard musical notation. However, a crucial distinction is that the lines in guitar tablature represent the 6 guitar strings, not musical pitches as in standard notation.
In guitar tab, the top line is always the high E string, and the bottom line is the low E string. This direct string representation makes learning and reading guitar songs tablature incredibly beginner-friendly. To avoid confusion with standard notation, guitar tabs are typically clearly labeled “TAB.”
Decoding Guitar Frets in Tablature
Guitar frets, those metal strips across the fretboard, are the building blocks of notes on the guitar.
Most guitars feature between 19 and 24 frets. The distance between each fret represents one semitone, or half step, in musical terms. Within each octave (a series of 12 semitones), there are 12 distinct notes. To aid in navigation, most guitars have fret markers – often dots or inlays – positioned at specific frets like the 3rd, 5th, 7th, 9th, and 12th frets. These markers serve as visual landmarks, making it easier to quickly identify fret positions while you’re playing guitar songs tablature.
Remember, when reading guitar tabs, numbers indicate fretted strings. An ‘0’ always indicates an open string, played without fretting. You simply pick or pluck the string and let it ring out.
Reading Guitar Tab Chords
While guitar songs tablature doesn’t use special symbols for chords themselves, chords are easily identifiable by their vertical arrangement. When you see multiple numbers stacked directly above each other in a tab, it signifies a chord. These notes are meant to be played together, creating harmonic richness. In cases where a chord is arpeggiated – meaning the notes of the chord are played individually rather than simultaneously – the tab will show the notes in sequence, even though you are still effectively playing the notes of a chord.
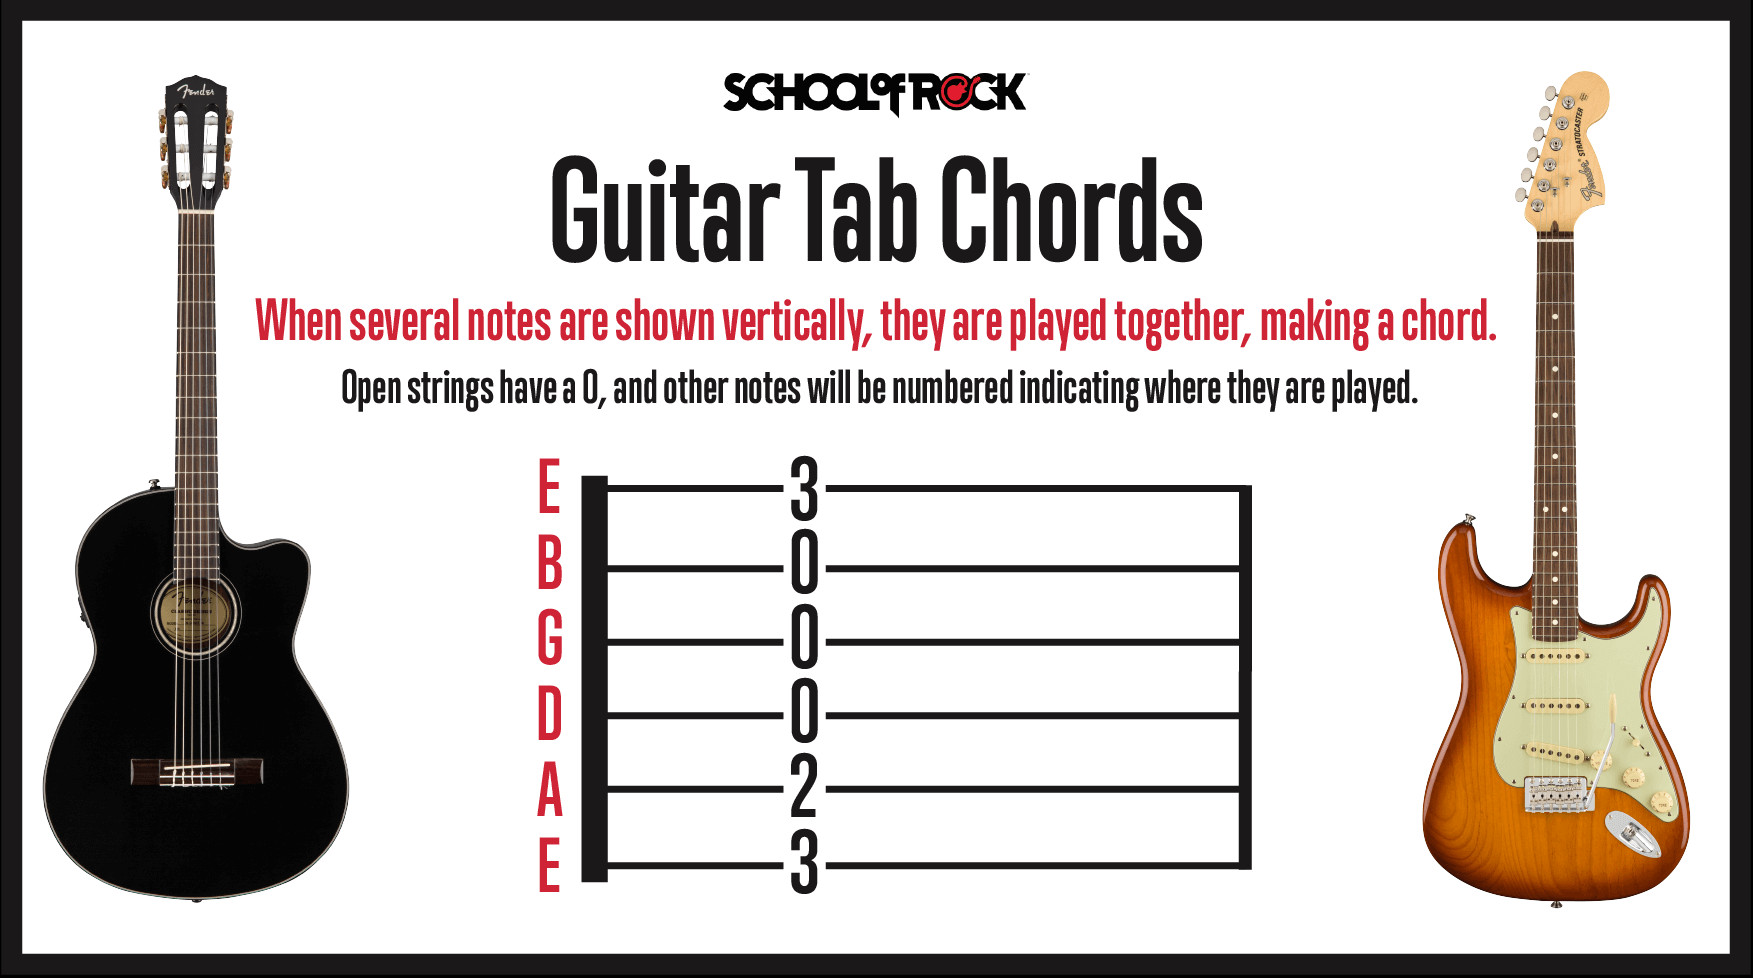 An example of guitar tablature showing a chord diagram, with numbers stacked vertically to indicate notes played together to form a chord.
Understanding Guitar Tab Riffs
Riffs are foundational in many genres, particularly rock music. Riffs are typically short, repeating musical phrases, often combining single notes and partial chords, like power chords. When you encounter riffs in guitar songs tablature, the same fundamental tab rules apply. If you see two or more notes aligned vertically, they are intended to be played at the same time. This consistency makes learning to read guitar tablature for riffs straightforward and efficient.
Guitar Tabs vs. Chord Charts: Key Differences
Guitar tabs and chord charts, while both helpful for guitarists, serve different purposes and present information in distinct ways. A chord chart is a visual diagram that illustrates where to place your fingers on the fretboard to form a specific chord. It often even suggests which fingers to use. Chord charts are frequently included within guitar songs tablature, typically positioned above the lyrics to indicate chord changes within the song’s structure.
However, chord charts usually simplify chord information, showing only the essential 3 or 4 notes that define the chord. A full and accurate musical arrangement of a song might include single notes, notes outside the basic chord voicing, or arpeggios (patterns of playing individual notes within a chord) that are not captured in a simple chord chart. For this reason, chord charts are often paired with guitar songs tablature. The tabs provide the detailed musical information, while chord charts offer a quick visual reference for basic chord shapes, aiding beginner guitarists in progressing beyond just basic chords to playing complete songs.
Fingers and Numbers in Guitar Tablature
Guitar tablature is linear, representing the musical timeline of a song. Chord charts, on the other hand, are like snapshots of your fretboard at a specific chord. Because of this, chord charts often use a numbering system to indicate which fingers of your fretting hand should be used to play each note of the chord. The fingers are numbered: index finger is 1, middle finger is 2, ring finger is 3, and pinky finger is 4.
This finger numbering is distinct from the numbers used in guitar songs tablature. In tabs, numbers indicate the fret to be played, not which finger to use. Therefore, easy guitar tabs often incorporate chord charts to guide beginners on hand positioning while playing chords, complementing the fret-based information provided in the tab itself.
Guitar Tab Symbols and Techniques
Beyond the basic lines and numbers, guitar songs tablature utilizes a range of symbols to indicate specific guitar playing techniques. Understanding these symbols is crucial for accurately interpreting tabs and adding authenticity to your playing, making your rendition of guitar songs sound closer to the original.
Tuning is Key Before You Start
Before you even begin to play, always ensure your guitar is properly tuned. Guitar tuning is fundamental; if your guitar is out of tune, nothing you play from guitar songs tablature will sound correct. Regularly check and adjust your tuning to ensure you’re playing in pitch.
Mastering Muting Techniques in Guitar Tablature
Muting is a vital technique, especially in genres like Rock music. Muting is used extensively in styles from Heavy Metal and Punk to Alternative to shape the sound and character of the music.
Palm Muting (P.M.)
Palm muting is a cornerstone technique in rock guitar playing. It’s achieved by lightly resting the palm of your picking hand on the strings near the bridge of the guitar as you pick. The degree of palm muting affects the sound: heavy palm muting creates a tight, percussive rhythmic sound, while lighter palm muting allows notes to ring out with a slightly muted quality. In guitar songs tablature, palm muting is typically indicated by the abbreviation “P.M.” written above the section of the tab where palm muting should be applied.
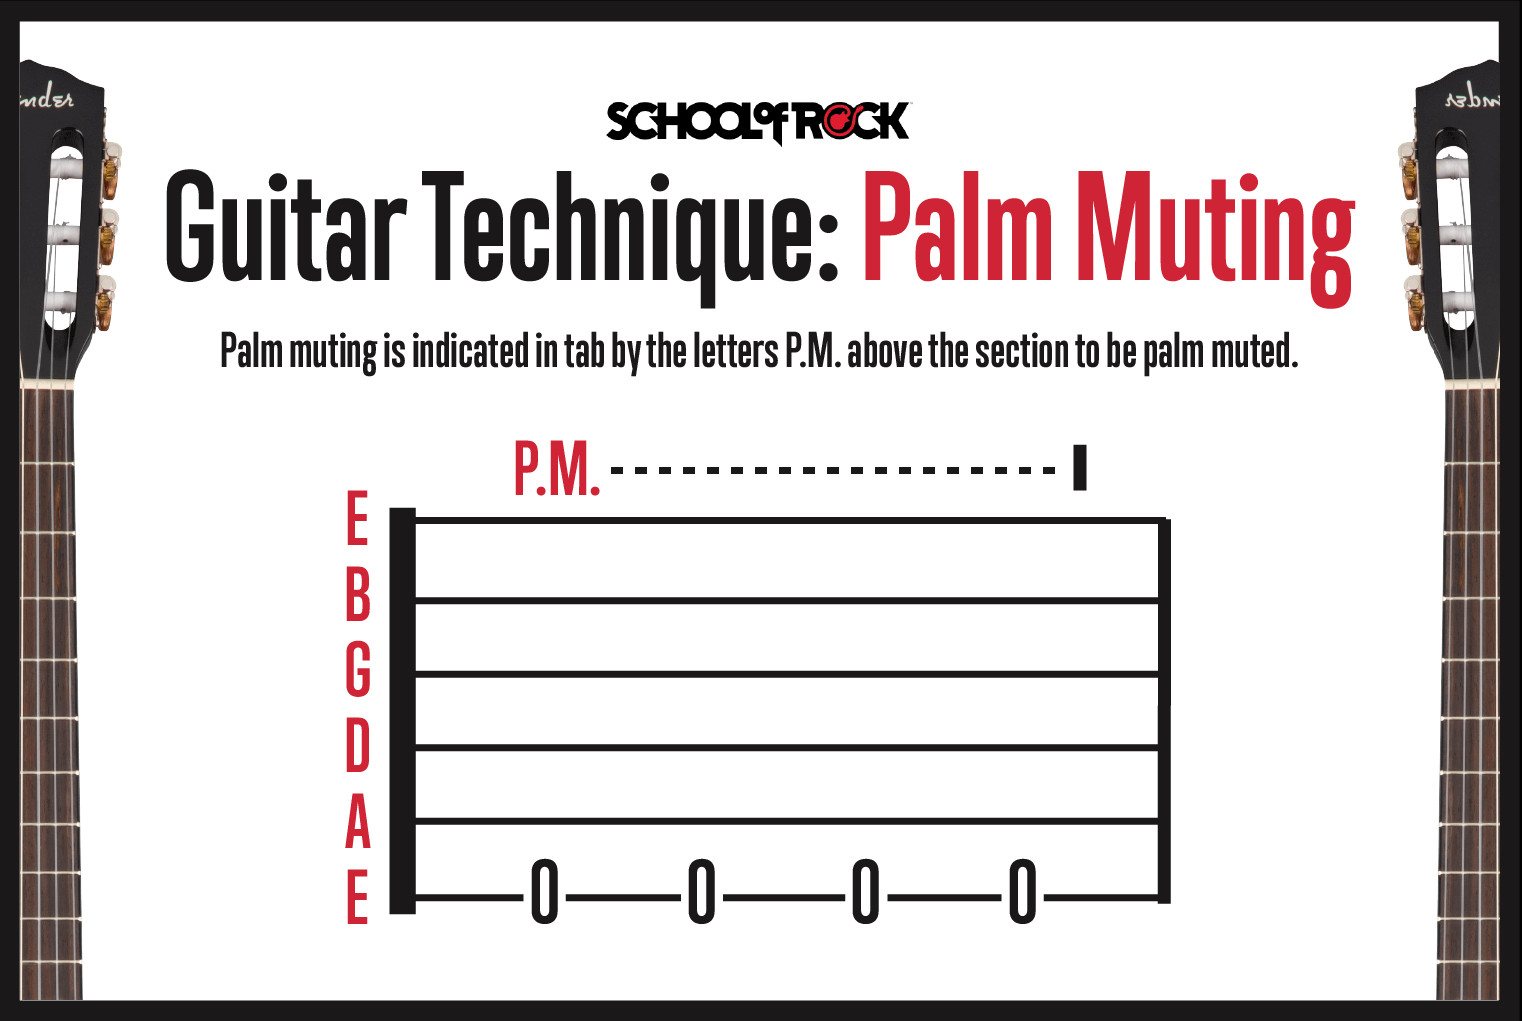 A visual representation of palm muting technique on a guitar, showing the palm of the picking hand resting lightly on the strings near the bridge.
Muted Notes (X)
Muted notes are a different technique from palm muting and are executed using your fretting hand. In this technique, you still pick the notes as written in the guitar songs tablature, but you don’t press down fully on the fretboard with your fretting hand. This results in a percussive, muted sound rather than a clear pitch. In guitar tabs, muted notes are represented by an “X” in place of the usual fret number on the string.
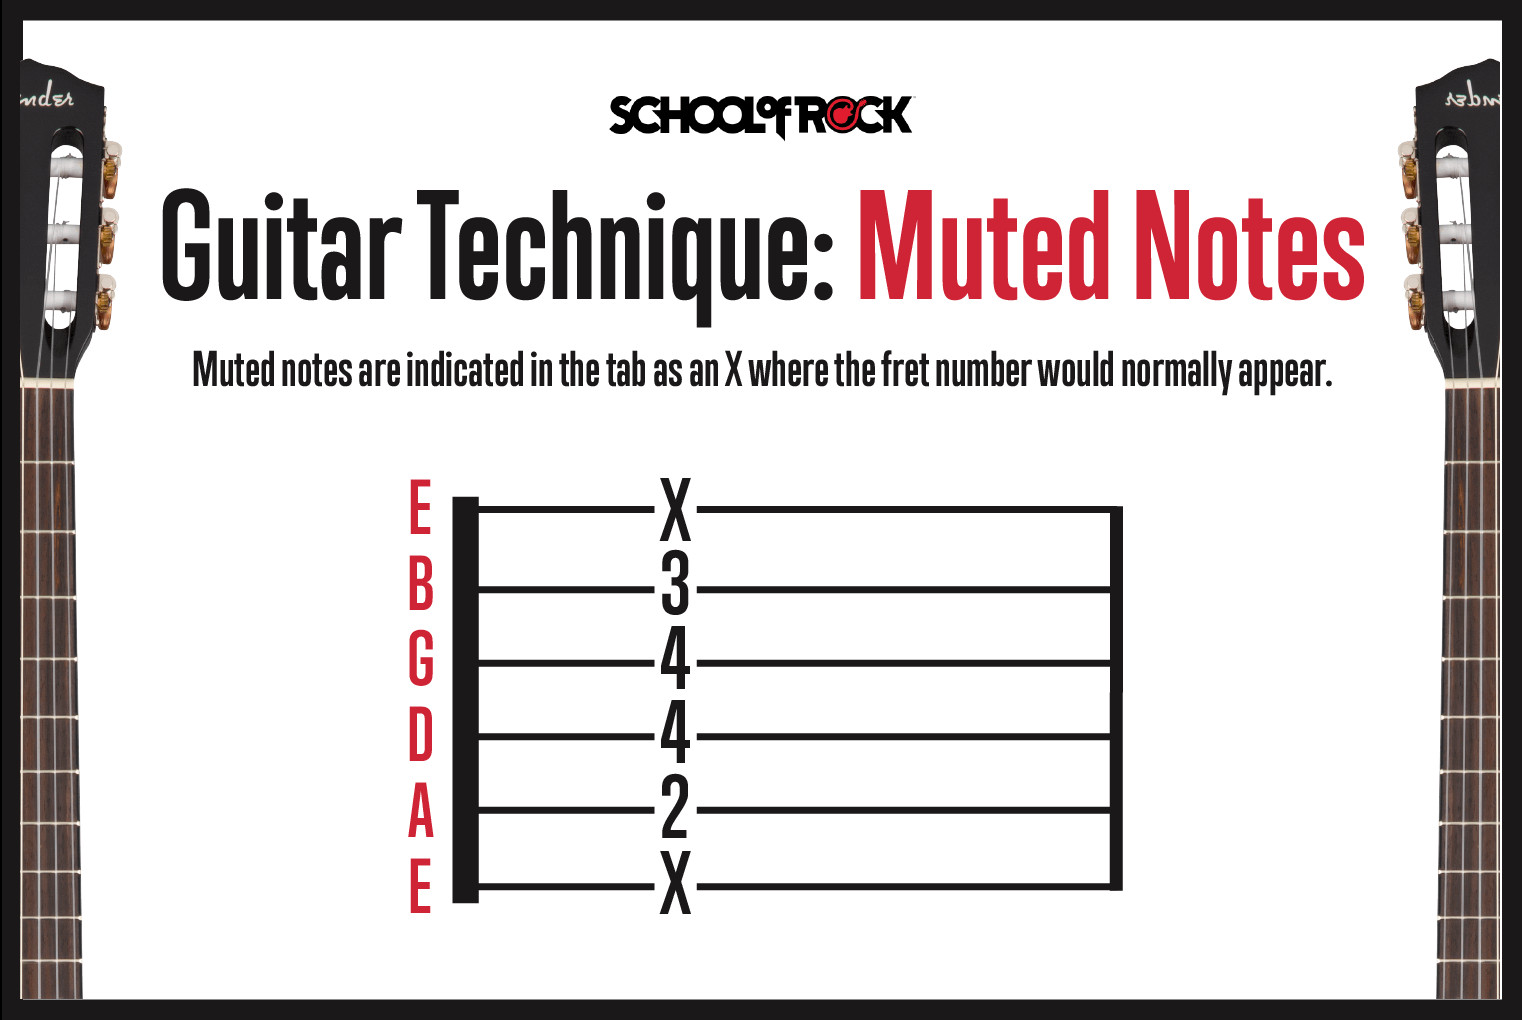 A visual representation of muted notes technique, showing the fretting hand lightly touching the strings without fully pressing down on the frets.
String Bending in Guitar Tablature
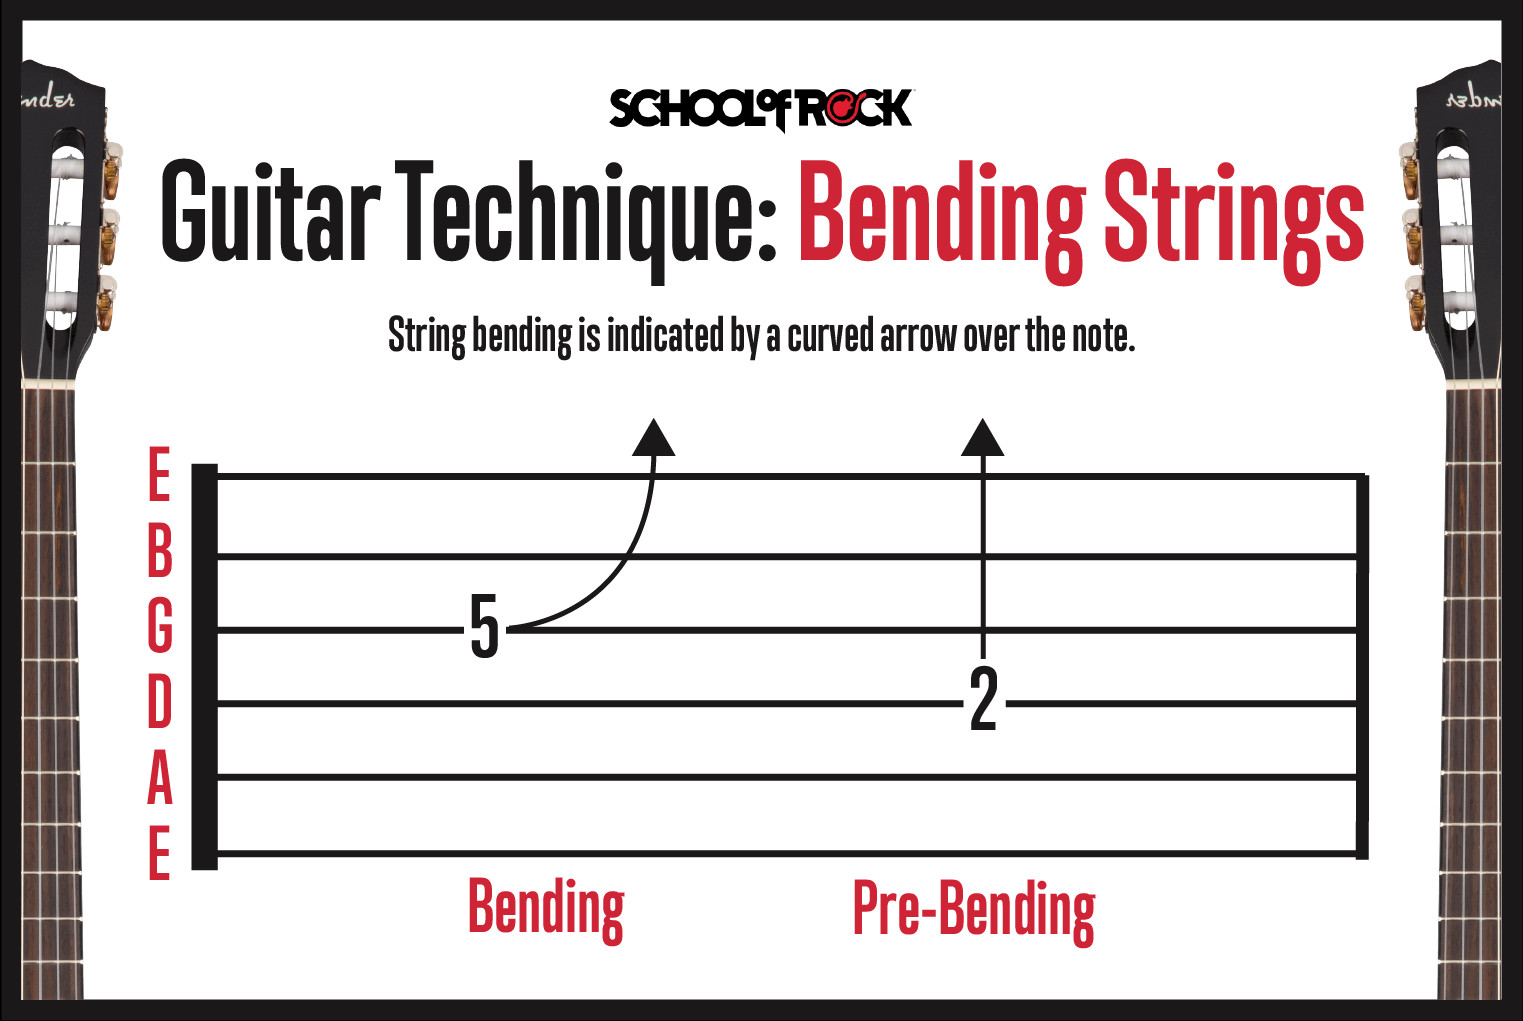
String bending is a technique that adds expressive, vocal-like qualities to guitar playing. To identify bends in guitar songs tablature, look for a curved arrow above the note. This arrow indicates that you should bend the string, increasing its pitch. The arrow may also specify the extent of the bend, such as “½” for a half step bend (raising the pitch by one semitone) or “full” for a full step bend (raising the pitch by two semitones). The target pitch of the bend is often referred to as the “target” note.
Bending Technique
String bending is achieved by pushing or pulling the string sideways across the fretboard, rather than pressing straight down as you normally do when fretting a note. For most strings (except the low E), guitarists typically push the strings upwards, towards the ceiling. The low E string is usually bent downwards, towards the floor. The key to a good bend is applying smooth, consistent pressure to the string as you bend it to reach the desired pitch.
Bending Technique
Most string bends are performed using a combination of fingers for added strength and control. Typically, the “main” fretting finger (often the ring finger) performs the bend, while the middle and index fingers provide support and additional force. This multi-finger approach results in smoother, more controlled bends with accurate pitch.
 A visual representation of bending technique, showing fingers used to bend a guitar string upwards on the fretboard.
Pre-Bending
When learning guitar songs tablature, you might encounter “pre-bends.” A pre-bend involves bending the string up to pitch before picking it. The tab notation for a pre-bend typically shows a vertical arrow pointing upwards, indicating the bend amount (full, ½, etc.), followed by a curved arrow pointing downwards. This indicates that after picking the pre-bent note, you should release the bend, allowing the string to return to its original pitch. Pre-bent notes may return to the original fretted pitch or sometimes be bent further upwards to another target note after the initial release.
Sliding Notes in Guitar Tablature
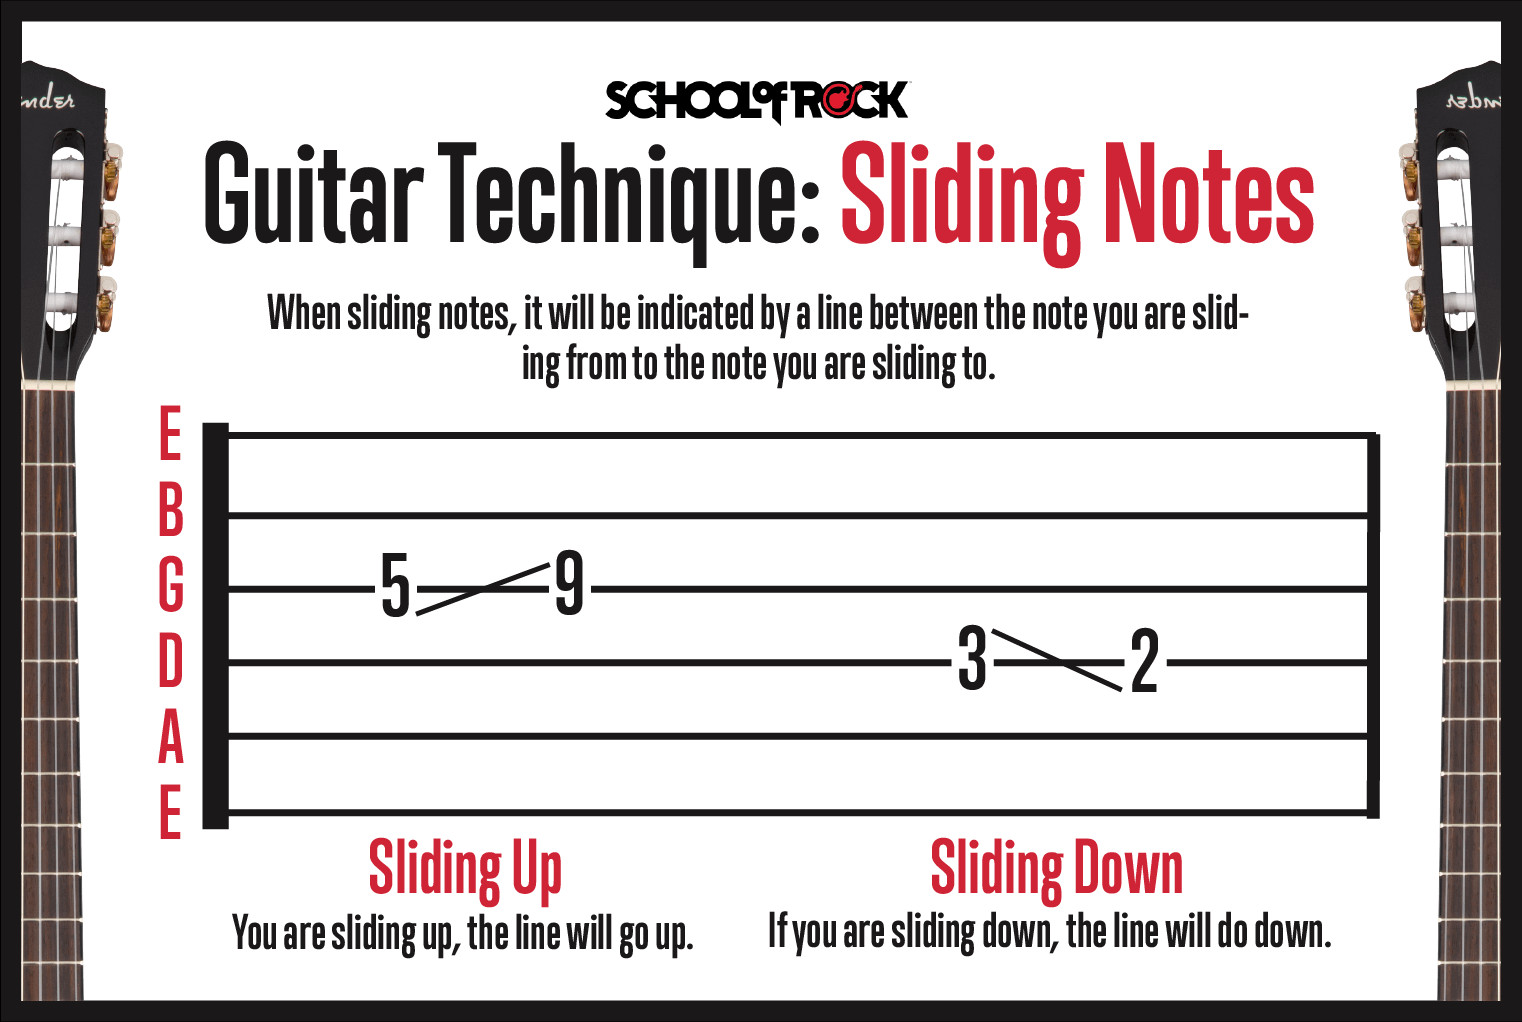
Sliding is another essential guitar technique that creates a smooth transition between notes. You can slide up to a higher note or down to a lower note. Sliding differs from bending in that you physically slide your fretting finger along the string to the target fret, maintaining contact with the string throughout the slide.
Slide Up
In guitar songs tablature, a slide up is represented by a line connecting the note you are sliding from to the note you are sliding to. If the target note is higher in pitch, the connecting line will often be angled slightly upwards.
 A visual representation of sliding up technique, showing a finger sliding upwards along the guitar string to a higher fret.
Slide Down
Conversely, a slide down in guitar songs tablature is also shown with a line connecting the starting and ending notes. If the target note is lower in pitch, the line may be angled slightly downwards.
Hammer-Ons (H) in Guitar Tablature
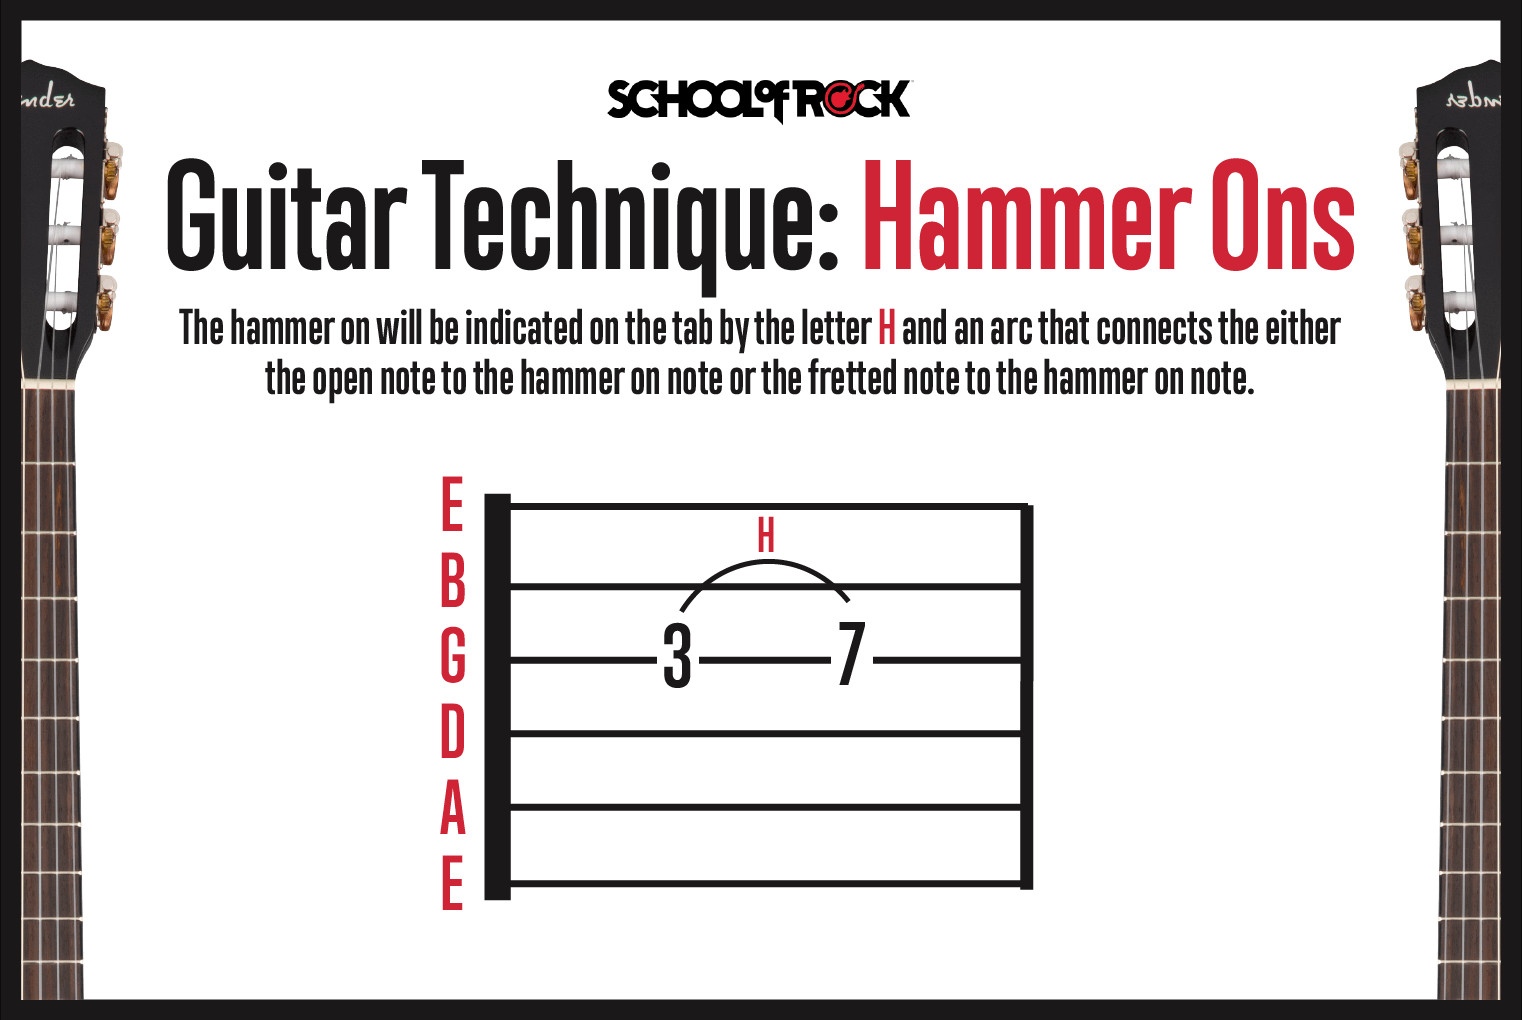
The hammer-on is a cool guitar technique where you produce a note by “hammering on” to a fret with your fretting finger, without picking the string again. You can hammer-on from an open string or from a previously fretted note. The resulting note will always be higher in pitch than the starting note. In guitar songs tablature, hammer-ons are indicated by the letter “H” and a curved arc connecting either an open string ‘0’ to the hammered-on fret number, or connecting two fret numbers where the second is hammered-on.
How to Play Hammer-Ons
To execute a hammer-on, strike the guitar string onto the desired fret with your fretting finger with enough force to make the note sound clearly. Achieving a strong, clear hammer-on takes practice. It’s often easier to practice hammer-ons on an electric guitar, especially at a moderate volume. Start by practicing on your open low E string, hammering-on to the third fret. Let the note ring, and repeat this exercise on different strings and frets to develop your technique.
 A visual representation of hammer-on technique, showing a finger forcefully striking the string onto a fret to produce a note.
Pull-Offs (P) in Guitar Tablature
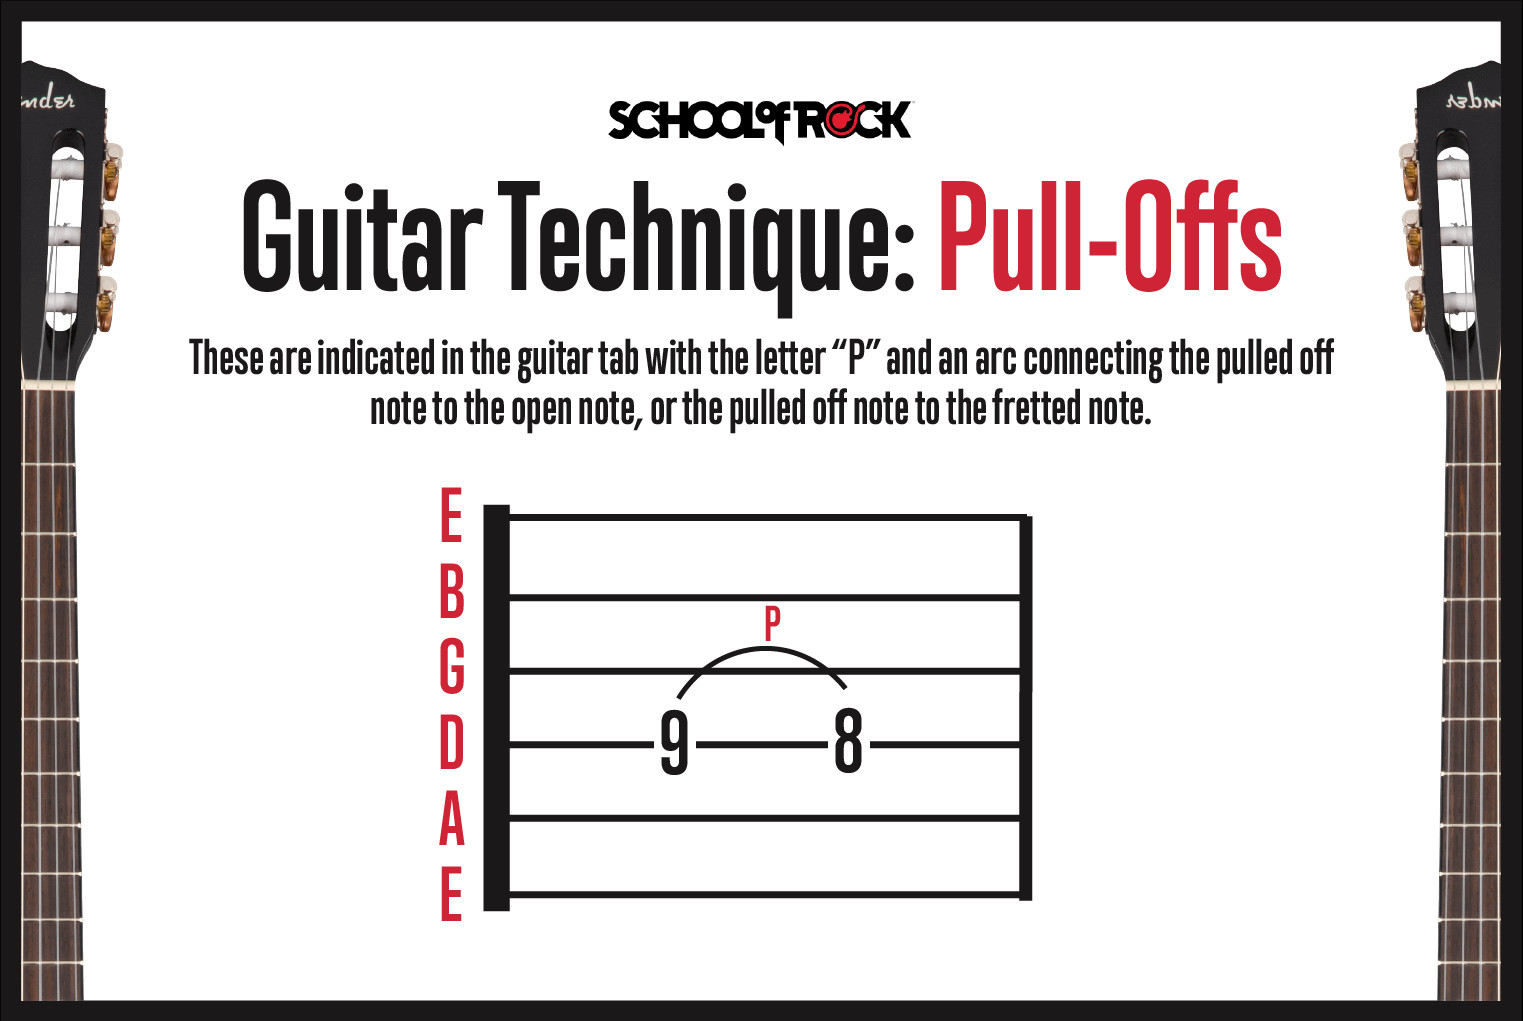
Pull-offs are the opposite of hammer-ons. Instead of hammering onto a string, you “pull off” a fretted note to sound either an open string or a note fretted by another finger on the same string that is lower in pitch. In guitar songs tablature, pull-offs are indicated by the letter “P” and a curved arc connecting the pulled-off note to the resulting open or fretted note. The resulting note after a pull-off will always be lower in pitch than the starting note.
How to Play Pull-Offs
To perform a pull-off, you first fret a note, then pull your fretting finger off the string in a downward or sideways motion, plucking the string as you release pressure. This action causes the string to vibrate and sound either an open string or a lower note already being fretted. When executing pull-offs, you need to “grab” enough of the string with your fingertip to ensure it vibrates audibly when you pull off.
Hammer-ons and pull-offs can be combined in sequence, creating alternating patterns known as trills. This combination is achieved by repeatedly alternating between a hammer-on and a pull-off motion.
 A visual representation of pull-off technique, showing a finger pulling off the string to sound a lower note.
Vibrato in Guitar Tablature
Vibrato is a technique that adds warmth and expressiveness to sustained notes. It involves repeatedly bending a note slightly and then returning it to its original pitch, all while sustaining the note. Vibrato is indicated in guitar songs tablature by a zig-zag line drawn above the staff. When learning to read tabs, pay attention to the length of the vibrato line. Generally, a longer line suggests a longer duration of vibrato should be applied.
How to Play Vibrato
Vibrato is similar to bending, but the pitch variation is smaller and more rapid. You can apply vibrato using a single finger or by using a main fretting finger supported by others. Start practicing with a slow, smooth vibrato and gradually experiment with varying the speed to achieve different expressive effects. Like bending, vibrato is a very personal technique, adding a unique “voice” to your guitar solos. Every guitarist’s vibrato is unique, as individual as a fingerprint.
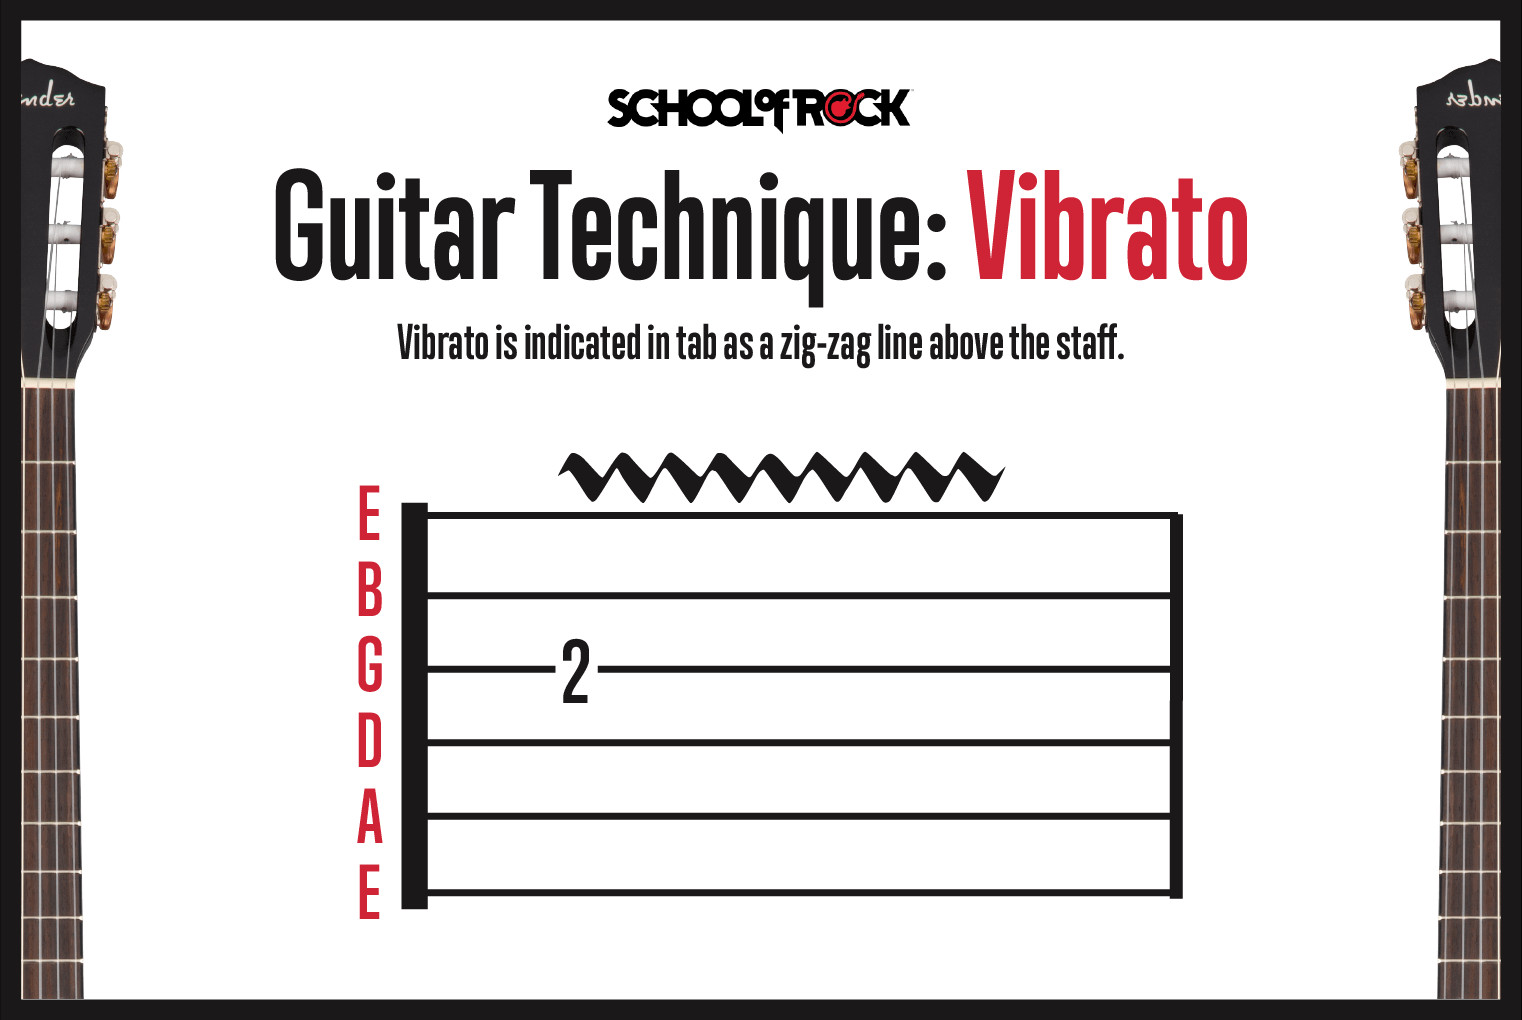 A visual representation of vibrato technique, showing a finger making small, rapid bending motions to create vibrato.
Tapping (T) in Guitar Tablature
Tapping is an advanced technique that involves using both your fretting hand and your picking hand to play notes on the fretboard. Typically, you fret notes with your regular fretting hand while also “tapping” or fretting notes with a finger from your picking hand (usually the index finger). The picking hand tap is essentially a variation of a hammer-on technique. Tapping is notated in guitar songs tablature with the letter “T” placed above the tapped note.
How to Finger Tap
Tapping gained mainstream popularity thanks to Eddie Van Halen, although the technique itself has roots in classical guitar. To finger tap, fret a note with your regular fretting hand and then “tap” a higher note on the same string by forcefully striking the fretboard above a higher fret with your picking hand index finger.
Finger tapping is analogous to a hammer-on, but instead of using a finger from your fretting hand, you use a finger from your picking hand to hammer onto the string. This technique allows you to play notes with intervals that are too wide to reach with just your fretting hand alone.
Playing with overdrive or distortion and at a decent volume level often makes tapping easier to execute and sound better. Tapping also enables you to play very rapidly because you are effectively using both hands to fret notes on the fretboard.
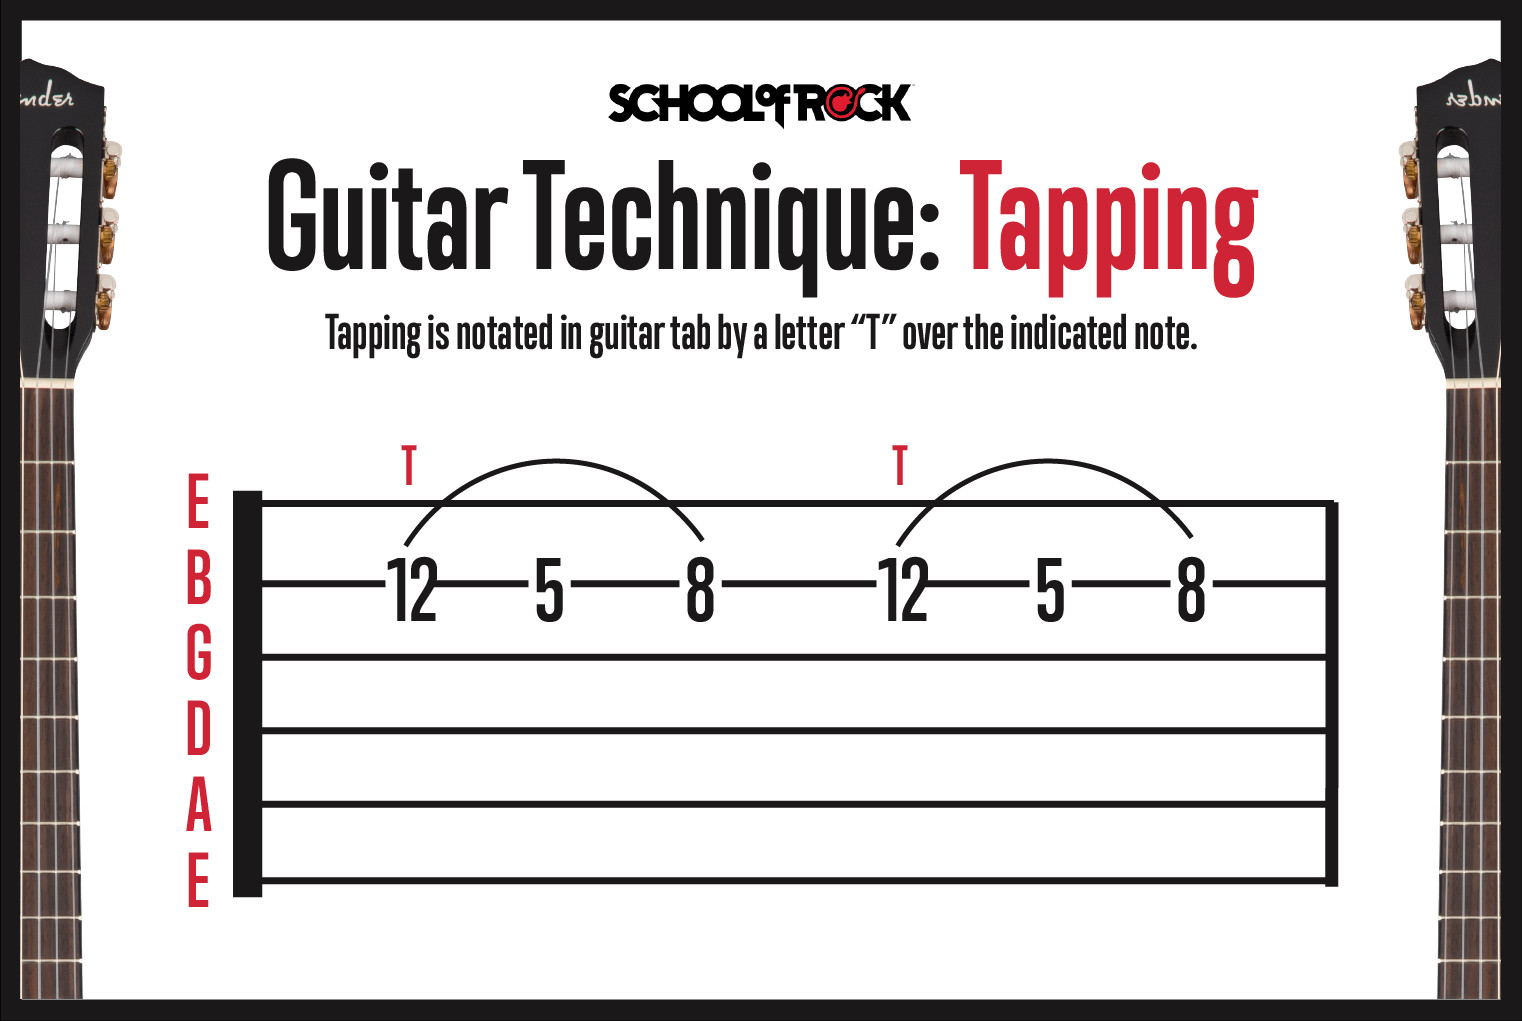 A visual representation of tapping technique, showing both hands on the fretboard, with the picking hand tapping a note.
Two-Handed Tapping
Two-handed tapping takes the tapping concept further. It’s a technique where both your fretting hand and picking hand independently tap notes on the fretboard, without traditional picking. In some applications of two-handed tapping, the fretting hand might tap bass notes while the picking hand simultaneously taps melody or solo lines, creating complex textures.
Strumming in Guitar Tablature
When guitar songs tablature indicates strumming chords, it will often use symbols to represent downstrokes and upstrokes, the two fundamental strumming motions.
Downstrokes
Downstrokes are strumming motions that start on the lower (bass) strings of the guitar and end on the higher (treble) strings, using a downward motion of your pick or strumming hand. In guitar tabs, downstrokes are represented by a symbol that looks like a thick horizontal line with two short “legs” pointing downwards on either side.
Upstrokes
Upstrokes are the opposite of downstrokes. They begin on the higher strings and end on the lower strings, using an upward strumming motion. In guitar songs tablature, upstrokes are notated by a “V” shaped symbol.
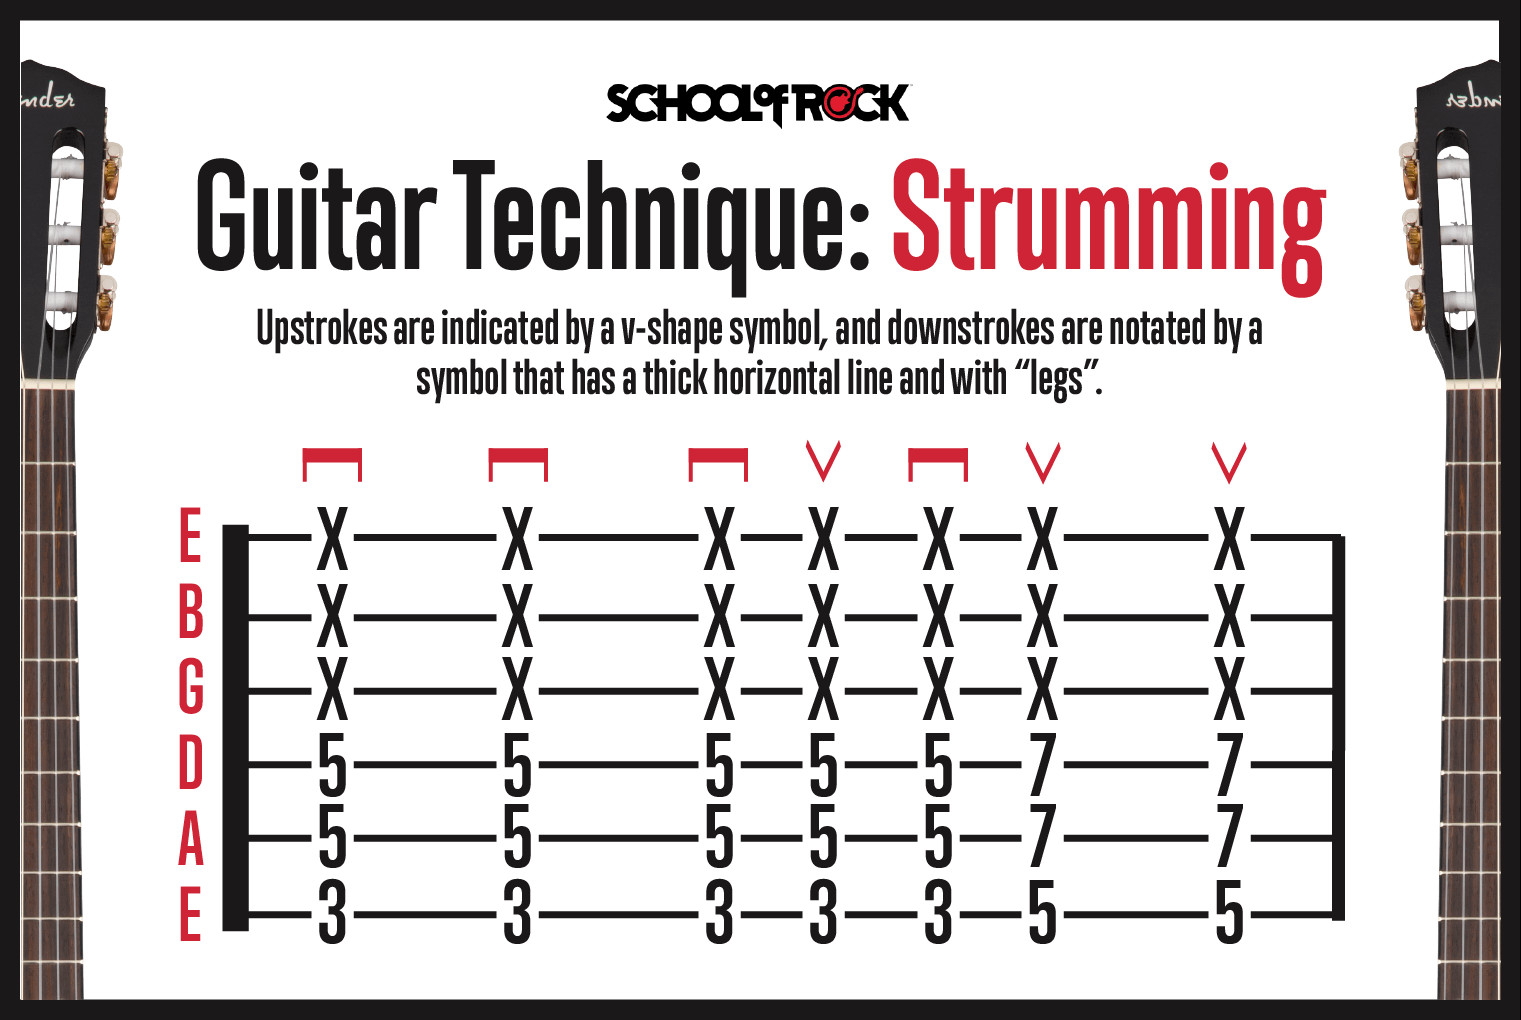 Visual representations of downstroke and upstroke strumming symbols as they appear in guitar tablature.
How to Strum Effectively
When playing chords, guitar songs tablature may indicate specific strumming patterns to match the rhythm of the song. You can strum using only downstrokes, only upstrokes, or, most commonly, a combination of both. Songs with an eighth-note rhythm are often counted as “one and two and three and four and…” Many songs utilize alternating downstrokes and upstrokes in an eighth-note rhythm, with downstrokes typically falling on the numbered counts (1, 2, 3, 4) and upstrokes on the “ands.”
Upstrokes and Downstrokes for Single Notes
The same upstroke and downstroke notation used for strumming chords in guitar songs tablature can also apply to single notes. A downstroke symbol indicates picking a single note with a downward motion of your pick, while an upstroke symbol indicates picking a single note with an upward motion.
Ready to Learn Other Guitar Techniques?
Now that you’ve learned how to read guitar songs tablature and understand various guitar techniques, you’re equipped to start playing a vast range of music. From beginner-level songs to complex pieces, guitarplayers.net is dedicated to helping you achieve your full potential as a guitarist. From basic strumming to advanced tapping, our resources provide the knowledge and guidance you need to quickly learn and play your favorite guitar songs.
Ready to find guitar tabs and start playing? From easy songs perfect for beginners to challenging pieces for experienced musicians, guitarplayers.net has resources for all levels. Explore our extensive collection of high-quality guitar songs tablature and unlock your musical journey today!
Looking to upgrade your gear? Check out our comprehensive Guitar Buying Guide!
