
For guitarists venturing into the world of effects pedals, the sheer variety and possibilities can be both exciting and overwhelming. Understanding how to arrange these pedals in your signal chain is crucial to unlocking their full potential and achieving your desired sound. While there’s no single “correct” way to order your guitar pedals, certain placements have become common practice due to their sonic benefits. This guide will walk you through the typical pedal order, explore different setups, and empower you to experiment and discover your own ideal configuration.
Understanding Common Pedal Order Categories
To grasp the fundamentals of pedal order, it’s helpful to categorize effects into groups based on their function and how they interact with your guitar signal. Here’s a breakdown of common effect types and their generally recommended placement in the signal chain:
Dynamics & Filters
These pedals are typically placed at the beginning of your signal chain as they are designed to shape the fundamental characteristics of your raw guitar signal.
- Compressors: These pedals even out your signal’s dynamics, reducing the difference between the loudest and quietest parts. Placing a compressor early ensures a consistent signal level for subsequent effects to process.
- Filters (Wah, Envelope Filters): Wah pedals and envelope filters react dynamically to your playing. Placing them early in the chain allows them to directly interact with your guitar’s natural output, creating expressive and responsive filtering effects.
Gain Effects
Gain-based effects, which introduce overdrive, distortion, and fuzz, are generally placed after dynamics and filters.
- Overdrive, Distortion, Fuzz: These pedals add harmonic richness and sustain to your tone. Positioning them after dynamics pedals allows them to work with a more controlled and shaped signal, leading to a tighter and more defined driven sound.
Modulation Effects
Modulation effects, which create swirling, shimmering, and textured sounds, usually follow gain effects in the signal chain.
- Chorus, Flanger, Phaser, Tremolo: These effects manipulate the signal to create movement and depth. Placing them after gain allows them to modulate the already distorted or overdriven signal, resulting in lush and expansive textures.
Time-Based Effects
Time-based effects, such as delays and reverbs, are commonly positioned towards the end of the signal chain to create ambience and space.
- Delay, Reverb: These effects simulate echoes and room acoustics, adding depth and dimension to your sound. Placing them last ensures that all preceding effects are incorporated into the delayed or reverberated signal, creating a cohesive and polished final tone.
Volume Pedals
Volume pedals are versatile and can serve different purposes depending on their placement within the signal chain.
- Volume Pedals: Positioned early, they act as a master volume control for your entire pedalboard, allowing you to adjust the overall level going into your amplifier and other effects. Placed later, especially after gain or modulation, they can be used to fade in or out specific effect combinations without altering the character of the drive or modulation itself.
Example Pedalboard Setups: Putting Theory into Practice
Let’s explore a couple of common pedalboard setups that illustrate these principles and offer different approaches to volume control.
Setup 1: Volume Control at the Beginning
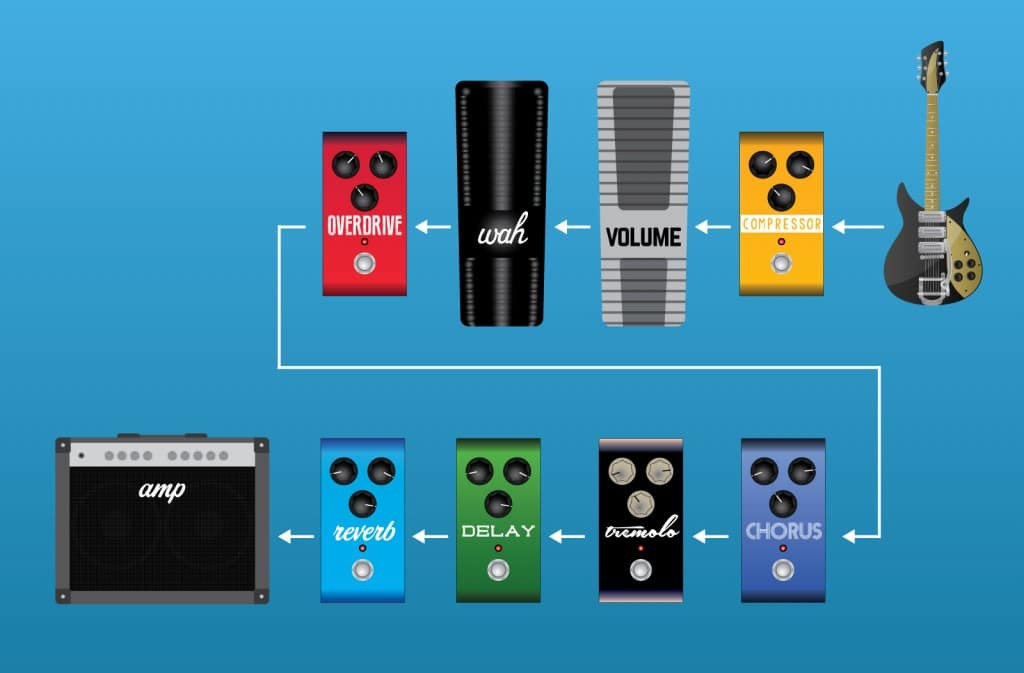 Effects Pedal signal chain
Guitar => Compressor => Volume Pedal => Wah Pedal => Overdrive => Chorus => Tremolo => Delay => Reverb => Amplifier
In this setup, the volume pedal is placed early in the chain, right after the compressor. This placement makes the volume pedal function as a global volume control for your entire pedalboard. By reducing the volume at this stage, you’re effectively lowering the input signal to all subsequent effects, including your overdrive and amplifier. This can be particularly useful for cleaning up your driven tones. For instance, if you have your overdrive pedal engaged, rolling back the volume pedal can reduce the amount of gain hitting the overdrive, resulting in a cleaner, less saturated sound without having to disengage the overdrive pedal itself.
Setup 2: Volume Control Before Time-Based Effects
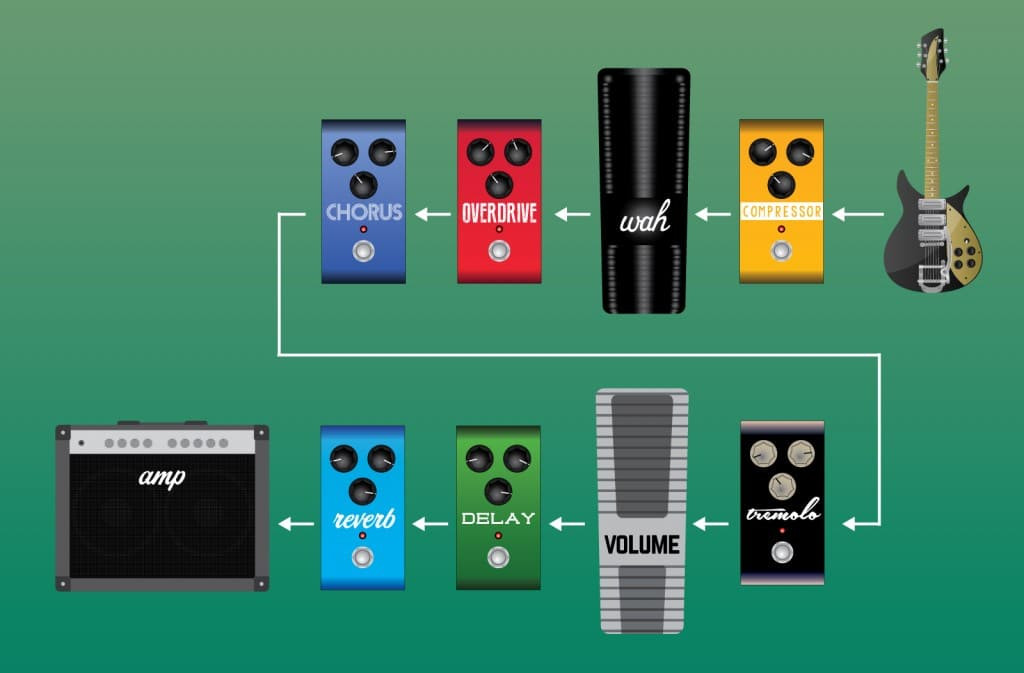 Effects Pedal signal chain
Guitar => Compressor => Wah Pedal => Overdrive => Chorus => Tremolo => Volume Pedal => Delay => Reverb => Amplifier
This setup moves the volume pedal towards the end of the chain, positioning it right before the time-based effects (delay and reverb). In this configuration, the volume pedal controls the level of your signal just before it enters the delay and reverb pedals. This is advantageous for maintaining the full character of your overdrive and modulation effects while still having volume control. For example, you can create swells and fades with a fully overdriven and modulated signal, allowing you to bring in washes of sound without altering the gain or modulation characteristics as you decrease the volume. This setup is excellent for creating ambient textures and dynamic soundscapes.
Exploring the Amplifier’s Effects Loop
Beyond pedalboard placement, another dimension to consider is utilizing your amplifier’s effects loop. An effects loop is essentially a break in your amplifier’s signal path, typically located between the preamp and power amp sections. It provides a dedicated point to insert effects into your signal flow.
What is an Effects Loop?
An effects loop consists of “Effects Send” and “Effects Return” jacks on your amplifier. The “Effects Send” jack outputs the signal after the preamp stage, and the “Effects Return” jack inputs the signal back into the power amp stage. Some amplifiers might label these jacks as “Preamp Out” (Effects Send) and “Power Amp In” (Effects Return). Not all amplifiers have effects loops, but those that do offer a valuable tool for shaping your tone.
Why Use an Effects Loop?
The primary benefit of using an effects loop is to maintain clarity, especially when using amplifier-derived distortion. If you rely on your amplifier’s preamp section for overdrive or distortion, placing time-based effects like delay and reverb in the effects loop can significantly improve their clarity and prevent muddiness. When delay and reverb are placed before the preamp (in the standard pedalboard chain going into the amp’s input), the delay repeats and reverb tails are then subjected to the amplifier’s overdrive, which can result in a washed-out and indistinct sound. By placing these effects in the effects loop, they are processed after the preamp’s distortion, ensuring that the delay and reverb remain clear and distinct, sitting on top of your driven tone rather than being smeared by it. Modulation effects can also benefit from effects loop placement, offering a different sonic character compared to placing them before the amplifier’s input.
Series vs. Parallel Effects Loops
Amplifiers can have either series or parallel effects loops, each functioning differently:
- Series Effects Loop: In a series loop, the entire signal from the amplifier’s preamp is routed through the Effects Send, passes through any pedals in the loop, and then returns to the power amp via the Effects Return. Essentially, the entire signal flow is interrupted and passes through the effects loop.
- Parallel Effects Loop: In a parallel loop, the signal from the preamp is split. A portion of the signal is sent through the Effects Send, processed by pedals in the loop, and then mixed back with the unaffected “dry” signal that continues directly to the power amp. Parallel loops often have a “mix” or “effect level” control that allows you to adjust the balance between the processed and unprocessed signals. When using pedals in a parallel effects loop, it’s generally recommended to set the “mix” control on your pedals to 100% wet (effect only) to avoid phase cancellation or unwanted doubling effects. Some pedals, like Strymon’s TimeLine and BigSky, even feature a “Kill Dry” function (often labeled “DRYSIG” in their menus) that completely removes the dry signal output, specifically designed for use in parallel effects loops. However, it’s generally not recommended to use the “Kill Dry” feature when using multiple pedals in a parallel loop, as it can complicate signal routing and mixing.
Effects Loop Setups: Integrating with Your Amp
Here are a couple of example setups that demonstrate how to incorporate your amplifier’s effects loop into your signal chain.
Effects Loop Setup 1: Time-Based Effects in the Loop
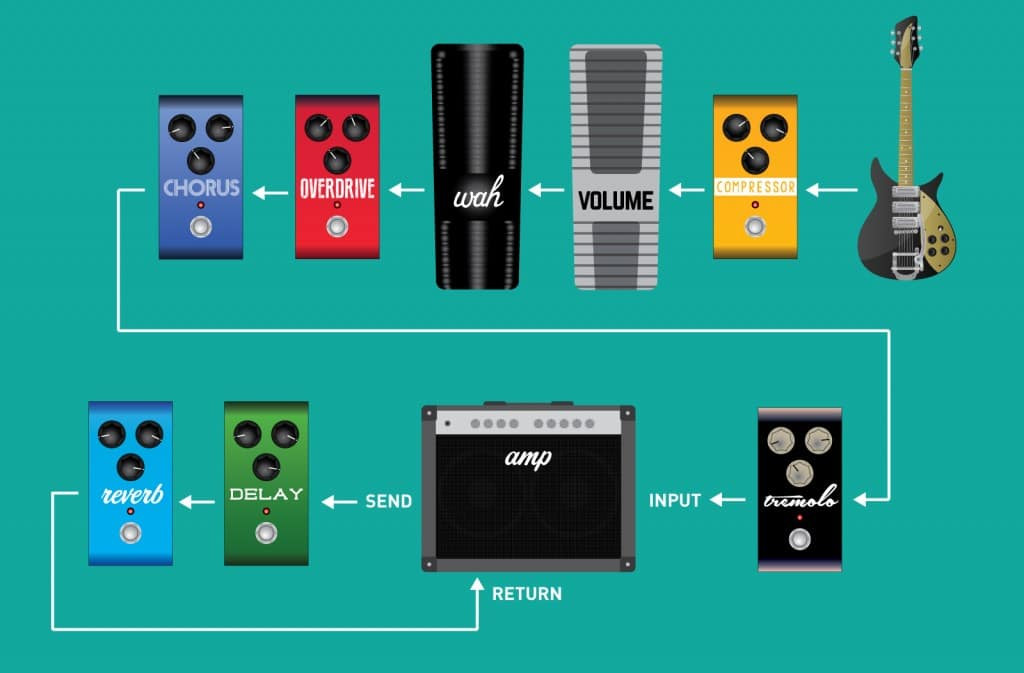 Setting up your Effects Signal Chain – Amplifier Effects Loops
Guitar => Compressor => Volume Pedal => Wah Pedal => Overdrive => Chorus => Tremolo => Amplifier INPUT; Amplifier Effects Send => Delay => Reverb => Amplifier Effects Return
In this configuration, only the time-based effects (delay and reverb) are placed within the amplifier’s effects loop. The dynamics, filter, gain, and modulation effects remain in front of the amplifier, plugged into the amp’s input. This setup is ideal for players who derive their overdrive from their amplifier’s preamp. By placing delay and reverb in the loop, the overdriven sound from the preamp feeds into these effects, ensuring clear and distinct delay repeats and reverb tails that sit beautifully with the driven tone.
Effects Loop Setup 2: Modulation and Time-Based in Loop
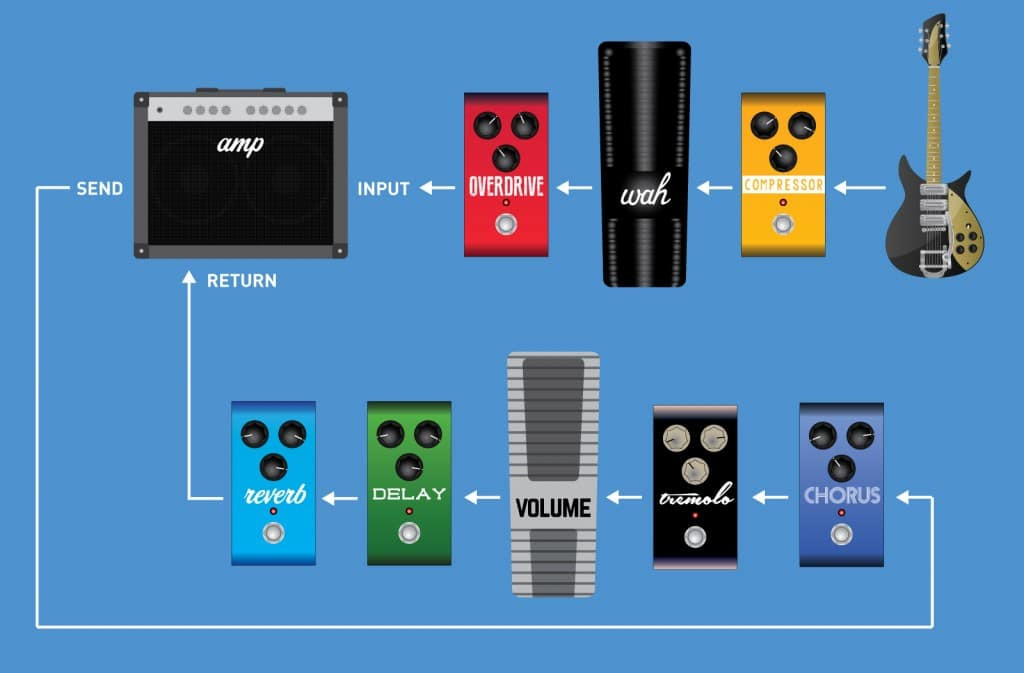 Setting up your Effects Signal Chain – Amplifier Effects Loops
Guitar => Compressor => Wah Pedal => Overdrive => Amplifier Input; Amplifier Effects Send => Chorus => Tremolo => Volume Pedal => Delay => Reverb => Amplifier Effects Return
This setup expands on the previous one by also placing modulation effects (chorus and tremolo) and the volume pedal into the effects loop, along with delay and reverb. Only the dynamics, filter, and gain effects remain in front of the amplifier. Moving modulation effects to the effects loop, after the preamp stage, can create a different sonic character compared to placing them before the amp’s input. Modulation effects in the loop can sound less intense and more subtly integrated with the overdriven tone, offering a smoother and sometimes wider stereo image, particularly with chorus and tremolo. Placing the volume pedal in the effects loop, in this scenario, provides a master volume control over the effects loop signal, useful for controlling the overall level of the effects in the loop without affecting the preamp gain stage.
Special Pedal Considerations and Flexible Placements
Certain pedals possess unique characteristics or features that allow for unconventional or more flexible placement options within your signal chain.
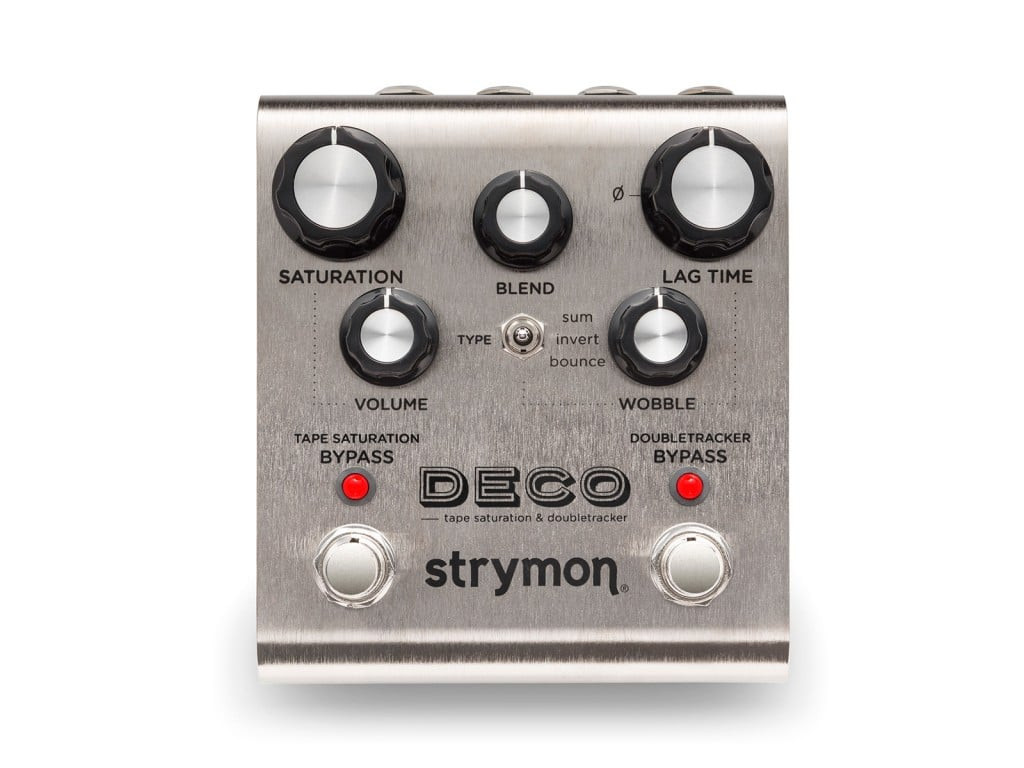 Deco Tape Saturation & Doubletracker
The Deco Tape Saturation & Doubletracker is a prime example of a versatile pedal that can function effectively in multiple positions. Placed early in your signal chain, the Deco’s Tape Saturation can act as a nuanced light overdrive, adding warmth and subtle compression to your core tone. Conversely, positioning the Deco at the end of your chain, with lower Tape Saturation settings, allows it to impart a tape-like warmth, gentle compression, and enhanced low-end harmonics to your entire processed signal, acting as a subtle tone sweetener for your overall sound.
Mobius Modulation pedals often feature advanced routing capabilities, such as the Pre/Post connection feature found in Strymon’s Mobius. This feature allows you to configure individual presets to be placed either in a “Pre” position (typically before gain) or a “Post” position (typically after gain) within your signal chain, offering immense flexibility in shaping the character of your modulation effects on a preset-by-preset basis. (Refer to the Mobius manual pages 22-23 for detailed instructions on utilizing this feature.)
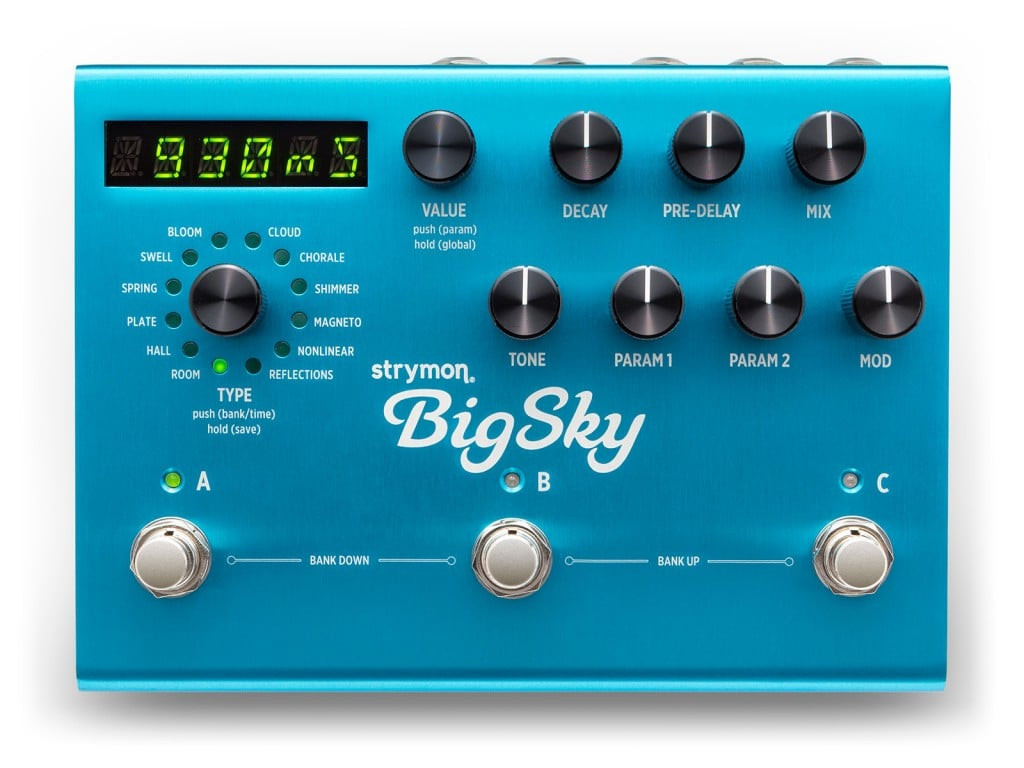 BigSky Reverberator – Reverb Pedal Pedals like the Lex Rotary and BigSky Reverberator can also be strategically placed for specific sonic outcomes. The Lex Rotary, while often placed with modulation effects after gain, can also be positioned at the very end of your signal chain to create the effect of your entire signal, including reverb and delay, passing through a rotating speaker cabinet, adding a unique swirling dimension to your complete tone. The BigSky Reverberator offers a built-in cab filter, activated by a toggle switch on the back panel. This feature simulates the sound of playing through a custom 1×12 speaker cabinet with reverb engaged or bypassed. This makes the BigSky particularly well-suited for direct recording scenarios or when connecting directly to a PA system, providing a more amp-like tone when bypassing a traditional guitar amplifier.
Breaking the Rules: Experimentation is Key
Ultimately, the most important principle to remember when setting up your Guitar Pedal Order is that there are no hard and fast rules. The suggestions and common practices outlined in this guide serve as excellent starting points, but the true magic often happens when you venture outside of these conventional approaches.
Experimenting with unconventional pedal orders can lead to serendipitous and unique sounds. Many guitarists have stumbled upon their signature tones by trying unorthodox setups and embracing “happy accidents.” Don’t be afraid to break the mold and try placing effects in unexpected positions. You might discover a sonic combination that perfectly complements your playing style and musical vision.
Conclusion: Your Sonic Journey
Understanding the typical guitar pedal order and the function of each effect type is a valuable foundation for crafting your ideal tone. While common placements offer reliable starting points, the true power of effects pedals lies in their versatility and the potential for sonic exploration. Experiment with different pedal orders, utilize your amplifier’s effects loop, and don’t hesitate to break the rules. The journey to finding your perfect pedalboard setup is a personal and rewarding one. Embrace the experimentation, trust your ears, and enjoy the sonic possibilities that await.