Learning the notes on your guitar fretboard is a foundational skill, yet many beginners find it challenging. Even players who have been strumming chords for years might not know the names of all the notes across the neck. This is a hurdle you can overcome quickly with the right approach.
Mastering your guitar notes doesn’t have to be a long, tedious process. The fretboard is logically organized, and once you grasp this underlying structure, everything will start to make sense.
In this guide, we will cover: A step-by-step method to learn guitar fretboard notes efficiently, designed for beginners.
Let’s dive in and unlock the secrets of your guitar fretboard.
Your Step-By-Step Guide to Learning Guitar Fretboard Notes
This method breaks down learning all the notes on your guitar into 4 manageable steps.
We will explain each step in detail, provide helpful diagrams, and ensure you have a clear understanding of the process.
Bookmark this page as a handy reference, especially if you are just starting out or struggling to memorize the notes on your guitar.
Step 1: Understanding the Interval Logic of Notes
In Western music, we primarily use 12 distinct notes. Learning these notes is simplified by understanding their logical arrangement – one note at a time.
Tip: Musical notes follow an alphabetical sequence. Knowing the letters A through G is your first big step.
The notes A, B, C, D, E, F, and G are the seven natural notes. These are analogous to the white keys on a piano.
This sequence repeats continuously: A, B, C, D, E, F, G, A, B, C, D, E, F, G, and so on.
The remaining five notes are sharps and flats: A♯/B♭, C♯/D♭, D♯/E♭, F♯/G♭, and G♯/A♭. These correspond to the black keys on a piano and are positioned between the natural notes.
Sharps and flats can be spelled in two ways – this is known as enharmonic spelling. While the pitch remains the same, the spelling can vary depending on the musical context. For beginners, focus on understanding the note positions first; the nuances of spelling will become clearer as you progress.
Whole Steps and Half Steps Explained
Observe a piano keyboard: you’ll notice black keys between most white keys, except in two instances.
Tip: There’s no black key between E and F, and no black key between B and C. This same principle applies to the guitar fretboard!
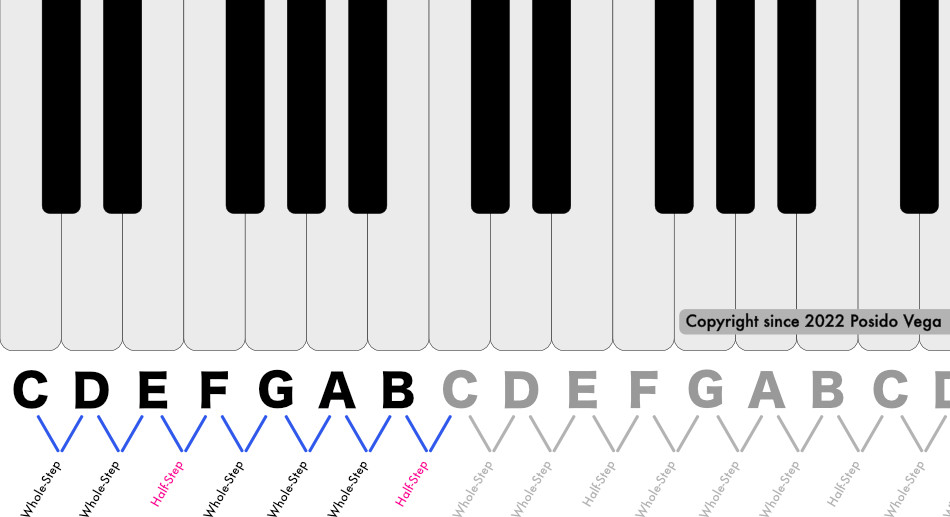 Piano keys – Whole-Step and Half-Step Diagram
Alt text: Diagram illustrating whole and half steps on a piano keyboard, highlighting the absence of black keys between E-F and B-C.
The distance between E and F is always a half step (one fret on the guitar). Similarly, the distance between B and C is always a half step (one fret).
All other natural notes are separated by a whole step (two frets).
Now, let’s apply this directly to the guitar fretboard. This method is far more intuitive than trying to memorize notes chromatically.
Step 2: The Guitar Fretboard Logic for Beginners
Let’s recap what we’ve learned:
- Musical notes are alphabetically ordered.
- E-F and B-C are always a half step apart.
- All other natural notes are a whole step (2 frets) apart.
Here’s the crucial fretboard logic to remember:
- Each fret on your guitar represents a half step.
- Two frets equal a whole step.
On a standard tuned guitar, the open strings are E, A, D, G, B, and E (from thickest to thinnest). For simplicity, let’s focus on the lower strings first and adapt the concept to a 4-string guitar equivalent (E, A, D, G) for easier visualization, then apply it across all 6 strings.
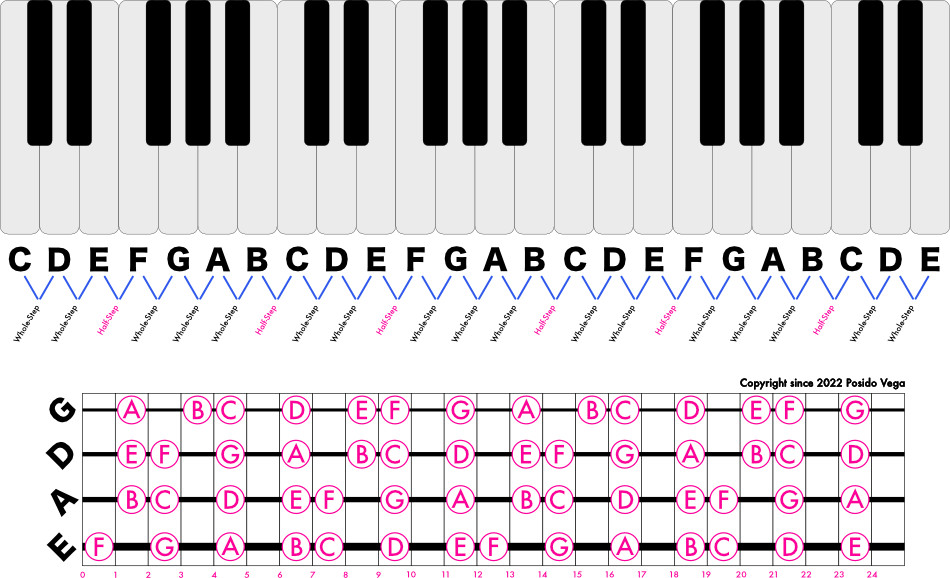 Bass Guitar Fretboard Notes and Piano Notes Diagram
Alt text: Diagram showing the correlation between bass guitar fretboard notes and piano keys, useful for understanding note intervals and positions.
Let’s start with the thickest string – the E string. Learning guitar notes is easiest when you focus on one string at a time.
Remember, E-F and B-C are the only natural note pairs without a note in between.
Finding Notes on Your Low E-String (Easy Method)
On the E string, the first fret is F.
Using the alphabetical order and half/whole step logic, we can find all natural notes on the E string:
- Two frets up from F is G.
- Two frets up from G is A.
- Two frets up from A is B.
- One fret up from B is C.
- Two frets up from C is D.
- Two frets up from D is E.
- The pattern then repeats.
Let’s apply this to the next string, the A string.
Finding Notes on Your A-String (Easy Method)
The note positions on the A string are:
- Two frets up from A is B.
- One fret up from B is C.
- Two frets up from C is D.
- Two frets up from D is E.
- One fret up from E is F.
- Two frets up from F is G.
- Two frets up from G is A.
- This pattern repeats as well.
Continue this process for the D, G, B, and high E strings, applying the same whole and half step intervals to map out all the natural notes.
Step 3: Octave Shapes as Fretboard Landmarks
This step is key to quickly expanding your fretboard knowledge. Octaves act as landmarks on the fretboard. While other intervals can also serve this purpose, octaves are excellent for beginners because they represent the same note at a higher pitch.
An octave is a perfect interval representing the same note at double the frequency.
Octaves are found in various positions across your guitar neck. Learning these shapes will significantly speed up your navigation.
Bass Guitar Fretboard Octaves Diagram
Alt text: Diagram illustrating common octave shapes on a bass guitar fretboard, useful for visualising intervals and note relationships.
Here are some easy-to-remember octave shapes:
- Two frets higher, move up two strings (e.g., from E string to D string) – one octave up.
- Two frets lower, move down two strings – one octave down.
- Three frets lower, move up three strings – one octave up.
- Three frets higher, move down three strings – one octave down.
- Five frets lower, move up one string – one octave up.
- Five frets higher, move down one string – one octave down.
- Seven frets higher, move up one string – one octave up.
- Seven frets lower, move down one string – one octave down.
Practice these shapes across the fretboard with different root notes to solidify your understanding of octave relationships.
Step 4: Practical Application in Musical Contexts
Steps 1-3 provide the foundational knowledge. Step 4, applying this logic in real playing scenarios, is what accelerates your fretboard mastery.
Tip: Practice is indispensable. You must play your guitar and actively apply what you are learning.
Consistent practice is key to making note recognition automatic and mastering the fretboard efficiently.
Incorporate exercises into your practice routine where you identify notes, play scales, and learn simple songs, consciously naming the notes as you play. This active recall method greatly enhances learning speed and retention.
(Bonus) Step 5: Verbalizing Note Names During Practice
During each practice session, dedicate a few minutes to consciously saying the name of each note aloud as you play it.
Practice slowly, focusing on accuracy first, then gradually increasing speed.
Accuracy over speed is crucial at this stage.
This verbal reinforcement is a highly effective method for quickly internalizing guitar notes. Try saying the note name, then locate it on the fretboard before playing. When learning to read music or tabs, verbally stating the note names reinforces their fretboard positions.
Incorporate this into your practice, jam sessions, and even during performances. Learning while playing in real-time is highly effective. This forces you to think on your feet and builds confidence as you become more familiar with the fretboard.
Your Turn to Play
Understanding fretboard logic and octave shapes is valuable knowledge, but its true power unlocks when you put it into practice.
Learning your guitar notes is crucial for improvisation, reading music, learning songs, and effectively jamming with other musicians.
Start applying these steps consistently, and you will see significant progress in your fretboard knowledge within weeks.
For more guitar learning resources and advanced techniques, explore our website further!
Frequently Asked Questions
What are the notes on a guitar? (Standard Tuning)
In standard tuning, the strings of a 6-string guitar are tuned to the notes: E, A, D, G, B, and E (from thickest to thinnest).
Understanding the intervals between these strings (primarily fourths, with a major third between G and B) can be another helpful pattern for learning notes across the fretboard.
What’s the most effective way to memorize guitar notes?
The most effective approach isn’t rote memorization, but understanding the underlying logic of note spelling and fretboard layout. Once you grasp these principles, note locations become intuitive.
Develop good habits like recognizing patterns, understanding shapes (like octaves), and actively naming notes as you practice. Trust the process of consistent, logical learning.
Natural memorization occurs when you establish meaningful connections and patterns within the information you are learning.
How do I find notes on the guitar fretboard?
To find any note on your guitar, you need to understand the fretboard’s structure. A standard tuned guitar has strings E, A, D, G, B, E. The fretboard, similar to a piano, follows a system of whole and half steps. All natural notes are a whole step apart, except for E and F (half step) and B and C (half step). Understanding these intervals from your open strings is the key to navigating the entire fretboard.