
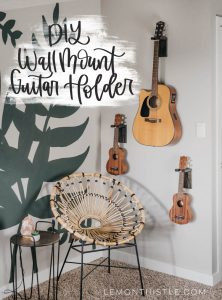
Having guitars lying around can be a common issue for music enthusiasts. They often end up taking up valuable floor space, becoming tripping hazards, or simply not being readily accessible for spontaneous jam sessions. This DIY wall mount Guitar Holder is the perfect solution, offering a stylish and practical way to display your instruments while keeping them safe and within reach. Not only does it solve storage problems, but it also turns your guitars into pieces of art, enhancing the aesthetic of any room, even when the guitar is in your hands.
 DIY Wall Mount Guitar Holders- Tutorial and plans
For years, the idea of wall mounts for guitars lingered on the to-do list. Finally bringing this vision to life and enjoying the guitar display in the playroom is incredibly satisfying. The days of stumbling over ukuleles in the dark are over. More importantly, having guitars readily visible encourages more frequent playing. Family jam sessions are a cherished activity, and with instruments easily accessible, these musical moments become more commonplace. Keeping guitars tucked away in cases often means less spontaneous music and fewer opportunities to play.
 DIY Wall Mount Guitar Holder
Ukuleles, despite their charm, often lack a designated storage space. Gifts for a first birthday, these instruments quickly became family favorites but presented a storage challenge due to their size and shape. They would frequently end up on the floor, hearth, or dresser – essentially wherever space could be found. However, the wall now offers the perfect solution!
This simple DIY project is made possible in partnership with Kreg Tools. The Kreg Jig K4 was instrumental in joining the wood pieces with pocket holes, ensuring a strong and seamless construction. The finished guitar holders exceeded expectations, prompting the question: why weren’t these made sooner? If you’re ready to create your own guitar wall display, follow this straightforward DIY tutorial.
 DIY Wall Mount Guitar Holders
 DIY Wall Mount Guitar Holders- Tutorial and plans
Materials Needed for Your DIY Wall Mount Guitar Holder:
To build your own wall mount guitar holders, gather these supplies:
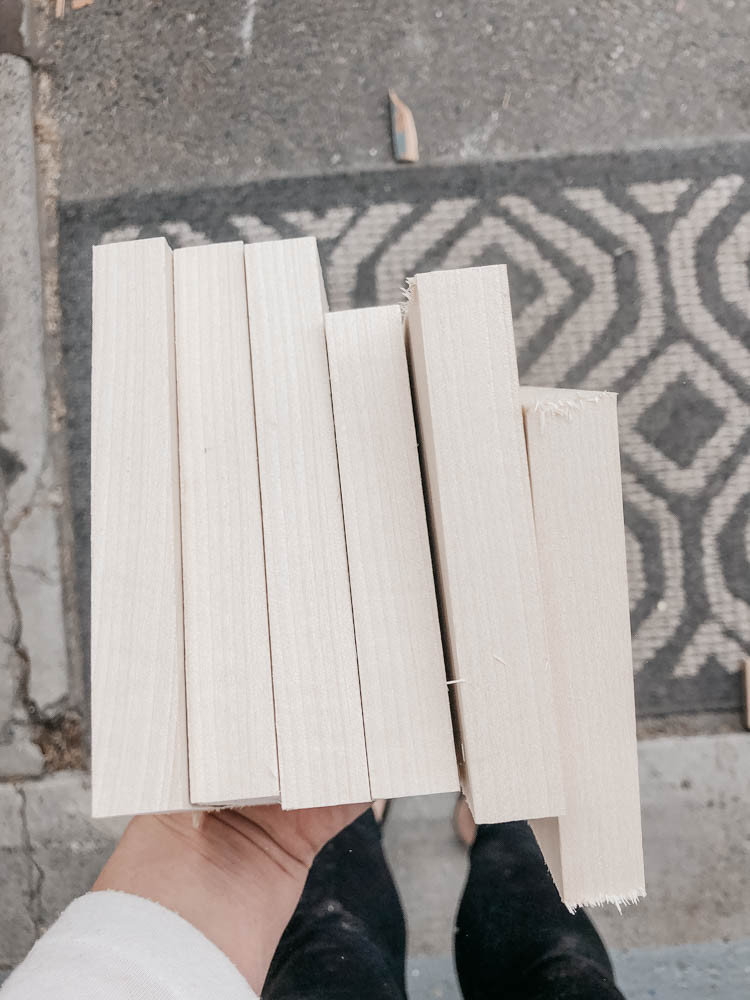
- 1×4 board (approximately 12 inches per guitar holder; maple wood is recommended for durability and aesthetics)
- Miter Saw (for precise wood cuts)
- Jigsaw or Scroll Saw (for shaping the guitar neck slot)
- Drill (for pilot holes and screw installation)
- Kreg Jig (for creating pocket holes – Kreg Jig K4 recommended)
- 1 1/4″ Kreg screws (specifically designed for pocket hole joinery)
- Fine grit sandpaper (for smooth finishing)
- Ebony Stain (or your preferred wood stain for color)
- Satin Polyurethane (for sealing and protecting the wood finish)
- 2 Black Screws (approximately 2 inches long, for mounting to the wall)
 DIY Wall Mount Guitar Holder Plans + Tutorial
Step-by-Step Guide to Building Your Guitar Holder:
Follow these steps to create your own stylish and functional guitar holders:
1. Cut the Wood Pieces:
Begin by cutting the 1×4 board into the required sizes. For each guitar holder, you’ll need two pieces: one for the wall mount (5 1/2 inches long) and another for cradling the guitar (4 1/2 inches long). Use a miter saw for clean and accurate cuts.
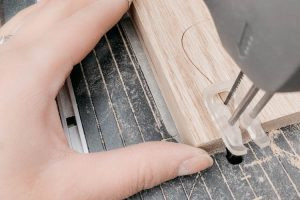
2. Drill Pocket Holes:
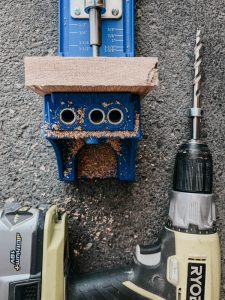
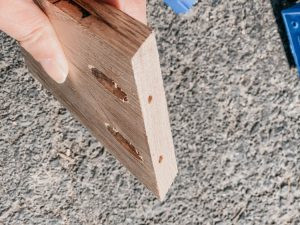
Utilize the Kreg Jig to drill pocket holes in one end of the 4 1/2 inch piece. Pocket holes create strong, hidden joints. Remember to adjust the Kreg Jig and drill bit stopper to match the thickness of your 1×4 board for optimal pocket hole depth.
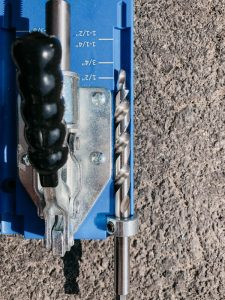 Adjust the bumper for your Kreg Jig drill bit
 Kreg Jig for pocket holes
 Kreg Jig for pocket holes
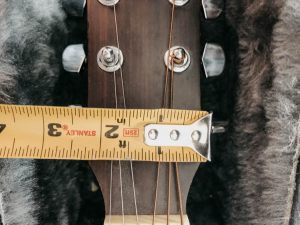
3. Shape the Guitar Neck Slot:
This step involves creating the contoured slot that will securely hold the neck of the guitar. Using a jigsaw or scroll saw, carefully cut the desired shape into the 4 1/2 inch piece of wood, opposite the pocket holes. Before cutting, measure the neck of your guitar to ensure the slot is appropriately sized. The entrance of the slot should be wider than the guitar neck’s depth but narrower than the guitar headstock to prevent the guitar from slipping through. When cutting curves, proceed slowly and let the saw blade do the work to avoid damaging the blade or the wood.
 Cut the guitar holder using a scroll saw (dremel moto saw)
 Cut the guitar holder using a scroll saw (dremel moto saw)
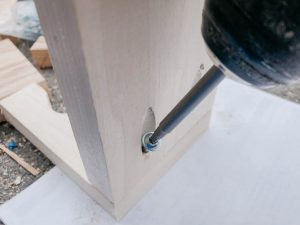
4. Assemble the Guitar Holder:
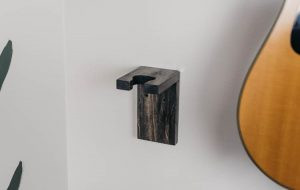
Once the guitar neck slot is cut and tested for fit, it’s time to assemble the two wood pieces. Align the 4 1/2 inch piece (with the guitar neck slot and pocket holes) perpendicularly to the 5 1/2 inch piece (the wall mount). Using the pocket holes, attach the two pieces together with 1 1/4″ Kreg screws. If working with hardwood like maple, ensure you use fine thread pocket hole screws for a secure hold.
 DIY wall mount guitar holder made from 12
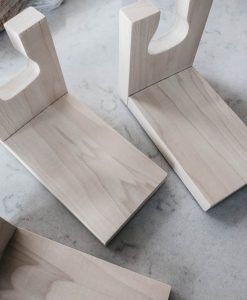
5. Sand, Stain, and Finish:
After assembly, sand all surfaces of the guitar holder thoroughly with fine-grit sandpaper. Sanding ensures a smooth finish and allows the stain to absorb evenly. Once sanded, apply your chosen wood stain, such as ebony stain for a dark, rich color. Allow the stain to dry completely according to the manufacturer’s instructions. Finally, seal the wood with a satin polyurethane finish to protect it and enhance its durability.
 Sanded maple guitar holders- DIY tutorial and plans
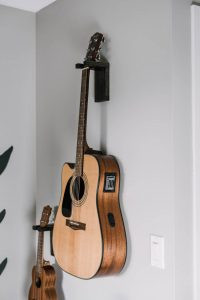
6. Mount to the Wall:
The final step is mounting your 완성된 guitar holder to the wall. Use two black screws (approximately 2 inches long) for each holder. Before screwing directly into the wall, it’s crucial to pre-drill pilot holes. Pilot holes prevent the wood from splitting and make screw installation easier. Mount the guitar holder by driving the screws through the top half of the wall mount piece and into the wall studs for maximum stability.
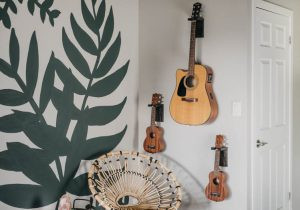
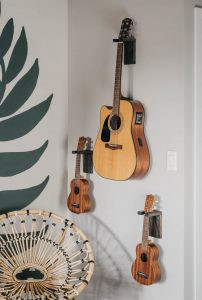
Alt text: Installed DIY wall mount guitar holders in a room, showing guitars hanging securely and stylishly on the wall.
 DIY Wall Mount Guitar Holders- Tutorial and plans
 DIY Wall Mount Guitar Holders
With that, your DIY wall mount guitar holders are complete! They’re a fantastic addition to any space, keeping guitars accessible, organized, and beautifully displayed. These holders are perfect for playrooms, living rooms, studios, or any area where you want to showcase your instruments while saving space. Now, guitars and ukuleles are not only within easy reach for playing but also serve as attractive wall décor. If you have guitars or ukuleles around your home, consider giving them a stylish home on the wall with these easy-to-build holders.
For detailed plans, save this project to your Kreg Build Something account! Love this DIY? Pin it for later!
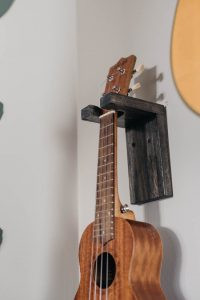
Alt text: Single ukulele displayed on a minimalist DIY wall mount guitar holder, showcasing its space-saving design and decorative appeal.
Image Sources:
LIKE IT? PIN IT!
Alt text: Pinterest pin image for DIY wall mount guitar holder tutorial, inviting users to save the project for later inspiration.