Is your Guitar Hero World Tour Guitar letting you down with a strum bar that’s only working in one direction? Frustration during a Guitar Hero session is real when your down strums aren’t registering, turning your rock anthems into awkward, broken solos. After a nostalgic date night turned repair mission thanks to a faulty strum bar, I decided to document the fix. If you’re experiencing the same issue with your Guitar Hero World Tour guitar, specifically the strum bar only registering upstrokes, this guide is for you. While my specific problem wasn’t covered in existing guides, adapting disassembly instructions was key to finding and resolving the issue. This guide will walk you through the steps to diagnose and potentially repair your Guitar Hero World Tour guitar strum bar, bringing your rockstar dreams back to life.
Tools Needed for Guitar Hero Guitar Disassembly
Before diving in, gather these essential tools to make the repair process smooth and efficient:
- Philips-head #0 Screwdriver
- Philips-head #1 Screwdriver
- Torx T9 Screwdriver
Having these screwdrivers on hand will allow you to disassemble your Guitar Hero World Tour guitar without stripping any screws and ensure a clean repair process.
Step-by-Step Guitar Disassembly
Let’s get started with taking apart your Guitar Hero World Tour guitar to access the strum bar mechanism.
Removing the Guitar Neck and Faceplate
First, ensure the “Lock” button at the rear of the guitar, near the base of the neck, is set to the unlocked position. This will allow you to detach the guitar neck. Once unlocked, gently remove the neck from the guitar body.
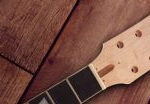
Next, we need to remove the faceplate. Carefully use a fingernail or a flathead screwdriver to get under the edge of the faceplate, starting at the top corners indicated in the image below. Gently pry around the edges until the faceplate detaches completely. Take your time with this step to avoid damaging the plastic.
 Guitar Hero World Tour Guitar Faceplate Removal Points
Accessing the Internal Electronics
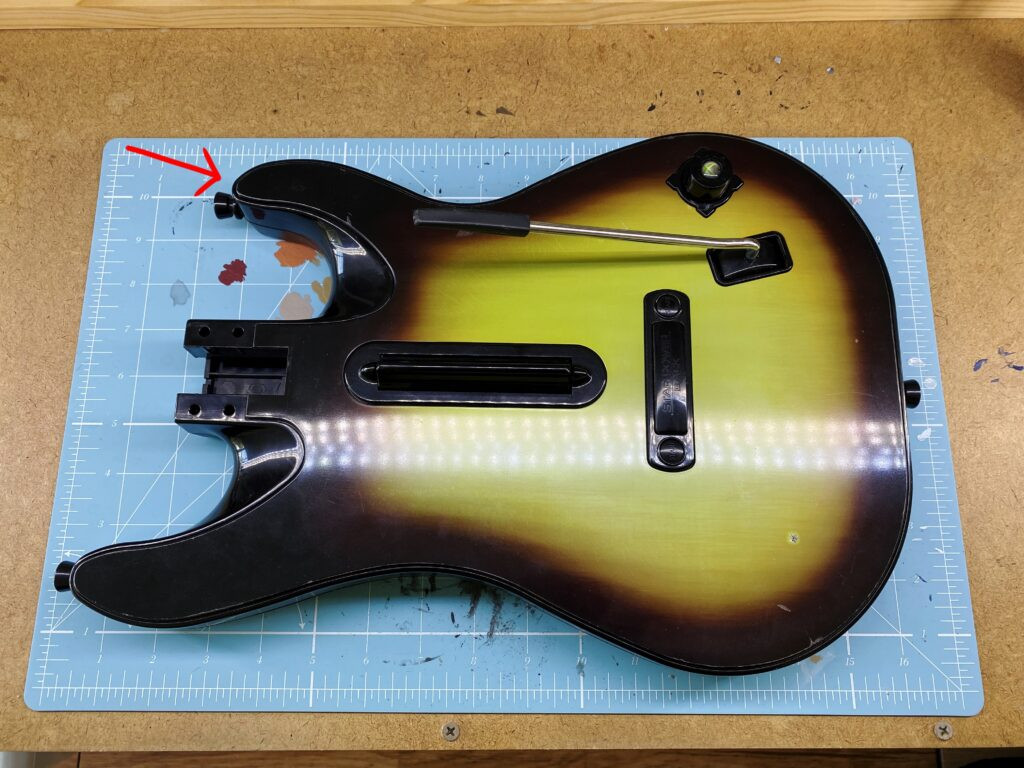
With the faceplate removed, you’ll now see the screws holding the guitar body together. There are a total of sixteen screws to remove. Locate the twelve Torx T9 screws, which are circled in red in the image below, and use your Torx T9 screwdriver to remove them. Additionally, find the four Philips-head #0 screws, marked in green, and remove them using the Philips #0 screwdriver.
 Guitar Hero World Tour Guitar Screw Locations
Once all sixteen screws are removed, carefully separate the front part of the guitar, where all the electronics are housed, from the back casing. Be gentle as you pull them apart, ensuring no wires are snagged or pulled forcefully.
Exposing the Strum Bar Circuit Board
Now that the guitar body is open, you need to access the circuit board connected to the strum bar. Locate the four Philips-head #1 screws that secure this circuit board to the strum bar assembly. These are highlighted in the image below. Use your Philips #1 screwdriver to remove these four screws. It’s important to only remove these four screws and leave the middle two untouched, as they hold the guides for the strum bar springs in place.
 Guitar Hero World Tour Guitar Strum Bar Circuit Board Screws
With these screws removed, you can now gently lift the circuit board away from the strum bar, giving you access to the strum bar mechanism itself.
Diagnosing and Repairing the Strum Bar
At this stage, the repair process becomes more specific to the issue you’re experiencing. Here’s how to troubleshoot and address common strum bar problems.
Checking the Strum Bar Switches
On the underside of the circuit board you just removed, you’ll see two small clicky switches. These are responsible for registering the up and down strums. Press each switch directly with your finger to ensure they both produce a solid click. If either switch doesn’t click properly, it might be faulty. Replacements are available (“275-016 SPDT Submini Lever Switch 5A at 125/250VAC”), and soldering skills would be needed to replace them. Luckily, in my case, the switches were functioning correctly.
Lubricating the Strum Bar Assembly
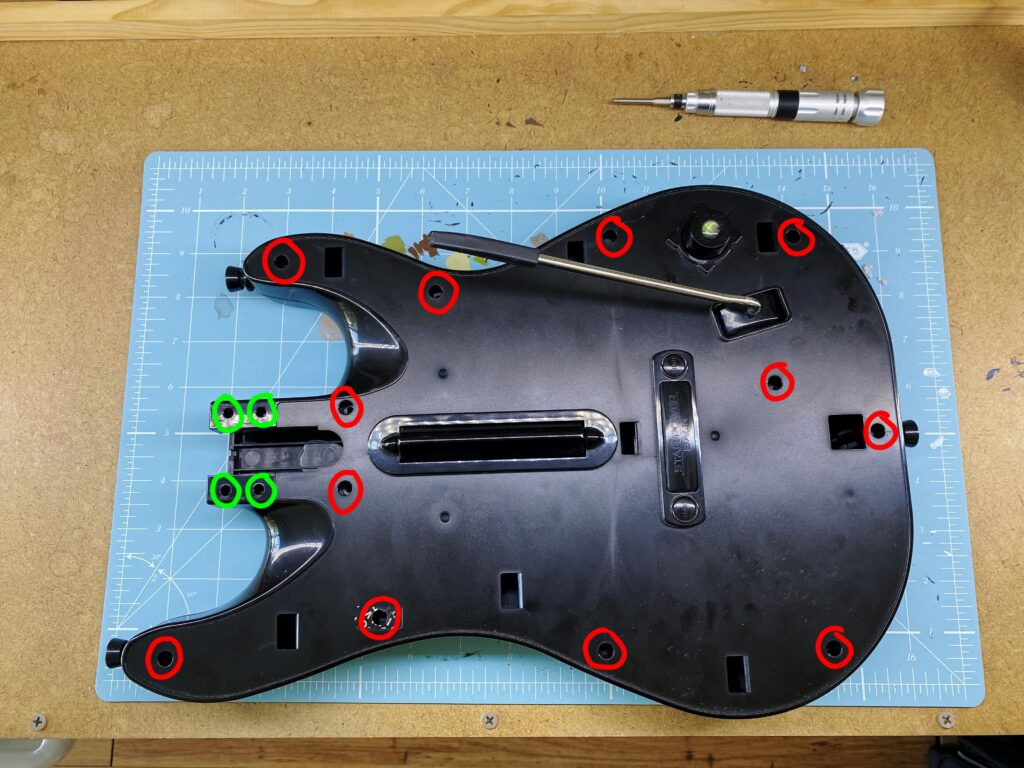
Sometimes, a sticky strum bar can cause issues. To address this, you can remove the entire strum bar assembly by undoing the Philips-head #1 screws circled in blue in the next image. Once removed, apply a small amount of lubricating grease (avoid WD40, use proper lubricating grease) to the moving parts of the strum bar. This will help it move smoothly back and forth.
For noise dampening, you can also add a couple of layers of electrical tape to the areas circled in red in the image below. These areas are where the strum bar hits the inside of the guitar casing, and the tape can reduce the strumming noise.
 Guitar Hero World Tour Guitar Strum Bar Assembly and Lubrication Points
Addressing a Worn Down Strum Bar Contact Point
In my specific situation, the problem was a worn-down contact point on the strum bar itself. The middle indented section of the strum bar, which presses against the switch to register a downstroke, had worn away. This meant it wasn’t pressing the switch far enough to register the down strum.
My solution, highlighted in green in the image above, was to improvise. I cut a tiny piece of plastic from a Warhammer 40,000 miniature sprue (any small piece of sturdy plastic would work) and glued it to the worn-down section of the strum bar using plastic glue (the same type used for assembling plastic models). This added just enough thickness to the contact point to properly engage the switch for down strums again.
Guitar Reassembly
Once you’ve addressed the issue, carefully reassemble your Guitar Hero World Tour guitar by reversing the disassembly steps. Make sure all screws are tightened securely but not over-tightened. Reattach the faceplate and finally, reconnect the guitar neck.
With the reassembly complete, test your Guitar Hero World Tour guitar to ensure the strum bar is now functioning correctly in both directions. Hopefully, this guide has helped you revive your guitar and get back to shredding your favorite tracks!