Guitar Hero, a beloved classic from the golden age of motion-controlled gaming on the Nintendo Wii, still brings nostalgic joy to players of all ages. If you’re a Wii enthusiast, you likely remember the thrill of rocking out with the Guitar Hero controller. However, like any well-loved gaming accessory, these guitars can suffer wear and tear. A common issue, especially with enthusiastic young players, is a broken connector cable. Before you rush to replace your cherished instrument, consider this cost-effective and satisfying DIY repair. This guide will walk you through how to breathe new life into your Guitar Hero guitar for Wii using a simple household item: an old Wii Nunchuk.
Understanding and Addressing the Connector Issue
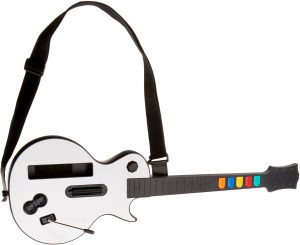
The weak point in many wired Guitar Hero guitars for the Wii is the connector that links the guitar to the console. As you can see in the image, this connector, identical to the Wii Nunchuk connector, is vulnerable to damage from bending, pulling, or general wear. When this connector breaks, your guitar becomes unresponsive, silencing your rockstar ambitions. Instead of discarding the entire guitar, we can perform a transplant, using a functional connector from a spare or broken Wii Nunchuk controller. This repair is straightforward and requires only basic tools and a bit of patience, making it an excellent project for any DIY enthusiast looking to get their guitar for Wii back in action.
Step-by-Step Guitar Hero Wii Guitar Repair Guide
Let’s dive into the repair process. The first step involves safely opening your Guitar Hero guitar to access the damaged connector.
-
Guitar Disassembly: Begin by separating the neck of the guitar from the body. This is typically done for shipping purposes and makes accessing the internal components easier. Once the neck is off, locate and remove all the screws on the back panel of the guitar body. Carefully detach the back cover to expose the internal circuit board and wiring.
-
Preparing the Guitar Connector Wire: Upon opening the guitar, you’ll find the existing connector wired to the controller board. If you’re comfortable with soldering, you can desolder the old connector directly from the board. However, for those less experienced with soldering, a simpler method is to carefully cut the wires leading to the broken connector, leaving enough wire length on the board side for easy soldering later.
Nunchuk Connector Harvesting
Now, we need to prepare the donor connector from the Wii Nunchuk. Open the Nunchuk casing by removing its screws. Nintendo often uses tri-wing screws for their consoles and accessories. While you can use specialized tri-wing screwdrivers, in a pinch, you can sometimes carefully use a small flat-head screwdriver. Once open, locate the connector wire inside the Nunchuk. You can either carefully desolder the wires from the Nunchuk circuit board or simply cut the wire, giving you ample length for the repair. The image here shows the inside of a Nunchuk, highlighting the connector and wiring we’ll be using. Don’t worry about tracing wires; we’ve confirmed the color code is consistent between the Nunchuk and the Guitar Hero guitar for Wii.
Soldering and Reassembly for Your Wii Guitar
With both the guitar and Nunchuk prepared, it’s time for the crucial soldering step. Strip the ends of the wires from both the Guitar Hero guitar and the Nunchuk connector. Solder each wire individually, matching the colors. This color-coding is essential to ensure proper functionality. After soldering each connection, insulate it thoroughly with electrical tape or heat shrink tubing. This prevents shorts and adds strength to the repaired connection, ensuring a longer lifespan for your DIY fix. Carefully tuck the soldered wires beneath the circuit board within the guitar body. Route the Nunchuk connector wire through the original strain relief and out through the designated hole, usually where the Wii Remote connects.
Finally, reassemble the Guitar Hero guitar by reattaching the back cover and securing it with the screws you removed earlier. Reconnect the guitar neck. Congratulations! You’ve successfully repaired your Guitar Hero guitar for Wii and saved yourself the cost of a replacement. Give yourself a pat on the back – you’ve not only fixed your gaming gear but also honed your DIY skills.
Ready to Rock Again or Need a New Axe?
After the repair, plug your guitar into your Wii and test it out. If all went well, you should be ready to shred some virtual tunes once more! However, if you prefer a brand-new guitar or aren’t comfortable with DIY repairs, there are readily available replacements.
For those looking to purchase a new guitar for Wii, options are available online. Click here to check out the Wireless Guitar for Wii Guitar Hero and Rock Band Games on Amazon.
Thank you for following this guide. We hope you are back to rocking out on your Wii in no time!