Classical Guitar Fingernails are essential for producing a rich and varied tone, adding warmth and beauty to your playing. However, they can also be a source of frustration if not properly shaped and maintained, sometimes leading to a thin or harsh sound. Concerns about nail care and even social perceptions (“What will my friends think?”) can also be a deterrent for some players.
This guide will explore everything you need to know about classical guitar fingernails, empowering you to achieve optimal tone and technique.
In this article, you will learn:
- The advantages of using fingernails for classical guitar.
- Step-by-step instructions on shaping your nails for superior sound quality and tone.
- Essential techniques for nail care and protection to keep them in top playing condition.
Do You Really Need Fingernails for Classical Guitar?
Whether or not to use fingernails in classical guitar is a deeply personal choice. Many guitarists find the upkeep of fingernails, even just on the right hand, to be inconvenient. Furthermore, certain professions or cultural norms may discourage or prohibit longer fingernails. Consequently, some players choose to maintain short nails.
It’s important to understand that classical guitar fingernails are not absolutely mandatory. Playing without nails is a viable option, and historically, lute technique traditionally employed short or no nails. This demonstrates a valid precedent for nail-less playing.
However, utilizing nails unlocks a significantly broader spectrum of tonal colors on the instrument. You can achieve incredibly lush, warm tones as well as bright, almost metallic sounds. Well-shaped nails enable a greater dynamic range and variety of timbres, expanding your expressive possibilities.
For a more in-depth exploration of this topic, you can read a detailed article on “Playing Classical Guitar Without Fingernails”.
Begin with Your Desired Sound in Mind
The ideal shape and length of your classical guitar fingernails should be dictated by your tonal goals. The way you articulate the strings and your overall playing technique will influence the optimal nail shape. (Of course, this is reversed for left-handed players, who sound the strings with their left hand).
Before you start shaping your nails, it’s beneficial to revisit fundamental classical guitar technique. Proper form, hand positioning, and technique are foundational to producing a beautiful guitar sound, and your nails are an extension of this.
Furthermore, the unique characteristics of your individual fingers and nails play a role in determining the best nail shape and length for you. Some individuals have fleshy fingertips, while others have thinner tips that slope sharply away from the nail. Nail curvature also varies considerably, from very flat to significantly curved or hooked. Nails simply grow in diverse ways.
Therefore, there is no universal nail length or shape that suits every player. However, there are general shaping principles that can be adapted by nearly all guitarists, regardless of their specific playing style or hand anatomy. We will delve into these methods below.
Understanding Nail Interaction at the String Level
To effectively shape your nails, it’s crucial to understand how they interact with the strings during a stroke.
When the string is set into motion with a circular movement, the resulting sound is typically warm and resonant. Conversely, if the string is caught or snagged, it vibrates in a more back-and-forth motion, often producing a harsh or unpleasant tone.
Our aim is to cultivate a stroke that initiates a circular vibration in the string (rather than a back-and-forth one). To achieve this, the string needs to glide smoothly off both the flesh of the fingertip and the fingernail as the finger moves through the stroke.
Any snagging or catching of the nail will compromise the tone. A clean, smooth stroke yields a beautiful sound. Therefore, excessively long nails are not necessarily the goal. Instead, we benefit most from well-shaped nails that complement our playing technique.
The Role of Technique
To encourage that desirable circular string motion, employing proper right-hand classical guitar technique is paramount.
Advanced guitarists generally “push through” the string, rather than hooking and pulling upwards (a less efficient motion sometimes referred to as “bicycling”). Consistent string contact is key to consistent tone quality. Refining your technique will enhance both your scale playing and arpeggio (fingerpicking patterns) execution.
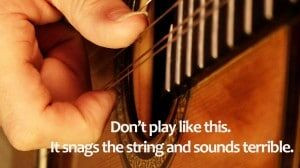 Classical guitar bad technique
Embrace the Learning Curve
Don’t expect to achieve perfectly shaped nails on your first attempt. Shaping nails is a skill that develops over time. Your ear will gradually become more attuned to the nuances of your guitar’s sound and how your nails influence it.
This is an ongoing process for every classical guitarist, evolving throughout your playing journey. Feel free to experiment and explore different shapes with an open mind.
There will be times when you file off too much nail, or create an angle that isn’t quite right. Conversely, your nails might grow too long without you realizing they could be improved. This is all part of the learning process. The beauty is that nails grow back, providing endless opportunities to refine your nail shaping artistry.
Step-by-Step Guide: Shaping Your Classical Guitar Fingernails
File, Don’t Clip
Tip: Keep your nail stationary and move the file.
A common mistake among beginner classical guitarists is attempting to cut their nails into shape using scissors or nail clippers. This method rarely produces satisfactory results. Shaping your right-hand nails is far more effectively achieved using a nail file.
Numerous types of nail files are available. Many classical guitarists shape their fingernails with metal or glass files. However, excellent results can be achieved with files of various shapes and materials.
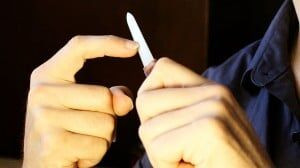 Shaping classical guitar nails with a file
Metal files are effective, but consider that they might not be permitted in carry-on luggage when traveling by air.
File Gently at an Angle
To begin, sitting at a desk or table with your elbows supported can provide greater stability.
When filing, it’s generally easier to keep your right hand (the hand with the nails) still and manipulate the nail file with your left hand (if you are right-handed). Many right-handed individuals instinctively hold the file stationary and move their nail across it, but you’ll find greater control by moving the file instead.
Crucially: Remove only a small amount of nail at a time. You can always file more, but you can’t easily reattach what’s been removed. Work slowly and check your progress frequently.
File from underneath the nail, at an upward angle, rather than filing straight across the edge.
When filing, aim for approximately a 45-degree upward angle from the underside of the nail. Avoid filing perpendicular to the nail’s edge.
The next angle to consider is the contour from the corner of the nail (thumb-side corner) to the nail’s peak. Because we want the string to release smoothly, we will create a “ramp” shape from this corner to the peak of the nail.
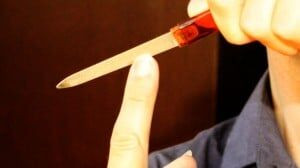 Creating a ramp shape on classical guitar nails
Start with around a 30-degree angle for this ramp and adjust from there. The angle at which you approach the strings while playing will influence this ramp angle. Your guitar holding posture, as well as the angles of your hand and wrist, also contribute.
With experience, you’ll develop a better understanding and be able to refine your shaping to achieve your desired results. In the beginning, simply start shaping and observe the effects on your sound. Alternate between filing and playing to assess your progress.
Remember, the objective is to achieve a specific sonic effect with the nail-string interaction. The visual appearance of the nail shape is secondary. Focus on creating a “ramp-like feel” when you play, rather than solely aiming for a visually perfect ramp.
For most guitarists, the index (“i”) and middle (“m”) fingers typically benefit from a more ramped shape for oblique (angled) playing. The ring finger (“a”), which often plays more perpendicularly to the string, may be shaped with a more rounded contour. The little finger is rarely used in classical guitar technique, so that nail can be kept short.
Experimentation is key to finding your ideal nail length. A good general guideline is to have enough nail to initiate a circular string vibration, but not so much that the nail catches or snags the string. You should still be able to feel the string with the flesh of your fingertip as each note is played. Explore these nuances through practice.
Shaping the Thumb Nail
While the thumb nail may be slightly longer than the fingernails, the same principles of shaping apply. Regardless of your thumb technique, file from underneath at an upward angle, creating a subtle ramp.
The thumb nail shape is generally more forgiving than the fingernail shapes. Even with a less-than-perfect thumb nail shape, you can usually achieve a decent sound. This is often not the case with the fingernails, where precise shaping is more critical.
The Finishing Touch: Nail Polishing
Once you have shaped your nails, a final step is crucial: polishing. Filing, even with a fine file, leaves microscopic ridges and scratches along the nail edge. You can feel these by gently dragging one nail across another.
These imperfections, though small, can negatively impact your tone. Polishing or buffing your nails eliminates these ridges, resulting in a smoother, cleaner sound.
 Classical guitar nail polishing paper
My preferred tool for polishing is very fine grit sandpaper. Keeping a small piece with you allows for quick touch-ups anytime, and your nails (and your tone) will benefit.
To use nail paper, simply gently buff or polish the edges of your nails with the sandpaper. Fold it, bunch it – whatever is comfortable.
Pay particular attention to polishing the area where the nail meets the sides of your fingertip. These edges can sometimes catch on things and lead to nail tears.
The result of polishing is a smooth, glassy finish that significantly enhances your tone. Many professional classical guitarists consider polishing an essential step, and it truly makes a world of difference.
If you are interested in trying the specific sandpaper I use, it is available at StringsByMail.com (non-affiliate link). Alternatively, explore other nail polishing products to find what works best for you. For polishing, the goal is smoothness, so higher grit numbers on sandpaper or polishing files are more suitable.
Also, remember that as your strings age, they develop tiny dents and imperfections. Regularly changing your classical guitar strings will not only improve your sound but also help to protect your meticulously shaped nails.
Embrace Experimentation and Trial and Error
It’s almost inevitable that you will occasionally remove too much nail, making them too short, or allow them to grow too long. This is a normal part of the learning process. Keep a nail file readily accessible in your practice area. When you feel the need to adjust your nail shape, take the time to do so. It might be a quick touch-up taking just a few minutes, or a more significant reshaping session.
Through consistent practice and attention, you will gradually discover the ideal nail length and shape that complements your playing style and hand anatomy.
Regardless of occasional setbacks, nails will always grow back, providing you with continuous opportunities for refinement. And if you happen to break a nail, there are effective repair techniques…
Broken Fingernail Repair Techniques
For a split nail, superglue can be used to temporarily hold it together until it grows out. For added strength, a few cotton fibers or a thin layer of tissue can be applied to the wet superglue. Once dry, this reinforcement can be carefully filed smooth.
For a completely broken nail, artificial nails offer a solution. Various commercial products are available. Rico Nails are particularly popular among guitarists. Beauty supply stores and department stores also offer a wide range of options.
Most artificial nails are designed to be glued to the top of the natural nail. While functional, this method can be visually noticeable. A more discreet and often stronger technique is to carefully superglue the sturdy portion of the artificial nail underneath the existing natural nail. This might cause slight initial discomfort, but it is effective and often produces a sound that is as good as, or even better than, your natural nail.
Another resourceful repair method involves using a ping pong ball. Numerous online video tutorials demonstrate this technique, offering a readily available and effective solution.
Explore Further Articles on Classical Guitar Fingernails
This guide provides a comprehensive foundation for understanding and managing your classical guitar fingernails. Continue exploring resources and experimenting to refine your technique and achieve your optimal tone.