
Guitar effects pedals are essential tools for crafting unique and inspiring sounds. From subtle enhancements to dramatic transformations, pedals offer a vast sonic palette for guitarists. However, to truly unlock the potential of your pedal collection, understanding the optimal Guitar Effects Pedal Chain Order is crucial. While experimentation is encouraged, a well-structured signal chain can significantly improve your tone and ensure each effect works harmoniously with the others. This guide will explore the most common and effective approaches to arranging your pedals, helping you build a rig that sounds its absolute best.
Understanding the Basics of Signal Flow
Imagine your guitar signal as a journey through your effects. The order in which your pedals are connected dictates how each effect processes and alters your guitar’s tone. This sequential flow is known as the signal chain. Different pedal placements can drastically change the final sound, turning a potentially muddy or weak tone into a clear, powerful, and articulate one.
Think of it like cooking: the order in which you add ingredients can dramatically change the flavor of a dish. Similarly, the order of your pedals shapes your guitar’s sonic character. There’s no single “right” way, but understanding some fundamental principles will provide a solid foundation for your pedalboard journey.
Common Pedal Order Guidelines
While experimentation is key to finding your signature sound, certain pedal types generally perform best in specific positions within the signal chain. These recommendations are based on how different effects interact with each other and the natural flow of audio processing. Here’s a breakdown of common placement suggestions:
-
Dynamics & Filters (First): Pedals that control the fundamental dynamics and frequency range of your guitar signal are typically placed at the beginning of the chain. This category includes:
- Compressors: Even out your playing dynamics, adding sustain and clarity. Placing them first ensures a consistent signal for subsequent effects.
- Wah Pedals: Filter pedals that create a vocal-like sweep. Positioning wah before gain effects often results in a more pronounced and expressive wah sound.
- Pitch Shifters: Alter the pitch of your guitar signal. Placing them early allows for cleaner tracking and avoids unwanted artifacts.
- Volume Pedals (Early Placement): When used to control overall input volume into your effects, volume pedals are best placed early in the chain.
-
Gain-Based Effects (Next): Overdrive, distortion, and fuzz pedals, which add saturation and harmonic complexity, generally follow dynamics and filters.
- Overdrive & Distortion: These pedals simulate tube amp breakup, adding warmth, grit, and sustain. Placing them after compressors can further enhance sustain and create a more controlled distortion.
- Fuzz: Known for their thick, saturated, and often unpredictable tones. Fuzz pedals often benefit from being placed early in the gain section.
-
Modulation Effects (Middle): Effects that modulate the signal in various ways, creating swirling, shimmering, or pulsating textures.
- Chorus: Creates a lush, doubling effect, adding width and depth.
- Flanger: Produces a sweeping, jet-plane like sound through time-based modulation.
- Phaser: Creates a swirling, psychedelic effect by shifting the phase of the audio signal.
- Tremolo: Cyclically modulates volume, creating a rhythmic pulsing or chopping effect.
-
Time-Based Effects (Last): Effects that manipulate time and space, adding ambience and depth.
- Delay: Repeats your guitar signal, creating echoes and rhythmic patterns. Placed last, delay repeats are affected by all preceding pedals, resulting in a cohesive and natural sound.
- Reverb: Simulates acoustic spaces, adding depth, spaciousness, and ambiance. Like delay, reverb is typically placed at the end to create a natural sense of environment.
-
Volume Pedals (Late Placement): When used for swells or to control the overall output volume of your entire pedalboard, volume pedals can be positioned at the end of the chain, just before your amplifier.
 Effects Pedal signal chain
Example Pedal Chain Setups
To illustrate these principles, let’s examine a couple of common pedalboard setups:
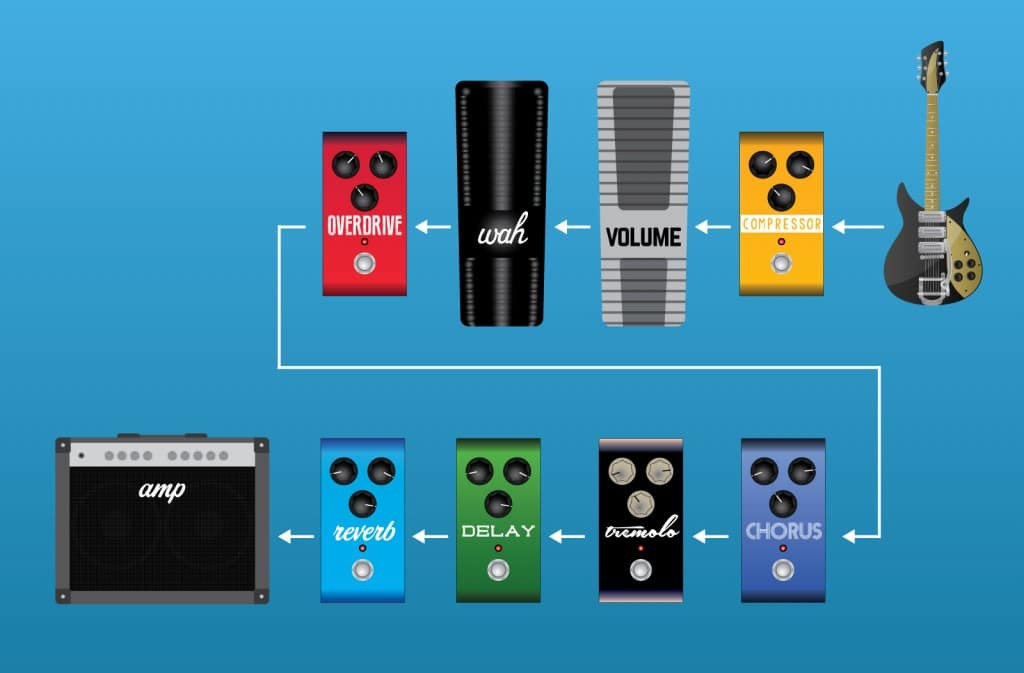
Setup 1: Classic Foundation
Guitar → Compressor → Volume Pedal → Wah Pedal → Overdrive → Chorus → Tremolo → Delay → Reverb → Amplifier
In this setup, the volume pedal placed early acts as a master input volume control. This is useful for adjusting the overall signal level hitting your gain pedals and amplifier. Rolling back the volume can clean up your tone even with overdrive engaged, providing dynamic control from your guitar.
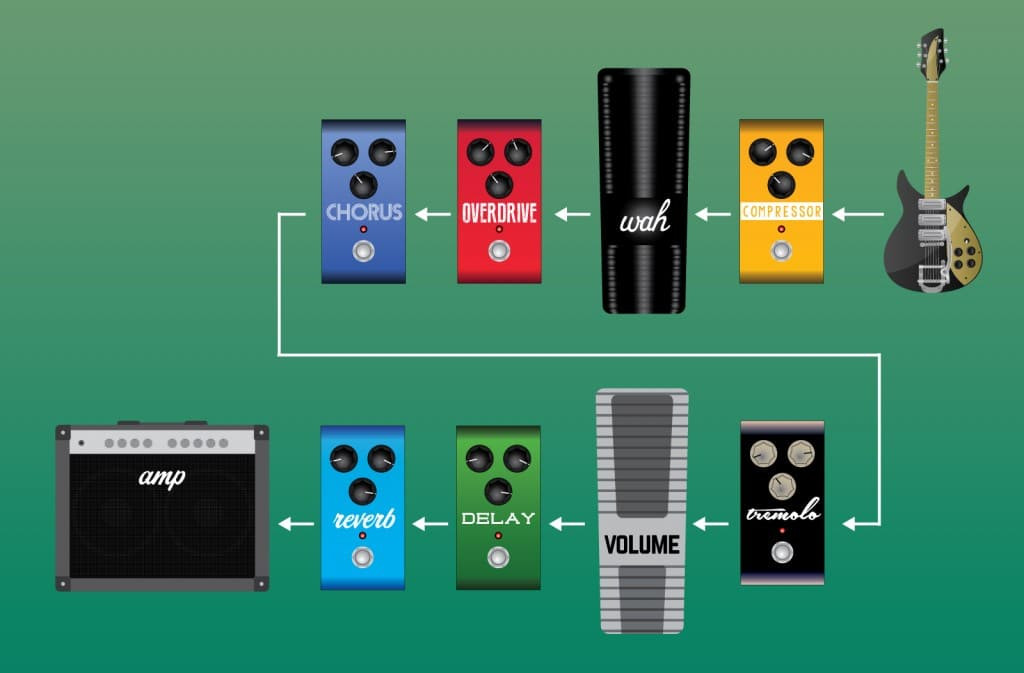
Setup 2: Volume Control at the End
Guitar → Compressor → Wah Pedal → Overdrive → Chorus → Tremolo → Volume Pedal → Delay → Reverb → Amplifier
Here, the volume pedal is positioned towards the end, right before delay and reverb. This configuration allows you to control the overall output level of your processed signal, including modulation and gain effects. This is particularly useful for creating swells and fades without altering the character of your overdrive or modulation. You can maintain a fully saturated overdriven tone and then use the volume pedal to seamlessly fade it in or out.
 Effects Pedal signal chain
Utilizing the Amplifier’s Effects Loop
Many guitar amplifiers feature an effects loop, which is a dedicated signal path located after the preamp section but before the power amp. The effects loop, typically labeled “Effects Send” and “Effects Return” (or sometimes “Preamp Out” and “Power Amp In”), allows you to insert effects pedals into this specific point in the amplifier’s signal flow.
Why is this important? The preamp stage of your amplifier is responsible for much of its core tone, including overdrive and distortion. Placing certain effects in the effects loop, especially time-based and modulation effects, can significantly improve clarity and prevent muddiness, particularly when using amplifier-derived distortion.
Benefits of the Effects Loop:
- Cleaner Time-Based Effects: Placing delays and reverbs in the effects loop ensures they process the already distorted signal from your preamp. This prevents delay repeats and reverb tails from becoming overly distorted and muddy, resulting in a clearer and more defined sound.
- Enhanced Modulation: Modulation effects can also benefit from effects loop placement, especially with high-gain amplifier settings. Placing chorus, flanger, or phaser in the loop can create a more polished and less cluttered modulation sound.
Series vs. Parallel Effects Loops:
Effects loops come in two main types:
- Series Effects Loop: The entire signal from the preamp is routed through the effects loop. This is the most common type. All of your signal passes through the pedals in the loop.
- Parallel Effects Loop: A portion of the preamp signal is sent through the effects loop, while the rest bypasses it. A “mix” or “level” control on the amplifier typically allows you to blend the effected and uneffected signals. When using a parallel loop, set the “mix” control on your pedals to 100% wet (effect only) to avoid phase cancellation issues. Some pedals, like Strymon’s TimeLine and BigSky, offer a “Kill Dry” feature for optimal use in parallel loops.
Effects Loop Setups:
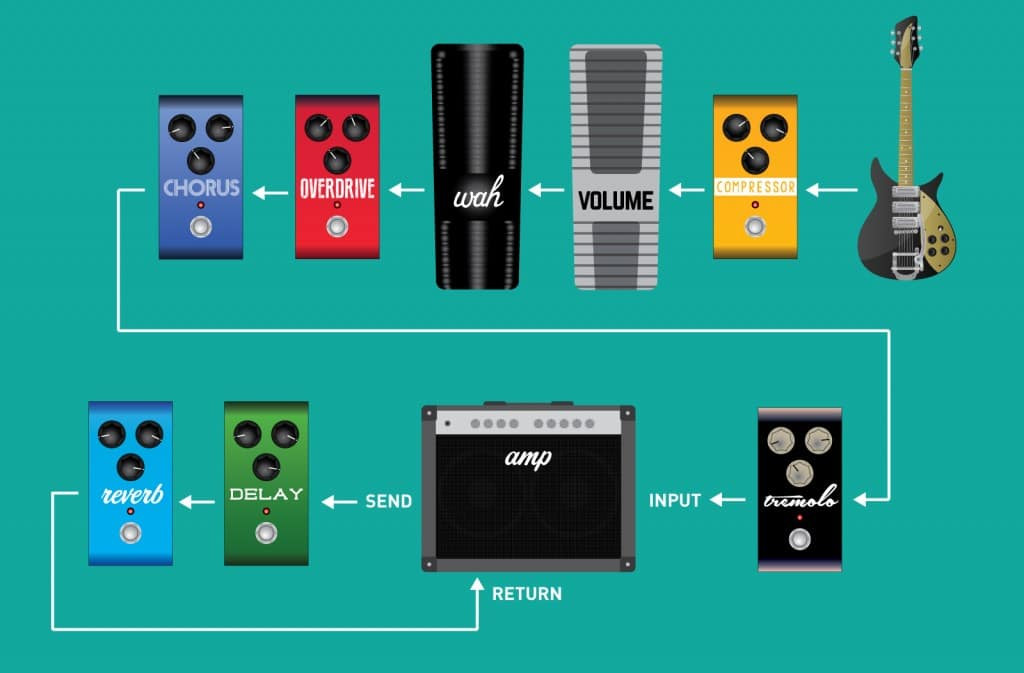
Effects Loop Setup 1: Time-Based Effects in the Loop
Guitar → Compressor → Volume Pedal → Wah Pedal → Overdrive → Chorus → Tremolo → Amplifier INPUT; Amplifier Effects Send → Delay → Reverb → Amplifier Effects Return
This is a very common and effective setup. All your core tone-shaping pedals (dynamics, gain, modulation) are in front of the amplifier, while delay and reverb are placed in the loop for clarity, especially with overdriven amp tones.
 Setting up your Effects Signal Chain – Amplifier Effects Loops
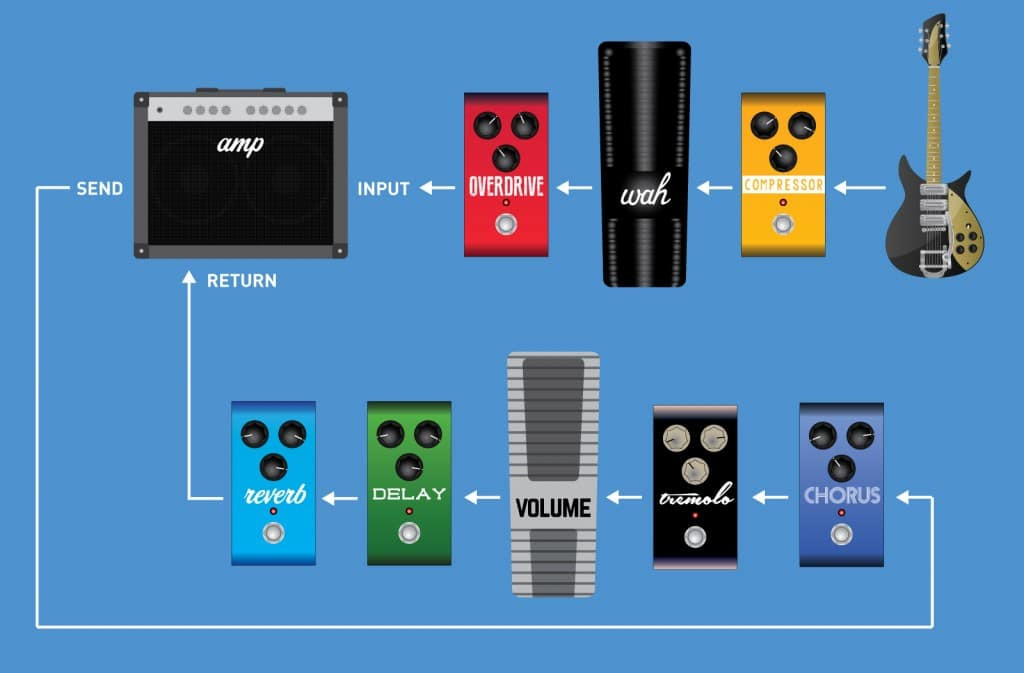
Effects Loop Setup 2: Modulation and Time-Based Effects in the Loop
Guitar → Compressor → Wah Pedal → Overdrive → Amplifier Input; Amplifier Effects Send → Chorus → Tremolo → Volume Pedal → Delay → Reverb → Amplifier Effects Return
This setup moves modulation effects (chorus, tremolo) and the volume pedal into the effects loop, along with delay and reverb. This can create a different flavor of modulation, placing it after the preamp distortion for a potentially smoother and less intense modulation effect. The volume pedal in the loop now controls the level of the effects loop signal before it returns to the power amp.
 Setting up your Effects Signal Chain – Amplifier Effects Loops
Special Pedal Considerations
Certain pedals have unique characteristics that might influence their placement:
- Tape Saturation & Doubletracker Pedals (e.g., Strymon Deco): These pedals, like the Strymon Deco, can function as subtle overdrives or tape emulators. They can be placed early in the chain for light overdrive or at the end for tape-like warmth and harmonic enhancement.
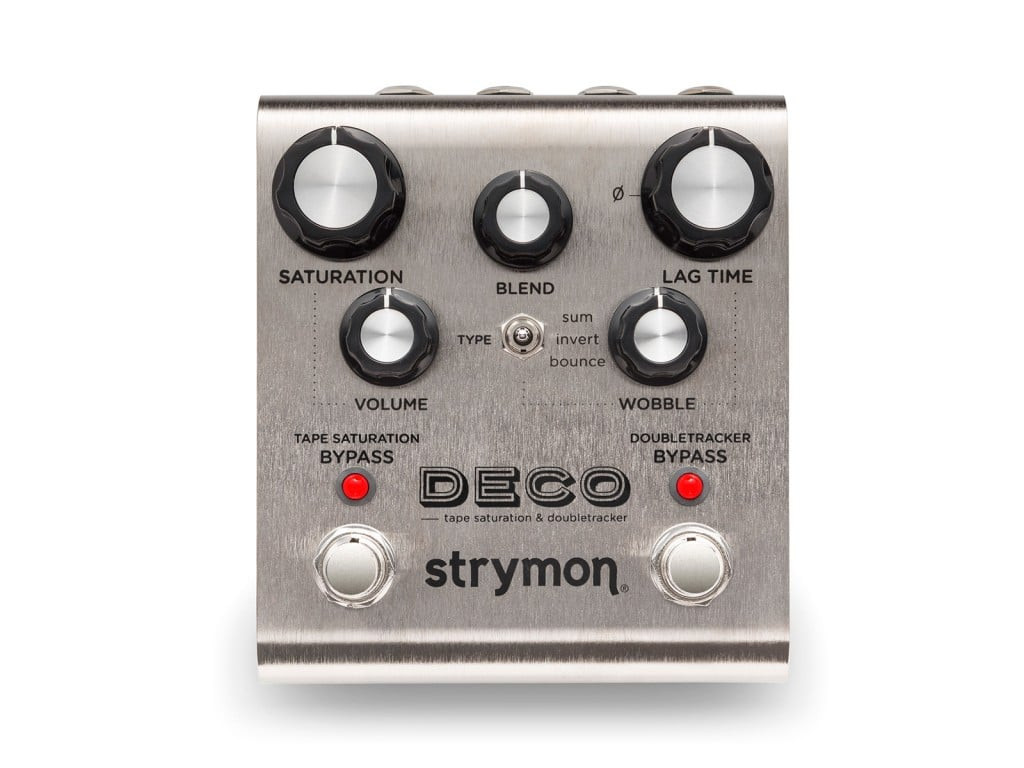 Deco Tape Saturation & Doubletracker
Image: A top-down view of the Strymon Deco Tape Saturation & Doubletracker pedal, highlighting its versatile nature in a pedal chain.
-
Multi-Modulation Pedals (e.g., Strymon Mobius): Pedals like the Strymon Mobius offer pre/post routing options within the pedal itself. This allows you to virtually place certain modulation effects before or after others within the Mobius, adding another layer of signal chain flexibility.
-
Rotary Speaker Emulators (e.g., Strymon Lex) & Reverb Pedals with Cab Sim (e.g., Strymon BigSky): Rotary speaker pedals like the Lex can be placed with modulation effects or at the very end of the chain for a final, swirling texture. Reverb pedals with built-in cabinet simulation, such as the BigSky, are particularly useful for direct recording or PA systems, simulating the sound of playing through a speaker cabinet.
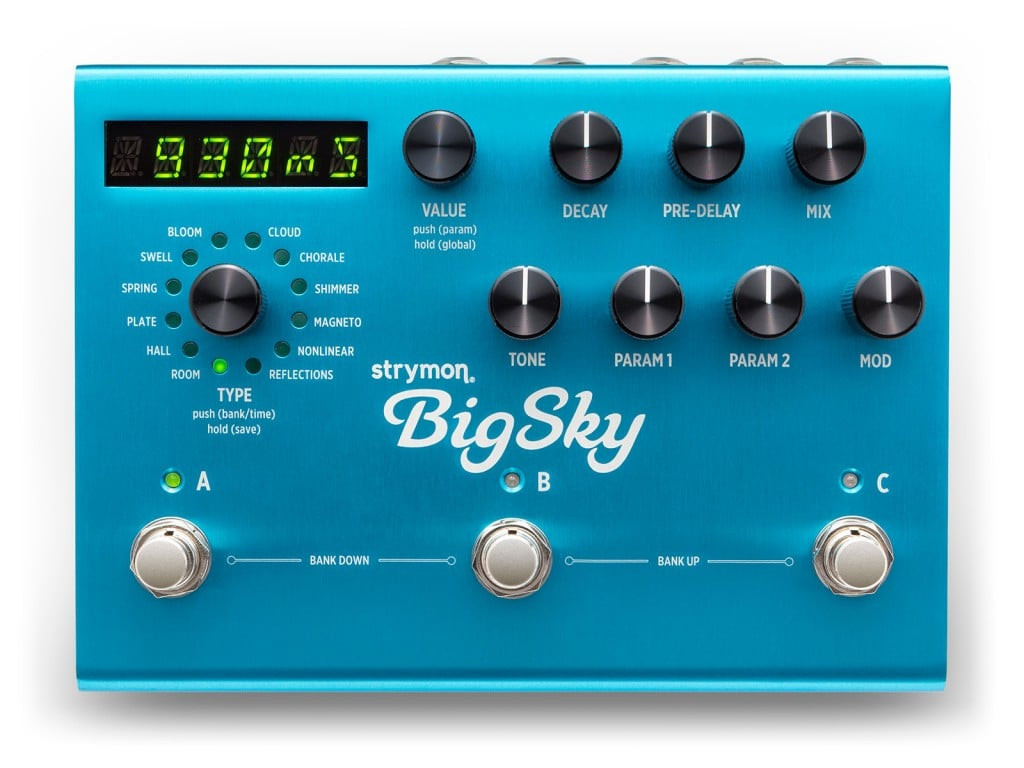 BigSky Reverberator – Reverb Pedal
Image: A top-down shot of the Strymon BigSky Reverberator pedal, known for its extensive reverb algorithms and cabinet simulation feature.
The Golden Rule: Experiment!
Ultimately, the “best” guitar effects pedal chain order is the one that sounds best to you. The guidelines provided are starting points, not rigid rules. Don’t be afraid to experiment and break convention. Happy accidents and unique sounds often emerge from unexpected pedal combinations.
The most important principle is to listen critically and trust your ears. Experiment with different pedal orders, explore the effects loop, and discover the sonic possibilities that best suit your musical style and preferences. Building your perfect pedalboard is a journey of exploration and sonic discovery.