
This guide is your starting point to understanding guitar chords, focusing on Guitar Chords Finger Placement, a fundamental skill for beginners and beyond. We’ll break down the essentials, from reading chord diagrams to mastering common chord shapes and finger positions. Whether you’re just picking up the guitar or looking to refine your technique, understanding how to position your fingers correctly is key to unlocking your musical potential.
Decoding Guitar Chord Diagrams for Finger Placement
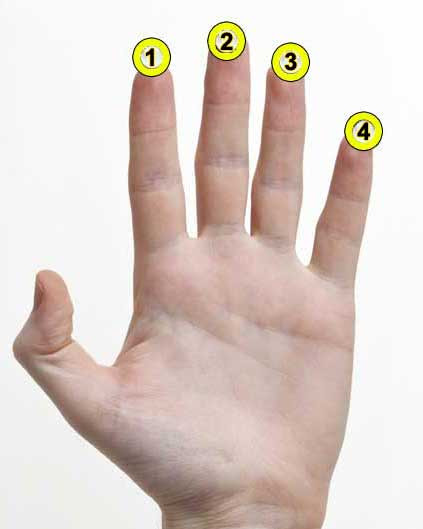 Guitarist's hand demonstrating proper finger placement for chords
Chord diagrams are your visual roadmap to playing guitar chords. Let’s use the A Major chord as our example to understand how to read them effectively and learn correct finger placement. In these diagrams, your fret hand fingers are numbered for clarity:
- 1: Index finger
- 2: Middle finger
- 3: Ring finger
- 4: Pinky finger
These numbers in the diagrams directly correspond to the fingers you should use to press down the strings at specific frets to form the chord.
Example: A Major Chord Finger Placement
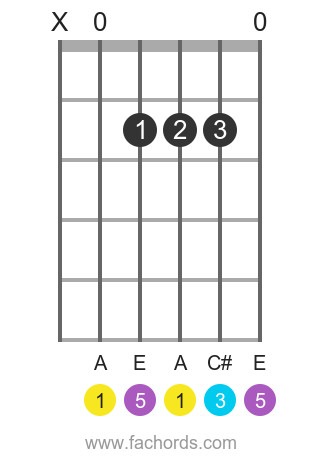 Diagram showing finger positions for A major guitar chord
Looking at the A Major chord diagram:
- The diagram represents the guitar neck, with the thickest string (low E) on the left and the thinnest string (high E) on the right.
- Numbers on the fret indicate the fret number.
- “X” above a string means mute that string (don’t play it).
- “0” above a string indicates playing the string open (without pressing any fret).
To correctly perform the A Major chord with proper finger placement:
- Low E string: Do not play (X).
- A string (5th string): Play open (0).
- D string (4th string), 2nd fret: Press with your index finger (1).
- G string (3rd string), 2nd fret: Press with your middle finger (2).
- B string (2nd string), 2nd fret: Press with your ring finger (3).
- High E string (1st string): Let ring open (0).
Essential Guitar Chords for Beginners: Mastering Finger Positions
Learning basic guitar chords is the first step in your musical journey. Here are some fundamental chords with diagrams and finger placement instructions to get you started. Consistent practice with these shapes will build your muscle memory and finger dexterity.
C Major Chord: Standard Fingering
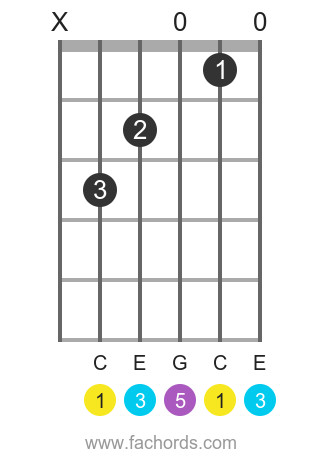 Diagram of C major chord finger placement on guitar
This is a very common way to play C Major. Ensure you avoid playing the low E string for a clean sound.
Finger Placement for C Major:
- Mute the Low E string.
- G string: Open.
- High E string: Open.
- B string, 1st fret: Index finger (1).
- D string, 2nd fret: Middle finger (2).
- A string, 3rd fret: Ring finger (3).
C Major Chord: Easier Version
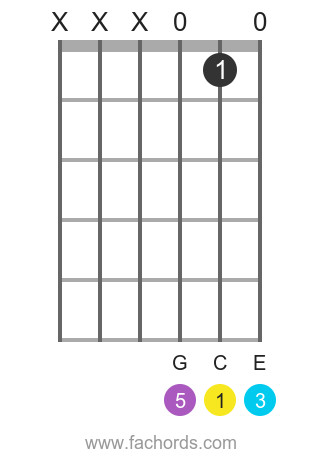 Simplified diagram of C major chord finger placement for beginners
This simplified C Major chord uses fewer strings and is easier for beginners to grasp, focusing on fundamental finger placement.
Finger Placement (Easy C Major):
- Mute Low E, A, and D strings.
- G string: Open.
- High E string: Open.
- B string, 1st fret: Index finger (1).
A Major Chord: Basic Shape
Diagram showing finger positions for A major guitar chord
The basic A Major chord shape utilizes three fingers on the second fret, demanding precision in finger placement.
Finger Placement for A Major:
- Mute the Low E string.
- A string: Open.
- High E string: Open.
- D string, 2nd fret: Index finger (1).
- G string, 2nd fret: Middle finger (2).
- B string, 2nd fret: Ring finger (3).
G Major Chord: Common Fingering
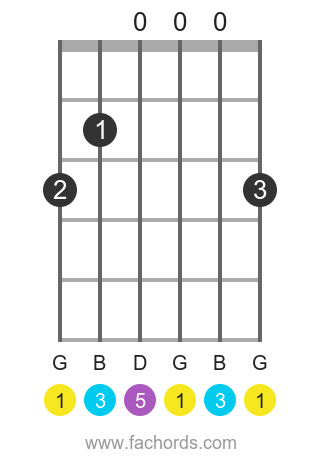 Diagram of G major chord finger placement on guitar fretboard
This is the most frequently used finger placement for G Major. It involves spreading fingers across the lower strings.
Finger Placement for G Major:
- D string: Open.
- G string: Open.
- B string: Open.
- A string, 2nd fret: Index finger (1).
- Low E string, 3rd fret: Middle finger (2).
- High E string, 3rd fret: Ring finger (3).
G Major Chord: Simplified Version
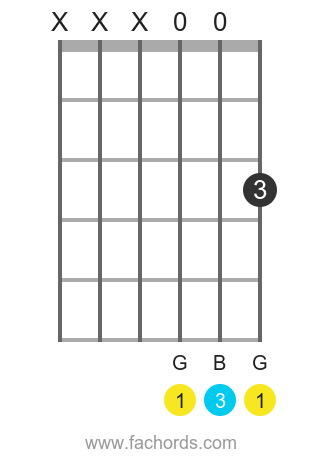 Easy G major chord diagram with single finger placement
A simpler G Major, using just one finger, ideal for beginners focusing on basic finger placement.
Finger Placement (Easy G Major):
- Mute Low E, A, and D strings.
- G string: Open.
- B string: Open.
- High E string, 3rd fret: Ring finger (3).
E Major Chord: Standard Shape
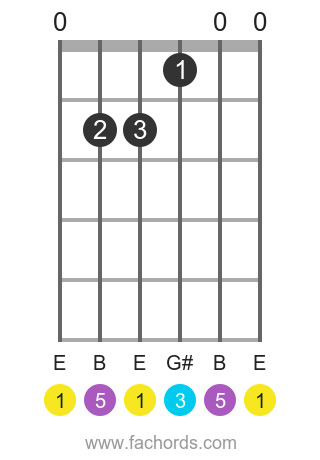 Diagram of E major chord and correct finger positions
For E Major, strumming all strings is typical. Proper finger arch and placement are crucial for clean notes.
Finger Placement for E Major:
- Low E string: Open.
- B string: Open.
- High E string: Open.
- G string, 1st fret: Index finger (1).
- A string, 2nd fret: Middle finger (2).
- D string, 2nd fret: Ring finger (3).
E Major Chord: Two-Finger Version
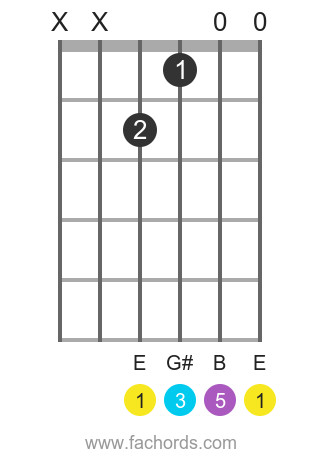 Simplified E major chord diagram using only two fingers
This simplified E Major uses just two fingers, making it a stepping stone towards the full chord and focusing on efficient finger placement.
Finger Placement (Easy E Major):
- Mute Low E and A strings.
- B string: Open.
- High E string: Open.
- G string, 1st fret: Index finger (1).
- D string, 2nd fret: Middle finger (2).
D Major Chord: Common Form
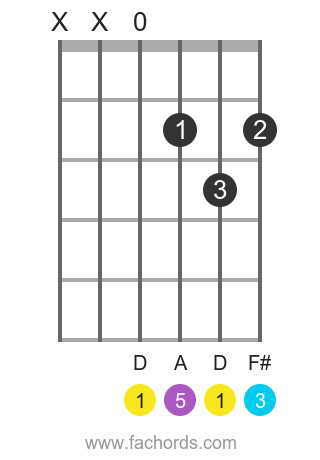 Diagram illustrating finger placement for D major chord on guitar
This is the standard D Major chord. Accurate finger placement avoids muting adjacent strings.
Finger Placement for D Major:
- Mute Low E and A strings.
- D string: Open.
- G string, 2nd fret: Index finger (1).
- High E string, 2nd fret: Middle finger (2).
- B string, 3rd fret: Ring finger (3).
A Minor Chord: Essential Minor Chord
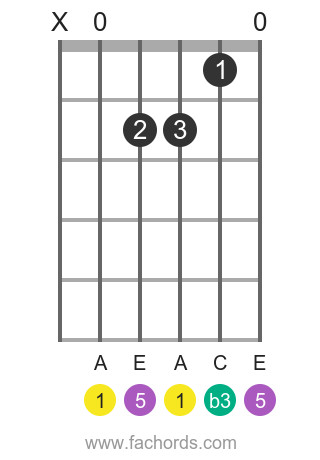 Diagram of A minor chord and finger positions on fretboard
A Minor is a foundational minor chord. Finger placement is similar to A Major but with a slight variation.
Finger Placement for A Minor:
- Mute the Low E string.
- A string: Open.
- High E string: Open.
- B string, 1st fret: Index finger (1).
- D string, 2nd fret: Middle finger (2).
- G string, 2nd fret: Ring finger (3).
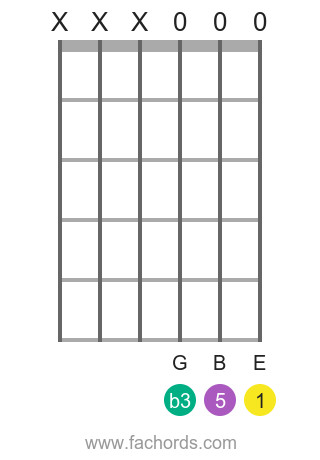
A Minor Chord: Easier Shape
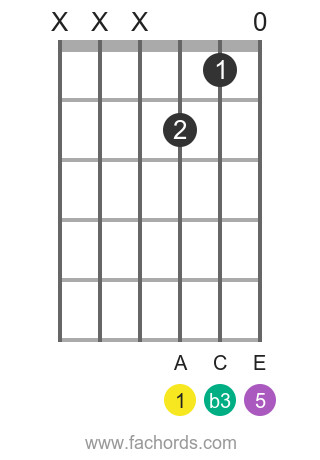 Simplified A minor chord diagram using fewer fingers
This easier A minor simplifies finger placement, making it more accessible for beginners.
Finger Placement (Easy A Minor):
- Mute Low E, A, and D strings.
- High E string: Open.
- B string, 1st fret: Index finger (1).
- G string, 2nd fret: Middle finger (2).
E Minor Chord: Simple Two-Finger Chord
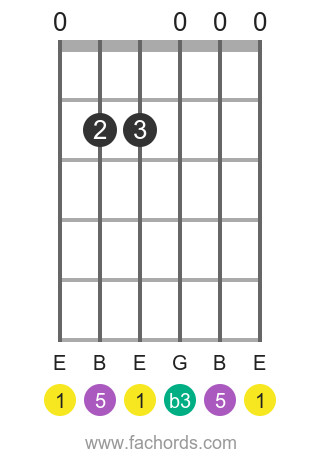 Diagram of E minor chord and its finger placement on guitar
E Minor is straightforward, requiring only two fingers, emphasizing efficient finger placement for a full sound.
Finger Placement for E Minor:
- Low E string: Open.
- G string: Open.
- B string: Open.
- High E string: Open.
- A string, 2nd fret: Middle finger (2).
- D string, 2nd fret: Ring finger (3).
E Minor Chord: Open Strings Version
 Easiest E minor chord diagram using open strings, no fingers needed
Surprisingly, this E Minor uses only open strings, no finger placement on frets needed, the simplest form for absolute beginners.
Finger Placement (Easiest E Minor):
- Mute Low E, A, and D strings.
- G, B, and High E strings: Open.
D Minor Chord: Last Basic Chord
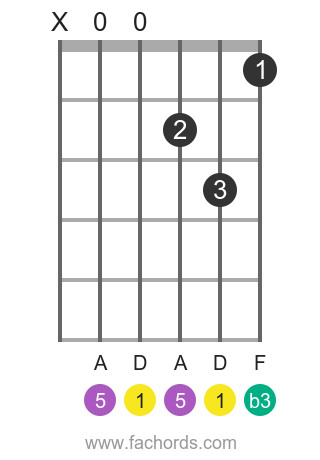 Diagram showing finger positions for D minor guitar chord
D Minor completes our basic chord set. Accurate finger placement is essential for a clear minor sound.
Finger Placement for D Minor:
- Mute Low E and A strings.
- D string: Open.
- High E string, 1st fret: Index finger (1).
- G string, 2nd fret: Middle finger (2).
- B string, 3rd fret: Ring finger (3).
Tips for Effective Guitar Chord Finger Placement
Practicing finger placement effectively is crucial for smooth chord transitions and clear sound.
- Use Finger Tips: Press strings with the tips of your fingers. It may be uncomfortable initially, but calluses will develop, making it easier and less painful.
- Close to Frets: Place fingers near the metal frets. This requires less pressure for a clean sound.
- Perpendicular Finger Tips: Ensure your fingertips are perpendicular to the fretboard. This prevents accidental muting of adjacent strings.
- Individual String Check: After forming a chord, play each string individually to confirm every note rings clearly and correct any muffled sounds.
- Optimal Pressure: Apply just enough pressure to make the notes ring clearly—avoid pressing too hard or too lightly.
- Chord Transition Practice: Practice switching between two chords initially, then gradually increase to sequences of three and four chords to improve fluidity.
Understanding Open Chords and Finger Placement
Diagram of C major chord finger placement on guitar
Open chords, like the C Major shown, utilize open strings extensively. They are generally easier for beginners as they require fewer fretted notes, simplifying finger placement and coordination. Starting with major and minor open chords is a common approach for new guitarists. Open chords build a foundation for understanding chord structure and finger mechanics.
A major chord fundamentally consists of the root, major third, and fifth intervals. For example, a G major chord includes the notes G, B, and D. Conversely, a minor chord is composed of the root, minor third, and fifth. Thus, a G minor chord comprises G, Bb, and D.
Power Chords: Simplified Finger Placement for Rock
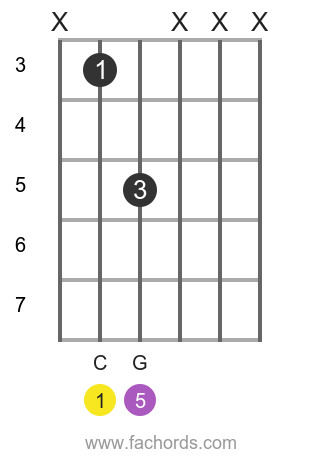 Diagram of electric guitar power chord finger placement
Power chords are excellent for beginners and are essential in rock and blues music. Technically dyads (two notes), they simplify finger placement significantly. A power chord consists of just the root and the fifth. For instance, a G power chord includes only G and D. They are typically played on the lower three strings of an electric guitar (E, A, D), often omitting the higher strings for a focused, powerful sound.
Beyond Beginner Chords: Expanding Finger Placement Skills
As you progress, you’ll move to intermediate and advanced chords, which demand more complex finger placement and dexterity.
Bar Chords: Movable Finger Shapes
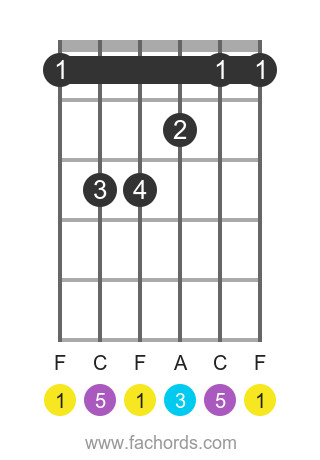 Diagram of bar chord finger placement on a guitar neck
Bar chords require barring multiple strings with one finger, initially challenging but crucial for playing across the fretboard. The beauty of bar chords is their portability; the same finger shape can be moved up or down the neck to create different chords. You might encounter full bar chords, like F Major, or partial bar chords.
Dominant Chords: Adding Seventh Intervals
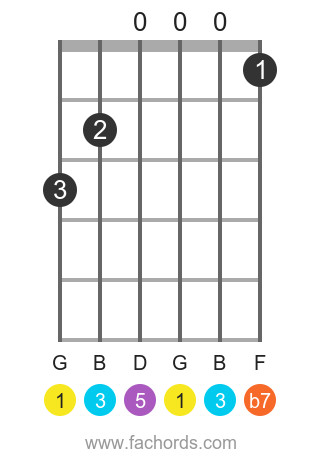 Diagram of dominant chord finger placement on guitar
Dominant chords are major chords with an added minor seventh, creating a richer, more complex sound. For example, G dominant 7th includes G, B, D, and F. These chords are vital in chord progressions, creating tension and resolution.
Diminished and Suspended Chords: Adding Flavor
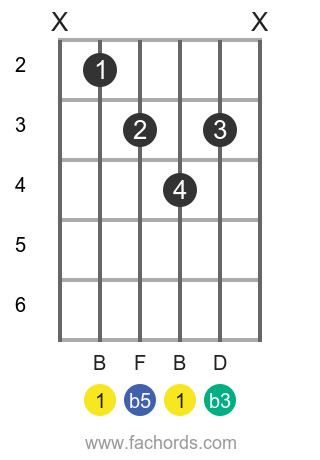 Diagram of diminished chord finger placement on guitar
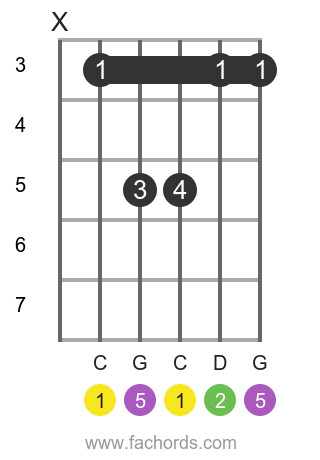 Diagram of suspended chord finger placement on guitar
Diminished chords create dissonance and tension, often resolving to more stable chords. Suspended chords, neither major nor minor, offer a unique ambiguous quality, useful for adding harmonic interest.
Sixth Chords: Laid-back Harmony
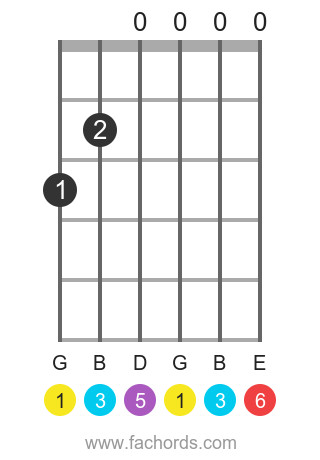 Diagram of sixth chord finger placement on guitar
Sixth chords add a relaxed feel to music, constructed by adding a major sixth to a major chord. A G6 chord, for instance, includes G, B, D, and E.
Advanced Chord Concepts and Finger Placement
Expanding your chord vocabulary involves understanding chord construction and how finger placement across the fretboard affects chord voicing and inversion. Exploring chord variations and inversions will significantly enhance your playing and understanding of harmony.
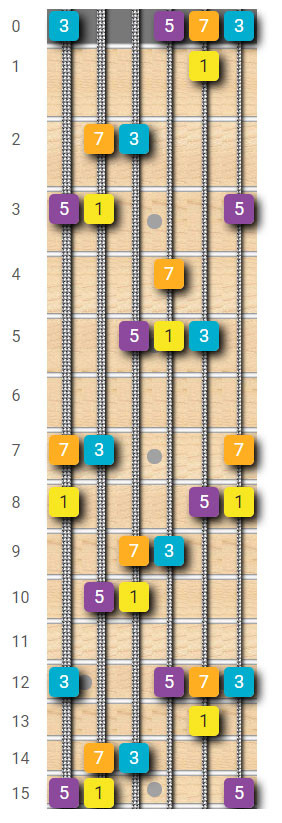 Fretboard map for C maj7 chord showing finger placement options across the neck
Finger Placement Suggestions: Adapt to Your Style
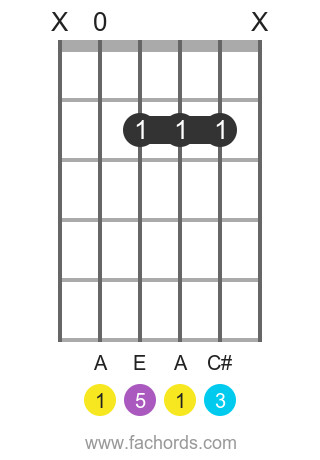 Diagram of A major chord with alternative mini barre finger placement
Remember, finger positions in chord diagrams are suggestions. Personal comfort and hand size play a significant role. Some guitarists with larger fingers may find standard fingerings cramped. An alternative for A Major, for example, uses a mini-barre with the index finger across the D and G strings at the second fret, with the middle finger on the B string, 2nd fret. This can provide more space and free up other fingers. Experiment to find what finger placements work best for your hand and playing style.
Building Your Chord Knowledge
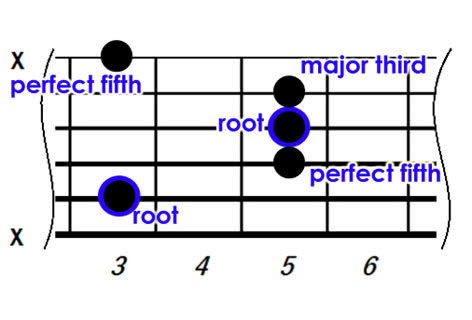 Illustration of guitar chords construction principles
Understanding how chords are built from scales and intervals is crucial for deeper musical knowledge. A chord is essentially three or more notes played together based on specific intervals from a scale. Guitars, like pianos, are multi-timbral, capable of playing multiple notes simultaneously, making them ideal for chordal playing. Basic major chords are built from the 1st (root), 3rd, and 5th notes of a major scale.
While theoretically unlimited chords exist, a repertoire of around 30 chords is often sufficient for many musical styles. Some genres even thrive on fewer. As you advance, understanding chord construction empowers you to create and recognize chords across the entire fretboard.
Mastering guitar chords, especially finger placement, is a journey. Consistent practice, attention to detail, and exploration will pave your way to musical expression on the guitar.