
Are you a guitar player who loves the rich, saturated tones of a tube amplifier but struggles with its often ear-splitting volume? Perhaps you need to practice late at night, have sensitive housemates, or simply want to achieve that sweet spot of amp saturation without rattling the windows. The solution? A Guitar Amplifier Attenuator.
This ingenious device sits between your amplifier and speaker cabinet, allowing you to crank your tube amp to achieve those coveted overdriven tones while reducing the overall volume. While there are many commercially available attenuators, building your own is a rewarding and cost-effective project. This guide will walk you through the process of creating a simple yet effective guitar amplifier attenuator.
What is a Guitar Amplifier Attenuator and Why Build One?
A guitar amplifier attenuator, sometimes referred to as a power soak, is a passive device designed to reduce the output volume of a tube amplifier without sacrificing its characteristic tone. Tube amps sound their best when pushed hard, driving both the preamp and power amp sections into saturation. This is where the magic happens – the warm overdrive, the responsive dynamics, and the harmonic richness that guitarists crave. However, this “sweet spot” often comes at volumes that are simply too loud for home practice, recording environments, or small venues.
An attenuator works by safely absorbing a portion of the amplifier’s power output and converting it into heat, before it reaches the speaker. This allows you to crank your amp to its tonal sweet spot and then use the attenuator to dial back the speaker volume to a manageable level.
Building your own attenuator offers several advantages:
- Cost-Effective: DIY attenuators can be significantly cheaper than commercially manufactured units.
- Customization: You can tailor your attenuator to your specific needs and amplifier setup.
- Educational: Building electronics projects is a great way to learn about amplifier circuitry and basic electronics.
- Satisfaction: There’s a unique sense of accomplishment in creating your own gear that enhances your guitar playing experience.
Components You’ll Need to Build Your Attenuator
To build a basic guitar amplifier attenuator, you’ll need a few readily available electronic components. Here’s a list of the essential parts for an 8-ohm attenuator, with options to add a 4/8 ohm switch for greater versatility:
- 100W 8 Ohm L-Pad Attenuator: This is the heart of your project. The L-Pad is a variable resistor that allows you to control the amount of attenuation. A 100-watt rating is suitable for most tube guitar amplifiers. (Amazon Link)
- Two 1/4 Inch Mono Jacks: These jacks will serve as the input (from your amplifier) and output (to your speaker cabinet) connections. (Amazon Link)
- Speaker Wire: Use quality speaker wire to ensure good signal transfer between components.
- Enclosure Box: You’ll need a sturdy enclosure to house all the components. A metal enclosure is recommended for heat dissipation and durability. Consider repurposing an old electronics enclosure as shown in the original guide or purchasing a project box.
- (Optional) 8 Ohm 50W Resistor: If you want to add a 4/8 ohm selector switch for compatibility with different impedance amplifiers and speaker cabinets, you’ll need this resistor. (Amazon Link)
- (Optional) SPDT Switch: A Single Pole Double Throw (SPDT) switch is required for the 4/8 ohm selector functionality. (Amazon Link)
- Tools: Soldering iron, solder, wire strippers, drill, drill bits, screwdrivers, pliers, and safety glasses. Thermal paste is recommended if using the optional resistor for better heat dissipation.
Step-by-Step Guide to Building Your Guitar Amp Attenuator
Before you begin, it’s crucial to understand basic electronics safety and soldering techniques. If you’re new to electronics, consider watching some introductory tutorials online. Always ensure your amplifier is powered off and unplugged before working with speaker connections.
-
Prepare the Enclosure: Choose your enclosure and plan the layout of the components. Decide where you want to place the input jack, output jack, L-Pad, and the optional 4/8 ohm switch (if you are including it). Mark and drill holes for these components.
-
Mount the Components: Securely mount the 1/4 inch jacks, L-Pad, and the switch (if applicable) into the drilled holes on the enclosure. Tighten the nuts to ensure they are firmly in place. If using the optional resistor, mount it securely to the enclosure base. Applying thermal paste between the resistor and the enclosure will improve heat transfer.
-
Wiring (8 Ohm Attenuator – No Switch):
- Refer to the “L-Pad for 8 Ohm only” schematic provided.
- Solder a length of speaker wire to the “Input” jack’s tip connector and connect the other end to terminal “1” on the L-Pad.
- Solder another wire from the “Output” jack’s tip connector to terminal “2” on the L-Pad.
- Connect terminal “3” on the L-Pad to the sleeve connectors of both the “Input” and “Output” jacks (ground).
- Ensure all solder joints are clean and solid.
-
Wiring (4/8 Ohm Attenuator with Switch):
- Refer to the “L-Pad with 4/8 Ohm Selector” schematic.
- Solder the 8 Ohm 50W resistor in series with the switch as shown in the schematic. One end of the resistor connects to one terminal of the switch, and the other end of the resistor connects to the center lug of the switch.
- Solder a wire from the “Input” jack’s tip connector to the remaining terminal on the switch (the one not connected to the resistor).
- Solder a wire from the center lug of the switch (the one connected to the resistor) to terminal “1” on the L-Pad.
- Solder a wire from the “Output” jack’s tip connector to terminal “2” on the L-Pad.
- Connect terminal “3” on the L-Pad to the sleeve connectors of both the “Input” and “Output” jacks (ground).
- Double-check all connections against the schematic.
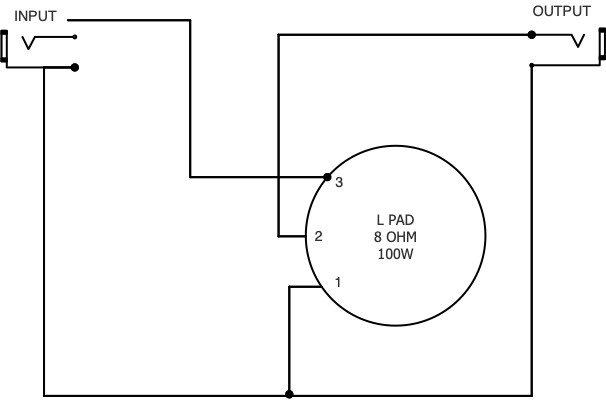 Schematic for 8 Ohm only Guitar Amplifier Attenuator
 Schematic for Guitar Amplifier Attenuator with 4/8 Ohm Selector Switch
-
Assemble and Test: Carefully place all the wired components inside the enclosure and close it securely. Before connecting to your valuable tube amp, test your attenuator with a less critical amplifier, like a solid-state practice amp, as demonstrated in the original article.
-
Heat Dissipation: Attenuators convert power to heat. To prevent overheating, especially at higher attenuation levels, it’s essential to provide ventilation. Drill ventilation holes in the enclosure, particularly around the L-Pad and resistor (if used). Consider a pattern or design for aesthetic appeal and functionality.
-
Disclaimer and Safe Usage:
Warning: Incorrectly built or used attenuators can damage your amplifier. Double and triple-check your wiring before use. Always ensure a speaker cabinet is connected to the attenuator’s output. This is not a load box; it requires a speaker to be connected. Running a tube amp without a load (speaker connected) can cause serious damage to the output transformer.
Before connecting to your main amplifier, test the resistance at the input jack with a multimeter to confirm the correct impedance (4 or 8 ohms depending on switch position, or 8 ohms for the basic version). Label the switch positions clearly if you’ve included the 4/8 ohm option.
Conclusion: Unleash Your Tube Amp’s Potential at Any Volume
Building your own guitar amplifier attenuator is a satisfying project that can significantly improve your playing experience. By taming the volume of your tube amp, you can unlock its full tonal potential at any volume level, whether you’re practicing at home, recording in the studio, or performing on stage. With a little effort and basic electronic knowledge, you can create a valuable tool that will enhance your guitar rig for years to come.