
Welcome guitar players! Are you ready to add a rich and versatile chord to your repertoire? This guide dives deep into the G9 Guitar Chord, a dominant chord known for its complex and colorful sound. As part of the Dominant Chords family, the G9 is built from five notes: G, B, D, F, and A. Understanding its construction and various positions will unlock new musical possibilities in your playing.
To truly grasp the G9 chord, it’s essential to explore the music intervals that form its foundation. These intervals represent the distances between the notes, defining the chord’s unique sonic character. The G9 chord utilizes the 1st (Root), Major 3rd, Perfect 5th, Minor 7th, and Major 9th intervals. If you’re keen to deepen your understanding of this fundamental aspect of music theory, our comprehensive tutorial about fretboard intervals is an invaluable resource.
The specific intervals in the G9 chord are created by layering these notes upon the root note G: the Major Third (B), Perfect Fifth (D), Minor Seventh (F), and finally the Major Ninth (A). This stacking of intervals creates the distinct, lush sound that makes the G9 chord so sought after in genres like jazz, blues, and even rock music. To further your knowledge on chord construction and interval stacking, take a look at our detailed tutorial on guitar music theory.
Learning the G9 guitar chord might present an initial challenge, particularly for beginners. However, with consistent practice and the right resources, mastering it is absolutely achievable. This tutorial will guide you through various chord diagrams and fretboard patterns, visually illustrating the notes that comprise the G9 chord across the fretboard. If you’re intrigued by the world of ninth chords and want to explore them further, our comprehensive tutorial about ninth guitar chords is highly recommended.
Whether you are a novice guitarist aiming to expand your chord vocabulary or a seasoned player seeking to explore more sophisticated harmonic colors, this tutorial dedicated to the G9 guitar chord is an excellent resource. Let’s embark on this musical journey and start creating captivating sounds with the G9!
Decoding the G9 Chord: Notes and Tones
The G9 guitar chord is composed of these notes: G, B, D, F, and A.
In terms of musical tones within the Dominant Ninth chord structure, we find:
- 1 (Root)
- 3 (Major Third)
- 5 (Perfect Fifth)
- b7 (Minor Seventh)
- 9 (Major Ninth)
These intervals contribute to the characteristic dominant quality of the chord, with the added 9th enriching its harmonic texture.
The chord diagrams below are arranged from easier to more challenging positions. If you are new to reading chord diagrams, our how to read chord diagrams guide will be beneficial. For those struggling with barre chords, our Bar Chords Tips tutorial offers valuable techniques and advice. Additionally, our accessible chords page provides written instructions for each chord diagram.
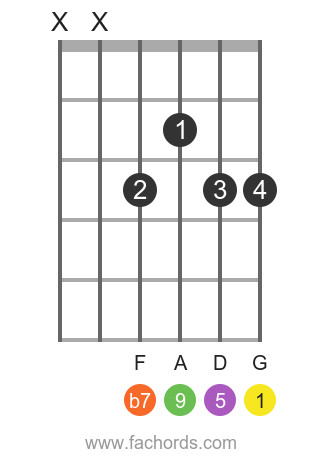
Position 1: Movable G9 Chord Shape
 G 9 position 1 guitar chord diagram
Alt text: G9 chord position 1 diagram, movable shape for guitar, illustrating finger placement and fretboard position.
This first position is a movable shape, meaning you can slide it up and down the neck to play different 9th chords. It’s a great starting point for understanding the G9 chord due to its relatively straightforward fingering.
Position 2: Another Movable G9 Chord Voicing
 G 9 position 2 guitar chord diagram
Alt text: G9 chord position 2 diagram, movable guitar chord shape, showing an alternative fingering and fretboard location.
Position 2 offers another movable voicing of the G9 chord, providing a slightly different sonic color and fretboard feel compared to Position 1. Experiment with both to discover your preference.
Position 3: Movable G9 Chord Shape Higher Up the Neck
 G 9 position 3 guitar chord diagram
Alt text: G9 chord position 3 diagram, movable guitar chord form played higher on the fretboard, demonstrating chord transposition.
Moving further up the neck, Position 3 presents yet another movable G9 shape. This position utilizes higher frets and can be useful for creating different tonal contexts within your playing.
Position 4: Movable G9 Chord Shape with Root on A String
 G 9 position 11 guitar chord diagram
Alt text: G9 chord position 4 diagram, movable guitar chord voicing with the root note on the A string, illustrating chord variation.
Position 4 shifts the root note to the A string, offering a different inversion and sonic texture of the G9 chord. This movable shape is valuable for exploring various bass note options.
Position 5: Open Position G9 Chord
 G 9 position 14 guitar chord diagram
Alt text: G9 chord position 5 diagram, open position guitar chord, utilizing open strings for a fuller and resonant sound.
Position 5 is an open position G9 chord, incorporating open strings into the voicing. Open chords often resonate more fully, and this G9 position is no exception, offering a rich and vibrant sound.
Position 6: Barre Chord G9 Shape
 G 9 position 7 guitar chord diagram
Alt text: G9 chord position 6 diagram, barre chord shape for G9 on guitar, demonstrating a common barre chord structure for dominant 9th chords.
Position 6 introduces a barre chord shape for the G9. Barre chords are essential for guitarists, allowing you to play chords across the neck. This G9 barre shape is a useful addition to your barre chord arsenal.
Position 7: Another Barre Chord G9 Voicing
 G 9 position 10 guitar chord diagram
Alt text: G9 chord position 7 diagram, alternative barre chord voicing for G9, showing a different hand position and fretboard placement.
Position 7 presents another barre chord voicing of the G9, offering a variation on Position 6 and expanding your options for playing this chord in a barre style.
Position 8: Barre Chord G9 Shape with Root on Low E String
 G 9 position 12 guitar chord diagram
Alt text: G9 chord position 8 diagram, barre chord shape with the root on the low E string, providing a foundational bass note for the G9 chord.
Position 8 is a barre chord shape with the root note on the low E string. This is a common and foundational barre chord structure, providing a solid bass note for the G9 chord.
Position 9: Barre Chord G9 Shape Based on A Shape Barre
 G 9 position 4 guitar chord diagram
Alt text: G9 chord position 9 diagram, barre chord shape based on the A shape barre chord, adapting a familiar shape to create a G9 voicing.
Position 9 utilizes a barre chord shape based on the familiar ‘A shape’ barre chord. This allows you to adapt a known chord form to create a G9 chord voicing.
Position 10: Barre Chord G9 Shape Using E Shape Barre
 G 9 position 9 guitar chord diagram
Alt text: G9 chord position 10 diagram, barre chord shape using the E shape barre chord, another adaptation of a common barre shape for G9.
Finally, Position 10 presents a barre chord G9 shape derived from the ‘E shape’ barre chord. Like Position 9, this leverages a well-known chord form to create a G9 voicing, expanding your versatility.
Explore our extensive all guitar chords online library for even more chord shapes. For a handy resource, download our Free Guitar Chords Chart Pdf for printable chord diagrams.
Explore G9 Chords with Different Root Notes
Expand your musical horizons by playing the 9th chord with different root notes! Here are some common 9th chords to explore:
C 9 | D 9 | E 9 | F 9 | G 9 | A 9 | B 9 | C#9 | D#9 | F#9 | G#9 | A#9 | Ab9 | Bb9 | Db9 | Eb9 | Gb9
Experiment with different voicings and positions of the G9 guitar chord to find your favorite sounds and integrate this rich chord into your playing. Happy playing!
