The G major chord is a cornerstone for anyone starting their guitar journey. It’s often one of the first chords beginners learn, and for good reason – it’s relatively straightforward to play with just three fingers. Once you’ve mastered the G chord on your guitar, a whole world of songs opens up. Let’s dive into this essential chord and get you playing it cleanly and confidently.
Understanding the G Chord on Guitar
The G major chord is a fundamental chord in music, known for its bright and uplifting sound. In guitar playing, it’s a gateway to countless songs across various genres, from folk and country to pop and rock. Learning the G chord is not just about memorizing finger positions; it’s about building a foundation for your musical exploration on the guitar. It’s a major chord, meaning it has a happy and resolved feel, and understanding how to play it opens doors to understanding music theory and chord progressions later on. For beginners, mastering the G chord provides a sense of accomplishment and motivates further learning.
Step-by-Step Guide to Playing the G Chord
Let’s break down the G chord into easy-to-follow steps. With a little practice, you’ll have it down in no time.
Step One
Begin by placing your index finger on the 2nd fret of the 5th string.
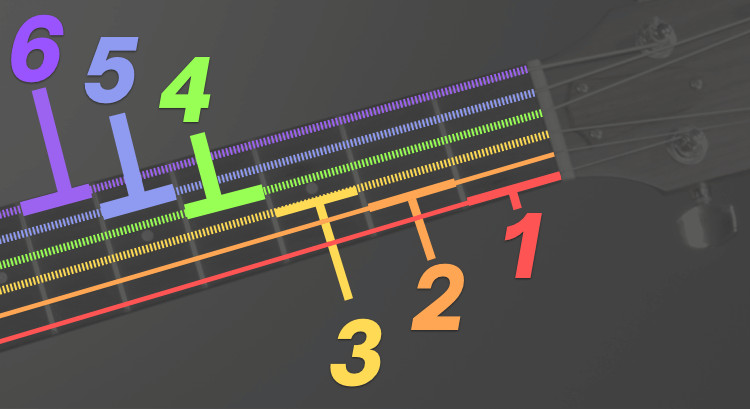
It’s crucial to understand guitar string order. Strings are numbered from thinnest to thickest.
When we refer to the “2nd fret,” we’re not placing the finger directly on the metal fret. Instead, position your finger in the space just behind the 2nd fret, closer to the guitar’s headstock.
Referring to the diagrams, you should be placing your index finger on the blue, 5th string within the orange finger zone of the 2nd fret. Ensure your finger is slightly curved and pressing down firmly enough to produce a clear note.
Step Two
Next, take your middle finger and place it on the 3rd fret of the 6th string.
The 6th string is the thickest string, located at the top when you hold your guitar in playing position. Position your middle finger just behind the 3rd fret, applying enough pressure to get a clear sound. Make sure your finger doesn’t accidentally mute any adjacent strings.
Step Three
Now, place your ring finger on the 3rd fret of the 1st string.
This step might feel like a bit of a stretch initially. You have your middle finger on the 6th, thickest string, and your ring finger needs to reach across to the 1st, thinnest string.
Ensure your ring finger is also positioned just behind the 3rd fret. It’s important to maintain a slight curve in your fingers to avoid muting other strings, especially the 2nd string. Take your time and adjust your hand position if needed to make this stretch comfortably.
Step Four
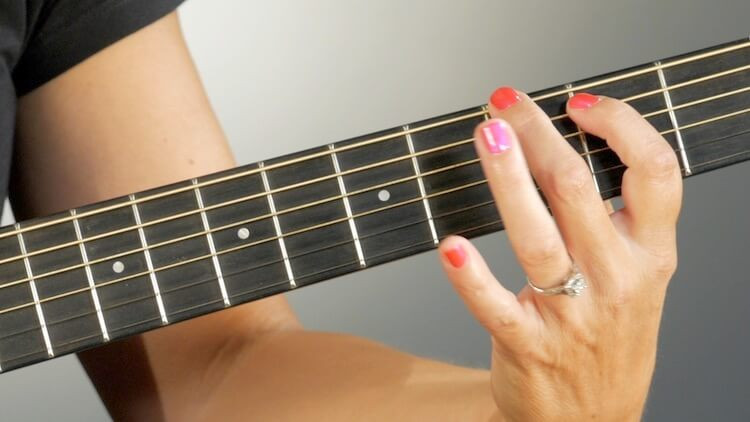
Once all fingers are in place, strum all six strings.
Listen carefully. Does it sound like a clear, resonant chord? Great! You’ve likely played your first G chord.
If you hear buzzing or muted sounds, don’t worry, this is common for beginners. Read on for helpful tips to achieve a cleaner sound. Consistent practice is key to refining your technique and getting a perfect G chord every time.

Tips for a Clear G Chord Sound
Achieving a clean and crisp G chord sound might take a little practice. Here are some common issues beginners face and how to overcome them:
Curve Your Fingers
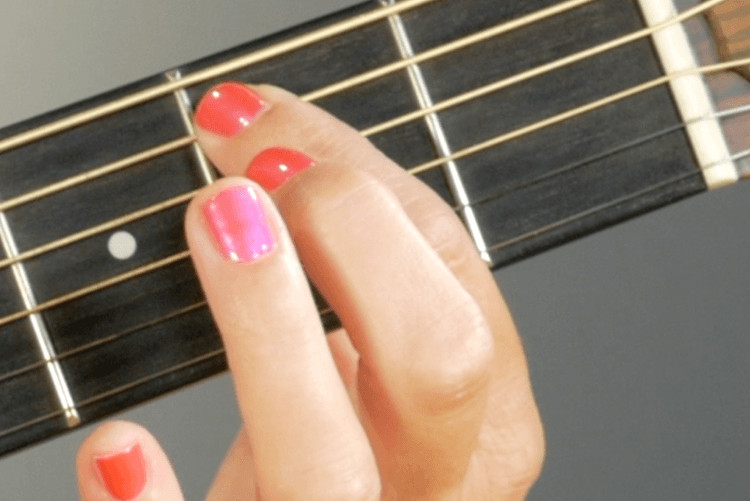
The G chord is often one of the first chords where beginners encounter the challenge of finger curvature. It requires your fingers to stretch across to the thicker strings, making it easy for the fleshy parts of your fingers to accidentally touch and mute adjacent strings. The solution is to consciously curve your fingers.
Think about holding a small ball, like an egg, in your palm. Your thumb rests on the back of the guitar neck, and your fingers curve around the fretboard. This curvature ensures that only the tips of your fingers make contact with the strings.
Observe experienced guitarists; you’ll notice their fingers are always curved when fretting chords. This technique is essential for playing cleanly and efficiently, especially as you progress to more complex chords. Curving your fingers allows each finger to press down its intended string without interfering with others, leading to a much clearer and more resonant chord sound.
Fret Proximity Matters
Buzzing strings are a frequent frustration for beginner guitarists. Often, this issue arises from not pressing down close enough to the fret. The closer your fingers are to the fret, the less pressure you need to apply to produce a clear sound.
 Place fingers close to the frets
As a general rule, aim to position your fingers just behind the fret. This leverages the fret’s height to your advantage, requiring less finger strength and resulting in a cleaner tone. Experiment by slightly adjusting your finger position closer to and further from the fret to find the sweet spot where the buzzing disappears.
Finger Pressure
Applying the right amount of pressure is crucial. Press down firmly enough to ensure the string makes solid contact with the fret, but avoid squeezing too hard. Excessive pressure can lead to finger fatigue and even pull the strings slightly out of tune. Find a balance where the note rings out clearly without excessive effort.
Guitar Setup
While technique is paramount, your guitar’s setup also plays a role in how easy chords are to play. High action (string height above the fretboard) can make chords harder to fret cleanly, especially for beginners. If you consistently struggle with buzzing or require excessive pressure for all chords, consider having your guitar professionally set up. A proper setup can significantly improve playability and make learning chords like G much smoother.
Practice Techniques and Next Steps
Mastering the G chord is just the beginning. Here are some effective practice techniques and ways to expand your guitar skills:
Chord Transitions
Being able to switch smoothly between chords is essential for playing songs. Practice transitioning between G and other basic chords like C major and D major.
Start slowly, focusing on accuracy over speed. Use a metronome to gradually increase your transition speed while maintaining clean chord sounds. Smooth chord changes are what transform chord knowledge into actual music playing.
Practice with Songs
The best way to solidify your G chord and chord transitions is to play songs that use it. Many beginner-friendly songs utilize G, C, and D chords. Start with simple tunes and gradually tackle more challenging songs as your skills improve. Playing songs provides context and makes practice more engaging and rewarding.
Metronome Practice
Rhythm is as important as chord accuracy. Use a metronome to practice playing the G chord and transitioning to other chords in time. Start at a slow tempo and gradually increase the speed as you become more comfortable. Metronome practice develops your timing and rhythm skills, which are fundamental to musicality.
Explore Further Guitar Learning Resources
To continue your guitar journey beyond the G chord, consider exploring comprehensive learning resources. Platforms like ChordBank offer structured lessons, chord coaches, and interactive games designed for beginners. These resources can guide you step-by-step, helping you learn new chords, techniques, and songs in an engaging and effective way. Whether through apps, online lessons, or in-person instruction, consistent learning and practice are key to becoming a proficient guitar player.

Conclusion
Congratulations on taking the first steps to learn the G chord on your guitar! With consistent practice and attention to technique, you’ll soon be playing this essential chord smoothly and clearly. Remember to curve your fingers, fret close to the frets, and apply just the right amount of pressure. Keep practicing chord transitions and playing songs, and you’ll be amazed at how quickly you progress. Now, pick up your guitar and start playing those G chords!